Exchange 2010 to Office 365 migration
Migrating from Exchange 2010 to Office 365 is crucial for maintaining security and ensuring access to ongoing support. Office 365 offers more than just reliable email services through Exchange Online; it also provides a suite of collaboration tools like SharePoint, OneDrive, and Microsoft Teams, making it an ideal solution for businesses seeking enhanced functionality and security.
EdbMails Exchange Migration software simplifies the process by enabling direct mailbox migration from Exchange 2010 to Office 365 without complex configurations or intermediate steps. With its user-friendly interface, EdbMails ensures data integrity throughout the migration. The software also supports incremental migration, transferring only new or modified items during subsequent migrations, which helps avoid duplicates, optimize bandwidth, and reduce overall migration time.
EdbMails is designed for high performance, ensuring fast migration even with large amounts of data. It also offers flexibility by allowing you to migrate specific mailboxes, folders, or items based on your needs. With clear and detailed migration reports, EdbMails keeps you informed throughout the entire process. This guide covers key reasons to move from Exchange 2010 to Office 365, a step-by-step migration checklist, migration prerequisites, the process itself, post-migration tasks, and how EdbMails can help ensure a smooth Exchange 2010 to Office 365 Migration.
Top reasons to migrate Exchange 2010 to Office 365:
- Migrating to Office 365 can lead to significant cost savings by eliminating the need for on-premises hardware maintenance, upgrades, and associated operational costs, while offering predictable subscription-based pricing. EdbMails facilitates a cost-effective Exchange 2010 to Office 365 migration by streamlining the migration process, reducing the need for additional IT resources, and ensuring zero disruption to daily operations.
- Office 365 enables users to access emails, calendars, and documents from anywhere, on any device with an internet connection, enhancing flexibility, remote work capabilities, and collaboration among employees. EdbMails plays a crucial role in this by ensuring a smooth migration of mailbox data, allowing users to quickly adapt to the new environment without losing access to important information.
- Office 365 provides strong security features, including threat protection, encryption, and multi-factor authentication, safeguarding against cyber threats and protecting sensitive data more effectively than on-premises solutions. EdbMails enhances this security by ensuring that all mailbox data is migrated securely, with encryption in transit, thus preserving the integrity of sensitive information during the transition.
- With Office 365, organizations benefit from automatic updates and maintenance, ensuring their email systems remain up-to-date with the latest features, security patches, and compliance requirements without the need for manual intervention. EdbMails supports this by providing a reliable migration process that preserves all data settings, allowing organizations to fully leverage Office 365's automatic enhancements from day one.
- EdbMails enhances the flexibility of Office 365, providing a scalable solution for organizational growth. This allows businesses to effortlessly add users and expand services without incurring additional hardware costs, ensuring both efficiency and adaptability. EdbMails makes scaling easy by allowing the seamless migration of multiple mailboxes, accommodating growth without impacting system performance.
Best software to migrate Exchange 2010 to Microsoft 365:
EdbMails Exchange Migration Software stands out as the best solution for migrating mailbox data from Exchange 2010 to Microsoft 365 due to its specialized features tailored for this transition. This software ensures zero data loss by allowing users to migrate all mailbox components, including emails, calendars, contacts, tasks, and public folders, while preserving the original folder structure and metadata. One of its key strengths is the incremental migration capability, which enables users to migrate only newly added or modified data during the subsequent migrations. EdbMails also offers robust security measures. Its intuitive user interface simplifies the migration process, making it accessible for both IT professionals and non-technical users, eliminating the need for extensive training. Furthermore, EdbMails automatically generates comprehensive migration reports, allowing users to monitor the migration status in real-time and troubleshoot any issues promptly. With its combination of efficiency, security, and user-friendliness, EdbMails is the optimal choice for organizations looking to migrate from Exchange 2010 to Microsoft 365 seamlessly.
Exchange 2010 to Office 365 migration checklists
During the Exchange 2010 to Office 365 migration, it is essential to consider the best strategy to be adopted depending on the position of the organization and its needs. Here is a general checklist of items to look for and plan that will help you in identifying your environments:
- Decide the number of mailboxes that you wish to migrate.
- Identify the type of migration environment you currently have (Hybrid or non-Hybrid).
- Create a list of items in the source environment, including the operating system, hardware, user count, Active Directory association, network configuration, firewall setup, and installed programs.
- Decide whether you prefer to migrate everything at once or in stages.
- Determine if you and or your clients want to move mailboxes from on-premises servers to Office 365.
- Check your internet connection speed, and ensure that all your network settings and configurations are correct.
- Based on the above analysis decide whether to convert public folders to shared mailboxes to target platform.
- Identify a proper Office 365 license and set up mailboxes in the desired target environment.
- To know the exact approach to take towards the migration, it is recommended to carry out a pilot migration of a limited number of mailboxes to determine the readiness for a large-scale migration.
- Carry out the actual migration processes and check if all the data had been migrated as intended.
- Make all necessary DNS entries on the intended platform and remove the Exchange 2010 server when all the configurations in the new environment are fine.
Exchange 2010 to Office 365 migration prerequisites
- Step 1: Consider the migration approach
There are various factors that you should follow before migrating to Office 365 so as to have a smooth migration. Depending on your source and target environment, the following migration paths are available to aid your decision making.
Current environment and migration requirement Ideal migration approach How does the migration take place? Complete Exchange 2010 to Office 365 migration in a single event and in a limited time frame. Cutover migration for Exchange Set up your target Office 365 tenant and migrate everything to the cloud in a single sitting. Perform the migration in phases or migrate mailboxes over weekends Staged migration to Office 365 Migrate your mailboxes and mail data in stages and transfer the required or the most recent data first, followed by the others. Migrate from Exchange 2010 to MIcrosoft 365 Hybrid environment Hybrid Exchange 2010 to Office 365 migration Migrate from the source to the target server in a Hybrid environment Use the Microsoft 365 mail migration advisor to determine which migration method is best suited to your environment.
- Step 2: Check the bandwidth and network requirements
Ensure that you meet the network and bandwidth requirements for the migration. See network and migration planning, performance factors and best practices for Microsoft 365 migration.
- Step 3: Determine the Microsoft 365 license plan suited to your needs
Office 365 has business and enterprise plans, each suited to different user requirements. Compare Office 365 business plans and compare Office 365 enterprise plans from these links. You can purchase an Office 365 licensing plan specific to your needs or sign up for a 30 day free trial and decide to go with a suitable one later.
- Step 4: Set up your target Office 365 tenant for the migration
Plan for your tenant implementation and deploy your tenant. See tenant roadmap for Microsoft 365. If you plan to install Office apps on your computer, see system requirements for Microsoft 365 and Office configuration support matrix. Because Office 365 is a cloud based solution, it is important to learn where your Microsoft 365 customer data is stored.
- Step 5: Add and verify the custom domain on Office 365
If you have a custom email domain from your hosting provider to which you want to migrate and receive emails, you must verify and add the domain on Office 365. Next, you must add DNS records to correctly receive emails to your new domain.
- Step 6: Create mailboxes and mail-enabled Public folders
Before you migrate to Office 365, ensure that you create mailboxes for your users in your organization and assign suitable licenses to them.
- Add users and assign licenses to Office 365 users
- Add several users at the same time to Office 365
- Assign Microsoft 365 licenses to user accounts
- If you are planning for the Public folder migration, ensure that you create the Public folder and assign root permissions to global admin user
- If you are planning to migrate to Archive mailboxes Enable In-Place Archive mailboxes in Office 365
- Step 7: Set the impersonation role on the source to the admin user
Ensure that you set the following permissions to the admin account on the source Exchange 2010 server and that the mailboxes you migrate are not hidden from the address lists.
- On the source server:
- ApplicationImpersonation
- View-Only Configuration - Run the cmdlet New-ManagementRoleAssignment using the Exchange Management Shell to assign the View-Only Configuration role to the admin.
Click here to set the impersonation rights in Exchange server using powershell for Exchange 2019, 2016, 2013, 2010
Click here to set the impersonation rights in Exchange server using powershell for Exchange 2007
- On the target server:
Ensure that you have a global admin account with a mailbox for Auto Registration of EdbMails application on your Entra ID (Azure Active Directory). However, you can use either a global admin account or any user account with full access rights in the Manual Registration method.
- On the source server:
- Step 8: Verify the mailbox of the admin account
Check to see if the admin account that has been assigned management roles has a valid and non-hidden mailbox on the Exchange 2010 server. This property also applies to all the other user mailboxes.
- Step 9: Configure Office 365 to send and receive large messages
Follow the steps to increase the message size on Office 365 to 150MB.
- Step 1: Consider the migration approach
Steps to migrate Exchange 2010 to Office 365 using EdbMails
Once you have completed the necessary pre-migration tasks, utilize the EdbMails Exchange migration tool for Exchange 2010 to Office 365 migration.
Step 1: Download and Install EdbMails software
- Download and install the EdbMails application on your computer.
Refer to the detailed list of EdbMails system requirements for Exchange 2010 to Office 365 migration.
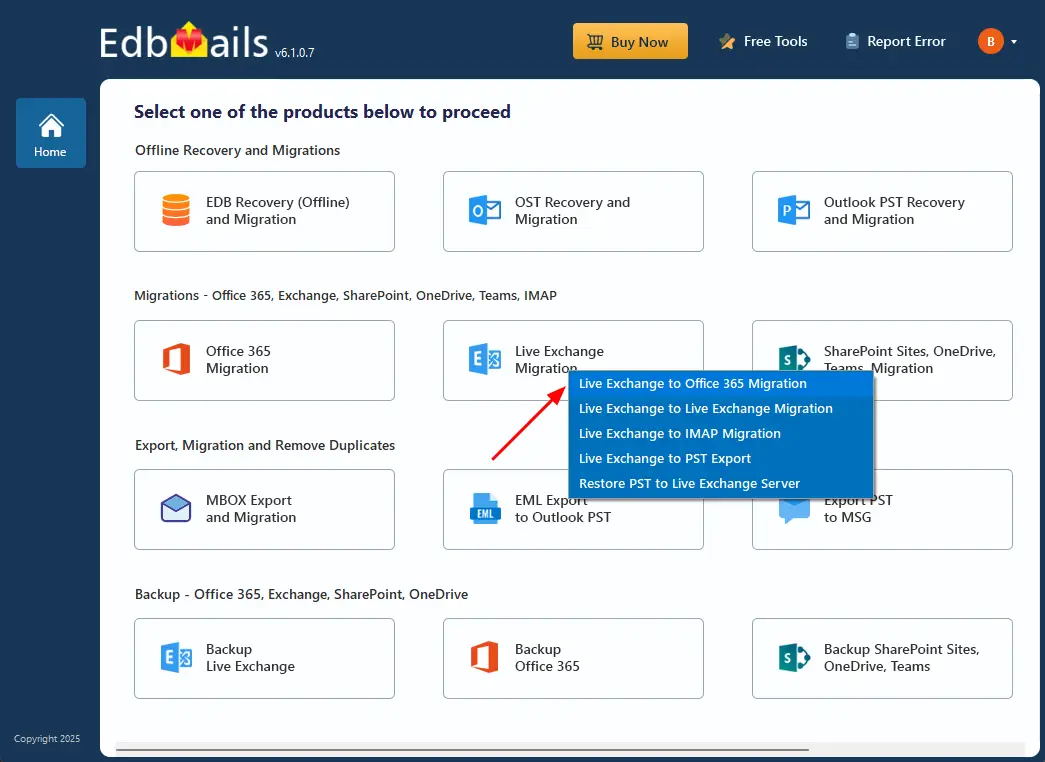
- Launch the EdbMails application. You can either ‘login’ with your email ID and password or click the ‘Start Your Free Trial’ button.
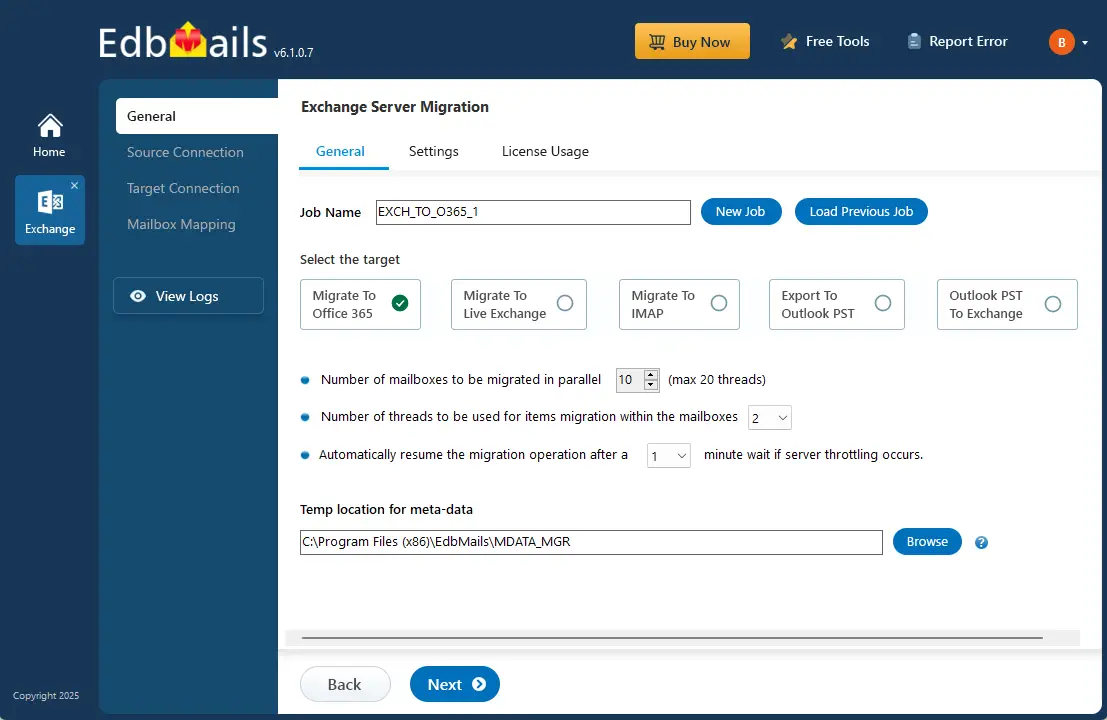
- Select the 'Live Exchange Migration' option.
- Select 'Live Exchange to Office 365 Migration' option.
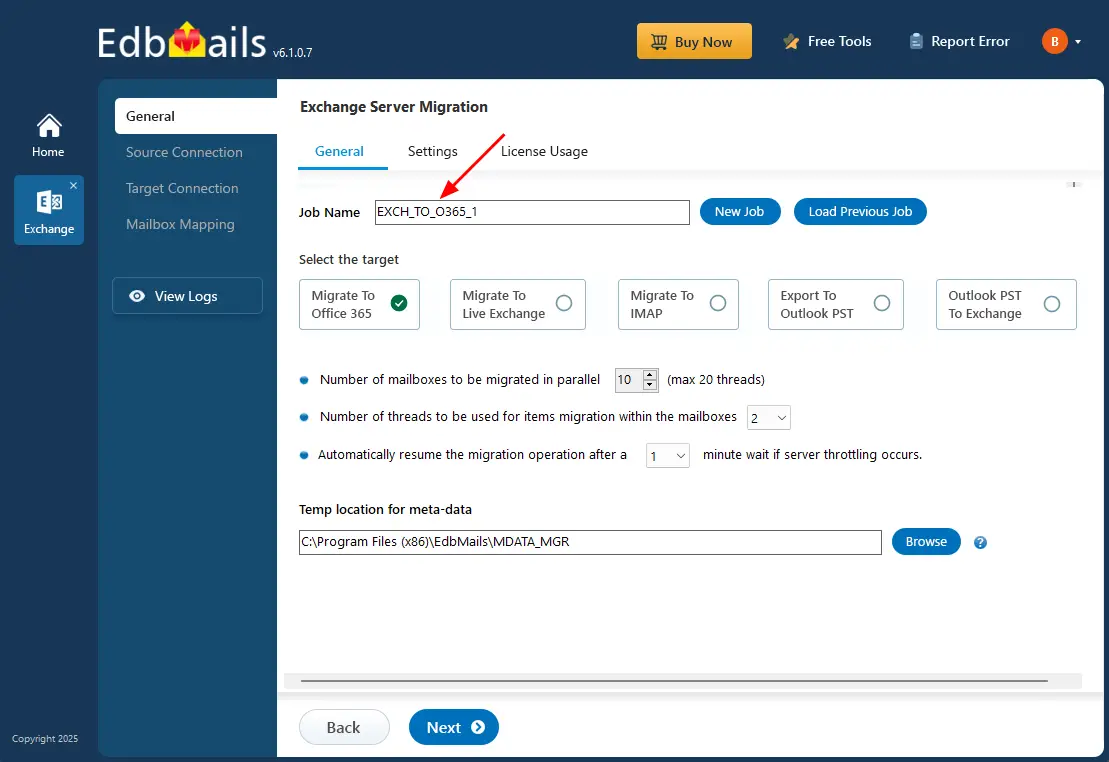
- You can stick with the default job name, or click ‘New Job’ to enter a name of your choice.
- Download and install the EdbMails application on your computer.
Step 2: Connect to source Exchange 2010 server
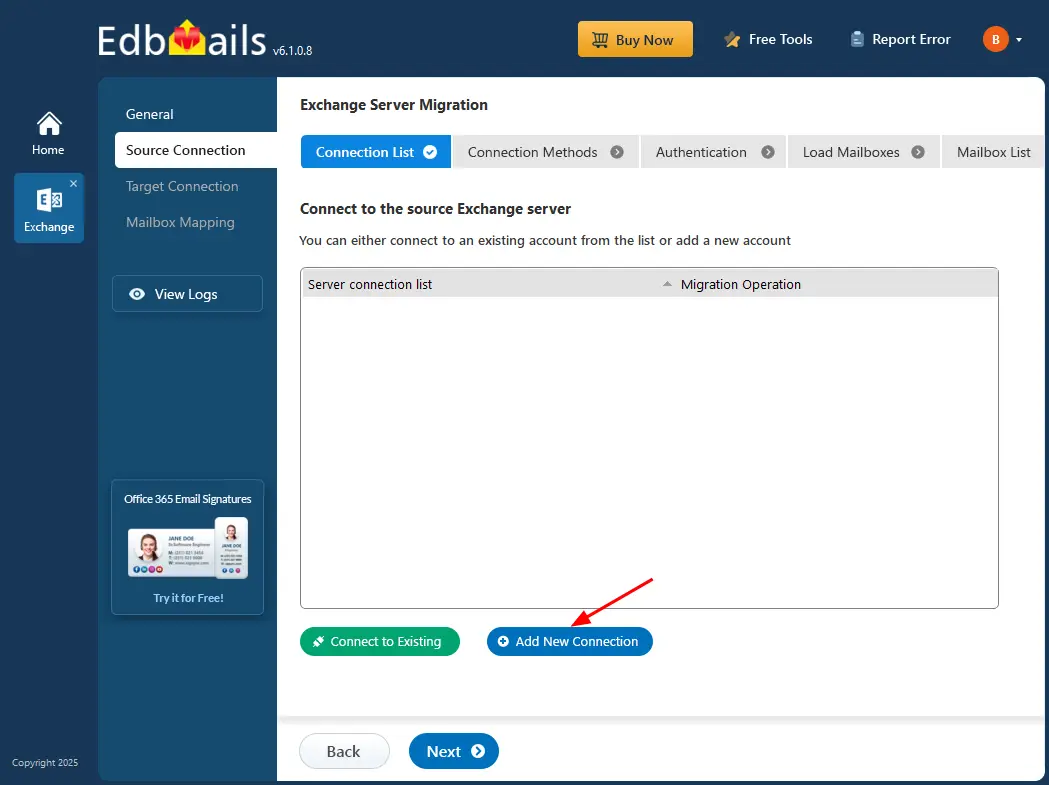
- To set up a connection to the source Exchange 2010 server, click ‘Add New Connection’. If you’ve already created one, simply select it from the list and click ‘Connect to Existing’.
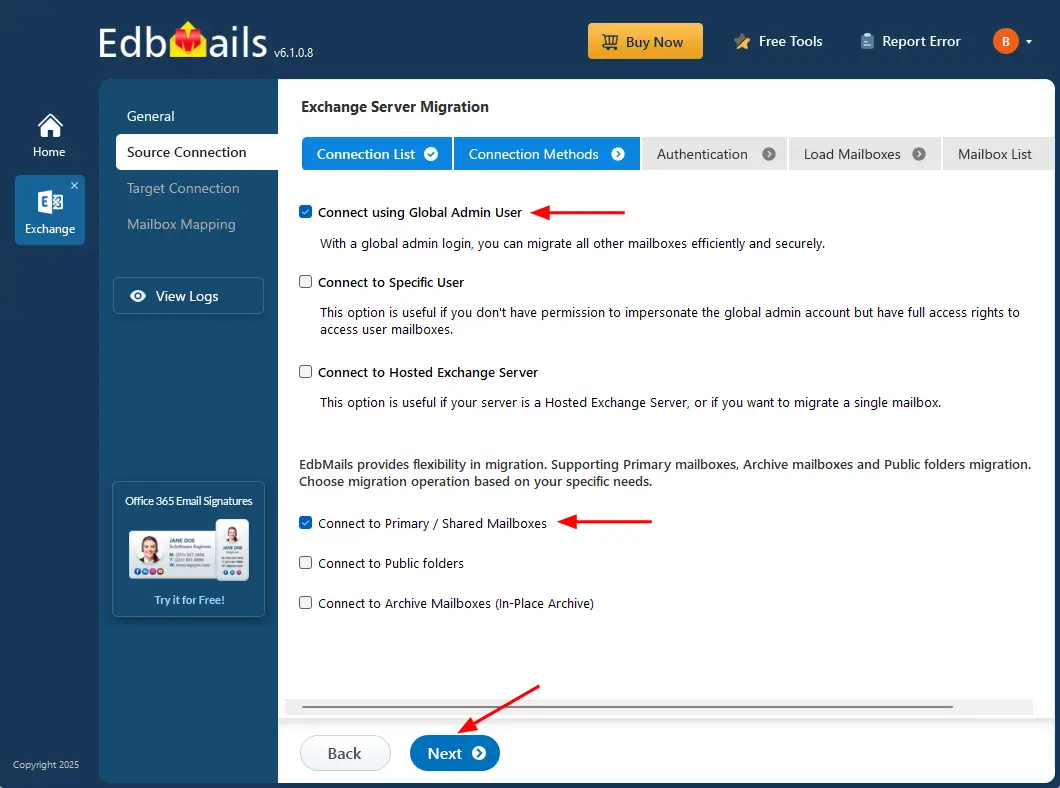
- Select the required connection options and click the ‘Next’ button.
Different options to connect to Exchange server in EdbMails.
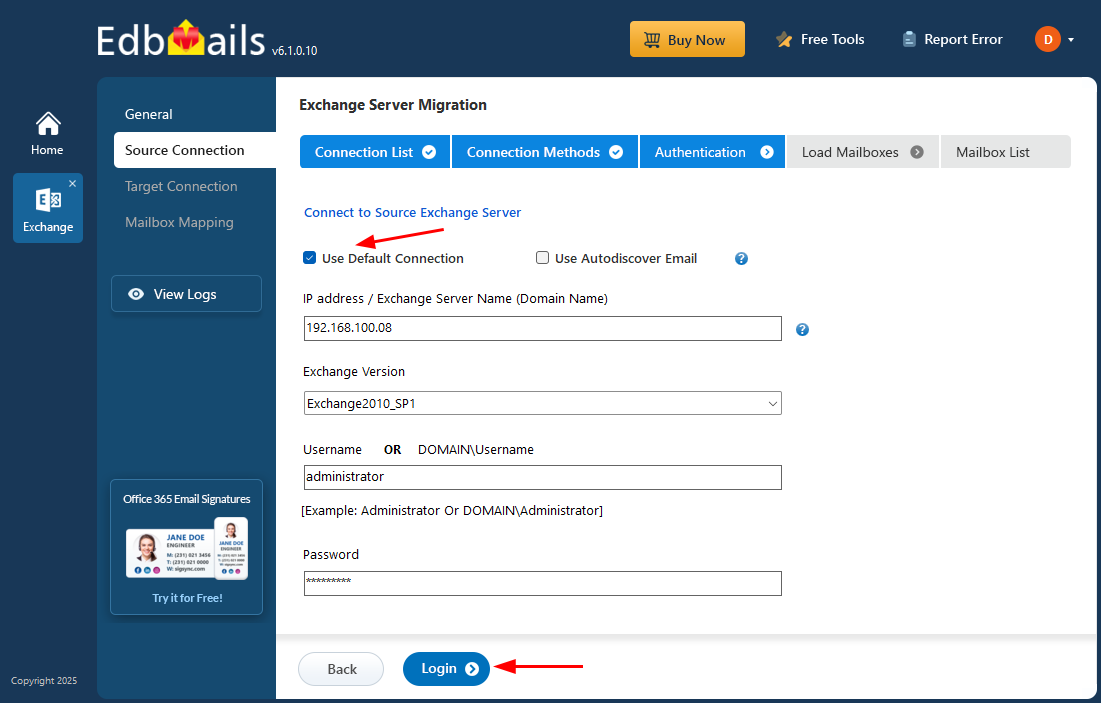
- Enter Exchange 2010 server details and click the ‘Login’ button.
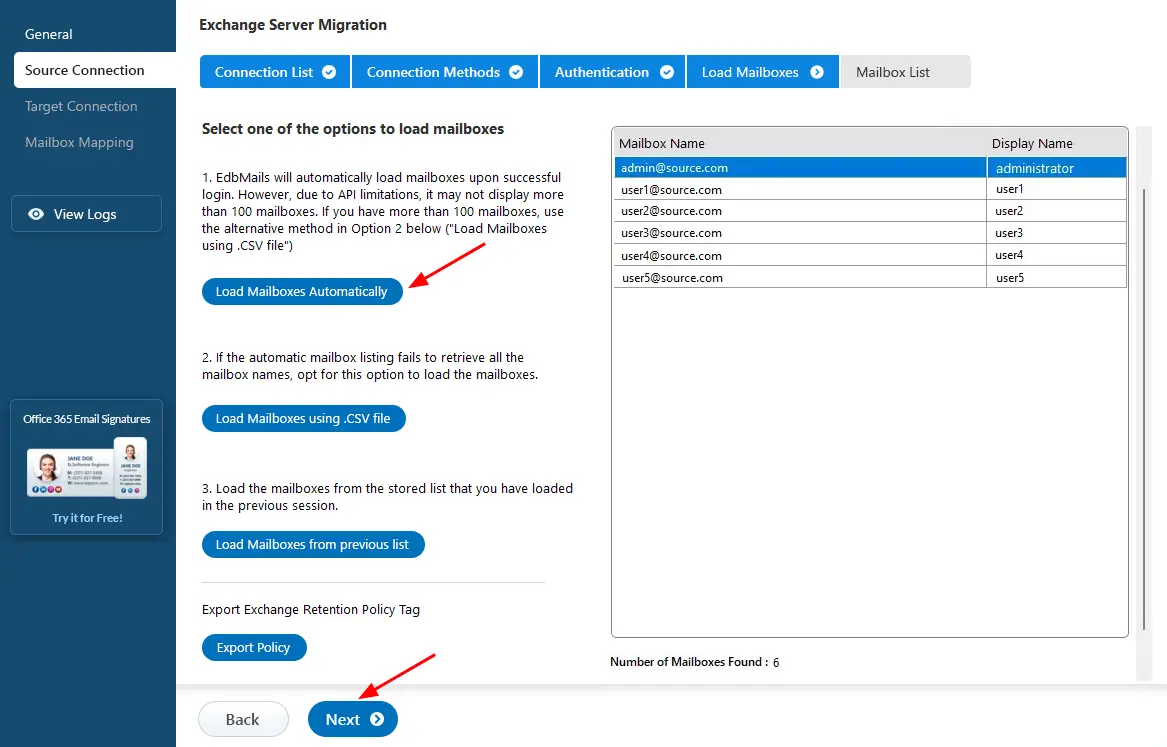
- Select one of the methods to load the mailboxes, You can also load the mailboxes using a CSV file.
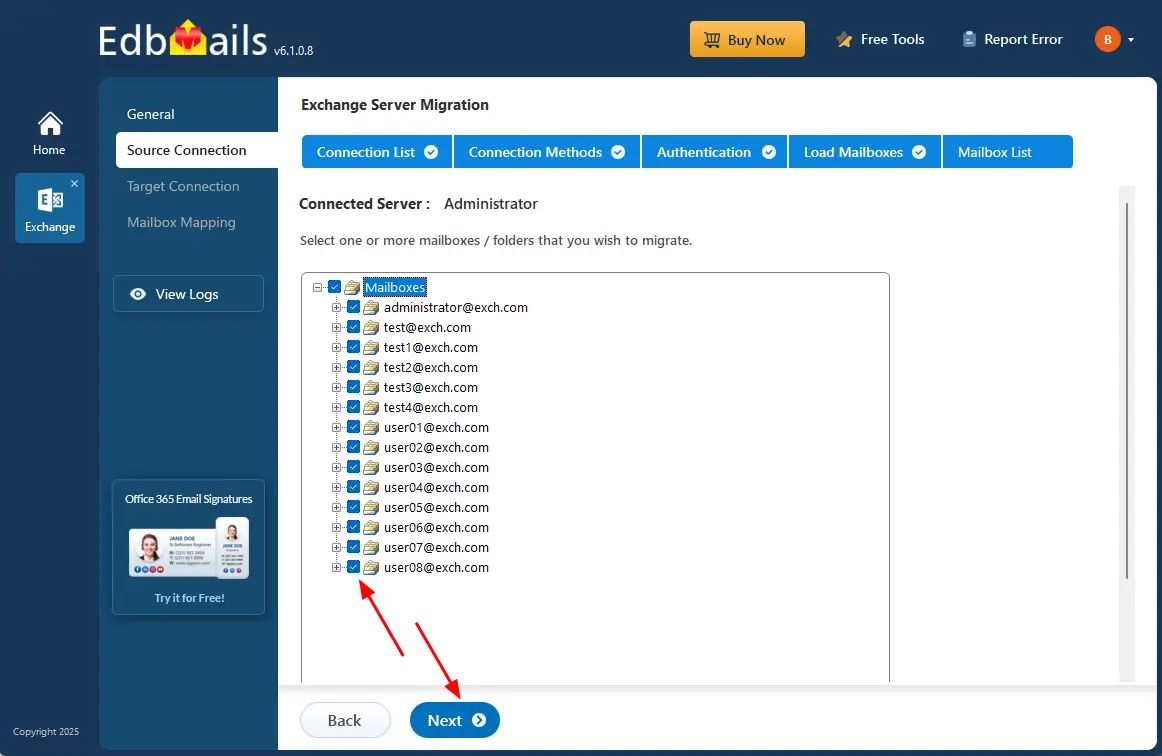
Step 3: Select the Exchange 2010 mailboxes
- Choose the mailboxes and folders from Exchange 2010 that you wish to migrate to Office 365.
Step 4: Connect to target Office 365 server
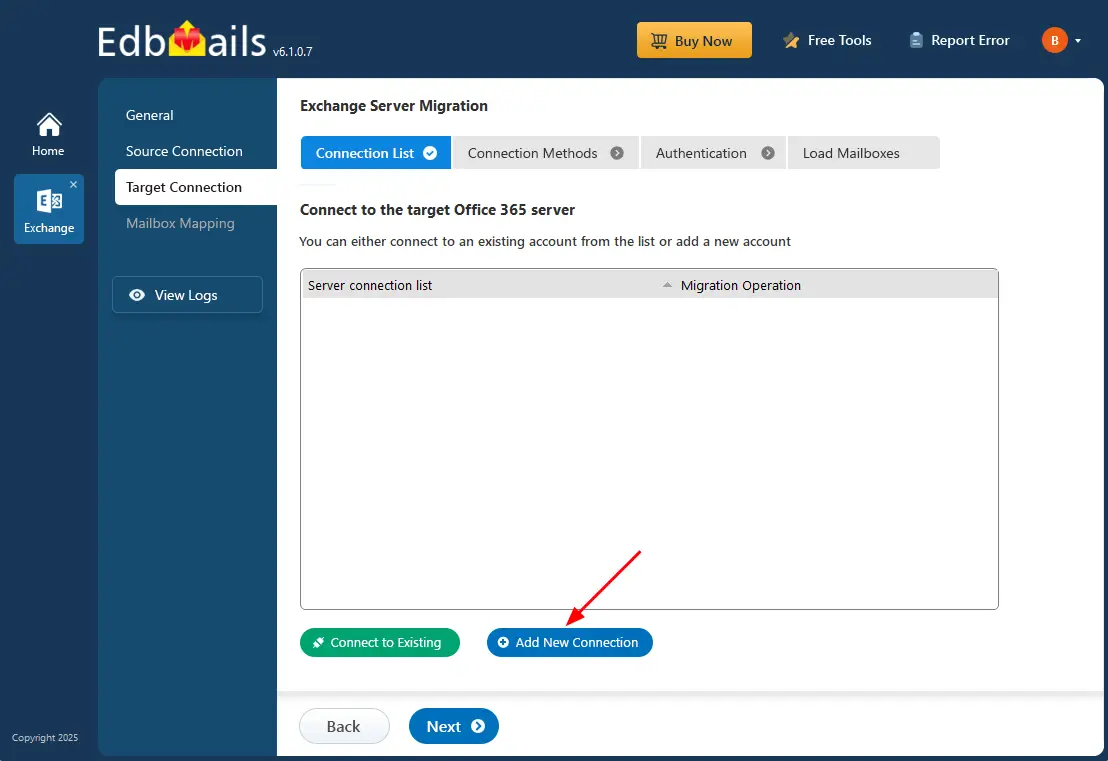
- To connect to your target Office 365 account, click ‘Add New Connection’. If you’ve already connected before, Select it from the list and click ‘Connect to Existing’.
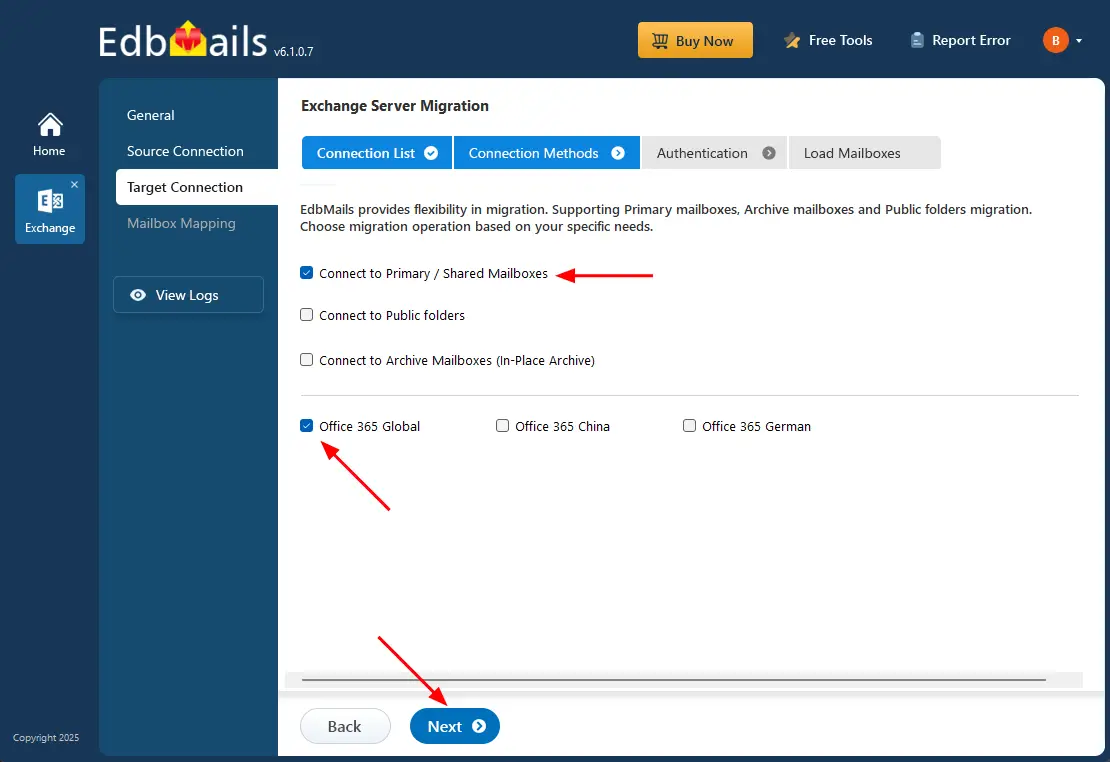
- Select the required connection options and click the ‘Next’ button.
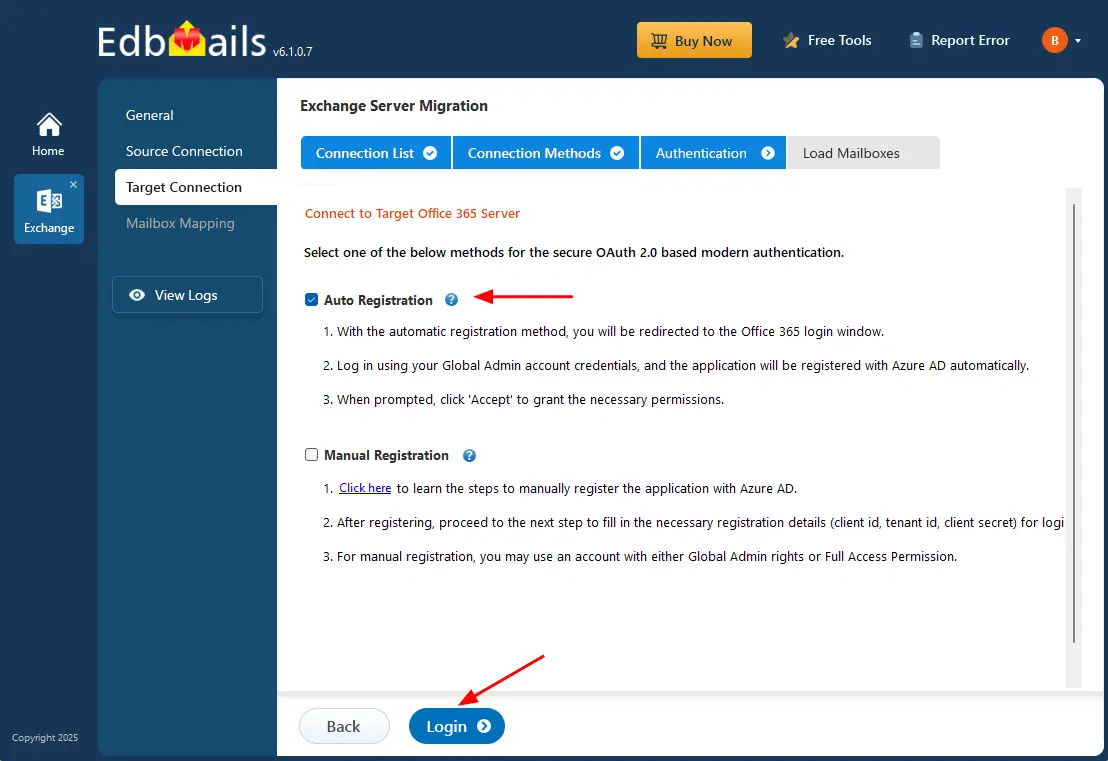
- Select one of the authentication methods to connect to Office 365 and click the ‘Login’ button to continue.
Know more details about target Office 365 server connection with EdbMails.
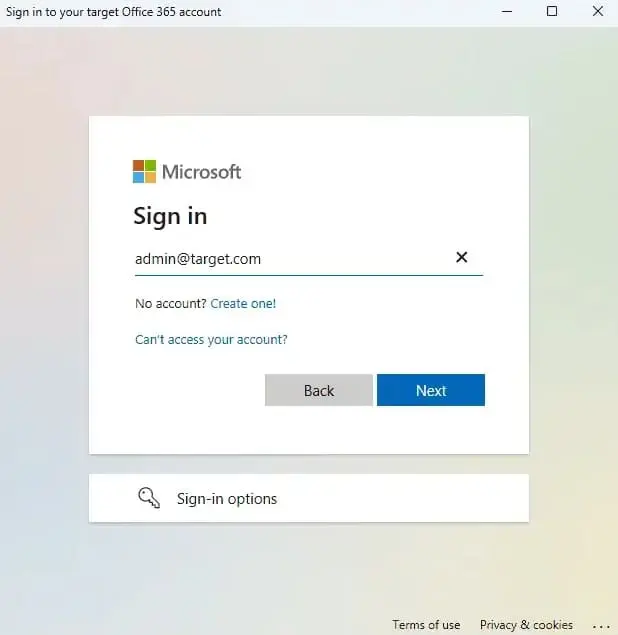
- Authenticate on Microsoft sign-in page.
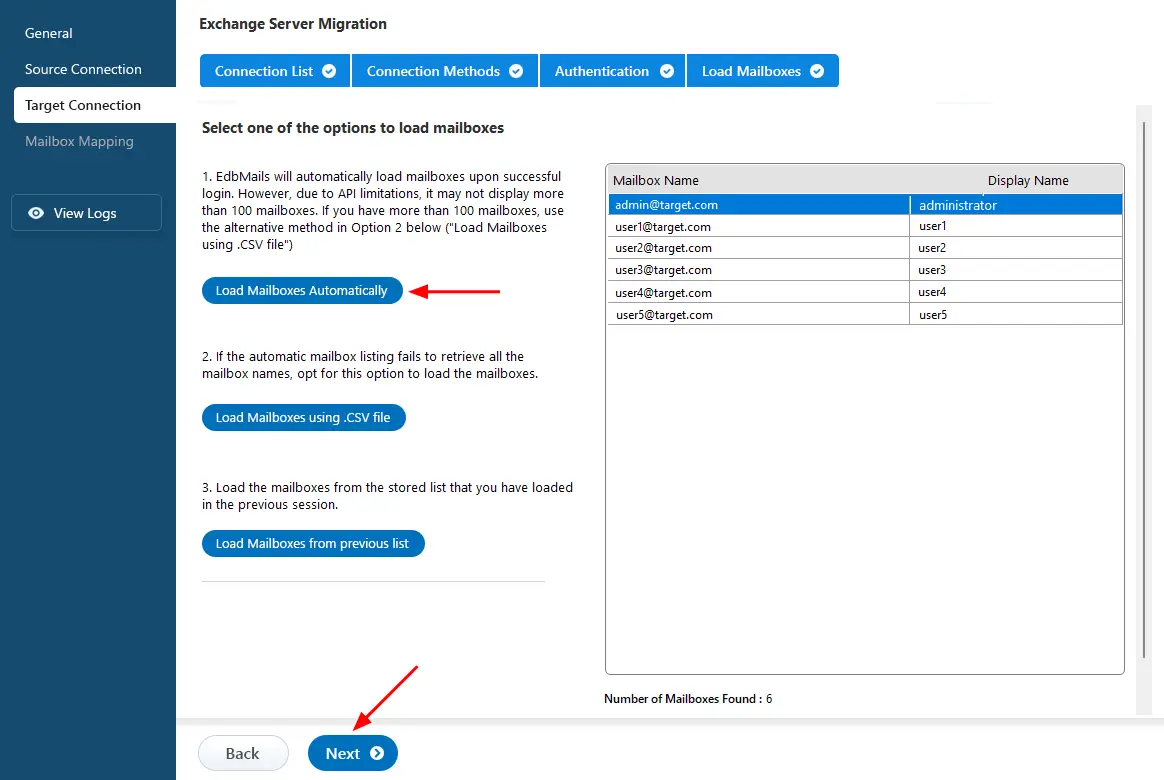
- Choose a method to load the mailboxes. The automatic option loads up to 100 mailboxes due to Microsoft API limitations. To load more, use the CSV file method, then click ‘Next’ to continue.
Step 5: Mapping source and target mailboxes
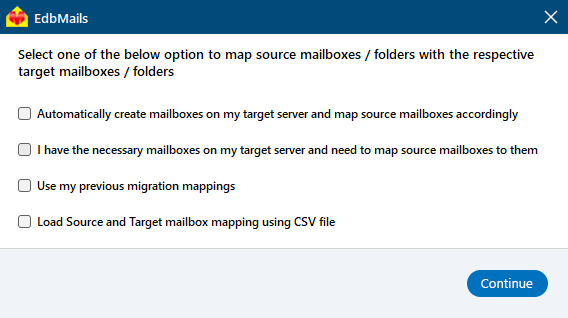
- Choose the required mailbox mapping option.
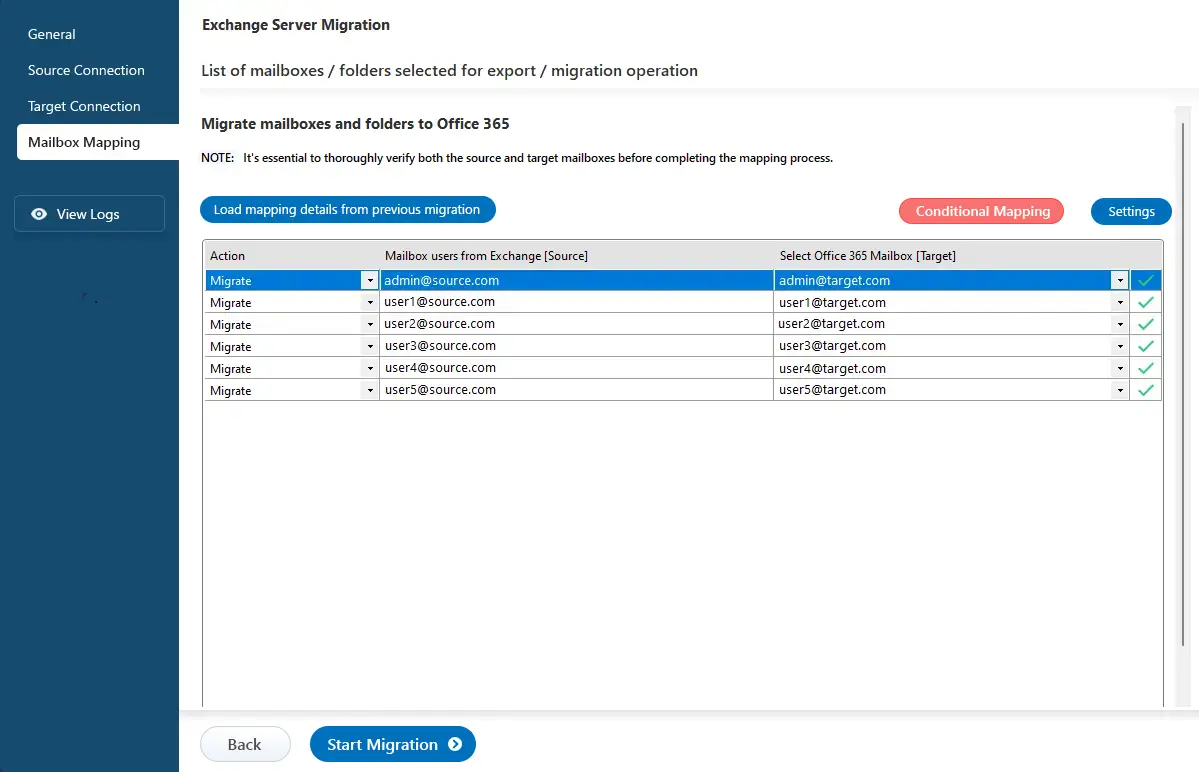
- EdbMails automatically creates mailboxes on your target Office 365 server.
Learn more about the automatic mailbox creation process on the target Office 365 server.
Step 6: Start migration from Exchange 2010 to Office 365
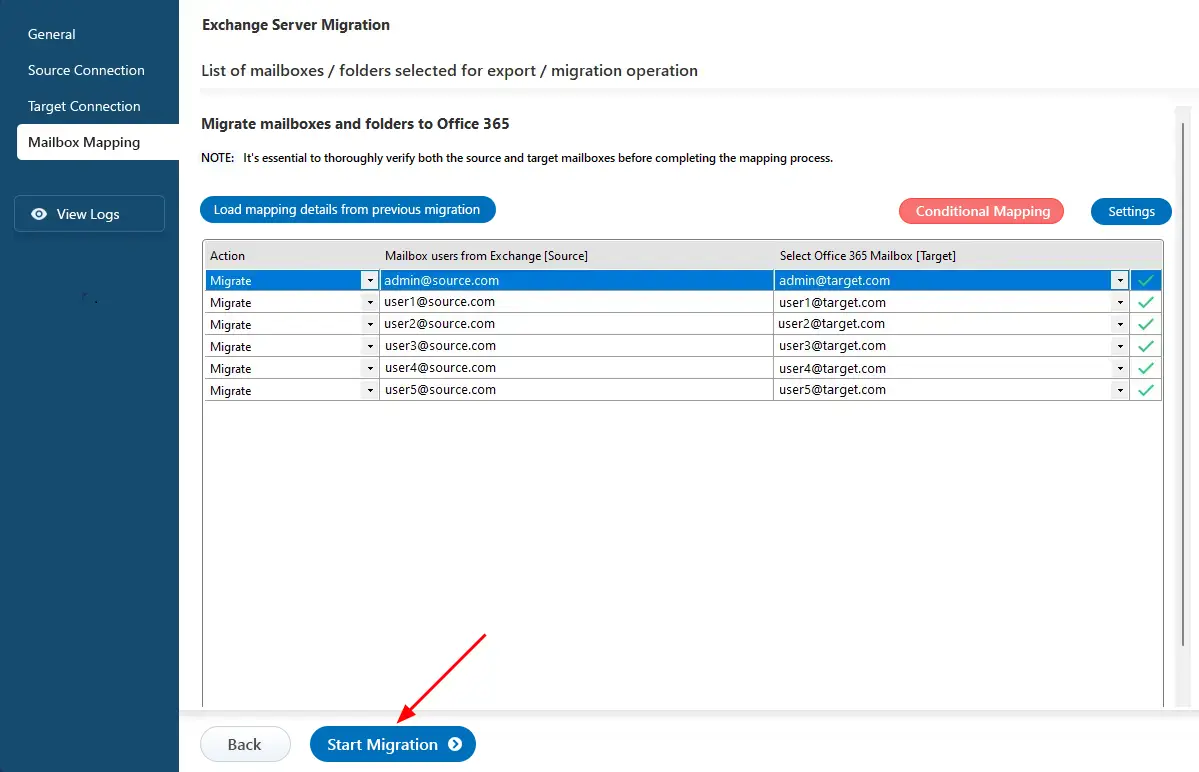
- Click the 'Start Migration’ button to initiate the migration process.
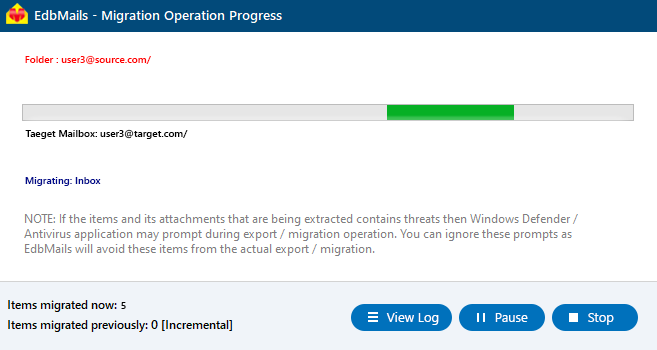
- Track migration progress in progress bar. After migration completion, EdbMails prompts to view the migration status. Click the ‘View Logs’ button to check the migration report..
Exchange 2010 to Office 365 post migration tasks
The following post-migration activities assist you in ensuring proper mail flow, allowing your users to receive emails correctly.
- Step 1: Modify the MX records to route to Office 365.
To start receiving emails on Office 365 after migration, update your domain's MX records to point to the new server. Also, set up the Autodiscover record so Outlook can connect to the migrated mailboxes without issues.
- Step 2: Set Up a New Outlook Profile for Users in the Updated Domain
Since Outlook 2010 is no longer supported, upgrade to the most recent Microsoft Office suite to prevent compatibility problems. If users encounter issues connecting Outlook to Office 365 mailboxes, manually configure their Outlook profiles for the domain.
- Step 3: Decommission and uninstall Exchange 2010 server
After a few days, verify that you are receiving emails properly and that everything is functioning as anticipated. Then, follow Microsoft's guidelines to uninstall Exchange Server 2010.
- Review the Essential Tasks After Completing Your Exchange 2010 to 365 migration.
- Step 1: Modify the MX records to route to Office 365.
Exchange 2010 to Office 365 migration troubleshooting
Check the Exchange migration troubleshooting guide for possible solutions to typical migration errors. For further information regarding EdbMails Exchange migration, please visit the frequently asked questions (FAQs) section.
Benefits of using EdbMails for Exchange 2010 to Office 365 migration:
- Versatile options for Exchange migration and export
EdbMails provides the capability to migrate either a single Exchange mailbox or several mailboxes at once. You can seamlessly transfer folders, selected attachments, contacts, and calendars from an on-premises environment to Office 365, or export Exchange 2010 mailboxes to PST files.
- Automated management of Exchange 2010 and Office 365 throttling
EdbMails Exchange migration tool adeptly manages throttling from both Exchange and Office 365 servers, as well as any connection interruptions that may occur during the migration, ensuring a smooth and continuous migration process.
- Delta Migration (Incremental)
EdbMails offers delta migration (incremental), which focuses on transferring only the new or altered data during each migration session. This method effectively eliminates duplicate entries on the target server and optimizes both migration time and network bandwidth usage.
- Single hop Exchange 2010 to Office 365 migration
EdbMails allows for seamless migrations from legacy Exchange servers, such as Exchange 2003, 2007, and 2010, directly to Office 365. Additionally, it supports migrations from Exchange 2019, 2016, hosted environments, and live Exchange servers without the necessity of any intermediary steps.
- Selective inclusion and exclusion of email items and folders
Within EdbMails settings, you have the facility to apply filter options to selectively include or exclude mail items from migration based on factors like Date, Subject, Sender, and Recipient Address. Furthermore, you can choose to skip the emails and attachments that surpass a specified size threshold.
- Easy solution to migrate mailbox from exchange 2010 to office 365
Migrating from an Exchange 2010 to Office 365 comes with various challenges and technical hurdles. EdbMails streamlines this process, condensing it into just a few straightforward steps for complete mailbox migration. Additionally, it supports migration from Hosted Exchange server to Office 365 and enables the conversion of public folders into shared mailboxes through a single user-friendly interface.
Exchange 2010 to Office 365 migration step by step video guide:
Frequently asked questions
- What is the process for migrating from Exchange 2010 to Office 365?
- Prepare your Exchange 2010 environment.
- Create mailboxes on Office 365 server
- Choose a migration method (cutover, staged, or hybrid).
- Use migration tools like EdbMails to migrate your data.
- Complete post-migration tasks to ensure everything runs smoothly.
- Which migration methods are available for moving from Exchange 2010 to Office 365?
There are three primary migration methods for migrating Exchange 2010 to Office 365:
- Cutover Migration: Suitable for small to medium-sized organizations, where all mailboxes are migrated at once.
- Staged Migration: For larger organizations, where mailboxes are migrated in batches over a period of time.
- Hybrid Migration: Combines both on-premises Exchange and Office 365
EdbMails supports all the migration methods mentioned above.
Learn more about the migration methods
- How to migrate Exchange 2010 to Office 365 using EdbMails?
Step 1: Download and install EdbMails Software
Step 2: Launch the application
Step 3: Connect to source Exchange 2010 server
Step 4: Choose mailboxes for migration and click ‘Migrate to Office 365’
Step 5: Connect to Office 365 server
Step 6: Choose mailbox mapping options and begin migration
- Can I migrate public folders from Exchange 2010 to Office 365?
Yes, EdbMails supports migrating public folders from Exchange 2010 to Office 365.
- Will there be any server downtime during the migration?
No, you won't experience server downtime during migration with EdbMails. EdbMails is designed to facilitate seamless migrations from Exchange 2010 to Office 365 without disrupting server operations, ensuring continuous access to your data throughout the migration process.
- How can I ensure the security of my data during the migration?
EdbMails utilizes secure Microsoft APIs for migration, following Microsoft's recommended workflow. Your credentials and data are never stored on its servers. OAuth 2.0 and TLS encryption ensure the security of your Office 365 credentials during authentication.
- Can I access my emails during the migration process?
Yes, you can continue to access your emails without any disruptions during the migration process with EdbMails.
- Does EdbMails support the automatic mapping of Exchange 2010 and Office 365 mailboxes?
Yes, EdbMails automatically maps Exchange 2010 mailboxes with the Office 365 mailboxes, which eliminates the need for manual mapping. This feature is particularly useful during migrations involving a large number of mailboxes, saving considerable time and effort.
- Does EdbMails delete or modify any data on Exchange 2010 during the migration?
No, EdbMails does not delete or modify any data on Exchange 2010 during the migration process. EdbMails ensures that data integrity is maintained throughout the migration, transferring data securely to Office 365 without making any changes.
- Which license do I need in EdbMails to migrate Exchange 2010 to Office 365?
To migrate from on-premises Exchange 2010 to Office 365 using EdbMails, you need the ‘Live Exchange Migration’ license.
Click here for more details on Exchange migration license details.
- Can I migrate an Exchange 2010 mailbox to an IMAP server?
Yes, EdbMails supports migrating an Exchange 2010 mailbox to IMAP-enabled servers such as Gmail, Yahoo Mail, Outlook.com, Zimbra, Zohoh etc. that support the IMAP protocol for email migration.
- Can I migrate an Exchange 2010 in-place archive mailbox directly to Office 365?
Yes, EdbMails allows you to migrate Exchange 2010 in-place archive mailbox directly to Office 365 without any intermediate steps.


