Migrate Exchange to Office 365
Many organizations are moving from on-premises Exchange Server to Office 365 (Microsoft 365) to take advantage of cloud benefits such as flexibility, anywhere access, stronger security, and lower server maintenance. This transition also helps teams collaborate more effectively, ensuring business operations continue smoothly during and after the migration. However, moving large amounts of mailbox data without proper planning can be challenging, and downtime or errors can disrupt productivity.
The EdbMails Exchange Migration software makes Exchange to Office 365 migration simple, secure, and reliable. It supports all major Exchange versions, including 2007, 2010, 2013, 2016, 2019, and Small Business Server (SBS) 2011, and ensures that all critical data — emails, contacts, calendars, archives, permissions, and shared mailboxes — is migrated safely to Office 365. With features like incremental migration, automated mailbox mapping, and concurrent mailbox transfers, the software reduces downtime, prevents duplicate data, and improves overall migration efficiency, allowing organizations to move to the cloud without disrupting daily business operations.
While EdbMails is designed for fast and secure migrations, factors such as network bandwidth, mailbox size, and Microsoft throttling policies can influence how quickly the migration completes. This guide covers every step of the process — from pre-migration planning and setup to execution and post-migration verification — along with optimization tips and best practices to ensure your move to Office 365 is smooth, secure, and hassle-free.
Best method to migrate Exchange to Office 365
Native migration methods, such as cutover and staged migrations provided by Microsoft, canfacilitate the transfer of Exchange server mailboxes to Microsoft 365. However, these methods comewith limitations, including extensive prerequisites, complex configurations, lengthy downtime, andthe risk of data loss or inconsistency during the migration process. In contrast, EdbMails Exchangeto Office 365 migration tool offers a robust solution that effectively addresses these challenges.It provides a secure and seamless migration process for all attributes—emails, contacts, tasks,journals, appointments, calendars, and notes—ensuring complete data integrity throughout themigration operation.
EdbMails stands out by allowing the migration of multiple user mailboxes, public folders, sharedmailboxes, and archives in a single operation, thus catering to diverse organizational needs. Unlikenative methods, which often require extensive technical knowledge and the use of complex PowerShellscripts, EdbMails features an intuitive user interface that simplifies the migration process. Byopting for EdbMails, individuals and organizations can confidently navigate the migration operation,mitigate risks, and ensure a smooth migration to Office 365 while fully utilizing the advantages ofthe Office 365 features.
Exchange to Office 365 Migration Checklist
The following checklists will help you migrate all your Exchange server data to Office365 smoothly.
- Plan for the migration:
- Identify the scope of the migration, including the number of mailboxes,public folders, and other data that needs to be migrated.
- Determine the size of the mailbox data and number of mailboxes to migrate.
- Assess the current environment, including hardware, software, and networkconfigurations.
- Prepare a complete inventory of items that you want to migrate.
- Determine the migration schedule, including the timing and duration of themigration.
- Identify any specific requirements or constraints that may affect themigration.
- Communicate any changes to your end users and inform the stakeholders.
- Prepare the data for migration:
- Clean up and archive any unnecessary data to reduce the amount of data thatneeds to be migrated.
- Perform a test (pilot) migration to identify and resolve any issues beforethe full migration.
- Purchase and configure Office 365 licenses:
- Purchase the necessary
- Configure the Office 365 tenant, including creating and configuring users,mailboxes, public folders and other resources.
- Configure the domains and DNS records:
- Prepare the domains and required Active Directory services on the target.
- Update the DNS records to point to the Office 365 tenant, including MXrecords and Autodiscover.
- Verify that the DNS changes have propagated and that email is flowing to theOffice 365 tenant.
- Perform Exchange to Office 365 migration with EdbMails:
- EdbMails can help you with Exchange to Office 365 migration
- Configure the migration settings and migrate mailboxes, Public folder andShared mailboxes.
- Monitor the migration progress and verify the migrated items
- Test and validate the migration:
- Test the migration by sending and receiving email and verifying that alldata has been migrated correctly.
- Validate the migration by checking for any missing data or issues, andtroubleshoot as needed.
- Perform a final backup of the Exchange server before decommissioning it.
- Post-migration tasks:
- Update email client settings, such as Outlook, to point to the Office 365tenant.
- Create new Outlook profiles and check if you are receiving mails correctly.
- Update any custom scripts or applications that access the email data topoint to the Office 365 tenant.
- Update any third-party services or integrations that access the email datato point to the Office 365 tenant.
- Update the helpdesk and end-user documentation to reflect the new emailenvironment.
- Train users on the new email environment and any new features orfunctionality provided by Office 365.
- Decommission the source Exchange server if you no longer plan to use it(optional).
- Monitor and maintain:
- Monitor the Office 365 environment for any issues or performance problems.
- Maintain and update the Office 365 environment as needed.
- Continuously review and improve security, backup, and disaster recoverystrategies.
- Plan for the migration:
Exchange to Office 365 Migration Planning
- Step 1: Decide on a suitable Exchange to Microsoft 365 migration type
The first step is to plan the Exchange mailbox migration to Office 365.Depending on your source and target environments, the following migration pathsare available.
Migration Requirement Ideal migration approach Migration flow You want to move all of your email, calendar, and contacts fromExchange to Office 365 at once. Exchange cutover migration Set up your target Office 365 tenant and migrate everything tothe cloud all at once. Suitable for large-scale mailboxmigrations You prefer to transfer mailboxes from Exchange Server to Office365 in smaller batches or on weekends. Staged Exchange migration Migrate your mailboxes and mail data in stages, transferring themost recent data first, followed by the others. You want to retain your on-premises Exchange server and prefermoving to Office 365 gradually Hybrid migration Move mailboxes to Office 365 in a Hybrid deployment of Exchangeand Office 365. Use the Microsoft 365 mail migration advisor to determine which migration method is best for you.
- Step 2: Install cumulative updates (CU) on the Exchange server
Ensure that you have the latest updates installed on the source Exchange.
- Install CU for Exchange server 2010
- Install CU for Exchange server 2013
- Install CU for Exchange server 2016
- Install CU for Exchange server 2019
- Step 3: Consider the network and bandwidth requirements
- Network requirements
- Understand the networking roadmap for Microsoft 365. It involves planning, deploying andmanaging your network.
- Internet Connectivity: A stable and reliable internetconnection is required for migration of Exchange to Office 365. Theinternet connection should have sufficient bandwidth to handle thedata transfer and should be free from congestion.
- Firewall and Port Configuration: Review and configure the firewall and port configurations to allow for the necessary data transfer to the Office 365 tenant.
- DNS Configuration: Review the DNS records and configure themto point to the Office 365 tenant, including MX records andAutodiscover. This task ensures that email is properly routed to theOffice 365 tenant after the migration.
- Network Latency: Consider the Network Latency to ensure aseamless data transfer. If the Network Latency is high, it may slowdown the migration process. See how Microsoft365 networking is different.
- Office 365 Throttling: Microsoft limits the number ofconcurrent mailbox transfers to ensure service availability.Consider the Office365 throttling policies when you migrate large mailboxes.
- Network Security: Review the network security to ensure thatthe data transfer is secure. This includes configuring any necessaryencryption, authentication, and access controls.
- Network Load Balancing: Consider the Network LoadBalancing to ensure that the data transfer is balancedacross multiple networks and to avoid any bottlenecks.
- Bandwidth requirements
Bandwidth requirements for Exchange to Office 365 migration can varydepending on several factors, such as the number of mailboxes, theamount of data to be migrated, and the migration method used. Use toolslike Microsoft Remote Connectivity Analyzer and connectivity test tool to test your existing network.
- Number of mailboxes: The number of mailboxes beingmigrated influences the overall bandwidth requirements. The moremailboxes you plan to migrate, the more bandwidth you will need. See bandwidth requirements for Office 365 migration.
- Mailbox Size: The size of the mailboxes beingmigrated also influences the overall bandwidth requirements. Largermailboxes will require more bandwidth to migrate.
- Migration Type: The type of migration you use alsoaffects the bandwidth requirements. For example, a cutovermigration, where all mailboxes are migrated at once, requires morebandwidth than a staged migration, where mailboxes are migrated insmaller groups.
- Migration schedule: The schedule of the migrationalso influences the bandwidth requirements. For example, migratingduring off-hours or over a weekend when network traffic is typicallylower, reduces the overall bandwidth requirements.
- Network infrastructure:. A network with higherbandwidth capacity can handle more data during the migration.
- Network Latency: Network Latency between the sourceand destination servers is also a factor to consider during themigration. If the Network Latency is high then a higher bandwidth isrequired.
See best practices for network planning and improving migration performance.
- Network requirements
- Step 4: Select a suitable Microsoft 365 license plan that fits your needs
Microsoft 365 is available as a cloud-based subscription service and offers avariety of licensing options, each tailored to a specific user needs. It isrecommended that you thoroughly evaluate the Office 365 business plans and Office 365 enterprise plans todetermine which one best meets the needs of your organization. You can also signup for a 30-day free trial of Office 365 to test out the various plans beforemaking a final decision.
- Step 5: Set up your target Office 365 Tenant for the migration
- Create an Office 365 Tenant: Plan for the Tenantimplementation and deploy the tenant. See the tenant roadmap for Office 365.
- Sign in to the Microsoft 365 admin center: Microsoft 365admin center https://admin.microsoft.com/ and sign in with your global administrator credentials.
- Customize the Tenant settings:After the tenant is set up, configure and customize the settingssuch as email domains, language, and time zone to suit your organization'sneeds.
- Configure Azure AD Connect: Azure AD Connect is used tosynchronize your on-premises Active Directory with Azure AD. This step isnecessary if you want to retain your on-premises in a Hybrid environment andto enable single sign-on (SSO) for your users.
- Configure email clients and apps: If you want to installOffice 365 apps and Outlook, see system requirements for Microsoft 365 and Office configuration support matrix. Because Office 365 is a cloud based solution, it is also important to learn where your Microsoft 365 customer data is stored.
- Set up Office 365 services: Besides email, you may want toset up additional services such as SharePoint, OneDrive and Teams.
- Establish data retention policies: With Office 365, youhave the ability to retain data in accordance with compliance and legalrequirements. Set up data retention policies to meet your organization's compliance needs, and if necessary configure retention policies for specific mailboxes or groups ofusers
- Step 6: Add and verify the custom domain on Office 365
If you have a custom email domain from your hosting provider to which you wantto migrate and receive emails, you must add and verify the domain on Office 365.This will enable you to use your own domain name (such as example.com) for youremail addresses and other Office 365 services.
To set up your custom domain, follow these steps:
- Verify that you own the domain by adding a TXT record to your DNS configuration.
- Add a new domain to your Office 365 tenant. You can use an existing domain that you own or purchase a new one. The domain is used to access your Office 365 services.
- Update your DNS records to point to Office 365. This step is required to ensure that your email is delivered tothe correct mailbox. You can also update the MX records after you complete the migration.
- Step 7: Create mailboxes and set up mail-enabled Public folders
Before you migrate to Office 365, ensure that you create mailboxes for users in your organization and assign suitable licenses to them. EdbMails automatically creates mailboxes on target Office 365 servers
- Add users and assign licenses to Office 365 users
- Add several users at the same time to Office 365
- Assign Microsoft365 licenses to user accounts
If you want to migrate Exchange public folders to Office 365 , then create and configure Public folders and make them mail enabled on Office 365.
- Create Office 365 Public folder and assign permissions to admin user If you are migrating to Office 365 archive mailboxes ensure to enable In-Place Archives on Office 365 server
- Steps to enable In-Place Archive mailboxes in Office 365 server
- Step 8: Set impersonation rights for the admin user on the source server
If you are using the global admin account to connect your source Exchangeserver, ensure to set the impersonation rights.
Steps to set impersonation rights in Exchange 2019, 2016, 2013, 2010
- Step 9: Verify the mailbox of the admin account
Check to see if the admin account that has been assigned management roles has avalid and non-hidden mailbox on the Exchange server. See how to configure user mailbox properties for the users from the Exchange admin center (EAC).
- Step 10: Configure Office 365 to send and receive large messages
Increase the message size limit on Office 365 to 150 MB. This option enables you to bypass message size limitations during the migration.
- Step 1: Decide on a suitable Exchange to Microsoft 365 migration type
Steps to migrate Exchange to Office 365 with EdbMails
Step 1: Download EdbMails Exchange to Office 365 migration tool
- Download and install theEdbMails application on your computer.
- See the detailed list of EdbMails system requirements for Exchange to Office 365 migration.
- Launch the EdbMails Software.
- Enter your email address & password or choose ‘Start Your Free Trial’ to use the trial version
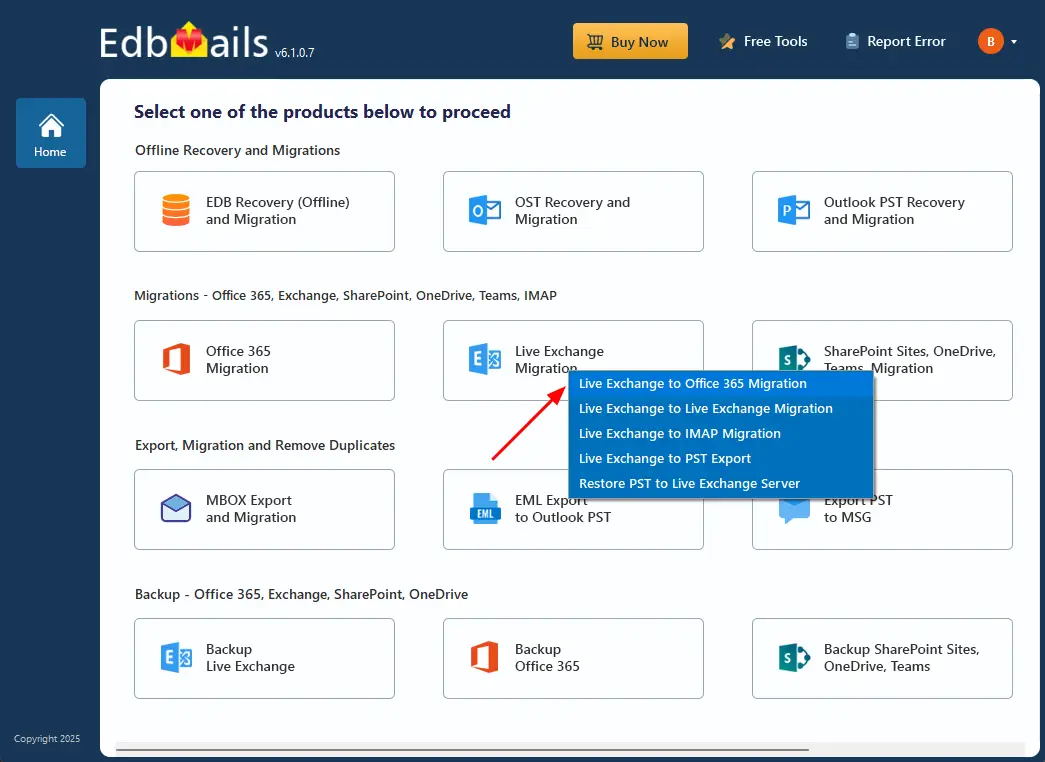
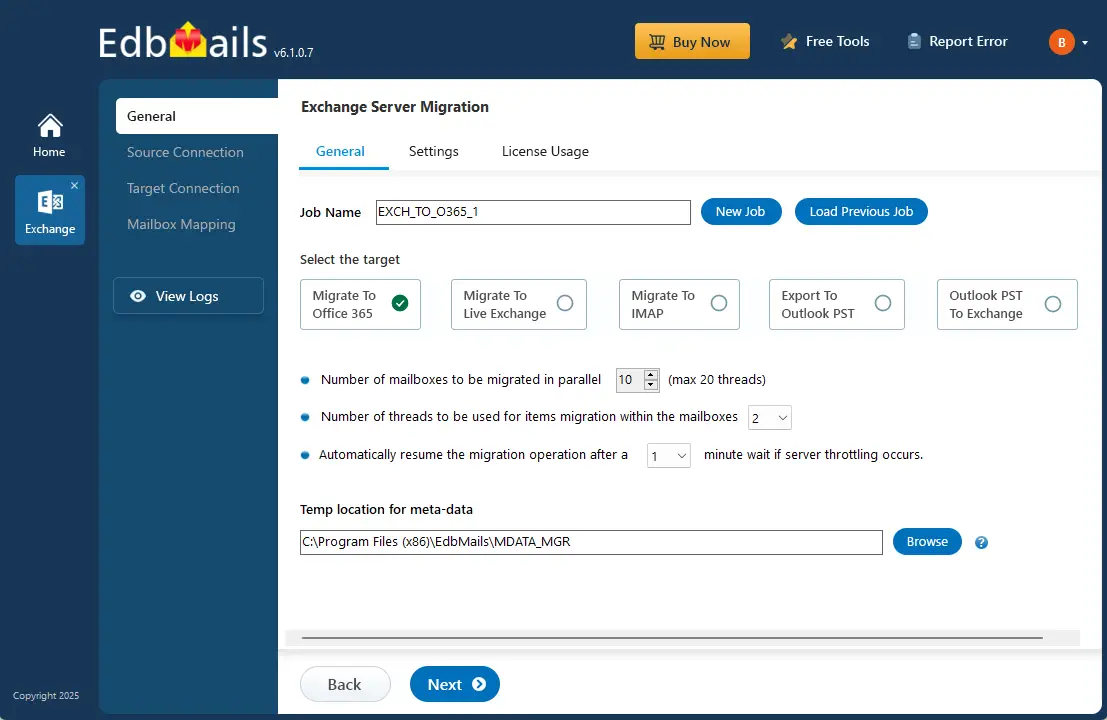
- Select ‘Live Exchange Migration’.
- Select 'Live Exchange to Office 365 Migration'
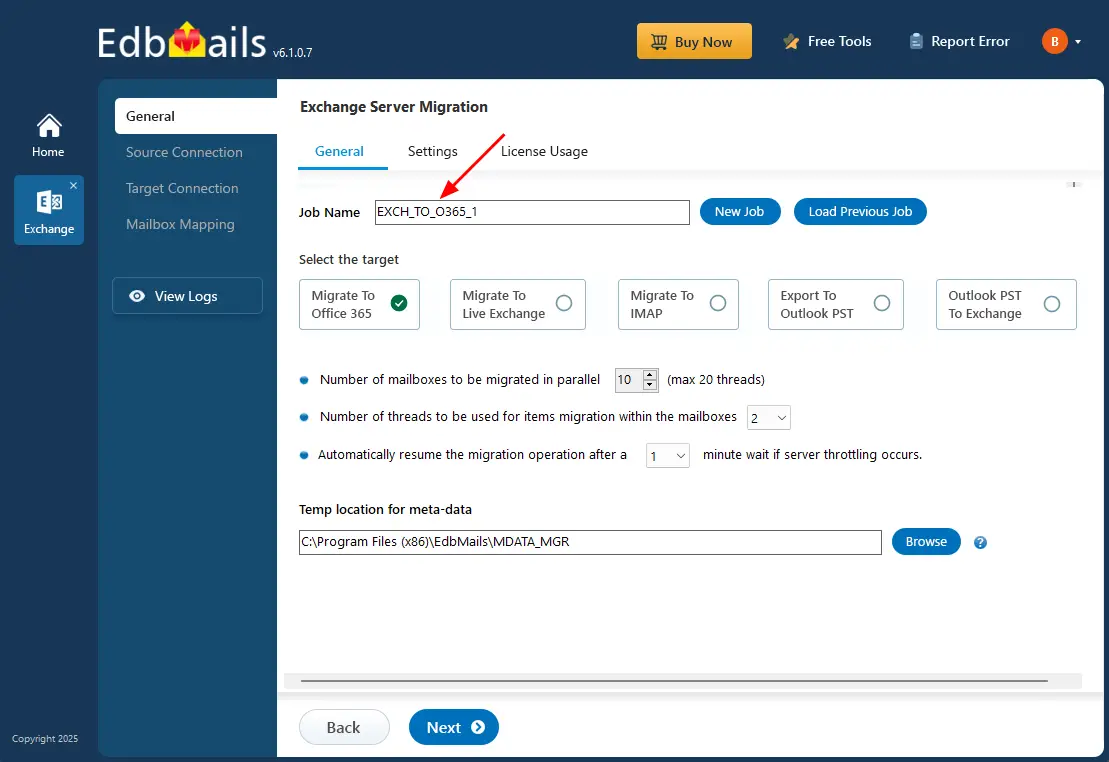
- You can use the default job name or click 'New Job' to modify the job name
Step 2: Connect to source Exchange server
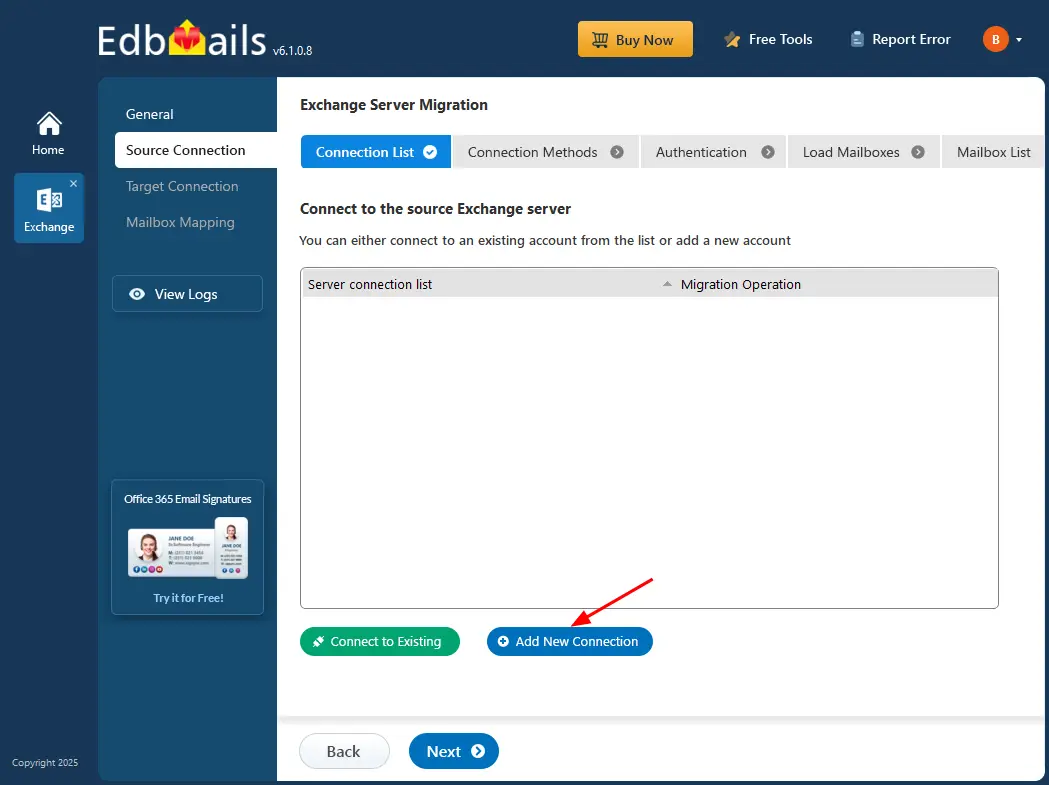
- Click ‘Add New Connection’ to set up a new connection to the source Exchange server. To reconnect using a previous connection, select it from the list and click ‘Connect to Existing’.
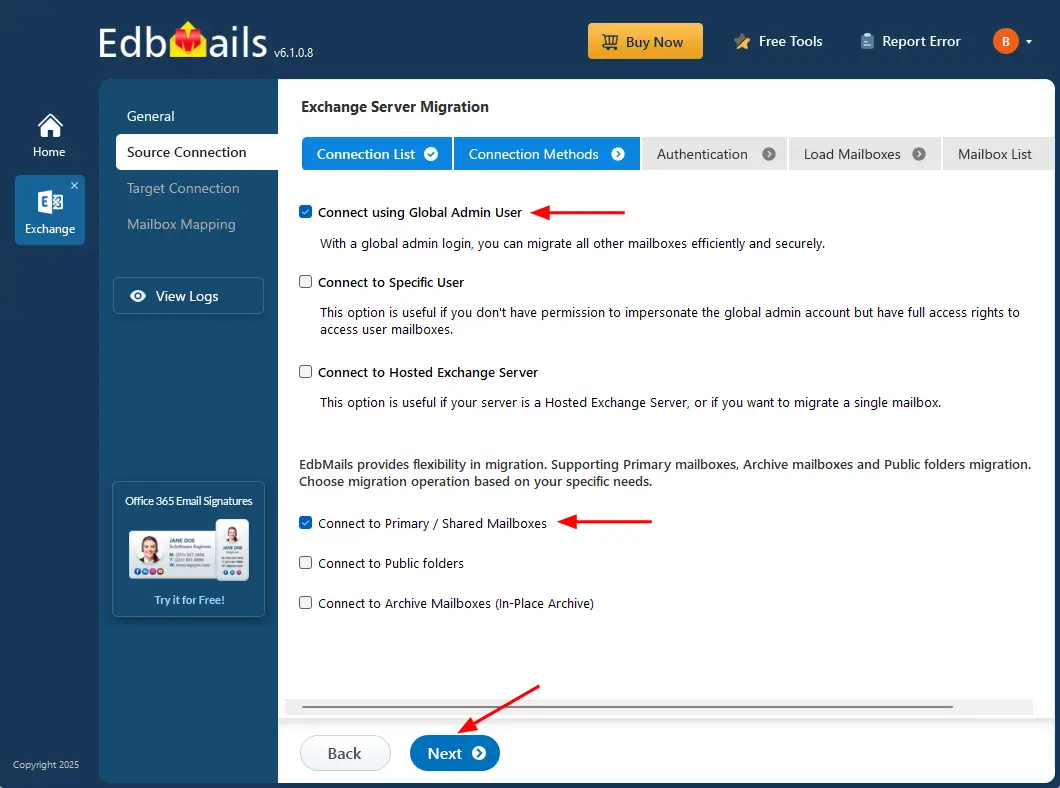
- Select the required connection options and click the ‘Next’ button.
Different options to connect to Exchange server in EdbMails
- EdbMails allows the migration of mailboxes, public folders, and archivemailboxes from the source Exchange serverto the target Office 365 server.
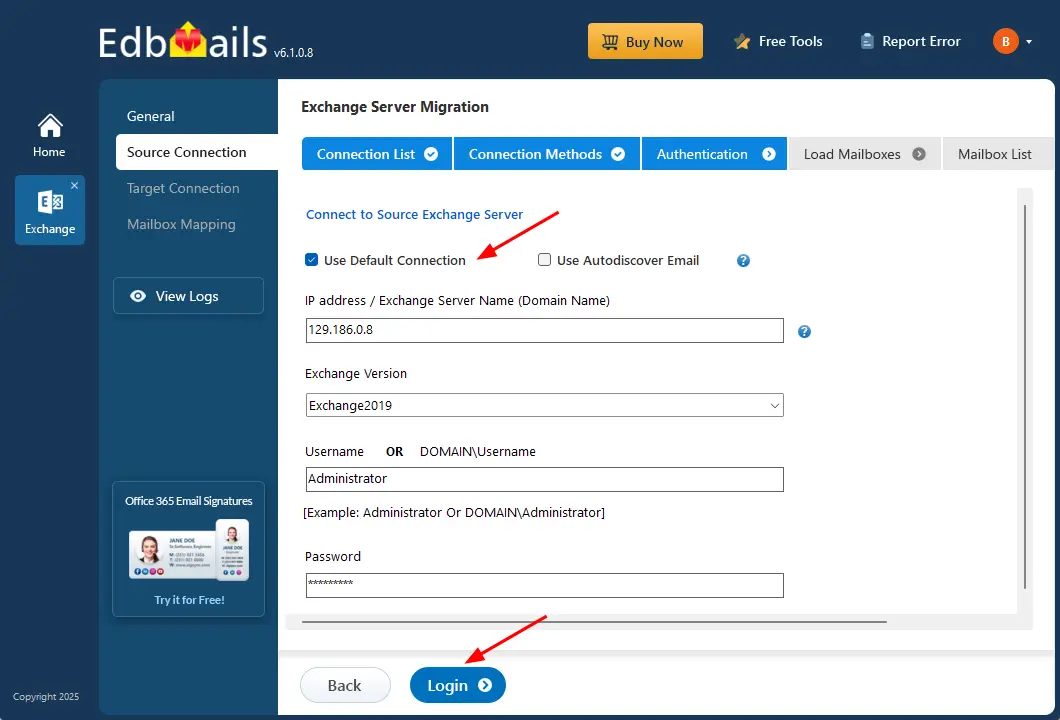
- Enter the source Exchange server details and click the ‘Login’ button
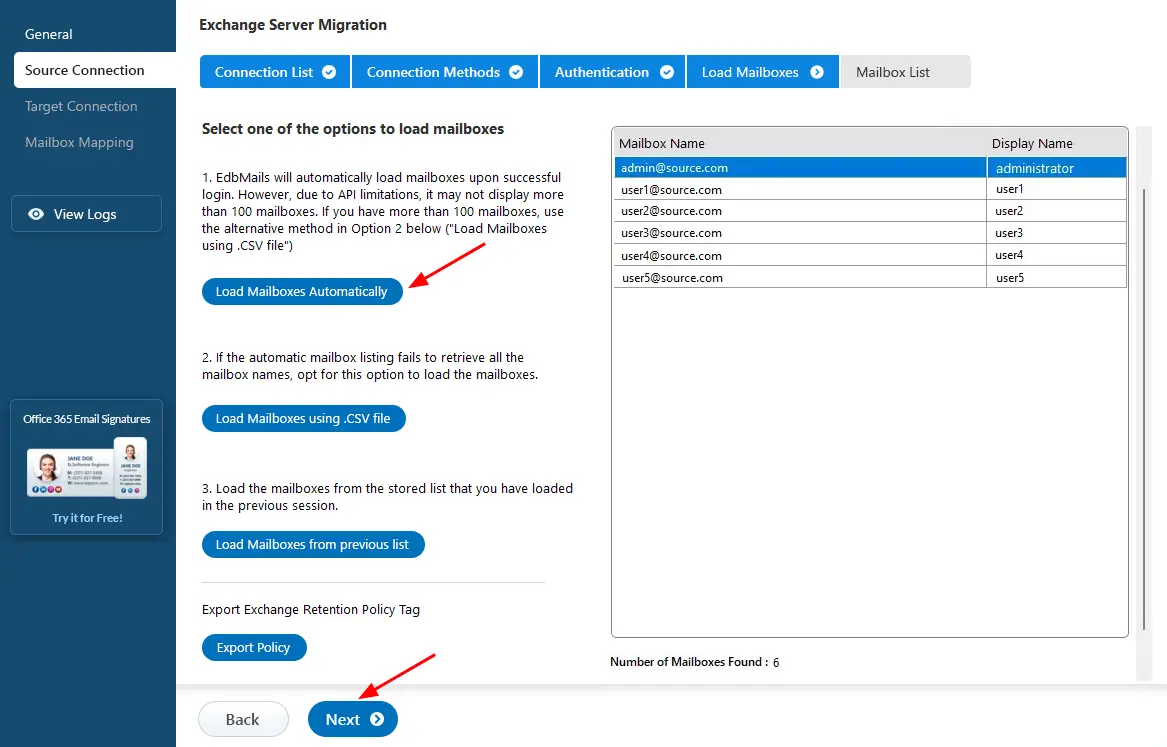
- Select one of the methods to load the mailboxes.
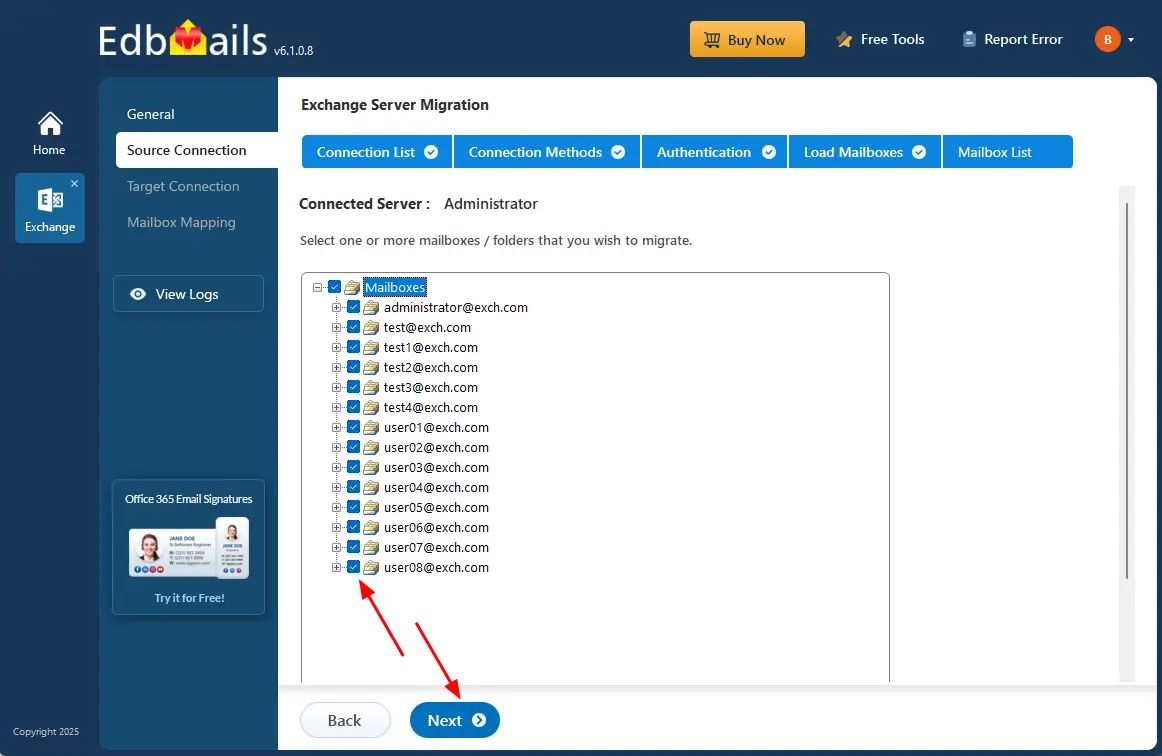
- Select the mailboxes to migrate, then click ‘Next’.
Step 3: Connect to target Office 365 server
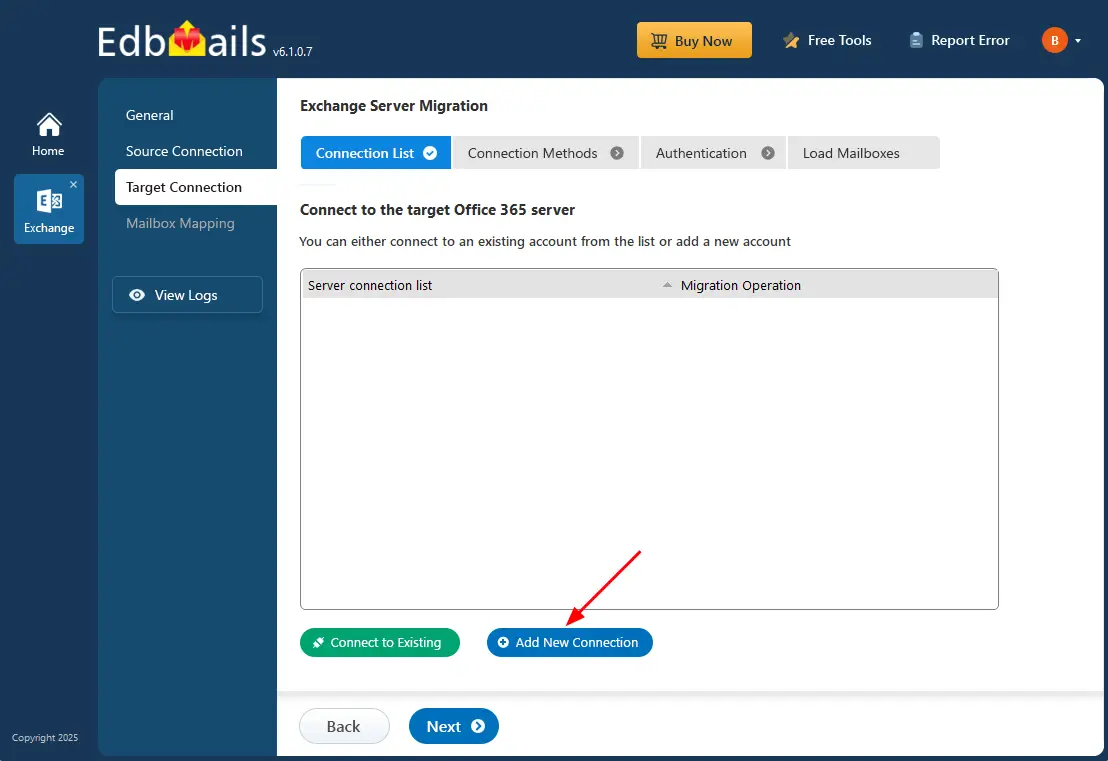
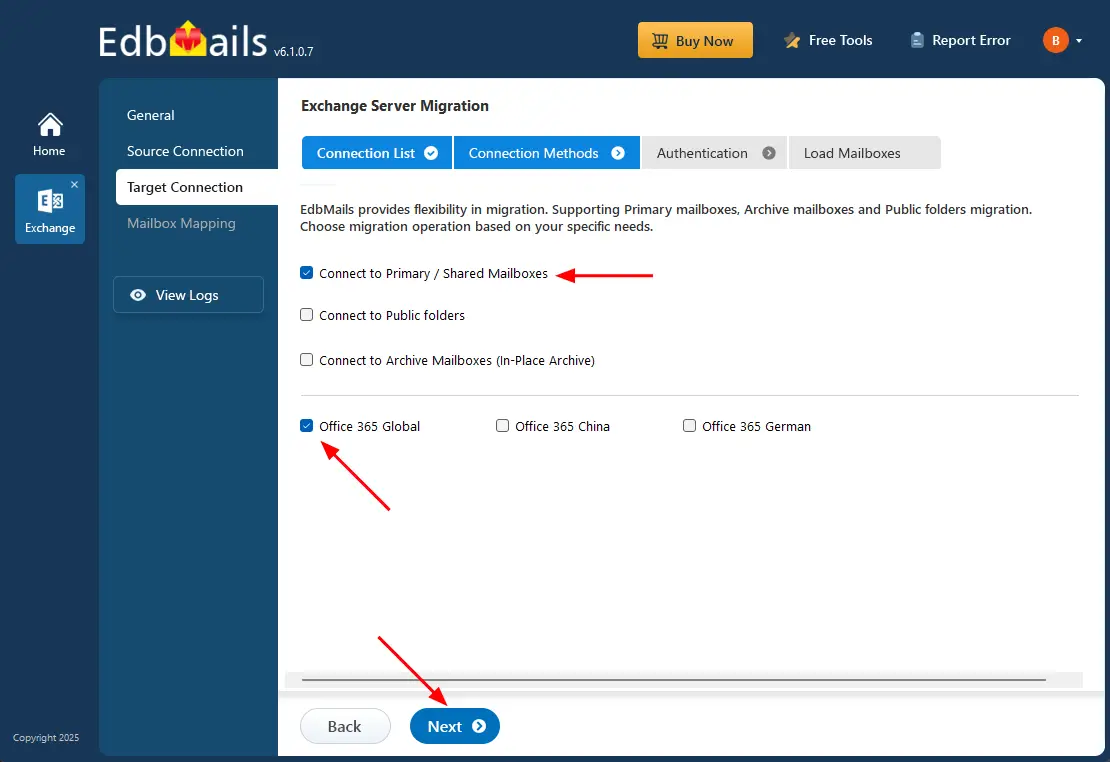
- Click ‘Add New Connection’ to set up a fresh connection to the target Office 365. If you've connected before, choose it from the list and click ‘Connect to Existing’ to continue.
- Select the required connection options and click the ‘Next’ button.
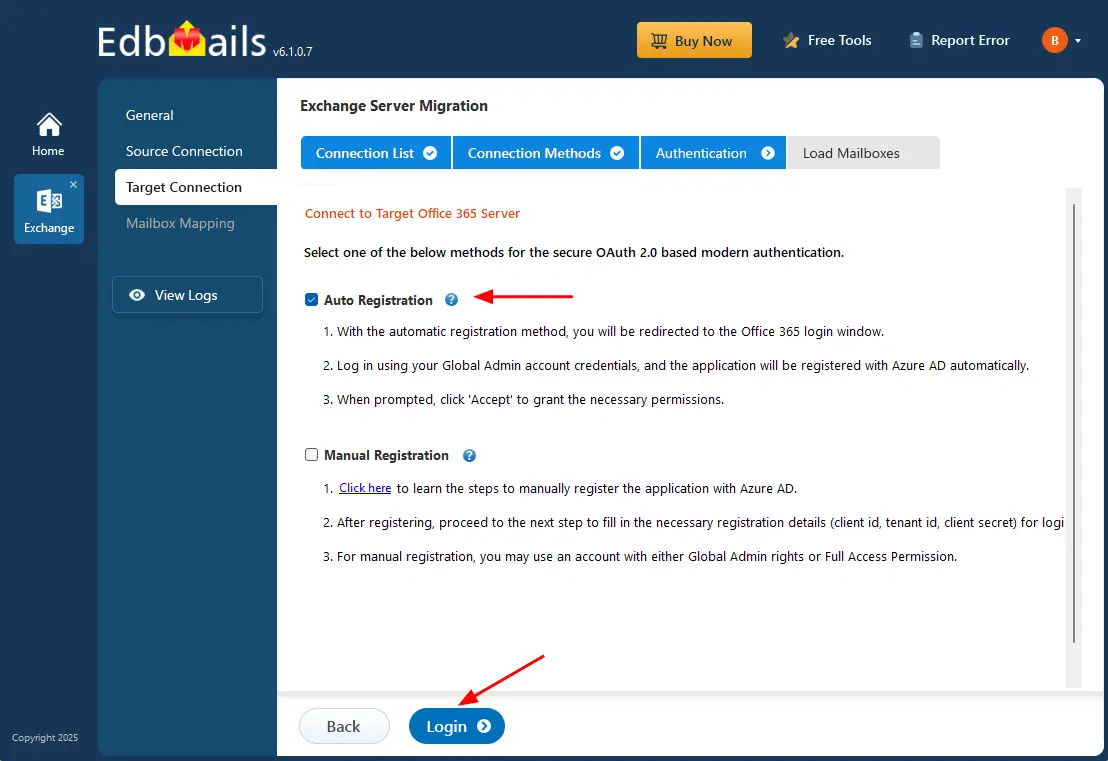
- Select the one of the authentication methods and click the ‘Login’ button to continue.
Connect to Office 365 server using secure modern authentication
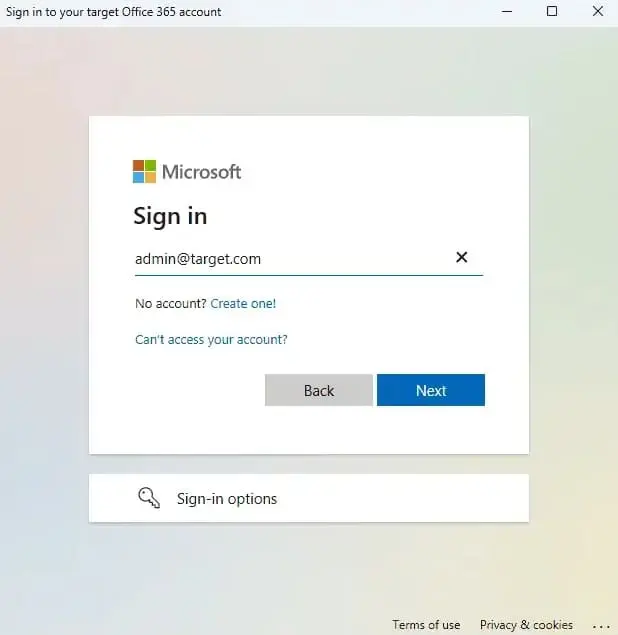
- Authenticate on Microsoft sign-in page.
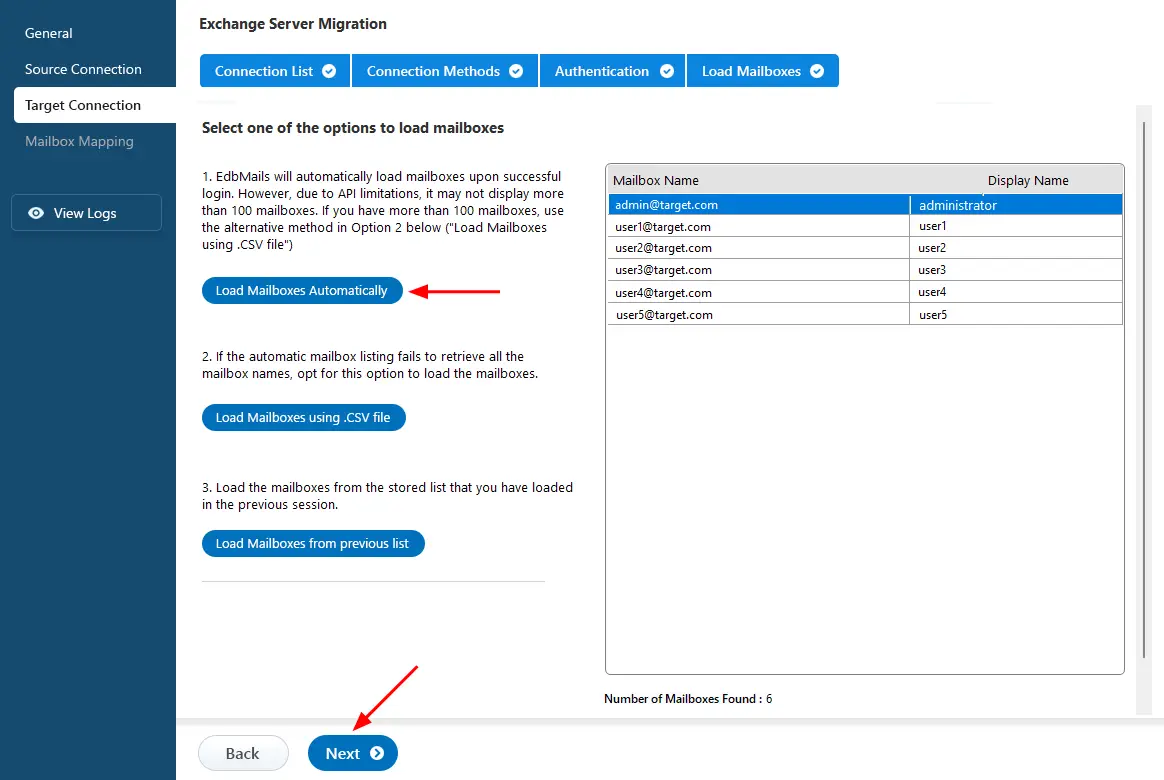
- Select one of the methods to load the mailboxes. You can Select ‘load Mailboxes Automatically’ or load the mailboxes using a CSV file and click ‘Next’.
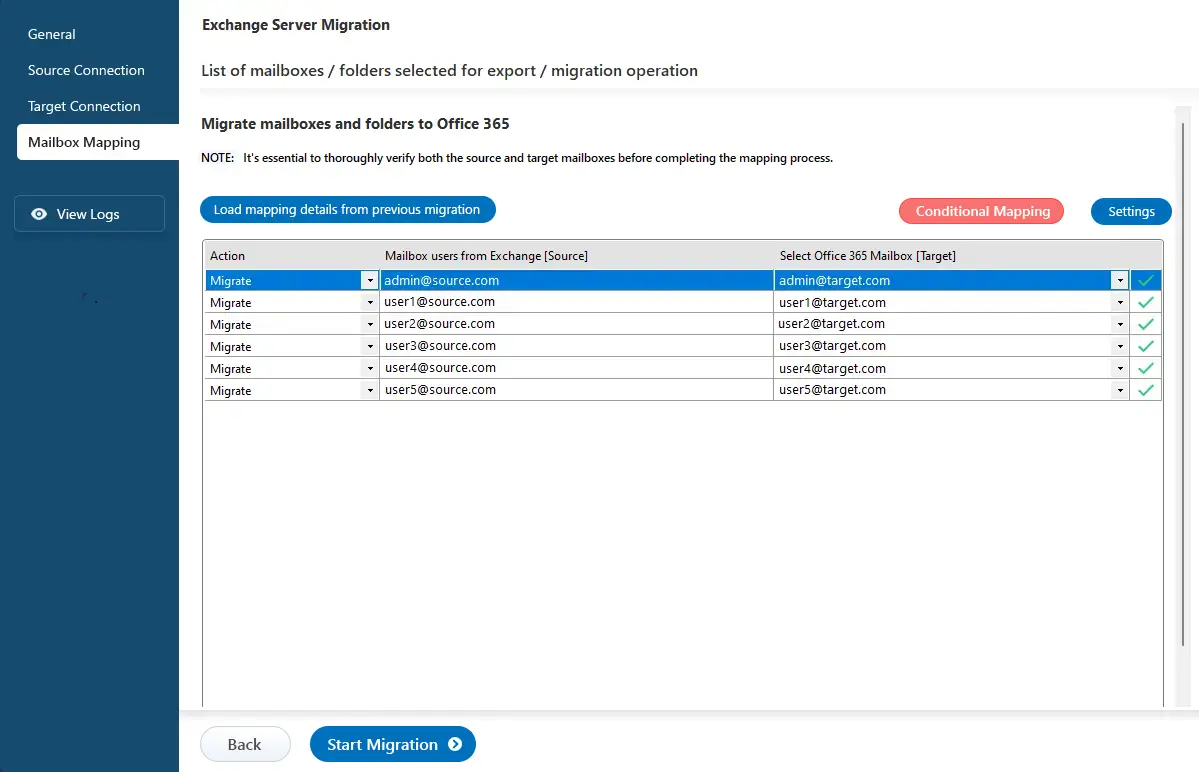
Step 4: Map source and target mailboxes
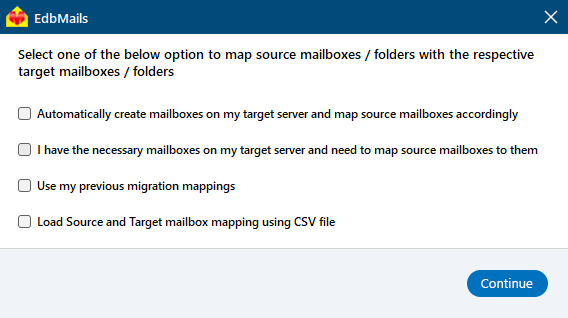
- Choose the required mailbox mapping option
- EdbMails automatically creates mailboxes on your target Office 365 server and assigns the necessary licenses.
Learn more about automatic mailbox creation in the target Office 365 server.
Step 5: Start Exchange to Office 365 migration
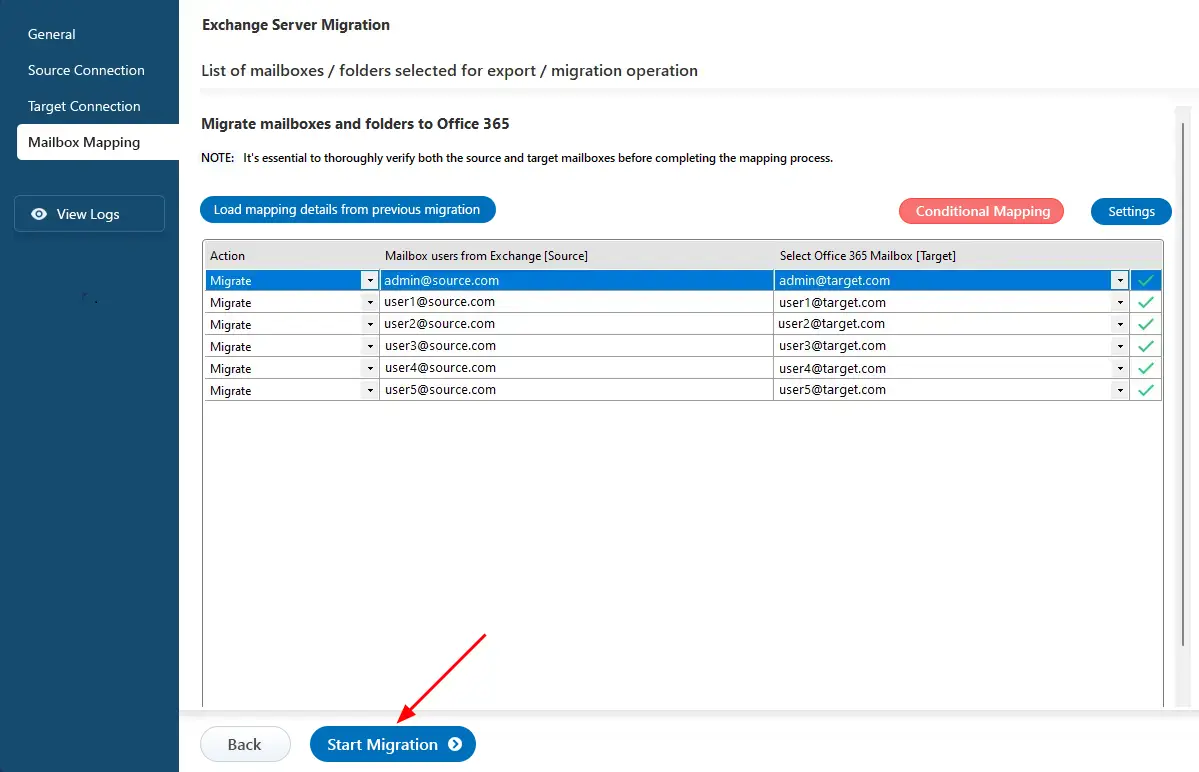
- Click the 'Start Migration’ button to initiate the migration process.
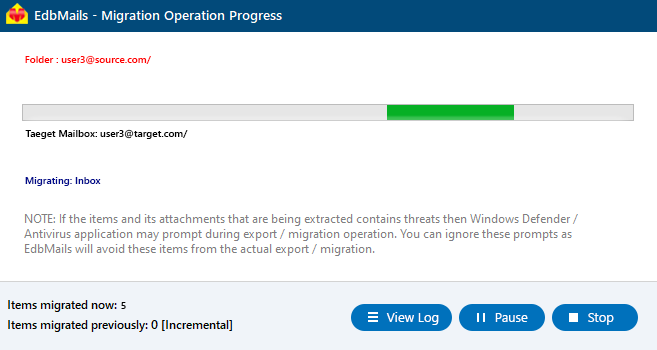
- Track migration progress in progress bar. After migration completion, EdbMails prompts to review the migration status. Click the ‘View Logs’ button to check the migration report. Log in to the target server and verify the migrated items.
- You can verify the list of migrated folders and mailbox items with EdbMails text-based migration log report.
- Login to your target Office 365 server and verify the migrated items.
Exchange to Office 365 post migration tasks
Exchange to Office 365 migration trouble-shooting guide
Benefits of EdbMails for Exchange to Office 365 migration
- Supports concurrent mailbox migration that enhances performance by allowingmultiple mailboxes to be transferred simultaneously.
- Offers incremental migration that boosts migration efficiency bytransferring only new and modified data during subsequent migration operations
- Support for migrating Exchange server 2007, 2010, 2013, 2016 and 2019
- Easy to use software without any PowerShell scripts.
- Keeps source and target servers data intact
- Migrates Exchange Public folders,
- Cost-effective Exchange to Office 365 migration software.
- Automatic mailbox mapping between Exchange server and Office 365.
- Secure modern authentication for Office 365.
- Granular brick-level technology for selective mailbox and mail item migration.
- Free 24x7 tech support to assist with the migration operation.
Additional resources:
- EdbMails Exchange migration software
- Exchange to Exchange migration
- Exchange to IMAP migration
- Export Exchange mailbox to PST
- Import bulk PST files into Exchange server
- Exchange 2010 to Office 365 migration
- Exchange 2013 to Office 365 migration
- Exchange 2016 to Office 365 migration
- Exchange 2019 to Office 365 migration


