Gmail to Office 365 Migration
As your organization expands, Gmail’s basic features like email, calendars, contacts, and spam protection may fall short for enterprise-level collaboration. Microsoft 365 (Office 365) provides a complete productivity suite that includes Outlook, Word, Excel, Teams, and OneDrive - designed to improve communication, teamwork, and secure file management. With robust security features and mailbox storage of up to 100GB per user on Enterprise plans, Office 365 offers a scalable and reliable platform for growing businesses.
While Gmail to Office 365 migration can involve challenges like data mapping, compatibility issues, and possible downtime, the right migration tool can make the process smoother and keep your data secure.

EdbMails IMAP migration tool allows a smooth migration from Gmail to Office 365, securely moving emails, folders, and attachments while maintaining complete data integrity. You can migrate one mailbox or multiple mailboxes at the same time, saving considerable migration time. With support for secure modern authentication in Office 365, the tool ensures a safe and compliant migration process.
Features like pause and resume, combined with automatic mailbox mapping, give you complete control and reduce manual work by aligning Gmail mailboxes with their corresponding Office 365 mailboxes.
Gmail to Office 365 Migration Checklist
Here is a detailed migration checklist for moving from G Suite (Google Workspace) to Office 365:
Plan the migration to Office 365
- Clearly identify the scope of migration, including which data, folders, and mailboxes are to be transferred.
- Establish a timeline and costs for the migration.
- Identify potential challenges or obstacles that could occur during the migration process.
- Create a detailed project plan that includes the steps necessary for the migration.
Prepare the target Office 365 environment
- Create and configure all mail accounts in Office 365.
- Ensure that all necessary permissions and access rights have been granted for users to access the data.
- Ensure that each user in Office 365 has the correct license assigned to enable mailbox creation and access.
- Create mail-enabled Public folders and enable the In-Place Archive.
Set up and configure Office 365
- Set up email routing in Office 365.
- Configure email policies and email archiving.
- Configure spam and malware protection.
- Configure email retention policies.
Migrate Gmail to Microsoft 365
- Use EdbMails to migrate all your emails, folders and mailboxes.
- Import Gmail calendars and contacts to Office 365.
- Import other items such as Conversations and Chats.
Post-migration tasks
- Add MX records to direct emails to Office 365.
- Test mailbox functionality by sending and receiving emails to ensure the migration was successful.
- Monitor the migration for errors.
- Review the migration and make sure that it's working as expected.
- Update users and stakeholders on the status of the migration.
- Train users on Office 365 and provide them the necessary assistance for the transition.
- Perform regular maintenance tasks, such as backing up data, configuring security settings, and troubleshooting issues.
Gmail to Office 365 Migration Prerequisites
Before you begin Gmail to Office 365 migration operation, it's important to make sure that your system meets the requirements for Office 365.- Step 1: Determine the number of users and create an Office 365 migration plan.
- Before starting the migration, identify the number of user mailboxes you intend to move to Office 365. This will help you select and purchase the most suitable Office 365 plan for your organization.
- Create a plan and schedule for the migration such as migration start and end date, the number of users being migrated, and the specific data that will be migrated.
- Step 2: Enable two-step verification and create app password in Gmail
- Ensure to enable IMAP for Gmail / Gsuite accounts.
- To connect Office 365 with Gmail, you must enable two-step verification and also create an app password for your account.
- Step 3: Evaluate the bandwidth and network requirements
When you migrate from Gmail to Office 365, it's important to take into account the bandwidth and network requirements of the migration operation. The amount of bandwidth and network resources required depends on the number of mailboxes being migrated, the size of the mailboxes, and the migration method being used.
- Connectivity: It's important to ensure that you have a stable connection to migrate all your emails between Gmail and Office 365. See networking roadmap for Office 365 which details the steps to plan and deploy your network for the migration.
- Internet bandwidth: The migration requires a reliable and fast internet connection to transfer the data from Google Workspace to Office 365. See bandwidth requirements for Office 365 migration and also consider the Gmail bandwidth limits at the source.
- Network latency: The network latency should be as low as possible. A latency of less than 150 ms is recommended. See how Microsoft 365 networking is different from IMAP servers.
- Firewall configuration: Make sure that your firewall is configured to allow traffic to and from Office 365 which includes ports that are used for Exchange and Azure AD Connect. See the list of worldwide endpoints for Office 365.
- Testing your network connection: With tools like Microsoft Remote Connectivity Analyzer and Microsoft 365 network connectivity test tool, you can test your existing network.
See best practices for network planning and improving migration performance.
- Step 4: Choose a Microsoft 365 license option that suits your requirements
Microsoft 365 is available as a cloud-based subscription service or as a one-time purchase of a perpetual license. Office 365 has different licensing plans each suited to different user requirements.
It is recommended to thoroughly evaluate the Office 365 business plans and Office 365 enterprise plans to determine which one aligns with your organization's requirements. Alternatively, you can also sign up for a 30-day free trial of Office 365 and test the various plans before making a final decision.
- Step 5: Set up your target Office 365 tenant for the migration
Setting up the target Office 365 for the migration involves creating the tenant and configuring it to receive the migrated data from Gmail.
- Create an Office 365 tenant: Plan for the tenant creation and deployment. See the tenant roadmap for Office 365.
- Sign in to the Microsoft 365 admin center: Go to the Microsoft 365 admin center (https://admin.microsoft.com/) and sign in with your global administrator credentials.
- Customize the tenant settings: After the tenant is set up, you can configure and customize the settings such as email domains, language, and time zone to suit your organization's needs.
- Configure email clients and apps: If you want to install Office 365 apps and Outlook, see system requirements for Microsoft 365. Because Office 365 is a cloud based solution, it is also important to learn where your Microsoft 365 customer data is stored.
- Set up Office 365 services: Besides email, you may want to set up additional services such as SharePoint, OneDrive, Teams and OneNote.
- Establish data retention policies: With Office 365, you have the ability to retain data in accordance with compliance and legal requirements. Set up data retention policies to meet your organization's compliance needs, and if necessary configure retention policies for specific mailboxes or groups of users
- Step 6: Add and verify the custom domain on Office 365
If you have a custom email domain from your hosting provider (such as GoDaddy, Cloudflare, AWS) to which you want to migrate and receive emails, you must add and verify the domain on Office 365. This will enable you to use your own domain name (such as example.com) for your email addresses and other Office 365 services.
To set up your custom domain, follow these steps:
- Verify that you own the domain by adding a TXT record to your DNS configuration. If you have your domain registered with GoDaddy, follow the instructions to connect your DNS records at GoDaddy to Microsoft 365.
- Add a new domain to your Office 365 tenant. You can use an existing domain that you own or purchase a new one. The domain is used to access your Office 365 services.
- Update your DNS records to point to Office 365. This step is required to ensure that your email is delivered to the correct mailbox. You can also perform this step at the end after the migration is complete.
- Step 7: Create mailboxes and mail-enabled Public folders
Before migrating from Gmail to Office 365, make sure to create mailboxes for your users and assign the appropriate licenses. You can choose to have EdbMails automatically create the mailboxes for you. However, if you prefer to create them manually in the Office 365 Admin Center, follow the links provided below.
- Add Office 365 users and assign licenses
- Add multiple users at the same time to Office 365
- Assign Microsoft 365 licenses to user accounts
If you want to migrate your Google emails to Office 365 Public folder, ensure that you create Public folders on Office 365 and assign permissions and make them mail enabled on Office 365.
- Create Office 365 Public folder and assign admin permissions
If you're migrating Gmail to Office 365 archive mailboxes, make sure to enable the In-Place Archive feature
- Enable In-Place Archive mailboxes in Office 365
- Step 8: Configure Office 365 to send and receive large messages
Follow the steps to increase the message size on Office 365 to 150MB
- Step 1: Determine the number of users and create an Office 365 migration plan.
Step-by-Step Guide for Gmail to Office 365 Migration
Step 1: Download EdbMails IMAP migration tool
- Download and install EdbMails on your computer.
- Launch the EdbMails application on your computer.
- Enter your registered email address and password, then click ‘Login’. If you don’t have an account yet, select ‘Start Your Free Trial’ to proceed with the trial version.Note: The Free Trial includes all key features and lets you export up to 30 items per folder. To remove this restriction and export unlimited items, purchase a valid license from the EdbMails website.
Click here to purchase the license from the EdbMails website.
Once the purchase is complete, restart the application and sign in again using the same email address and password used during the purchase to activate the license.

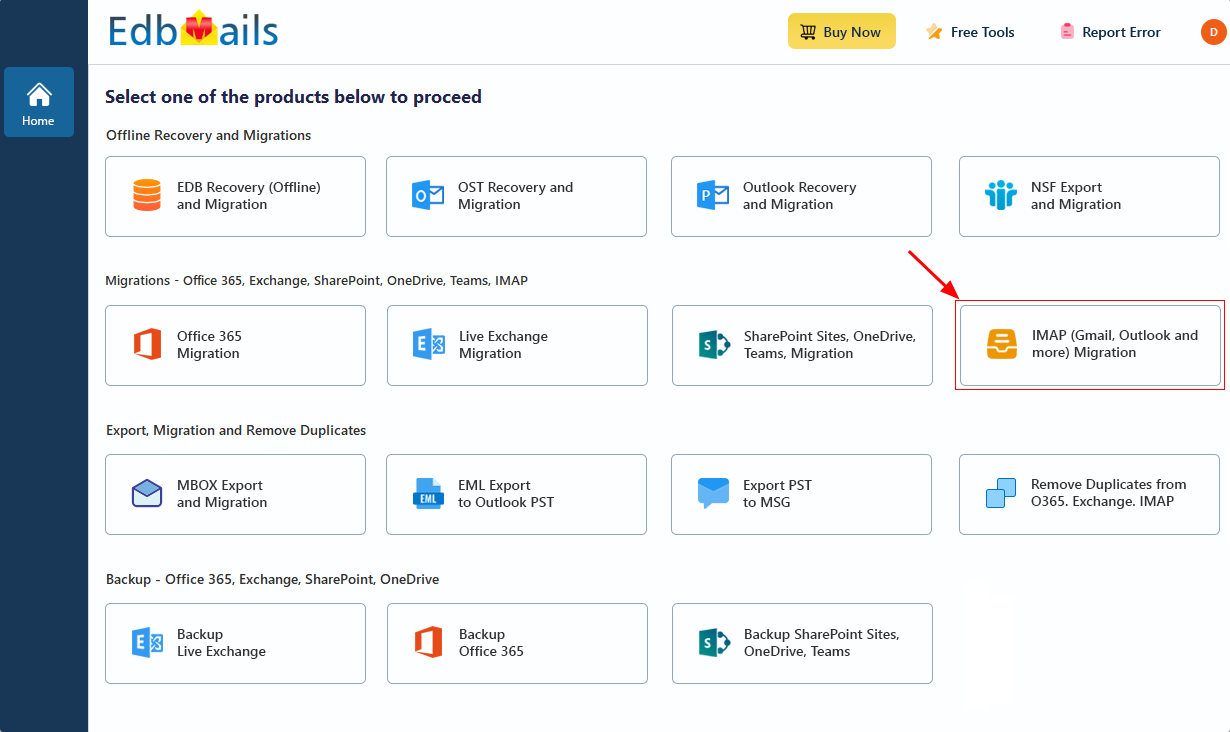
- Select the option ‘IMAP (Gmail, Outlook & more) Migration’
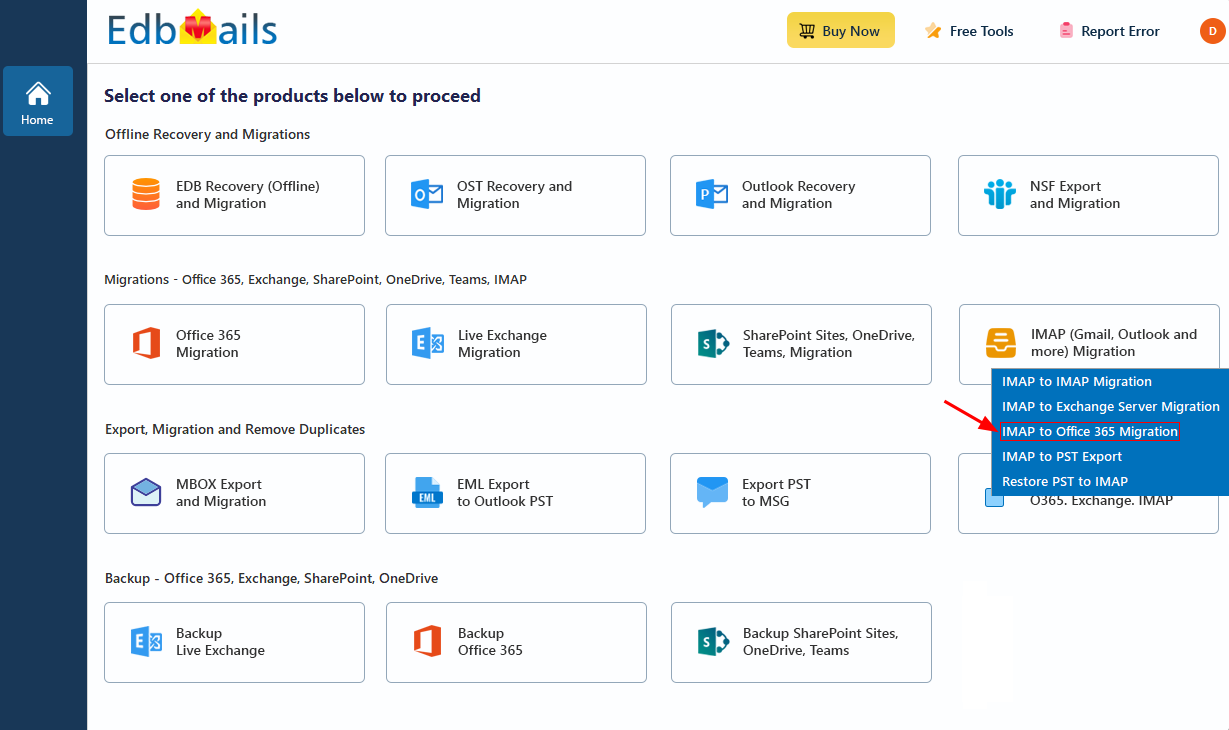
- Select ‘IMAP to Office 365 Migration’.
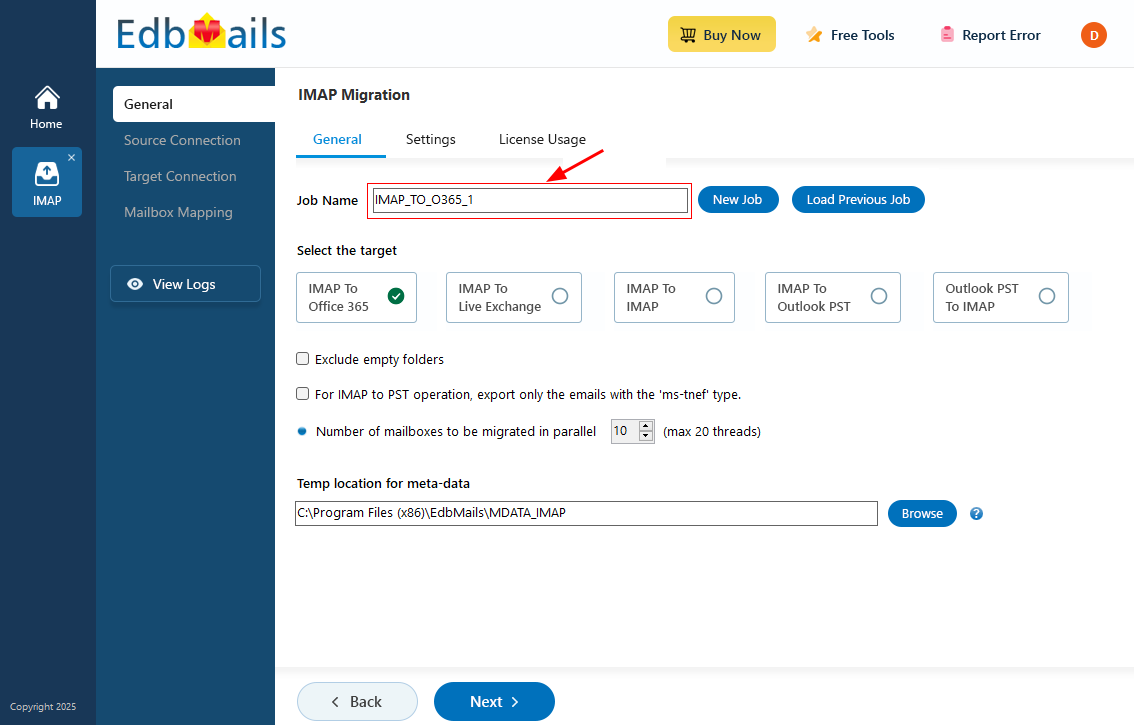
- You can proceed using the automatically assigned default job name or choose ‘New Job’ to rename it according to your preference before continuing with the process.
- Download and install EdbMails on your computer.
Step 2: Connect to Source Gmail Server
- To migrate a single account, select ‘Single User / Account Migration’, choose the suitable connection option such as ‘Connect to IMAP Server’ or ‘Connect to POP3 Server’, and click ‘Next’ to proceed.
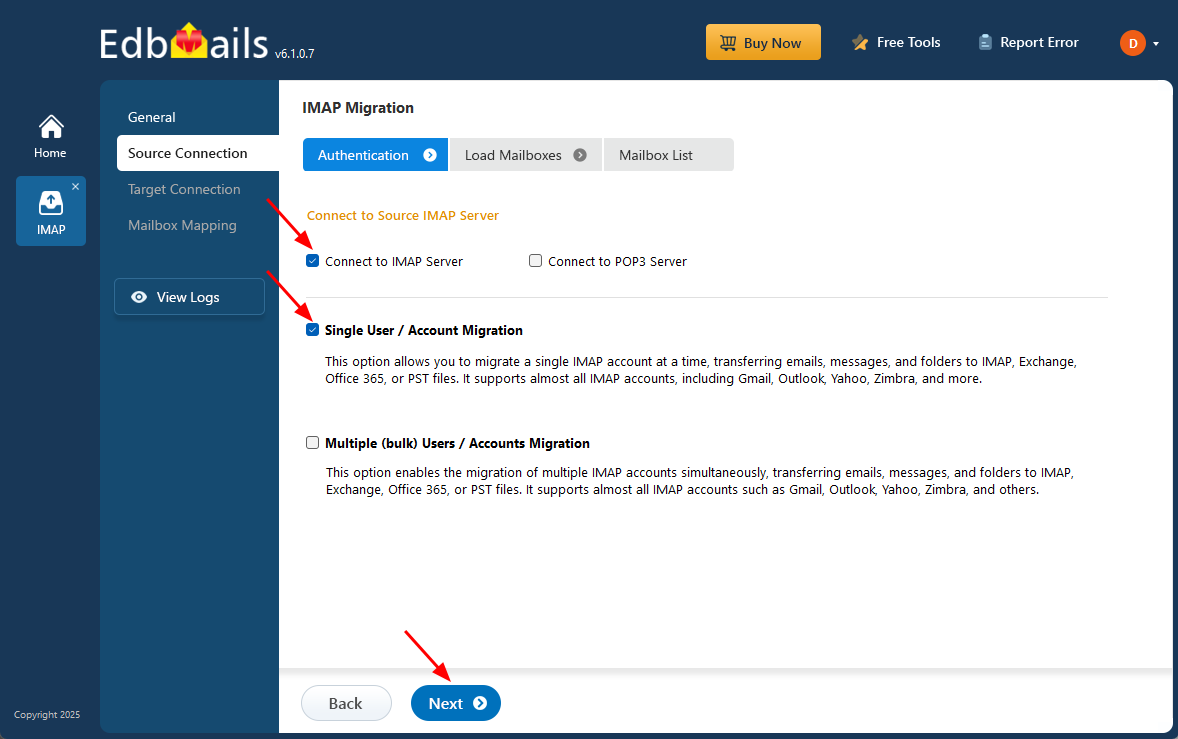
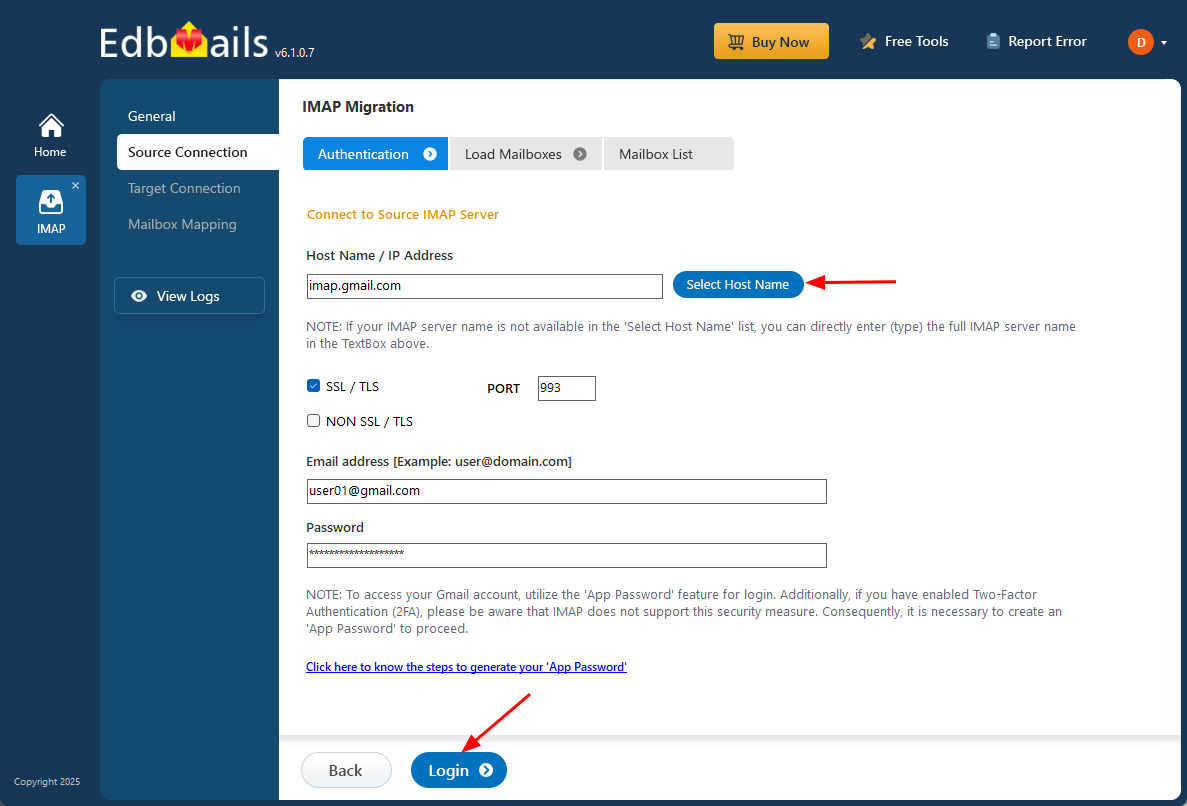
- For a single user login, choose the appropriate IMAP host name (imap.gmail.com) from the list or enter the full IMAP server name manually. Next, enter your email address and password to continue. If you are adding a Gmail account, create an app password and use it instead of your standard account password.
- Click the ‘Login’ button.
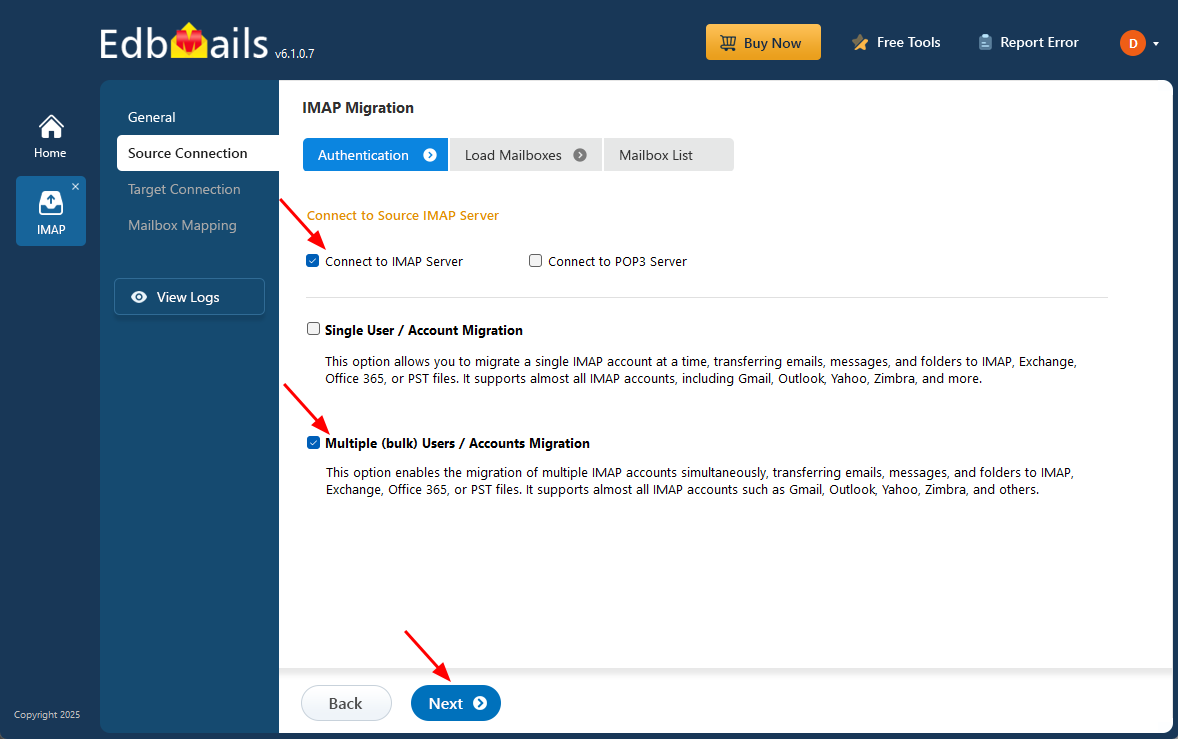
- To migrate multiple mailboxes at once, select ‘Multiple (bulk) Users/Accounts Migration’, choose the suitable connection method such as ‘Connect to IMAP Server’ or ‘Connect to POP3 Server’, and then proceed by clicking ‘Next’.
- Select ‘IMAP Migration CSV File’ to download the ‘Sample.CSV’ template file.
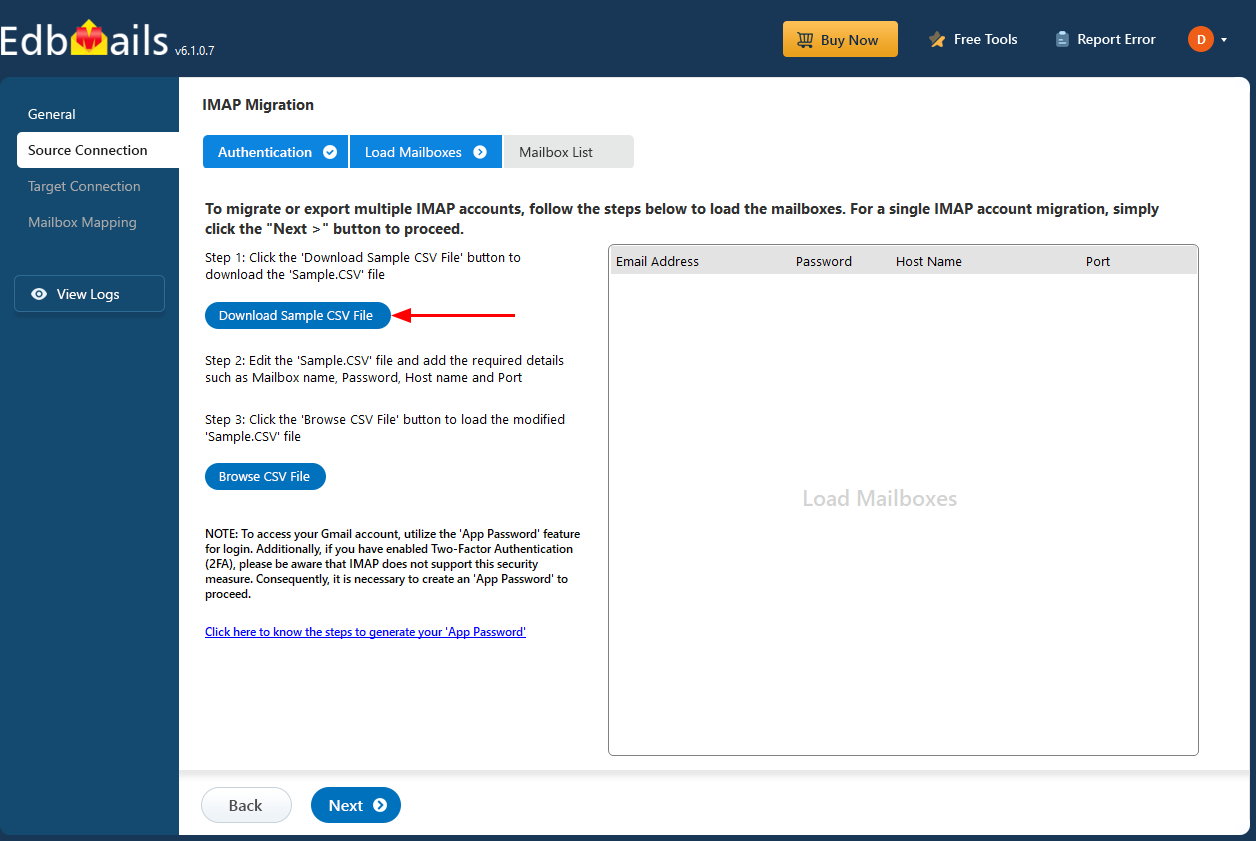
- Update the CSV file with the required details such as email address, password, server host, and port number. Once done, save the file to keep the changes.
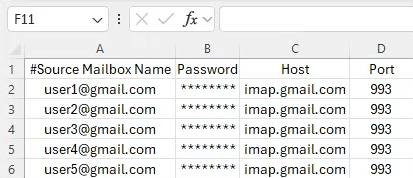
- Close the CSV file and click ‘Load Modified CSV File’ to upload it.
- Then click ‘Next’ to proceed after verifying the listed mailboxes.

- To migrate a single account, select ‘Single User / Account Migration’, choose the suitable connection option such as ‘Connect to IMAP Server’ or ‘Connect to POP3 Server’, and click ‘Next’ to proceed.
Step 3: Select Source Gmail Mailboxes
- Choose the mailboxes or particular folders you wish to migrate and once your selection is complete click ‘Next’ to continue.
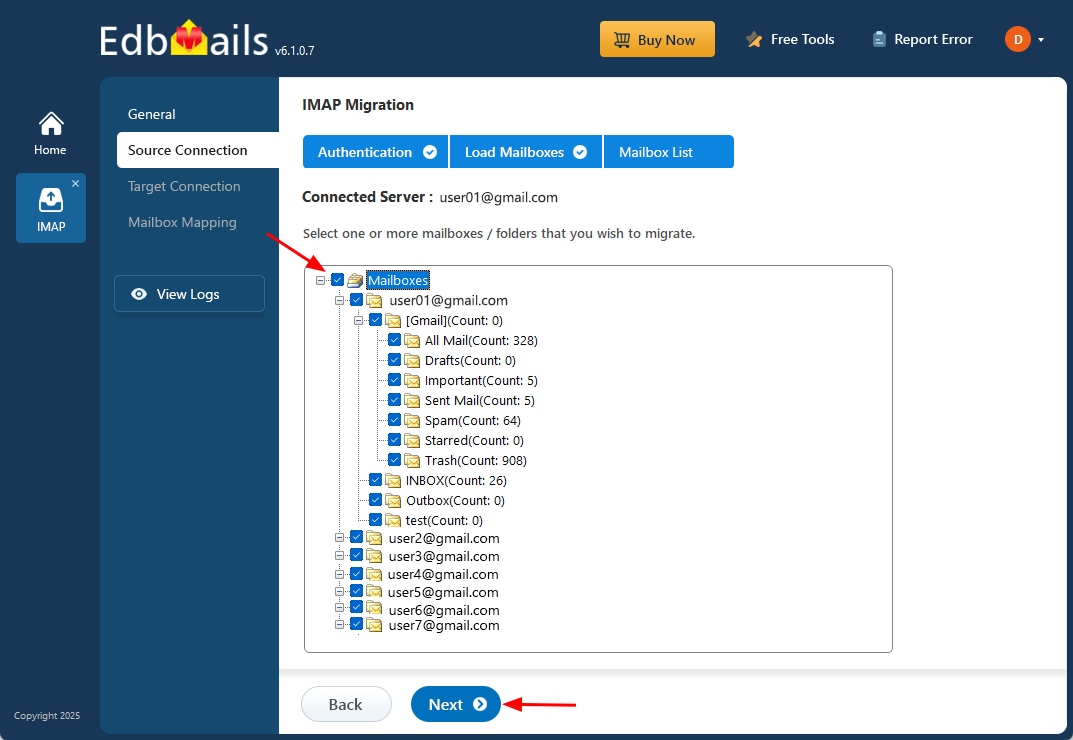
- Choose the mailboxes or particular folders you wish to migrate and once your selection is complete click ‘Next’ to continue.
Step 4: Connect to the Target Office 365 Server
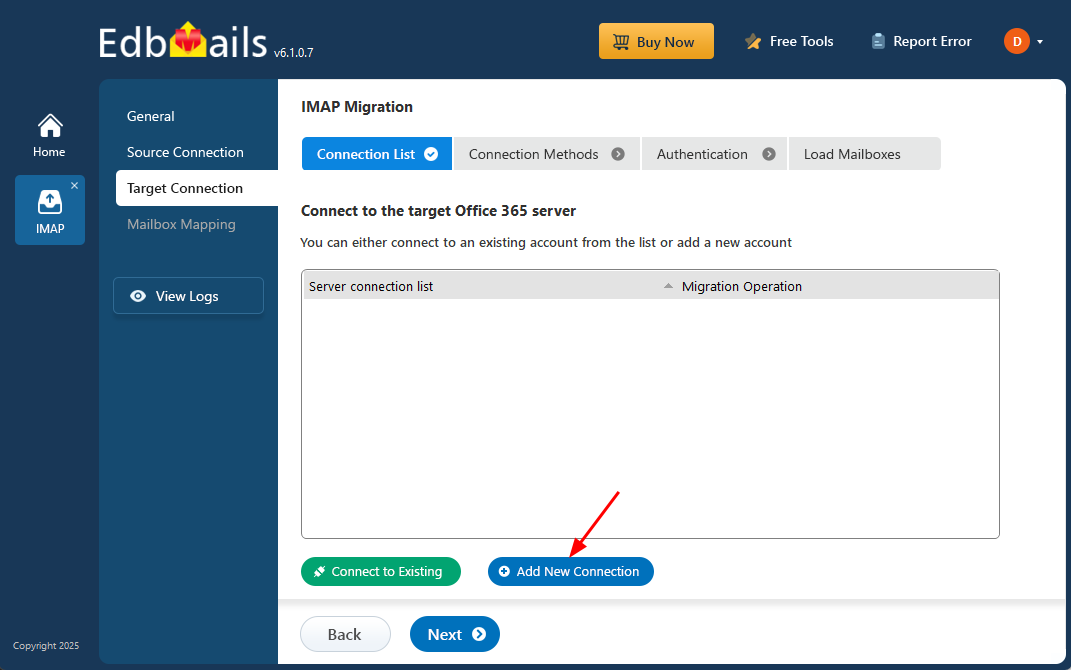
- Select ‘Add New Connection’ to set up a fresh connection with the target Office 365 account. If you have already created a connection earlier, choose it from the list and click ‘Connect to Existing’ to proceed.
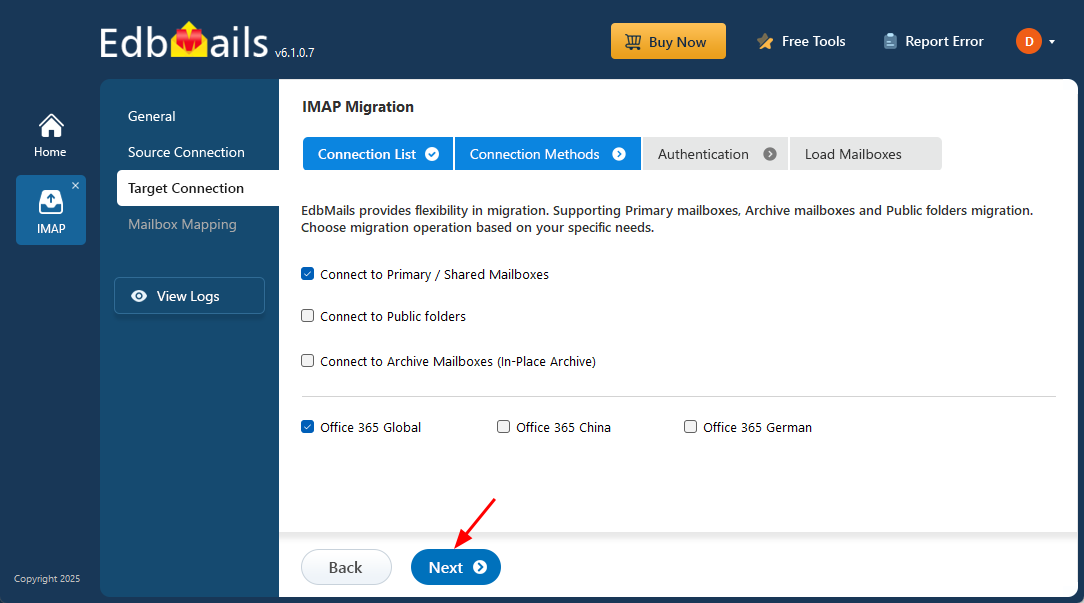
- Select the required connection options and click the ‘Next’ button.
- Choose a preferred authentication method to connect to the target Office 365 server.
- Click the ‘Login’ button to proceed.
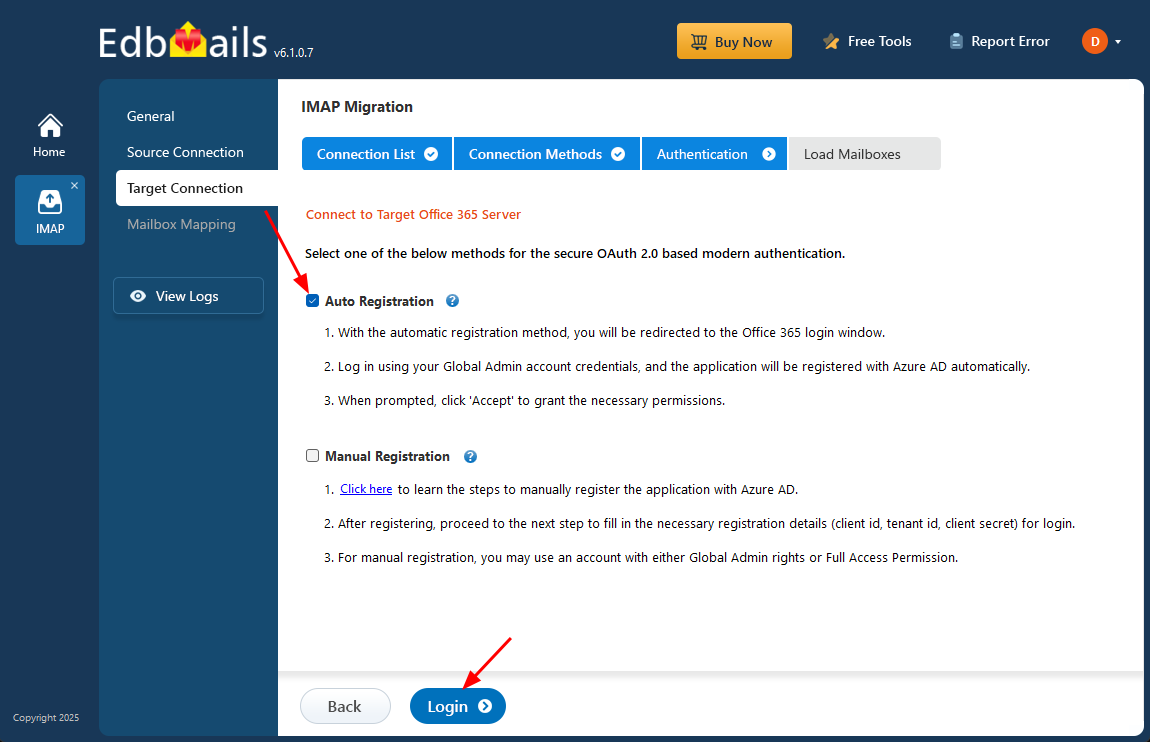
- Authenticate securely using the official Microsoft sign-in page. EdbMails uses modern OAuth 2.0 authentication, ensuring your credentials are never stored or shared.

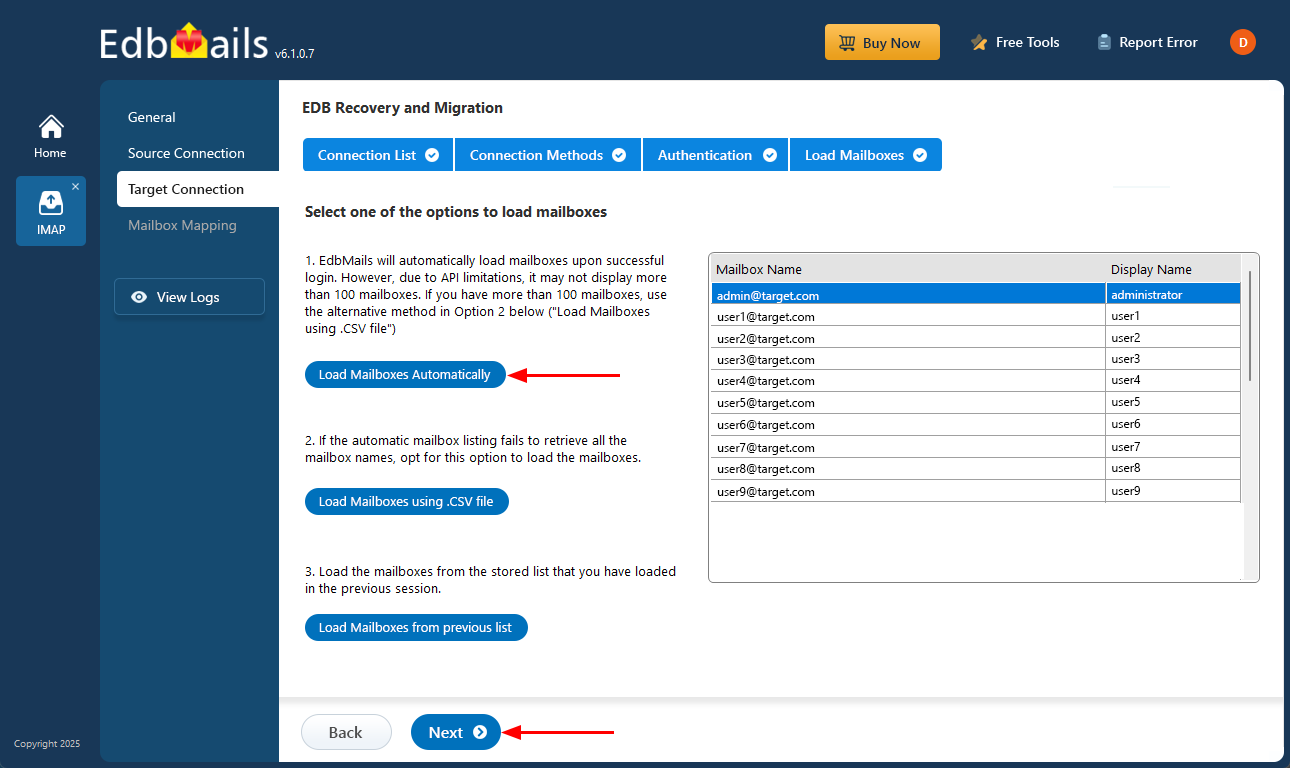
- Select one of the methods to load the mailboxes from the target server. You can Select ‘Load Mailboxes Automatically’, Load Mailboxes using .CSV file or ‘Load Mailboxes from previous list’.
- Because of Microsoft API limitations, this option can retrieve only up to 100 mailboxes. If you need to load more than 100 mailboxes, use the CSV file method.
- Click ‘Next’ to proceed.
- Select ‘Add New Connection’ to set up a fresh connection with the target Office 365 account. If you have already created a connection earlier, choose it from the list and click ‘Connect to Existing’ to proceed.
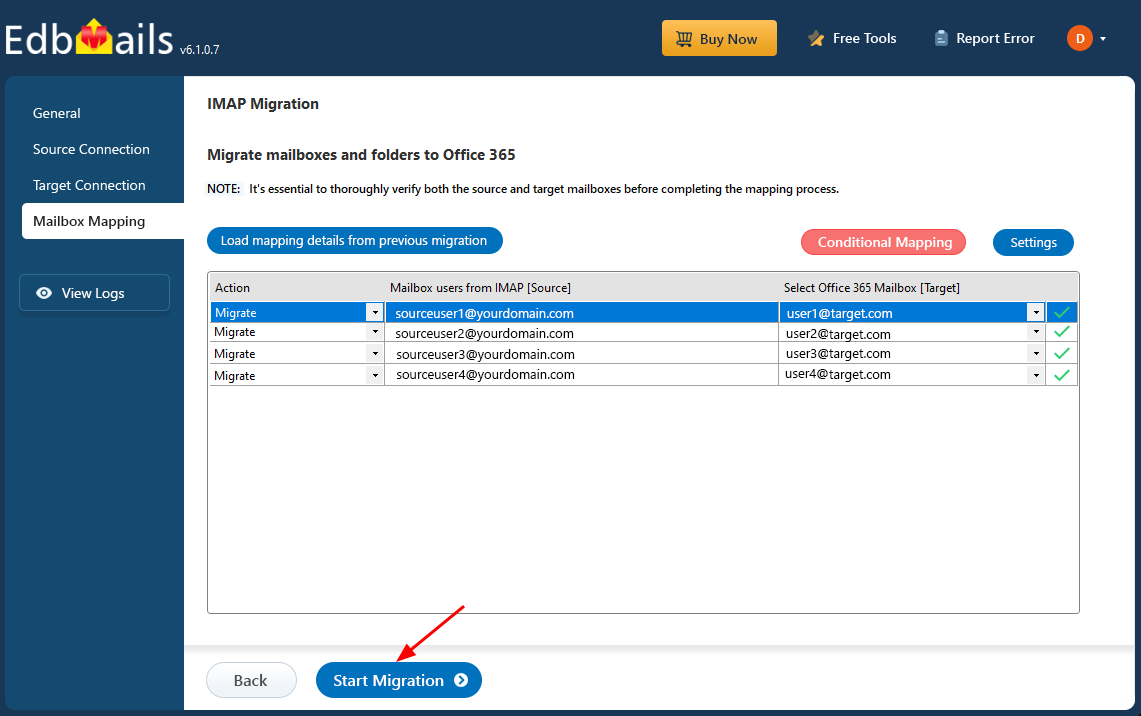
Step 5: Gmail to Office 365 mailbox mapping
- Select the appropriate mailbox mapping option that matches your migration requirements.
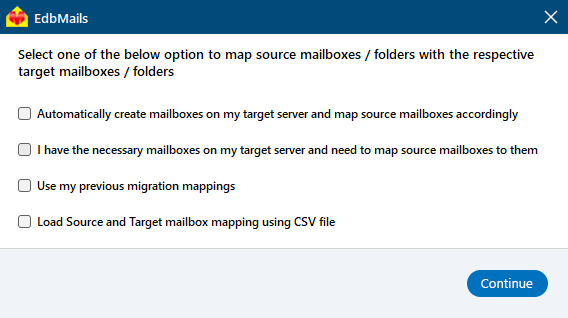
- You can choose the option to let EdbMails automatically create the required mailboxes in the target Office 365 account.
- EdbMails automatically maps source Gmail mailboxes and folders to the target Office 365 mailboxes, making it easy to manage large-scale migrations.
- Select the appropriate mailbox mapping option that matches your migration requirements.
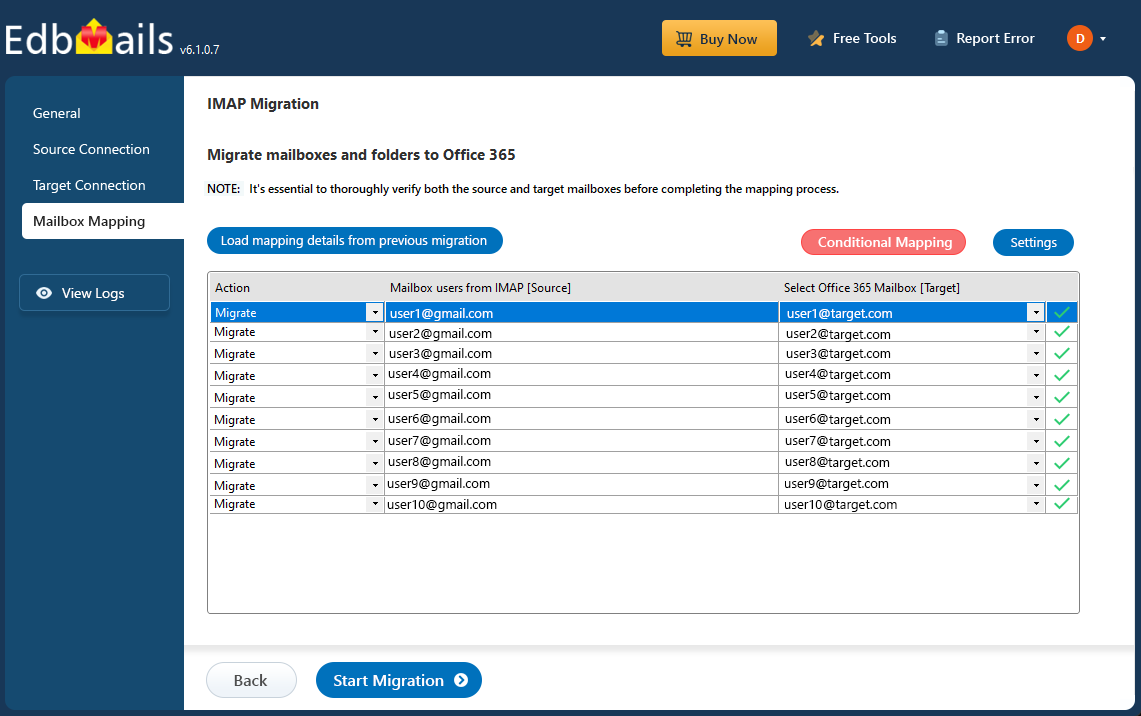
Step 6: Start Gmail to Office 365 migration operation
- After verifying the mailbox mapping, Click the 'Settings' button to personalize your migration.
- Click the 'Settings' button to personalize your migration. This lets you filter the items you want to transfer, whether by a specific date range, keywords in the subject or attachment names, sender or recipient addresses, or whether the messages are read or unread.
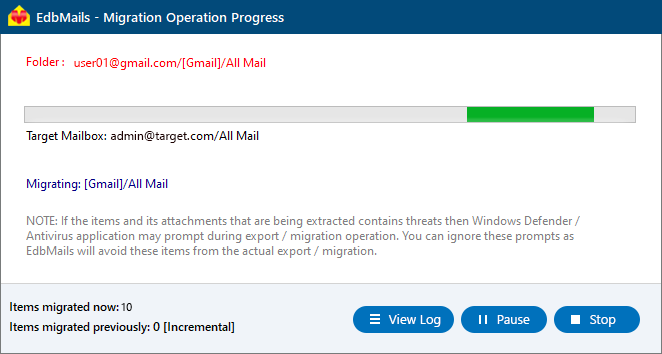
- Click the ‘Start Migration’ to initiate the migration process.
- Once the migration is complete, a confirmation message will appear.
- Click the ‘View Log’ button to open the IMAP Export migration report, where you can review the mailbox migration status, check for any errors or warnings, and see a detailed summary of the migrated data, including the total number of items exported, helping you clearly monitor and assess the entire process.
Gmail to Office 365 Post Migration Tasks
- Step 1: Verify the Gmail to Office 365 email migration
After completing the Gmail to Office 365 migration, verify that all of your mail data, including messages, attachments, and folders, have been migrated successfully. Verify if all of your calendars and contacts have been imported.
Perform the following tasks in Microsoft help page to verify a successful mailbox migration to Microsoft 365.
- Step 2: Update MX records to point to Office 365 and send a test email
Update your MX records to direct incoming emails to the Office 365 server. Keep in mind that it can take 48 to 72 hours for these changes to fully take effect. During this time, any emails sent to your domain on Gmail will start being delivered to the Office 365 mailboxes.
- Test the email flow by sending and receiving emails to ensure everything is working as expected.
- Test the sending and receiving of messages between internal and external users.
- Test the sending and receiving of messages with large attachments.
- Step 3: Reset and create new password for all users on Office 365
Ensure that the latest version of Microsoft Office and Outlook is installed to avoid compatibility issues with Office 365. If Outlook has trouble connecting to mailboxes, create a new profile for each user in your domain.
See how to add email account to Outlook on PC and email account on Mac
- Step 4: Create a new Outlook profile for users in the new domain
Ensure you have the latest version of Microsoft Office and Outlook installed to avoid compatibility issues with Office 365. Configure the Outlook profile for each user in your domain if Outlook has problems connecting to your mailboxes. See how to add email account to Outlook on PC and email account on Mac
Step 5: Train your users to become familiar with Office 365
- Provide training for users on the new Office 365 environment, including new features and apps.
- Train users on how to access and use the new email, calendar, and contacts features.
- Provide training on how to access and use other Office 365 tools such as OneDrive, SharePoint, and Teams. See Microsoft 365 help documentation.
- Step 1: Verify the Gmail to Office 365 email migration
Troubleshooting Guide for Gmail to Office 365 Migration
For troubleshooting, visit Knowledge Base.
For more queries, check Frequently Asked Questions or contact support.
Benefits of EdbMails for Gmail to Office 365 Migration
- User-friendly migration tool
EdbMails offers an intuitive interface that requires no technical expertise, allowing users to migrate emails from Gmail to Office 365 easily. Its simple step-by-step process ensures a seamless experience for both personal and business users.
- Data consistency assurance
EdbMails guarantees perfect data consistency during Gmail to Office 365 migration, ensuring that emails, attachments, folders, and labels are transferred without any loss or alteration. This ensures the integrity of your data remains intact throughout the process.
- No size limitations for large mailboxes
EdbMails allows you to transfer large mailboxes from Google Workspace to Office 365 without encountering size restrictions. You can effortlessly move extensive mailbox data without worrying about capacity or performance issues.
- Advanced include/exclude filters
With EdbMails’ advanced filtering options, you can easily manage large batch migrations by selecting specific emails, folders, or items for transfer. This makes it simple to exclude unwanted data, streamlining the process for efficiency.
- Cost-effective and efficient
EdbMails provides a budget-friendly solution for both individual and corporate users, delivering high-quality results without the high cost. It saves time and effort, offering excellent value for efficient email migration.
- Zero downtime during migration
EdbMails guarantees zero downtime during Gmail to Office 365 migration, enabling users to continue accessing and using their mailboxes uninterrupted while the migration runs seamlessly in the background. This ensures minimal disruption and allows business workflows to continue smoothly throughout the migration process.
Frequently Asked Questions (FAQ)
What are the steps for IMAP migration from Gmail to Office 365
Migrating Gmail to Office 365 is a simple 3-step operation with EdbMails
- Step 1: Install EdbMails and connect to your Gmail IMAP server
- Step 2: Select the mailboxes to migrate and connect to the Office 365 server.
- Step 3: Start the migration from Gmail to Microsoft 365
Why migrate from G Suite to Office 365?
The main reasons for migrating from Google Workspace to Office 365 include access to advanced email and calendar features, improved security and compliance, seamless integration with other Office 365 tools such as OneDrive and SharePoint, and the ability to collaborate easily with other users. See common reasons to migrate from G Suite to Office 365.
What are the technical requirements for Gmail to Office 365 migration?
- Before starting the migration, ensure your network infrastructure is fully prepared. This includes verifying that your network is properly configured, sufficient bandwidth is available, and any firewalls or security software do not interfere with the migration process.
- You must have an active Office 365 subscription with a configured Office 365 account for the migration. A Google Workspace (formerly G Suite) account with administrator privileges is required to facilitate the migration.
- Develop a comprehensive migration and backup plan for Office 365. This should include ensuring all necessary email data is backed up and ready for transfer. It is also strongly recommended to conduct a test migration to identify and resolve potential issues before the live migration.
How to configure my email signatures on Office 365?
If you are looking to set up and manage email signatures for Office 365, then you can go with Sigsync centralized email signatures. It is a web-based solution that can help you configure signatures for your entire organization. With Sigsync, you can ensure that the signatures are consistent, up to date and are uniform across all devices and email clients.