


Liquid Web to Office 365 Migration
Liquid Web is a trusted managed cloud and web hosting provider offering services such as dedicated servers, cloud VPS hosting, WordPress hosting, and enterprise hosting along with email, storage, and backup solutions. Its email hosting plans include Standard and Plus (the latter requiring a hosting subscription). With managed services handling maintenance, users can easily access and manage their emails from anywhere. Key features include POP/IMAP support, webmail access, spam and virus protection, Outlook compatibility, and 50 MB attachment support.
While Liquid Web’s email hosting is reliable for basic communication, it lacks the advanced collaboration, productivity, and security features offered by Microsoft 365 (Office 365). Office 365 includes 50 GB mailboxes, shared mailboxes, in-place archiving, and integrated apps like Teams, SharePoint, OneDrive, and the Microsoft Office suite, making it a more comprehensive solution for modern business environments. As organizations scale, many choose to migrate from Liquid Web to Office 365 for improved performance, accessibility, and enterprise-grade collaboration.

EdbMails IMAP Migration Tool, a Microsoft-partnered solution, provides a secure and fully automated method for Liquid Web to Office 365 migration. It ensures seamless migration of emails, attachments, and folders while preserving folder hierarchy and metadata. With advanced filtering options, users can selectively migrate data based on date range, subject, sender, or attachments, ensuring that only relevant information is moved.
EdbMails incremental migration avoids duplicate items, automatic mailbox mapping for accuracy, and Microsoft’s modern authentication for secure access. By eliminating manual configurations and reducing migration time, EdbMails guarantees a safe, efficient, and compliant email migration from Liquid Web to Office 365 with full data integrity and zero downtime.
User Query
"We use Liquid Web for hosting and would like to migrate our emails from Business email to Office 365." We looked for solutions but found it difficult to comprehend the migration. Could someone please simplify the steps for us or point us in the right direction so that we can safely transfer all of our data? "
Common Challenges & Solutions
- IMAP Login Issues:
Challenge: Login errors occur due to blocked access or incorrect credentials.
Solution: EdbMails supports app-passwords and OAuth 2.0, ensuring secure and successful authentication.
- Throttling:
Challenge: Servers may slow or interrupt transfers during heavy data loads.
Solution: EdbMails has an auto-resume mechanism that continues migration from the last synced point without data loss.
- DNS Propagation Delays:
Challenge: After updating MX records, mail flow may take time to route correctly.
Solution: Verify DNS updates using public DNS checkers to ensure proper mail delivery.
- IMAP Login Issues:
Liquid Web to Office 365 Migration Planning
Before beginning your Liquid Web to Office 365 migration, it's essential to create a detailed plan to ensure the safety of your data. A well-thought-out plan helps save time and provides a clear roadmap for the entire process. Below is a checklist of key considerations to help guide your migration.
- Ensure that you have administrator access to both Liquid Web and Office 365 accounts.
- Keep your Liquid Web email's IMAP connection information handy.
- Before beginning the migration, make a complete backup of all your mailboxes.
- Make a list of what you want to migrate and what you want to leave behind.
- Remove unwanted and unnecessary mailboxes from the source.
- Request that your users save or export large attachments to their local storage.
- Consider whether you want to keep the Liquid Web domain or get a custom domain for your email.
- Communicate all of these changes to your end users, stakeholders and keep them updated.
- Perform a pilot migration to ensure everything works as expected.
- After you complete the migration, allow enough time for testing and verification.
- Add the MX records on Office 365 and configure Outlook for all users.
Pre migration activities for Liquid Web to Office 365 Migration
- Create a list of users in a CSV file, which you want to migrate from Liquid Web.
- Find the name of your source email server from an email client
- Purchase a suitable Office 365 licensing plan. You can also sign up for a 30 day free trial and decide to go with a suitable one later. Compare Office 365 business plans and Compare Office 365 enterprise plans
- Create Office 365 mailboxes and assign licenses to them
- If you plan to migrate your mailboxes to Office 365 Public folders, ensure that you create and configure the Public folder mailboxes on the target server.
- Similarly, if you want to migrate mailboxes to Office 365 In-Place archive, enable them from the admin center.
- If you have a custom email domain from the source which you want to retain and receive emails to, you must add and verify the domain on Office 365.
Steps to add a custom domain to Office 365 and steps to add DNS records to connect your domain.
- Configure Office 365 to send and receive large messages.
Follow the steps to increase the message size on Office 365 to 150MB. See message size limits on Office 365 for more information.
Steps to Migrate from Liquid Web to Office 365
Step 1: Download and Install EdbMails migration software
- Download EdbMails and install the application on any computer operating on.
- Launch the EdbMails application on your computer.
- Enter your registered email address and password, then click ‘Login’. If you’re using EdbMails for the first time, select ‘Start Your Free Trial’ to continue with the trial version.Note: The trial edition includes all major features and lets you migrate up to 30 items per folder. For unlimited migration, you need to buy an IMAP Migration license from the official EdbMails website.Once the purchase is complete, close the application and open it again. Log in with the same email address and password used for the purchase to activate your license successfully.

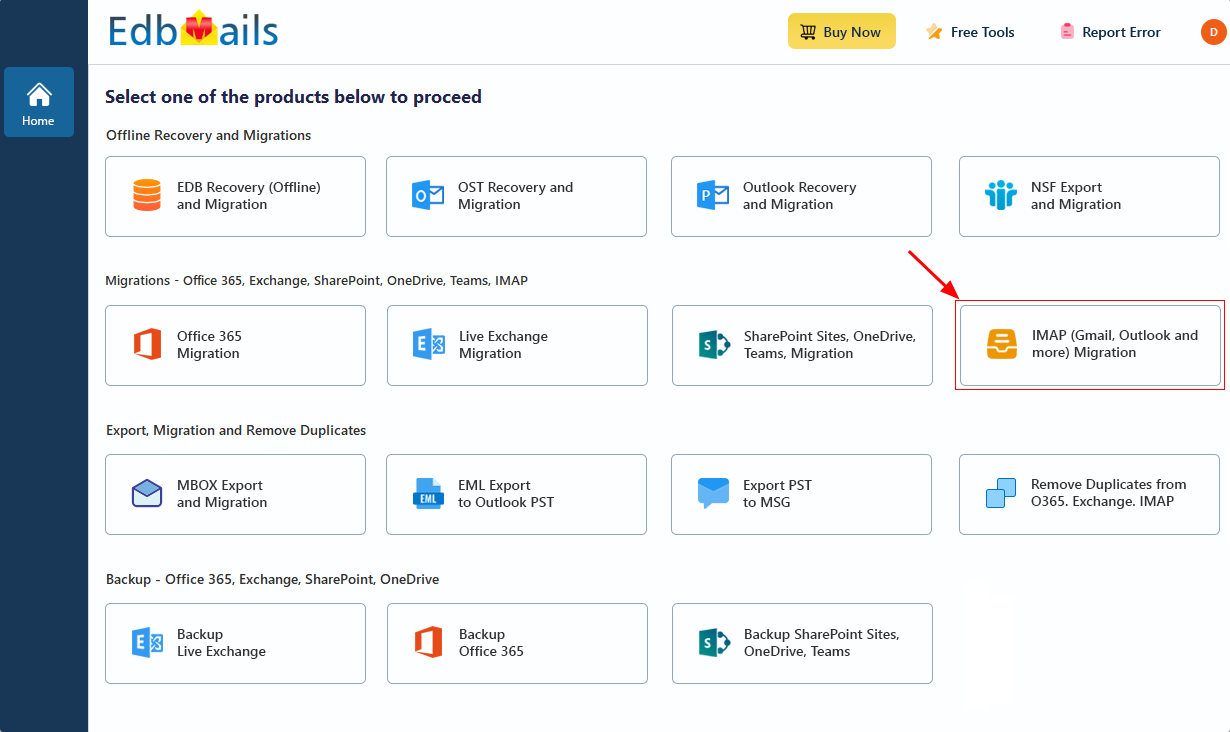
- Select the option ‘IMAP (Gmail, Outlook & more) Migration’.
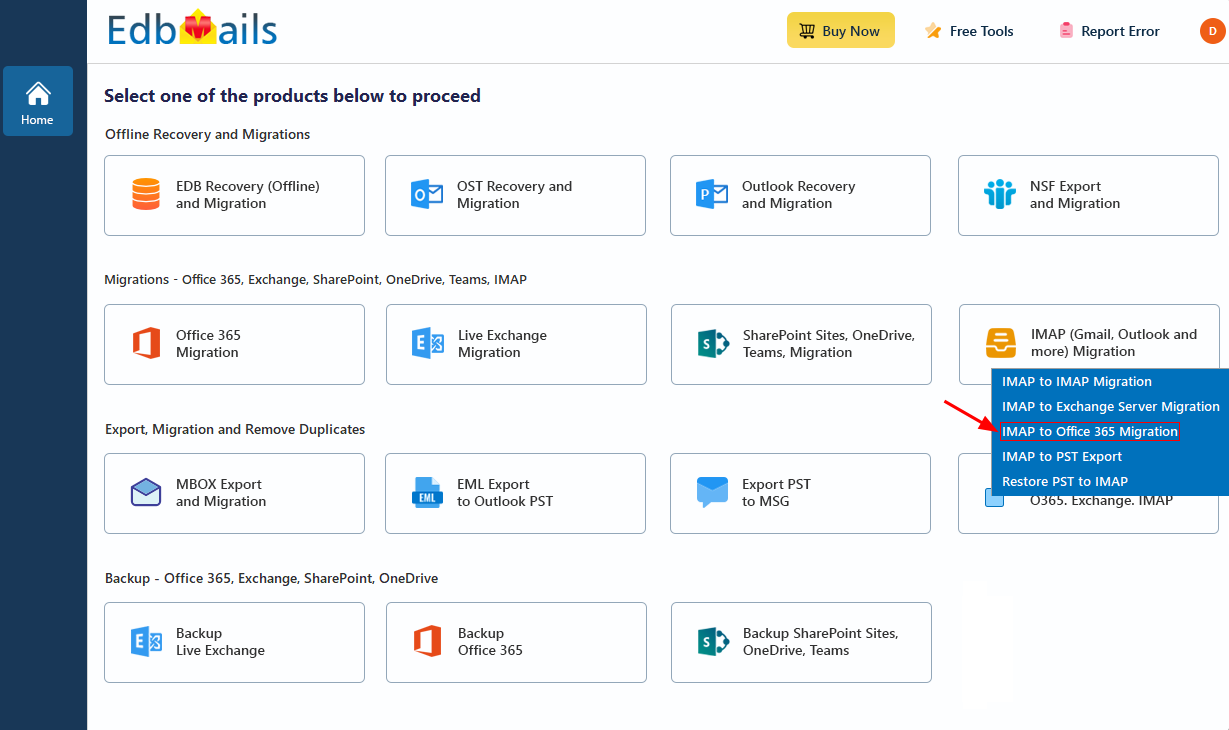
- Select ‘IMAP to Office 365 Migration’.
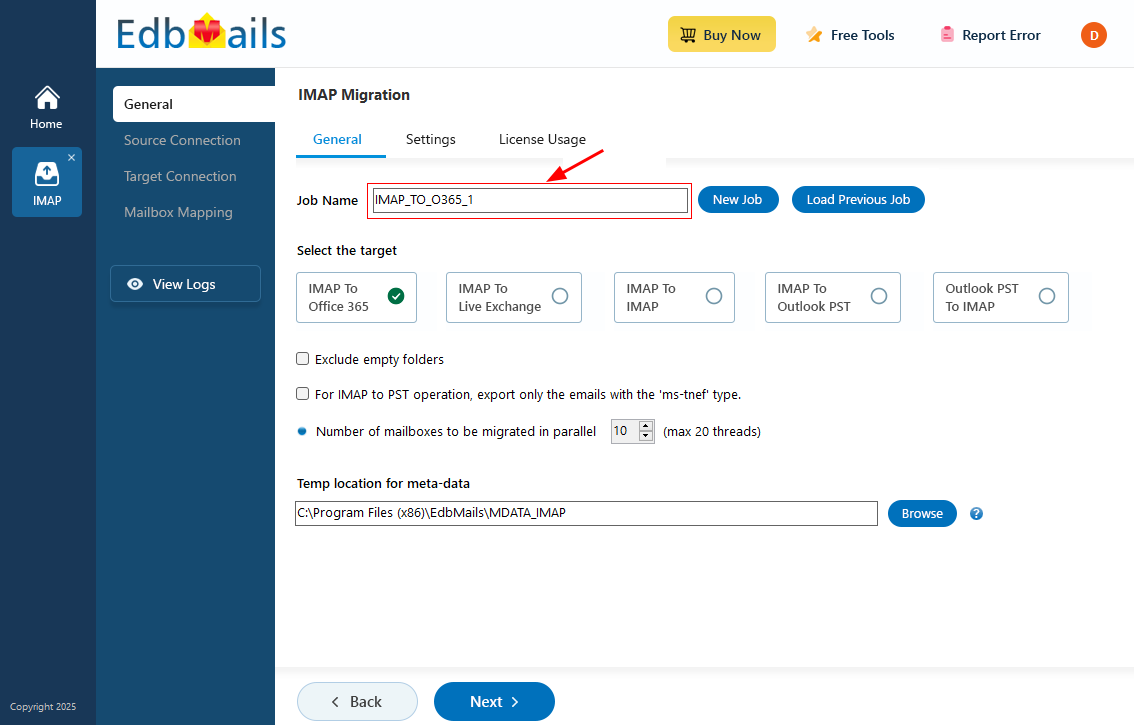
- Use the default job name or select ‘New Job’ to customize the name.
- Download EdbMails and install the application on any computer operating on.
Step 2: Connect to source Liquid Web server
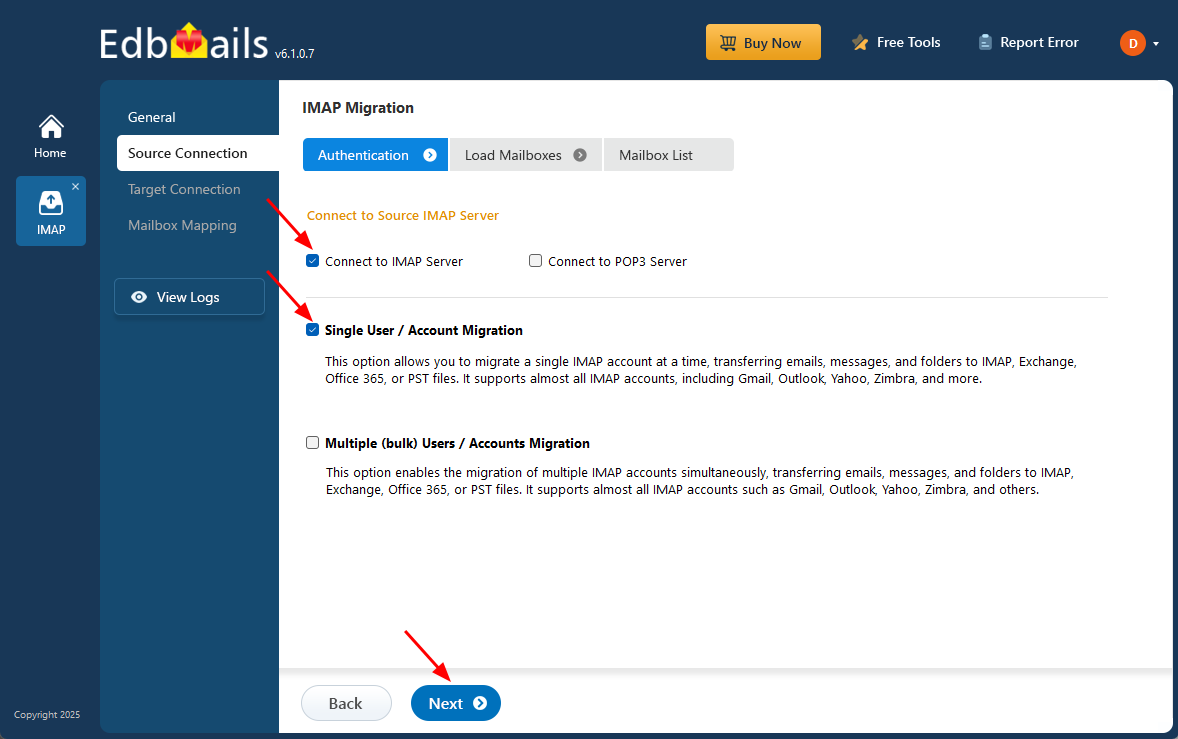
- To migrate a single Liquid Web account, select ‘Single User / Account Migration’, then choose the appropriate connection method such as ‘Connect to IMAP Server’ or ‘Connect to POP3 Server’ based on your setup. Click ‘Next’ to continue with the process.
- In the EdbMails IMAP connection interface, enter the connection details and user credentials as shown. EdbMails is a secure application that does not save any login data.
- Hostname: secure.emailsrvr.com (If you’re using the Business email)
- Port Number: 993 with SSL/TLS selected (For secure IMAP connection)
- Email address and password associated with your account.
- Click the ‘Login’ button.

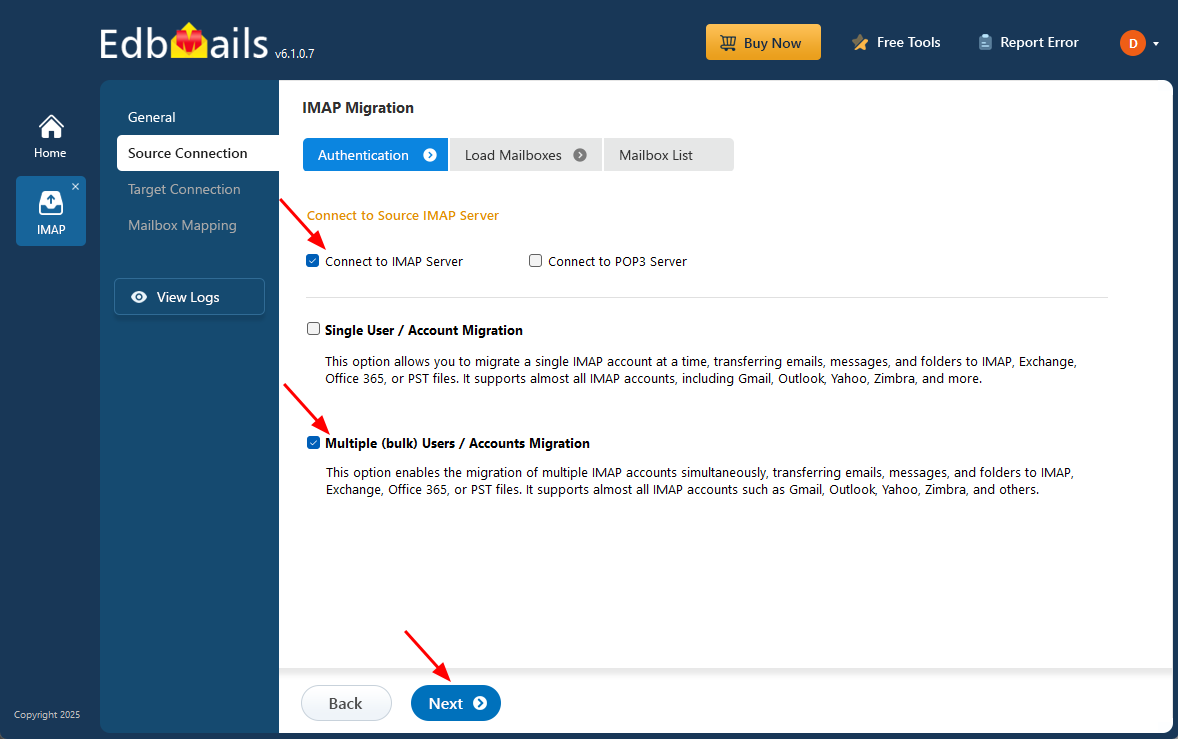
- To migrate multiple mailboxes from Liquid Web to Office 365, choose ‘Multiple (Bulk) Users/Accounts Migration’ and select the appropriate connection option, either ‘Connect to IMAP Server’ or ‘Connect to POP3 Server’.
- Click ‘Next’ to continue.
- Click ‘IMAP Migration CSV File’ and specify the location to save on your local drive.
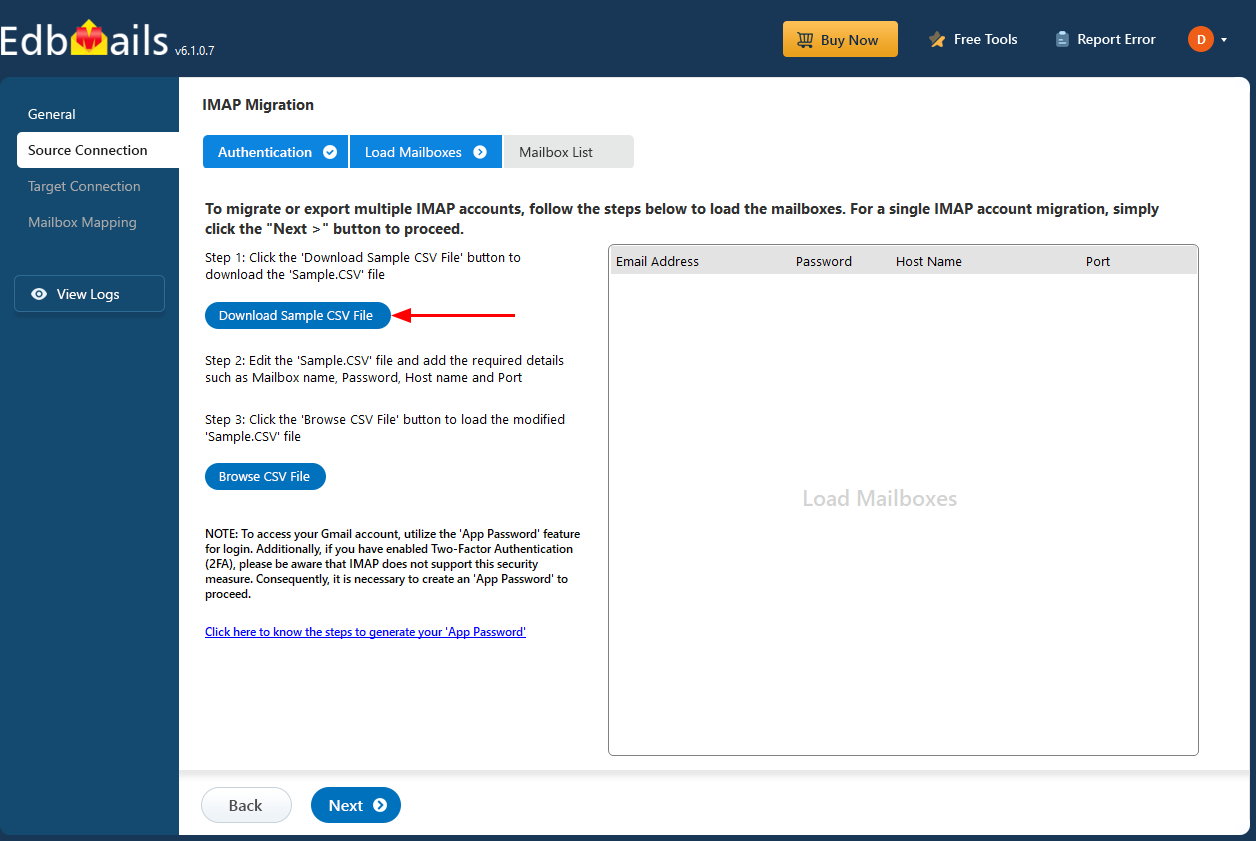
- Open the CSV file and fill in the necessary details, including the email address, password, IMAP server hostname, and port number for each mailbox. After completing the entries, save the CSV file and close.

- Now, click the 'Load Modified CSV File' button, open the CSV file and click ‘Next’ to proceed

- To migrate a single Liquid Web account, select ‘Single User / Account Migration’, then choose the appropriate connection method such as ‘Connect to IMAP Server’ or ‘Connect to POP3 Server’ based on your setup. Click ‘Next’ to continue with the process.
Step 3: Select source Liquid Web server mailboxes
- Select the mailboxes or specific folders you want to migrate, then click ‘Next’ to proceed with the migration process.
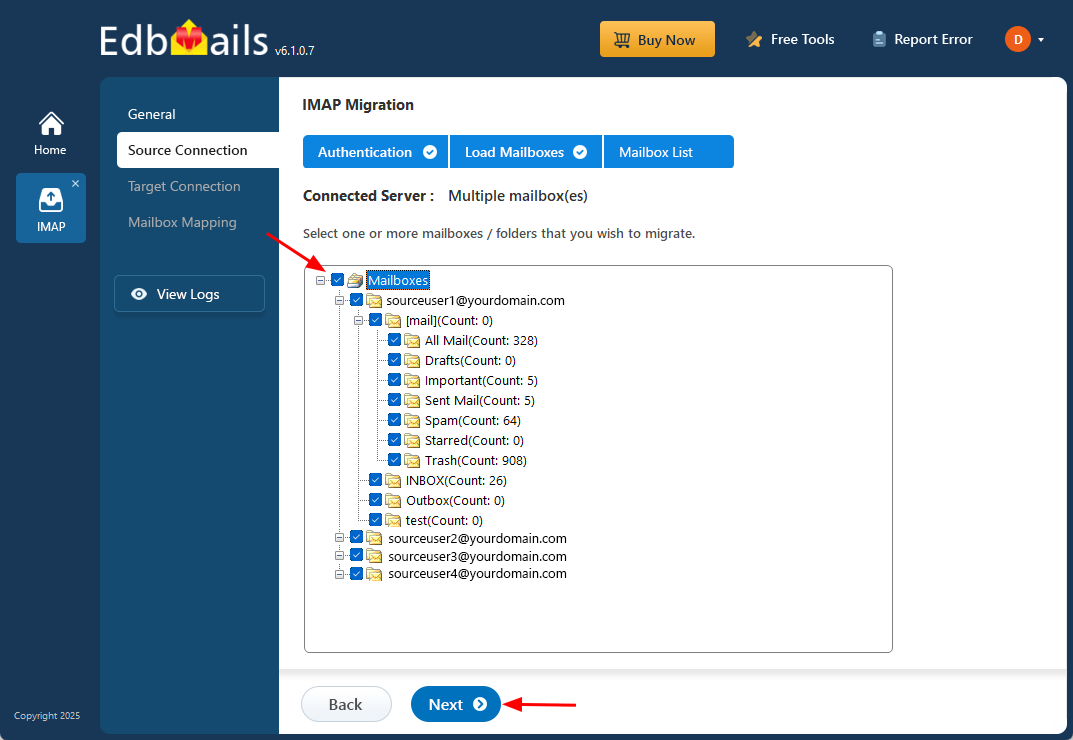
- Select the mailboxes or specific folders you want to migrate, then click ‘Next’ to proceed with the migration process.
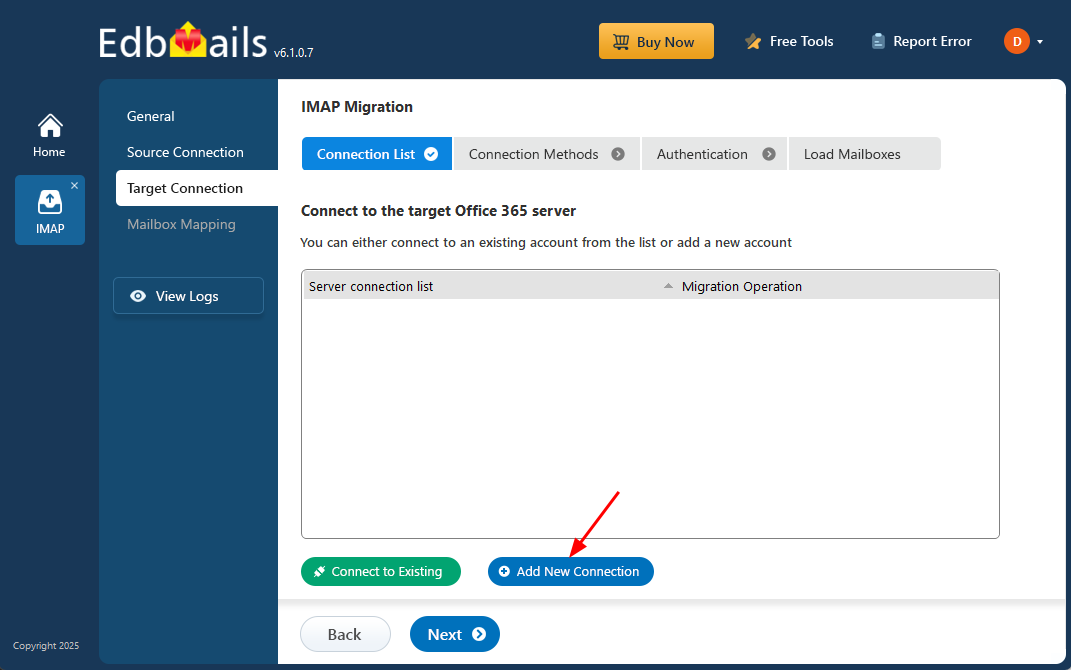
Step 4: Connect to target Office 365 server
- Click on ‘Add New Connection’ to create a connection with your target Office 365 account.
- To use the previous connection, select it from the list and choose ‘Connect to Existing’ to continue.
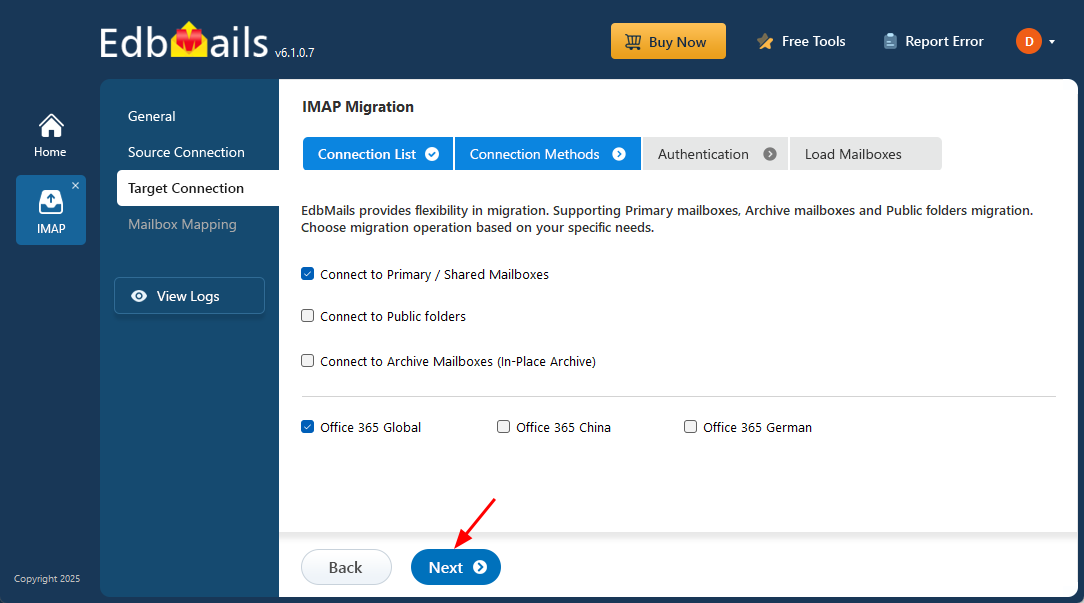
- Select the required connection options and click the ‘Next’ button.
- Select the authentication method and click the ‘Login’ button to continue.
- Choose your preferred method for secure OAuth-based authentication. The recommended ‘Auto Registration’ option simplifies setup and requires Global Admin rights to configure permissions automatically. For more control, you can opt for ‘Manual Registration’, which works with either a Global Admin or any user account that has full mailbox access. Once you've made your selection, click the ‘Login’ button to proceed.
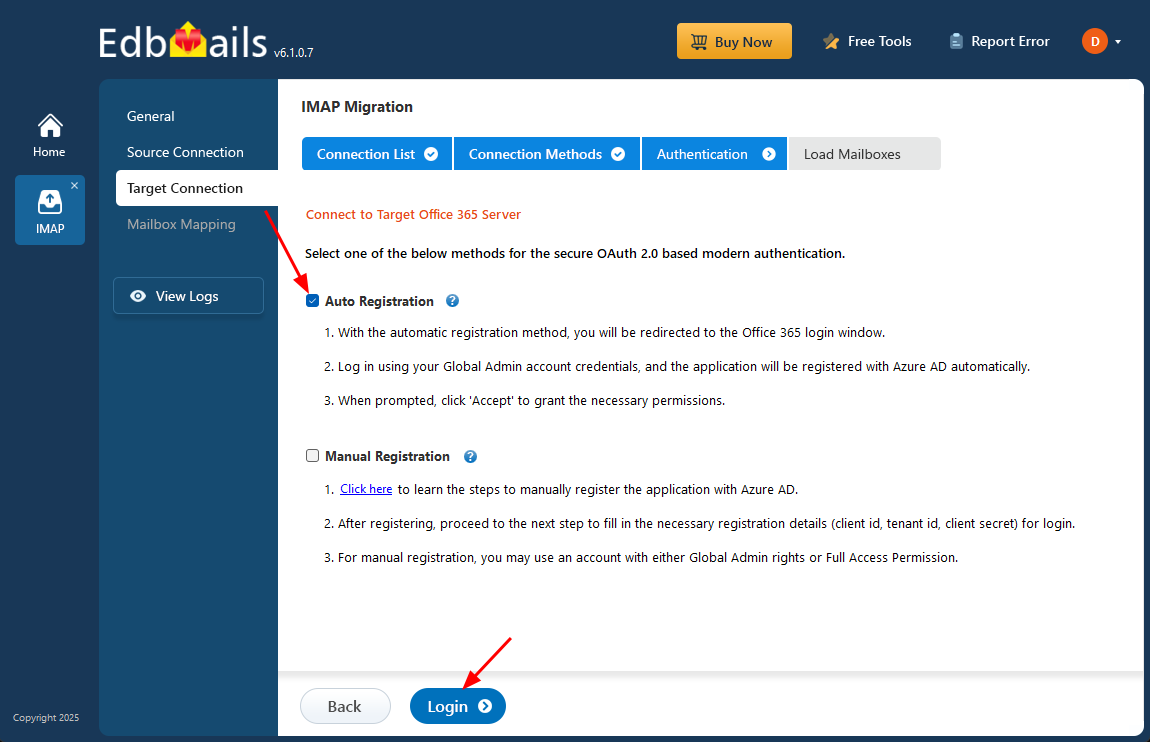
- Authenticate on Microsoft sign-in page.

- Click the ‘Next’ button to continue.
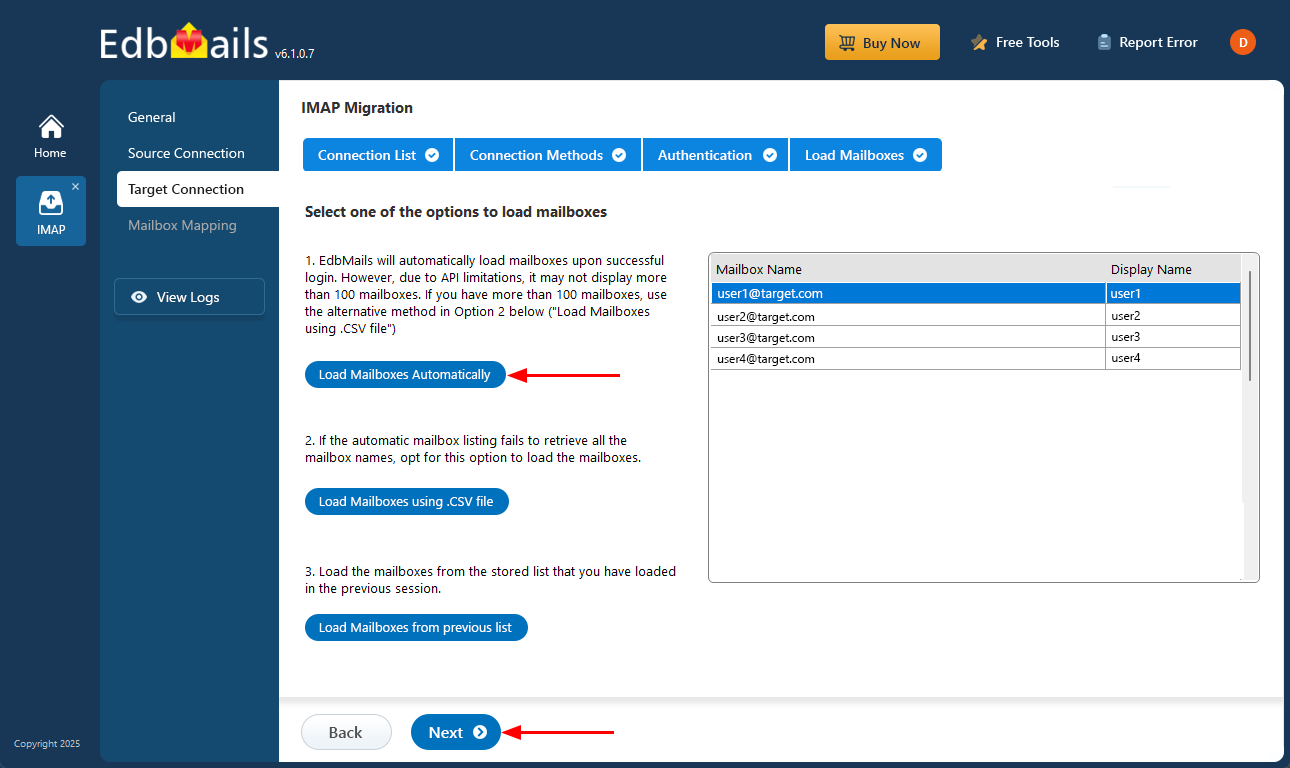
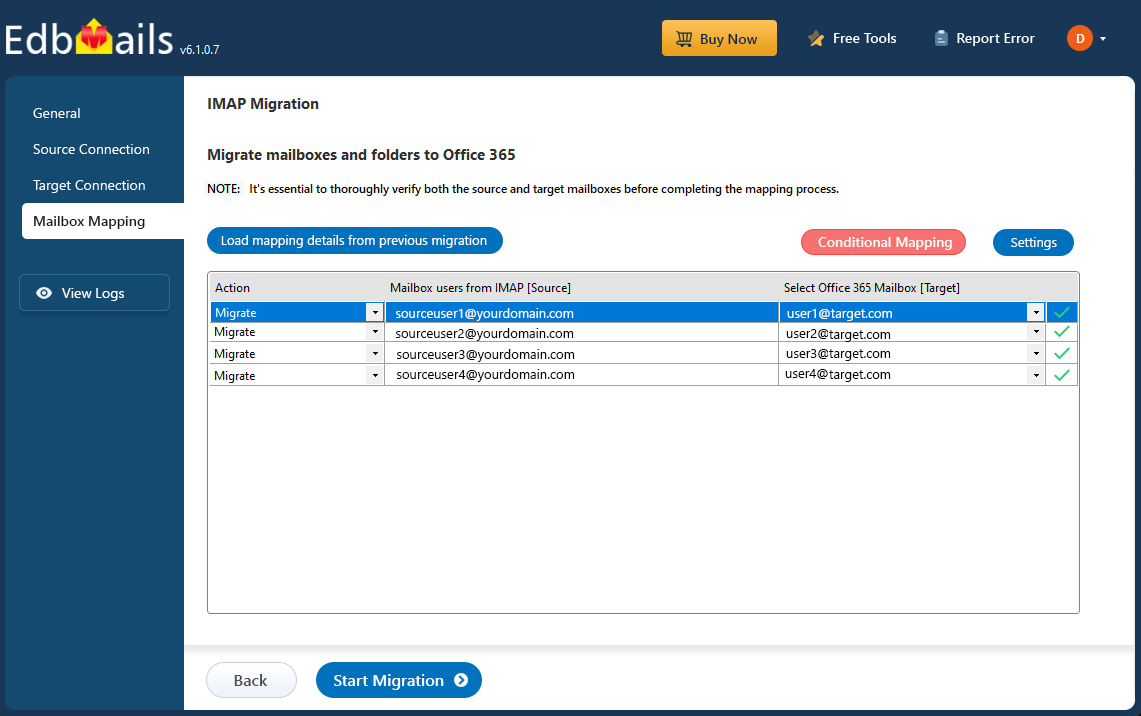
Step 5: Liquid Web to Office 365 mailboxes mapping
- Select the mapping option that best aligns with your requirements.
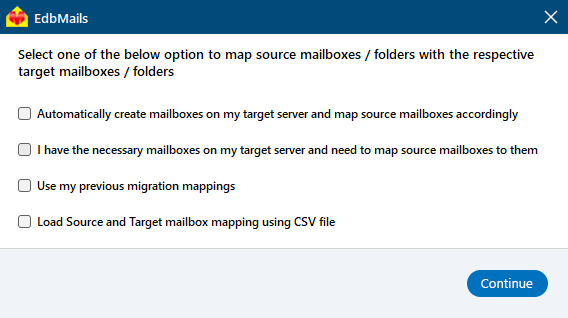
- You can choose to let EdbMails automatically create mailboxes in Office 365 and map them between the source and target servers. This feature is especially useful for large-scale migrations, saving time, reducing manual effort.
- Select the mapping option that best aligns with your requirements.
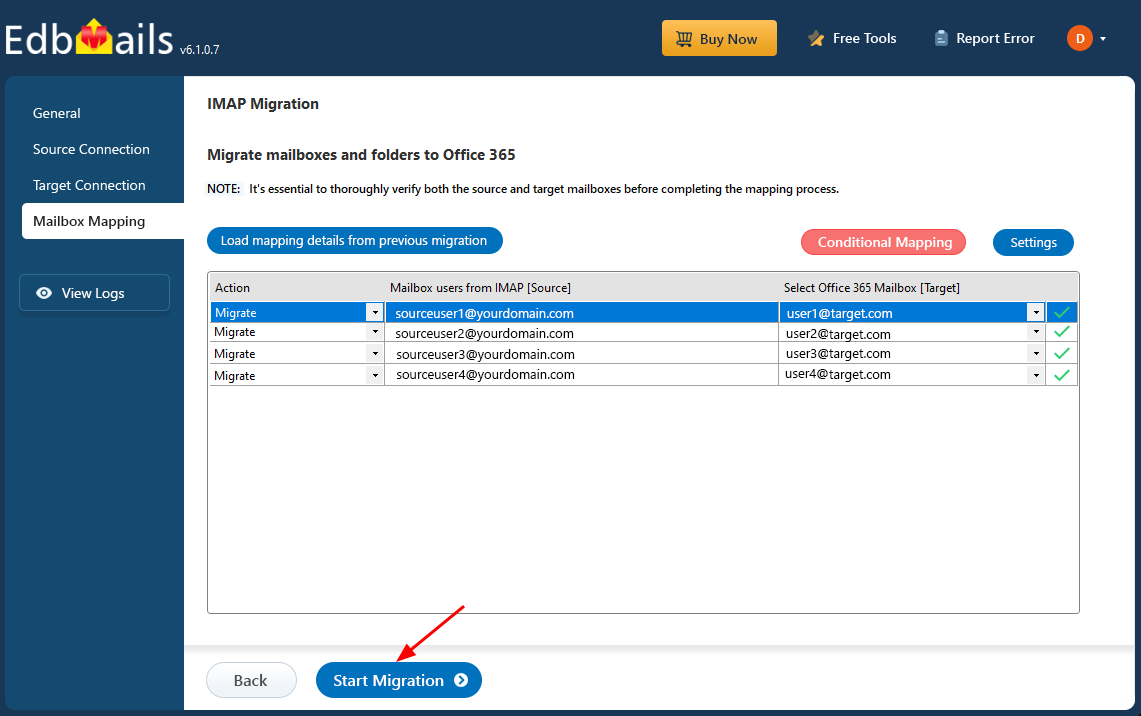
Step 6: Start Liquid Web to Office 365 migration
- After mapping the mailboxes, click the ‘Start Migration’ button to initiate the migration process.
- Click the ‘View Log’ button to view the migration report, which includes mapping details and the total count of migrated emails.

- Login to your target server and verify the migrated items.
- After mapping the mailboxes, click the ‘Start Migration’ button to initiate the migration process.
Liquid Web to Office 365 Post Migration Tasks
Step 1: Update the MX records to point to Office 365
If you have not done this step previously, change the DNS records known as MX records to enable email and receive messages on the target Office 365 server. In addition, configure the Autodiscover record to allow Outlook to connect to the migrated mailboxes.
Step 2: Create a new Outlook profile for users in the new domain
Configure the Outlook profile for each user in your domain if Outlook has problems connecting to Office 365 mailboxes.
Troubleshooting Guide for Liquid Web to Office 365 Migration
For common migration issues, check the knowledge base articles. For more information on EdbMails IMAP migration, visit the frequently asked questions (FAQs) section or contact our technical support team.
Frequently Asked Questions (FAQ)
Can I migrate multiple Liquid Web accounts at once?
Does EdbMails support OAuth login?
How long does the migration take?
Benefits of EdbMails to migrate from Liquid Web to Office 365
- Intuitive Interface for seamless Migration
EdbMails is built with a clean, straightforward interface that guides you through every step of moving your emails from Liquid Web to Office 365. You don’t need deep technical knowledge to get started, everything is laid out clearly to avoid confusion. From setup to completion, the tool handles the heavy lifting in the background, allowing you to focus on what matters while ensuring a smooth and organized migration experience.
- Script-free Migration Process
EdbMails takes the complexity out of email migration by removing the need for manual scripting. Unlike traditional tools that require custom scripts and constant supervision, EdbMails handles the entire process automatically. This not only minimizes the chance of errors but also ensures that your email data is transferred accurately, saving time and simplifying the migration for IT teams and non-technical users alike.
- No Data Duplication
Data duplication can lead to confusion and potential storage inefficiencies during migration. EdbMails prevents this by ensuring that emails are transferred without any duplication, maintaining a clean and organized structure throughout the migration from Liquid Web to Office 365, safeguarding data integrity.
- Direct Migration with Zero Downtime
EdbMails supports direct migration to Office 365 without the need for intermediate steps or lengthy processes. This approach ensures minimal disruption to daily business operations, with zero downtime, enabling users to continue accessing their emails without interruption.
- Free Trial for Evaluation
To build trust and provide transparency, EdbMails offers a free trial option, allowing users to evaluate the tool's functionality before committing. This enables organizations to test key features and gain confidence in the tool’s ability to handle their specific migration needs efficiently.

