What causes the Outlook inbox not updating error?
The error ‘Outlook emails not updating automatically’ is caused when you have a corrupted Outlook data file or incorrect settings in Outlook. In such cases the application fails to synchronize your emails with the mail server. To resolve the issue, reconfigure your Outlook profile or convert the Offline Storage Table (.ost) file with EdbMails OST to PST converter.
Here is a comprehensive list of possible causes for the error ‘Outlook inbox not updating’ and how they can affect the working of Outlook.
- Slow or unstable internet connection: If your internet connection is slow or unstable, it can prevent Outlook from connecting to the server and downloading new emails. This issue can cause Outlook to stop syncing emails and updating the inbox.
- Outdated Outlook version: If the Outlook data file is moved or deleted from its original location, Outlook may not be able to find and access it, resulting in the error message. This can happen if the user accidentally moves or deletes the file, or if the file is moved by another program or process.
- Corrupted Outlook profile: If your Outlook profile is corrupted, it can prevent your inbox from updating. You can try creating a new Outlook profile or rebuilding the OST file in Outlook to fix the issue.
- Incorrect email account settings: If Outlook is not connecting to the Exchange server, your email account settings are most likely incorrect, which can prevent Outlook from updating the inbox. Check that your email account settings are correct and up to date.
- Large mailbox size: Sometimes, conflicts with other programs or add-ins can cause the error message. For example, antivirus software, backup software, or third-party add-ins may interfere with Outlook and cause the data file to become inaccessible.
- Full storage device: If the Outlook profile is damaged or corrupted, Outlook may not be able to access the data file associated with the profile, resulting in the error message. This can happen if the user inadvertently deletes or modifies the profile settings or if the profile becomes corrupted due to a software error.
- Corrupted Outlook data file: If your Outlook data file (OST) is corrupted, it can prevent your inbox from updating. You can try repairing the corrupt OST file or creating a new data file to see if this fixes the issue.
- Antivirus software: If the user upgrades or downgrades the version of Outlook, it may cause compatibility issues with the data file, resulting in the error message. This can happen if the user upgrades to a newer version of Outlook that is not compatible with the data file format or if the user downgrades to an older version of Outlook that cannot read the data file.
- Firewall settings: If your firewall settings are blocking Outlook from connecting to the server, it can prevent your inbox from updating. You can try temporarily disabling your firewall to see if this fixes the issue. If it does, then you may need to configure your firewall to allow Outlook to connect to the server.
How to resolve the issue ‘Outlook not updating inbox error’?
- Method 1: Check the internet connection
- Step 1: Close Outlook on your computer
- You can do this by opening a web browser and trying to access a website.
- If you are unable to access a website, then your internet connection may be down or unstable.
- Step 2: Check your internet speed
- You can use an online speed test tool to check your internet speed.
- If your internet speed is too slow, it may be affecting Outlook's ability to connect to the server and download new emails.
- Step 3: Check your network configuration
Ensure that your network configuration settings are correctly set up, and that your computer is connected to the right network.
- Step 4: Check if other programs can access the internet
- Check if other programs on your computer can access the internet.
- If other programs can access the internet without any issues, then it is possible that Outlook is experiencing a problem with its connection to the email server.
- Step 5: Try resetting your internet connection
- You can try resetting your internet connection by unplugging your modem and router for a few minutes, and then plugging them back in.
- This task can sometimes help to resolve internet connectivity issues.
- Step 6: Check the computer time and date settings
- If your computer's clock is not set correctly, it can cause issues with syncing your mailbox.
- You can access the time and date settings by right-clicking on the clock in the taskbar and selecting ‘Adjust date/time’.
- Step 1: Close Outlook on your computer
- Method 2: Restart Microsoft Outlook
Restarting Outlook is a common method to solve most of the Outlook inbox and email synchronization problems.
- Step 1: Close Microsoft Outlook and related processes
- Click the ‘X’ in the top-right corner of the program window or select the ‘File’ menu and click ‘Exit.’
- Give Outlook a few minutes to fully close down and release any resources that it was using.
- Restart Outlook
- Step 2: Check for Outlook updates
- After Outlook has restarted, check to see if there are any updates available.
- Go to the ‘File’ menu and select ‘Office Account’ or ‘Account,’ depending on your version of Outlook.
- From there, you can check for updates and install any that are available.
After you have checked for updates, try accessing your inbox again to see if Outlook can synchronize and update emails with the server. If it cannot update the inbox and shared folders automatically, you may need to try the next method to resolve the issue.
- Step 1: Close Microsoft Outlook and related processes
- Method 3: Clear Outlook Cache
Clearing the Outlook cache can help to resolve issues with the synchronization of emails and other data in Outlook. Sometimes, the cache files can become corrupted, which can prevent Outlook from properly syncing with your mailbox. By clearing the cache, you can ensure that Outlook creates new cache files that are not corrupted, which can help to resolve the issue.
- Step 1: Close Microsoft Outlook
- Before you can clear the Outlook cache, you need to make sure that Microsoft Outlook is closed.
- Step 2: Navigate to the Outlook Cache Folder
- Open the Run dialog box: Press the Windows key + R on your keyboard to open the Run dialog box.
- Type ‘%localappdata%\Microsoft\Outlook’ and click ‘OK’, which opens the folder where the Outlook cache files are stored.
- Step 3: Delete the contents of the RoamCache folder
- Open the RoamCache folder
- Select all the files in the folder and then press the Delete key on your keyboard.
- After you have deleted the contents, close the folder.
- Step 4: Restart Microsoft Outlook
- Now that you have cleared the Outlook cache, you can open Microsoft Outlook again.
- When you open Outlook, it creates new cache files, which should help to resolve any issues you were experiencing with your inbox not updating.
- Step 1: Close Microsoft Outlook
- Method 4: Disable incompatible Outlook Add-ins
While accessing Outlook, you may encounter a message ‘Outlook detected a COM add-in problem’. These COM add-ins decrease performance or cause Outlook to crash. In such cases, disabling or removing the incompatible add-ins from Outlook can help resolve mail synchronization and email not updating problems.
- Step 1: Close and relaunch Microsoft Outlook in Safe mode
- You can do this by clicking on the ‘X’ in the top-right corner of the program window or by going to the File menu and selecting ‘Exit’
- To open Outlook in safe mode, hold down the CTRL key while clicking on the Outlook icon, which launches Outlook in safe mode with all add-ins disabled.
- Step 2: Check if the issue has been resolved
- After you launch Outlook in safe mode, try accessing your inbox again to see if the issue has been resolved.
- If the error ‘Outlook not updating inbox automatically is resolved’, then it is likely that one or more of your add-ins is causing the issue.
- Step 3: Disable the Outlook add-ins one at a time
- To disable add-ins, go to the File menu and select ‘Options.’
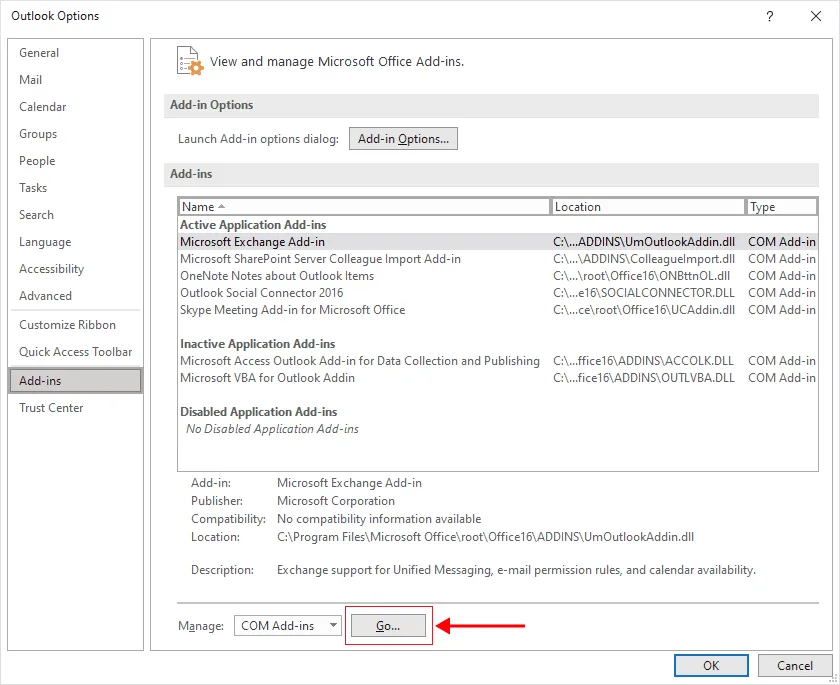
- From there, select ‘Add-ins’ and then click on the ‘Go’ button next to ‘Manage COM Add-ins’, which brings up a list of all of the add-ins that are currently installed in Outlook.
- To identify which add-in is causing the issue, disable one add-in at a time and then try accessing your inbox again.
- If the issue is resolved, then the add-in that you just disabled is likely the culprit.
- Step 4: Remove or update incompatible Add-ins
- Once you have identified the add-in that is causing the issue, you can either remove it from Outlook or update it to a compatible version.
- Finally, restart Outlook to check if the issue has been resolved.
- Step 1: Close and relaunch Microsoft Outlook in Safe mode
- Method 5: Check and reconfigure Outlook settings
Configuring Outlook settings can help to resolve the ‘Outlook inbox not updating’ error by ensuring that Outlook is properly configured to connect to your mailbox and sync your email, calendar, and other data. Here are some specific settings to check:
- Step 1: Check email account settings in Outlook
- Open Outlook and go to the ‘File’ menu.
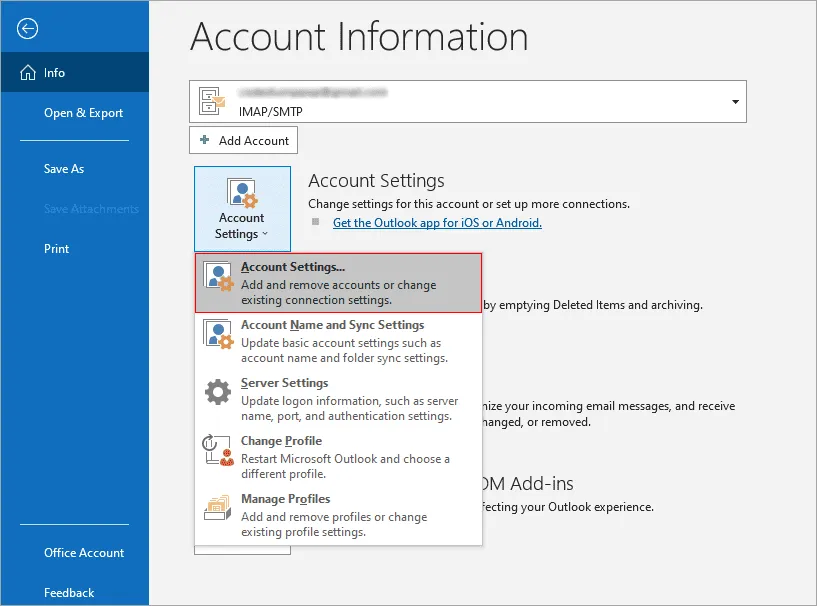
- From there, select ‘Account Settings’ and then ‘Account Settings’ again.
- This brings up a list of all of the email accounts that you have set up in Outlook.
- Step 2: Check the server settings for your email account
- Double-click on the email account that you are having issues with to bring up its settings.
- From there, check the incoming and outgoing server settings to make sure that they are correct.
- This step helps you to identify any issues with the settings that could be preventing Outlook from properly syncing with your mailbox.
- Step 3: Reconfigure your email account settings
- If there are any issues with your email account settings, you can reconfigure them by clicking on the ‘Change’ button and then following the prompts to update your settings.
- Restart Outlook and check if the issue has been resolved
- Step 4: Check the Cached Exchange mode settings
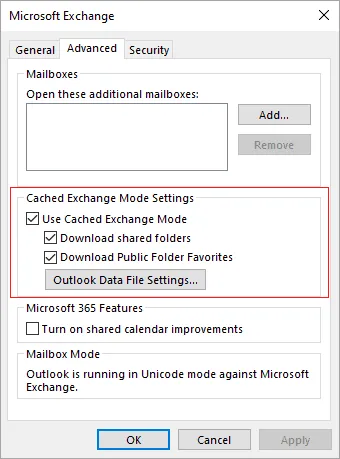
Check your Cached Exchange mode settings to ensure that they are properly configured. Cached Exchange mode in Outlook can help to improve performance by storing a copy of your mailbox on your local computer. However, if the settings are not configured correctly, it can cause issues with syncing your mailbox.
- You can access the Cached Exchange mode settings by going to File > Account Settings > Account Settings, and then selecting your Exchange account and clicking ‘Change’.
After you restart Outlook, try accessing your inbox again to see if the issue has been resolved. If the application is unable to open the Outlook data file, you may need to try the next method to resolve the issue.
- You can access the Cached Exchange mode settings by going to File > Account Settings > Account Settings, and then selecting your Exchange account and clicking ‘Change’.
- Step 1: Check email account settings in Outlook
- Method 6: Repair Outlook data file with EdbMails
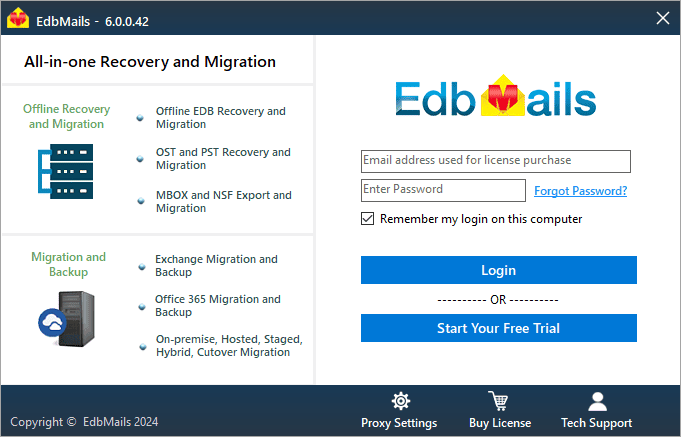
EdbMails is a repair and converter tool for Outlook OST files. If the Outlook data file cannot be accessed or if you are having inbox sync issues, you can use EdbMails to convert all your mail items to PST format and import them into Outlook. This method preserves all your emails and mailbox data without data loss. The application also enables you to open the OST file and includes a free Outlook OST viewer to view orphaned and corrupted files. The following section describes how to perform OST to PST conversion with EdbMails.
- Step 1: Install EdbMails repair tool for OST and PST
- EdbMails is a software tool that can repair and export OST to PST files.
- You can download it from the EdbMails website and then install it on your computer.
- The application is compatible with Windows 11, 10, 8.1, 8 and 7 and supports Outlook data files from all Outlook versions.
- Step 2: Select the Outlook data file to repair and convert
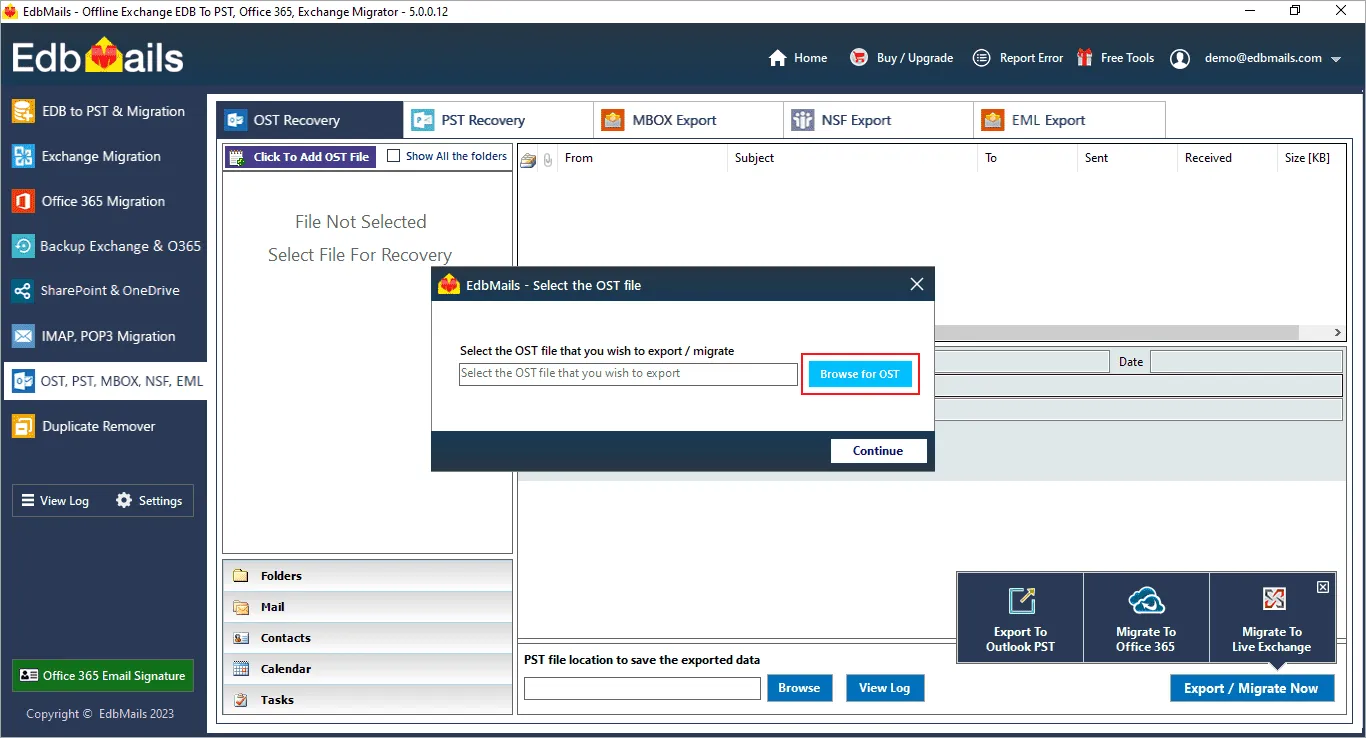
- Click ‘Browse’ and select the OST file from your computer that you want to repair and convert to PST file format.
- Step 3: Preview and select the mail items to be converted to PST
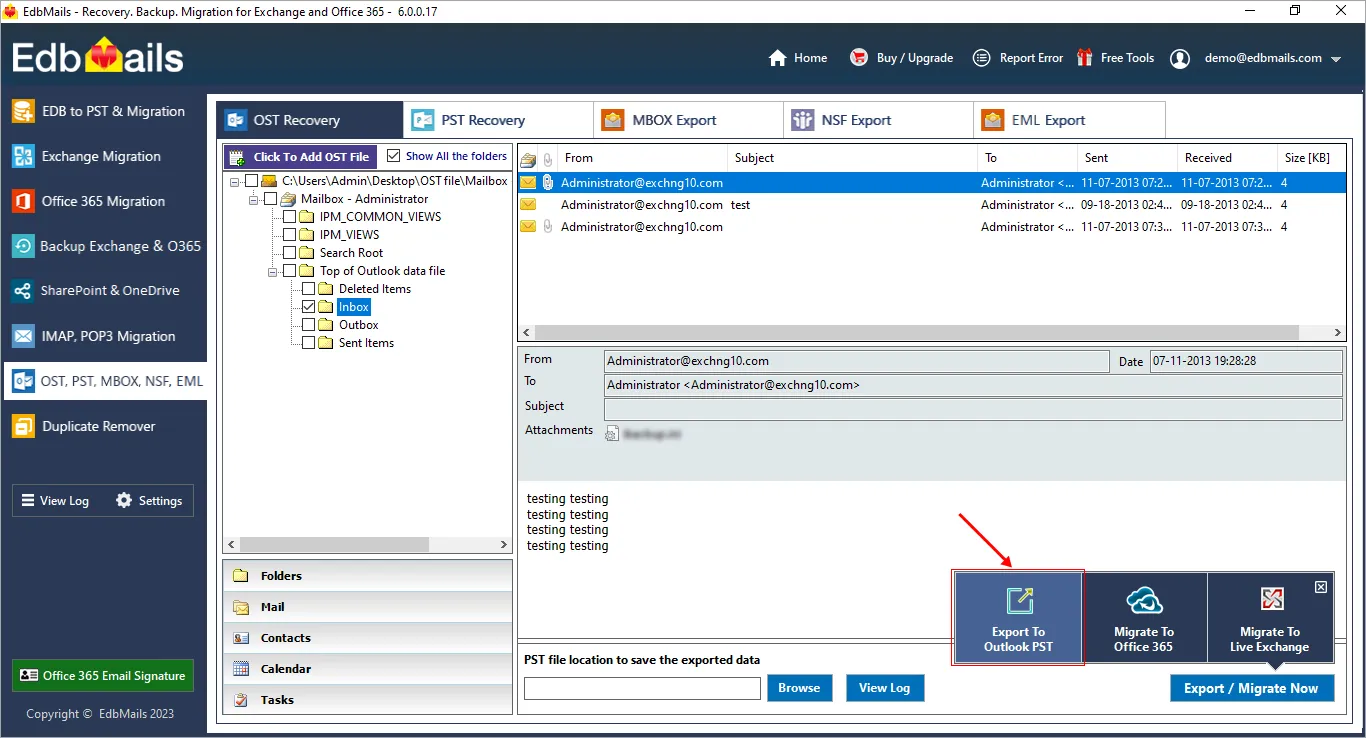
- After EdbMails successfully repairs the OST file, you can preview mail items such as contacts, emails, notes, calendars, tasks.
- Select the required items, folders and ‘Export OST to PST’
Tip: If you want to transfer your email data to the cloud, EdbMails also enables you to upload OST to Office 365 and Live Exchange without requiring any technical expertise. This is one of the best methods if you are looking for a solution to directly import the OST into Office 365 for various requirements.
- Step 4: Start the OST to PST file conversion
- EdbMails prompts you to select the location to save the output file.
- Ensure that you have sufficient space on your hard disk and select the location to convert the file.
- After the conversion is complete, verify the exported items with EdbMails text-based log report.
- With this method, you can also download all your Outlook emails to a hard drive.
- Step 5: Import the PST file into Outlook
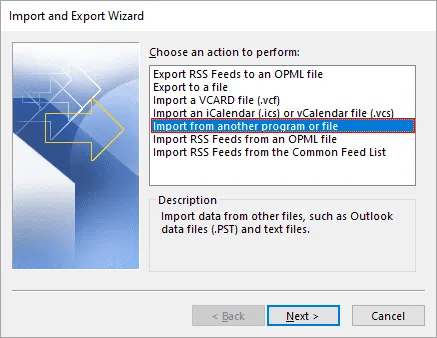
- Go to the ‘File’ menu in Outlook and select ‘Open & Export’ and then ‘Import/Export’.
- Select ‘Import from another program or file’ and then ‘Outlook Data File (.pst).’ Use the ‘Browse’ button to select the PST file that you just converted with EdbMails.
- Follow the prompts to import the file into Outlook and synchronize your emails with the email server.
By following these steps, you can repair and convert OST to PST with EdbMails to resolve the issue ‘Outlook inbox not updating.’ Sometimes issues with Outlook can be caused by corruption in the OST file or when the mailbox has been temporarily moved on Exchange, which can prevent Outlook from properly syncing with your mailbox.
- Step 1: Install EdbMails repair tool for OST and PST
To summarize
The preceding methods which we discussed in this article can help to resolve Outlook updating problems and ensure that you have access to all of your emails and other data. The Outlook Inbox Not Updating error is usually caused by a network connectivity issue, incorrect mail settings, or a corrupted Outlook data file. To resolve the problem, you can create a new profile on Outlook. However, if the Outlook data file (OST) is corrupted and you want to restore your email data, then the best method is to convert the OST file to PST with EdbMails converter. The application can restore all your mailbox data from orphaned or corrupted OST files without requiring the original Outlook profile.

