What causes Outlook sync issues in Windows?
Outlook is a popular email client used by millions of people worldwide for personal and business purposes. In certain situations, Microsoft Outlook cannot connect to the server and users often encounter an error that prevents Outlook from synchronizing or updating emails, calendar events, and contacts. This error can cause significant inconvenience and frustration, especially for those who rely on Outlook for work or communication. As a result, users may not receive new emails, or their sent emails may not appear in their sent folder. Additionally, calendar events and contacts may not be updated and Outlook cannot open the OST file.
The sync error in Outlook occurs when the application fails to synchronize your emails and mailbox data with the server. In such cases, it is highly recommended to reconfigure your Outlook profile or use EdbMails OST to PST converter tool to restore your data. In this article, we discuss the error Outlook not syncing, its causes, and how you can troubleshoot and fix the issue.
The following some of the reasons why Outlook fails to sync emails in Outlook:
- Incorrect account settings: If your account settings such as email, password and connection details are incorrect, Outlook may not be able to connect to the server and synchronize your data.
- Server issues: If the email server is down or experiencing technical issues, you may see the error message and Outlook will not be able to sync with it.
- Network connectivity issues: A weak or unstable network connection can prevent Outlook from synchronizing and making it unable to update your Outlook 365 inbox.
- Antivirus software: Antivirus software on your computer can sometimes interfere with the synchronization process, resulting in the error 'Outlook email not syncing'.
- Corrupted Outlook data file: A corrupted Outlook data file (OST) can cause the Outlook not syncing error. In such cases you must repair the Outlook OST from corruption to restore your mailbox data.
- Outdated software If you are using an outdated version of Outlook, you may experience the issue of Outlook not syncing emails.
- Deleted mailbox on the server: If the mailbox associated with your email address is deleted or is unavailable, Outlook may not sync emails and other mail items.
How to resolve the issue of Outlook not syncing in Windows?
There are several methods to fix Outlook connection issues and Outlook not syncing emails with the server.
- Method 1: Check your internet connection
If you are having trouble synchronizing your Microsoft Outlook account with your online account, there are a few things you can do to troubleshoot the issue. First, check your internet connection to make sure that it is working properly. Outlook may fail to connect to the email server if your internet connection is poor or if the computer is not connected to a network.
- Step 1: Open Windows Settings in your computer
- Click on the Windows Start button and select the ‘Settings’ icon.
- Step 2: Go to the Network & Internet options
- In the Settings window, click on ‘Network & Internet.’
- On the Network & Internet page, click on "Status" in the left-side menu.
- Step 3: Check Internet Connection Status
- On the Status page, look for the section labeled ‘Internet Connections.’
- If your computer is connected to the internet, it should say ‘Connected.’
- Step 4: Start the Network Troubleshooter
- If not connected, click on the ‘Network troubleshooter’ to diagnose and fix internet connection issues.
- If the troubleshooter can't resolve the issue, go to ‘Change adapter options’ in the left-side menu on the Status page.
- Step 5: Diagnose and reset the Network Adapter
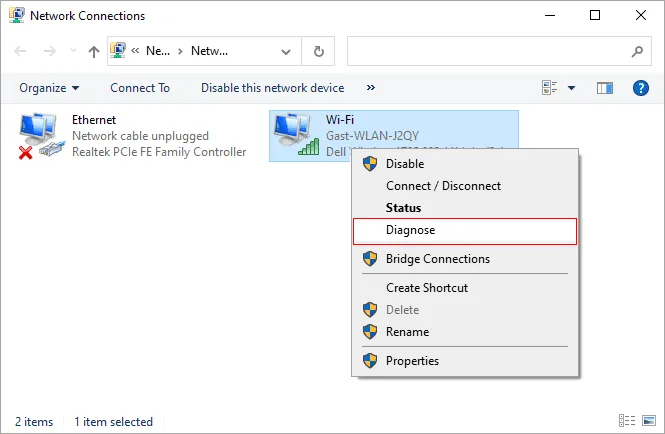
- Right-click on the current network adapter and select ‘Diagnose’ to launch the adapter's built-in diagnostic tool.
- If the diagnostic tool can't fix the issue, go to the adapter's Properties and click on ‘Configure.’
- Go to the Advanced tab, find the ‘Reset’ option and click on it.
- Step 1: Open Windows Settings in your computer
- Method 2: Close and restart Microsoft Outlook
The next step is to restart both your computer and Outlook and install the latest updates. If that does not fix the problem, you can try resetting the Outlook settings, which can help clear up any issues that may be causing the sync to fail.
- Step 1: Close Outlook and restart your Computer
- Click on the ‘File’> menu in Outlook and select ‘Exit’ or simply close the Outlook window.
- Restart your computer to clear any temporary files or issues that may be causing the sync error.
- Step 2: Open Outlook and check the sync status
- After your computer has restarted, open Outlook and wait for it to load completely.
- Go to your email folders and check if your emails are syncing properly.
- Step 3: Check for Outlook Updates
- If the sync issue still persists, go to the ‘File’ menu in Outlook and select ‘Office Account.’
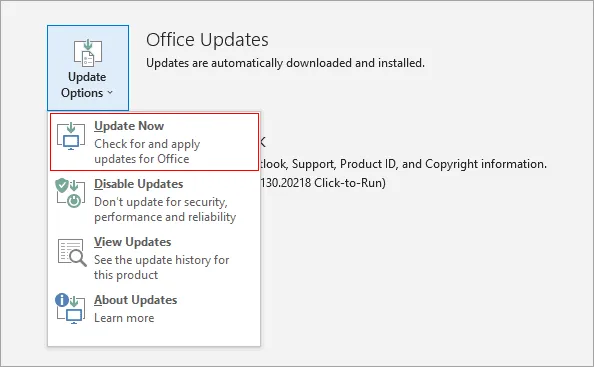
- Click ‘Update Options’ > ‘Update Now’ and check for any available updates to install them.
- Step 1: Close Outlook and restart your Computer
- Method 3: Force Outlook to sync manually
If you are getting the error message, Outlook folders not syncing, try syncing your emails and folders manually as described in the following steps.
- Step 1: Open Outlook and go to Send/Receive
- Open your Outlook application and wait for it to load completely.
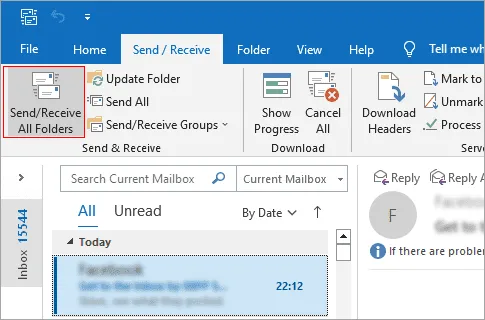
- In the Outlook main window, click on the ‘Send/Receive’ tab in the ribbon.
- Step 2: Select Send/Receive All Folders
- In the Send/Receive group, click on ‘Send/Receive All Folders.’
- This forces Outlook to sync all of your email folders.
- Step 3: Check Sync Status and repeat the step
- After a few moments, go to your email folders and check if your emails are syncing properly.
- If the sync error still persists, repeat the steps to force Outlook to sync all folders again.
- Step 1: Open Outlook and go to Send/Receive
- Method 4: Change the Outlook sync frequency
If you're experiencing Outlook sync issues, one possible cause could be the sync frequency. By default, Outlook syncs emails every 30 minutes, but you can change this to be more or less frequent.
- Step 1: Open Outlook and go to File
- Open your Outlook application and wait for it to load completely.
- In the Outlook main window, click on the ‘File’ menu.
- Step 2: Select Options > Advanced > Send and Receive
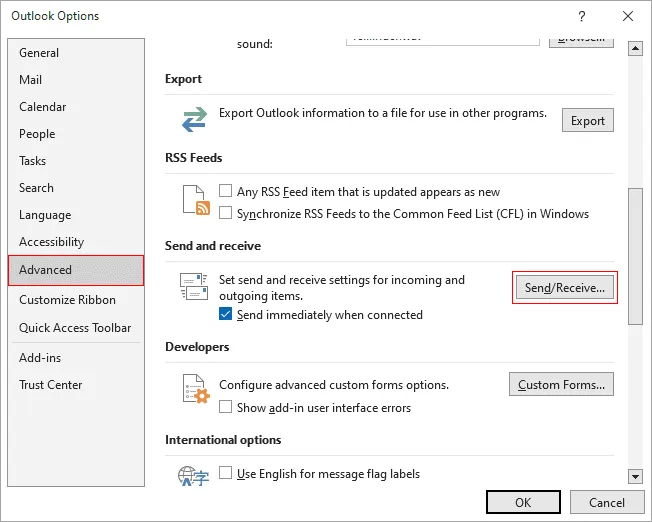
- In the File menu, click on ‘Options’ and click on the ‘Advanced’ tab.
- Scroll down to the ‘Send and Receive’ section.
- Step 3: Change the Outlook Sync Frequency
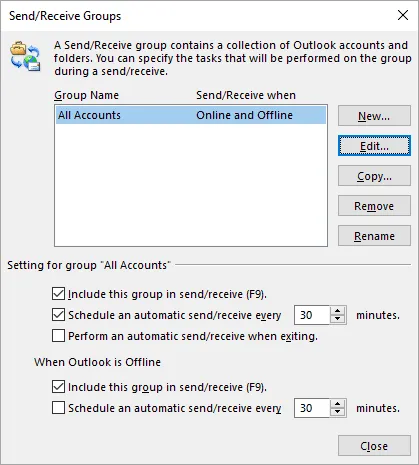
- In the Send and Receive section, click on ‘Send/Receive.’
- In the Send/Receive Settings window, change the sync frequency to a lower value, such as 5 or 10 minutes.
- Click ‘OK’ to apply the changes and close the Send/Receive Settings window.
- Step 4: Check the email sync status
- Go to your email folders and check if your emails are syncing properly.
- If the sync error still persists, try changing the sync frequency to a different value.
- Step 1: Open Outlook and go to File
- Method 5: Reconfigure the Outlook profile settings
If you are having issues with Outlook not syncing across devices, one potential fix is to reconfigure your Outlook profile settings. This process varies depending on your specific Outlook version, but the general idea is to go into your Outlook settings and check/adjust your account settings, verify your user account credentials, and cache settings. By ensuring that these settings are all correct, you can often fix synchronization issues.
- Step 1: Open Control Panel and go to Mail
- Click on the Windows Start menu and type ‘Control Panel’ in the search bar.
- In the Control Panel, click on ‘Mail (Microsoft Outlook 2016)’ under ‘Programs.’
- Step 2: Open Mail Setup and select the profile
- In the Mail Setup window, click on ‘Show Profiles.’
- In the Mail dialog box, select the profile that you are using with Outlook.
- Click on Properties and go to Email Accounts
- Click on the ‘Properties’ > ‘Email Accounts’
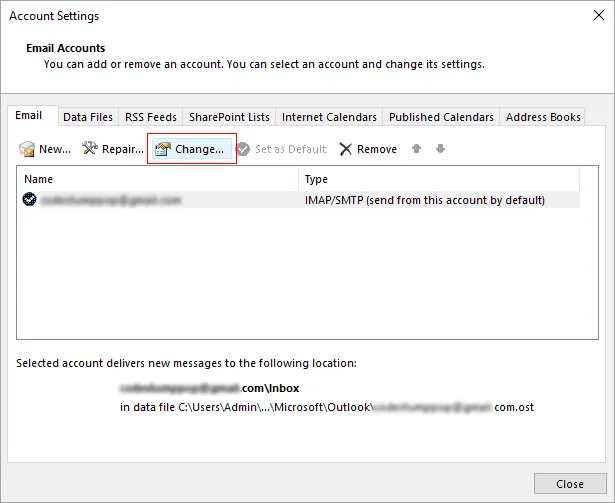
- Select the email account that you are using with Outlook and click on ‘Change.’
- Step 4: Verify the Settings and apply the changes
- In the Change Account window, verify that all of the account settings are correct.
- Make sure that the incoming and outgoing server settings, email address, and password are all correct.
- If any changes were made, click on ‘Next’ and then ‘Finish.’
- Restart Outlook and check if the sync error has been resolved.
- Step 1: Open Control Panel and go to Mail
- Method 6: Check your network and security settings
When you are troubleshooting Outlook synchronization issues, one of the first things you should do is check your network, firewall and antivirus. One of the causes of this issue could be that your computer's security settings are blocking unwanted network requests from applications and email clients.
- Step 1: Check your Network Connection
- Make sure that your computer is connected to the internet and that you have a stable connection.
- Try restarting your router or modem if needed.
- Step 2: Disable Firewall and Antivirus temporarily
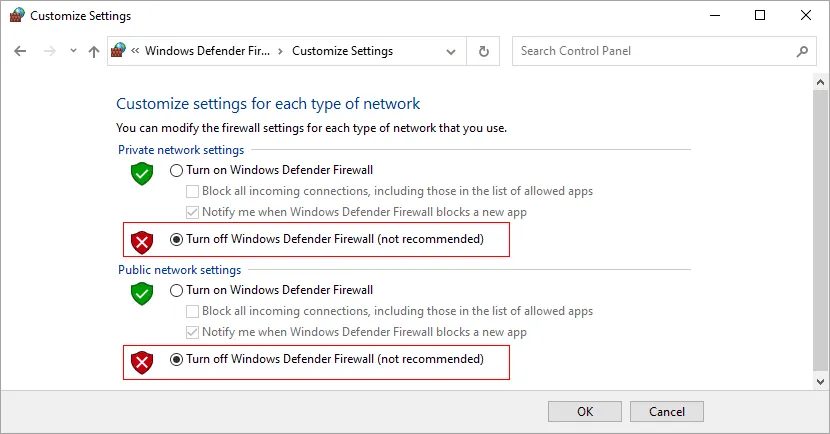
Disable the firewall on your computer temporarily to see if it is causing the sync error.
Disable the antivirus on your computer temporarily to see if it is causing the sync error.
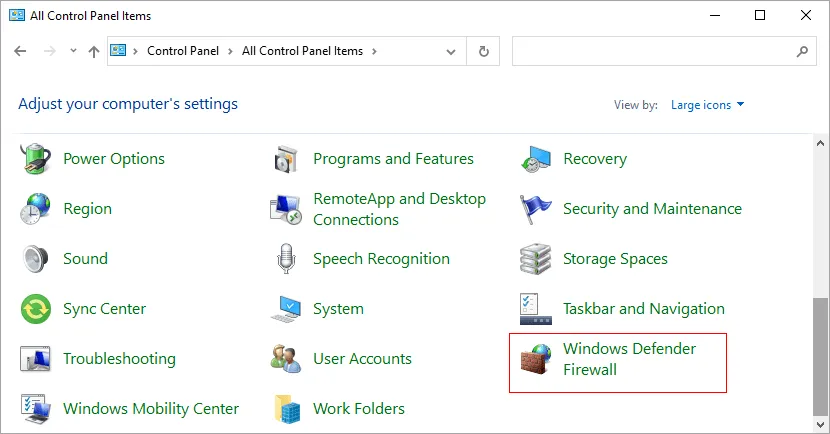
- To disable the firewall, go to the Windows Control Panel and click on ‘Windows Defender Firewall.’
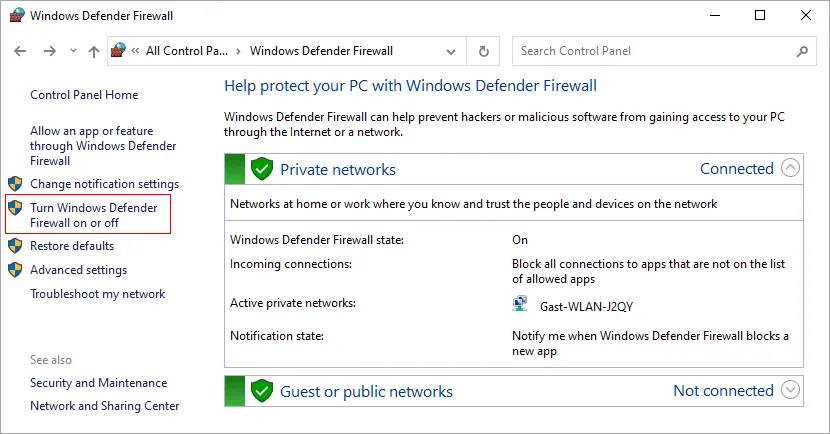
- In the Windows Defender Firewall window, click on ‘Turn Windows Defender Firewall on or off.’
- Select ‘Turn off Windows Defender Firewall’ for both private and public networks and click ‘OK.’
- The method to disable the antivirus may vary depending on the antivirus software that you are using.
- Restart Outlook and check if the sync error has been resolved.
- Step 1: Check your Network Connection
- Method 7: Use SSL in Outlook to connect to your server
Using SSL (Secure Socket Layer) in Outlook to connect to your email server can resolve sync errors. SSL encrypts the data being transmitted between Outlook and your email server, providing an extra layer of security. To use SSL in Outlook, modify your email account settings by enabling SSL, updating the port number for incoming and outgoing mail, and applying the changes.
- Step 1: Open Outlook and navigate to Account Settings
- Open the Microsoft Outlook application.
- Click on the ‘File’ tab in the Outlook ribbon and then click on ‘Account Settings.’
- In the Account Settings window, click on the ‘Email’ tab.
- Step 2: Select the account and modify the Account Settings
- Select the email account that you want to modify and click on the ‘Change’ button.
- Check if you have configured your email account as POP3 or IMAP
- In the Change Account window, click on ‘More Settings.’
- In the Internet Email Settings window, click on the ‘Advanced’ tab.
- Step 3: Enable SSL and update the Port Number
- Select the option to ‘Use the following type of encrypted connection’
- From the dropdown menu, choose ‘SSL (Secure Sockets Layer)’ as the type of encrypted connection.
- Change the port number depending on the source server with which you want to synchronize your emails.
- Step 4: Apply the Changes and test the connection
- Click on ‘OK’ to apply the changes and close the windows.
- Test the connection by sending an email to yourself or to someone else.
- Step 1: Open Outlook and navigate to Account Settings
- Method 8: Change the root folder path location
If you are having trouble syncing Outlook with your email account, one potential solution is to change the root folder path. This is the folder where your email account's messages are stored on the server. By changing the root folder path, you can force Outlook to look in a different location for the messages, which can help resolve any synchronization issues.
- Step 1: Open Outlook and navigate to Account Settings
- Open the Microsoft Outlook application.
- Click on the ‘File’ tab in the Outlook ribbon and then click on ‘Account Settings.’
- In the Account Settings window, click on the ‘Email’ tab.
- Step 2: Select the email account and modify Account Settings
- Select the email account that you want to modify and click ‘Change’
- In the Change Account window, click on ‘More Settings.’
- In the Internet Email Settings window, click on the ‘Advanced’ tab.
- Step 3: Change the Root Folder Path and apply the changes
- In the Advanced tab, under ‘Root folder path,’ type in the correct location of the root folder of your mailbox.
- The default path is usually ‘Inbox.’
- Click on ‘OK’ to apply the changes and close the windows.
- Step 1: Open Outlook and navigate to Account Settings
- Method 9: Repair the email account in MS Outlook
Repairing your email account can help reset any incorrect settings that may be causing the sync issues. It can also help free up any space that may be being used by the corrupt or damaged files, which can help the Outlook sync process run more smoothly. The following steps describe how you can perform a repair operation on your email account in Outlook.
- Step 1: Open Outlook and navigate to Account Settings
- Open the Microsoft Outlook application.
- Click on the ‘File’ tab in the Outlook ribbon and then click on ‘Account Settings.’
- In the Account Settings window, click on the ‘Email’ tab.
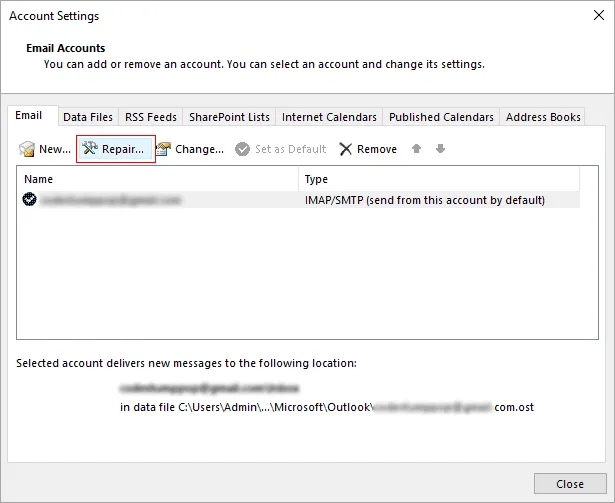
- Step 2: Repair the Email Account and test the connection
- Select the email account and click ‘Repair’
- Follow the on-screen instructions to complete the repair process.
- Method 10: Repair and reinstall Microsoft Office
Outlook may fail to sync your email account with the server and fetch new emails if Microsoft Office is out of date or you are using an older version of the application. In such cases, a simple repair and upgrade to the latest version can help resolve the issues.
- Step 1: Open Control Panel and select Microsoft Office
- Click on the Windows Start menu and open the Control Panel.
- In the Control Panel, click on ‘Programs and Features.’
- Find Microsoft Office in the list of installed programs and click on it.
- Step 2: Repair Office and relaunch Outlook
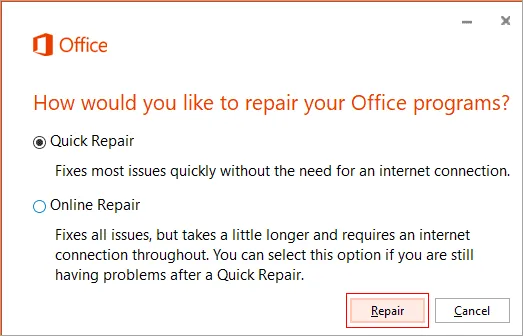
- Click on ‘Change’ and then select ‘Repair’.
- Follow the on-screen instructions to complete the repair process.
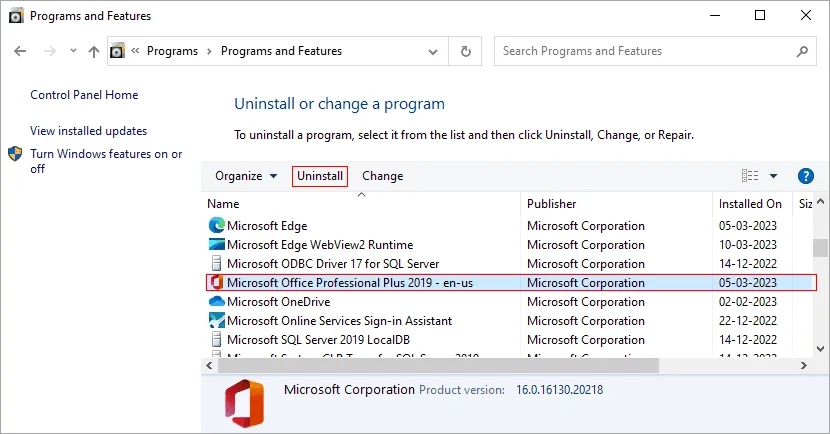
- Step 3: Uninstall Microsoft Office if the repair is unsuccessful
- Find Microsoft Office in the list of installed programs and click on it.
- Click on ‘Uninstall’ and follow the on-screen instructions to uninstall Microsoft Office.
- Step 4: Download and install the latest version of Office
- Download the latest version of Microsoft Office from the official Microsoft website.
- Run the installer and follow the on-screen instructions to install Microsoft Office.
- Step 5: Open Outlook and set up your Email Account
- Open the Microsoft Outlook application.
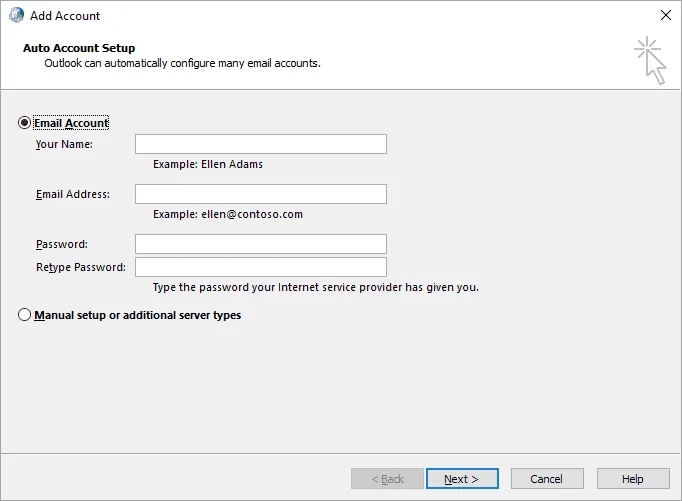
- If prompted, set up your email account by entering your email address and password.
- Test the connection by sending an email to yourself and verify if the Outlook sync issue is resolved.
- Step 1: Open Control Panel and select Microsoft Office
- Method 11: Empty the contents of the Sync Issues folder
When Outlook synchronizes with the mail server, it creates a Sync Issues folder and stores any information about the synchronization process in that folder. If you are having synchronization problems, clearing the contents of the Sync Issues folder (Conflicts, Local Failures and Server Failures) can help troubleshoot Outlook Sync issues.
- Step 1: Open Outlook and click the menu icon
- Open the Microsoft Outlook application.
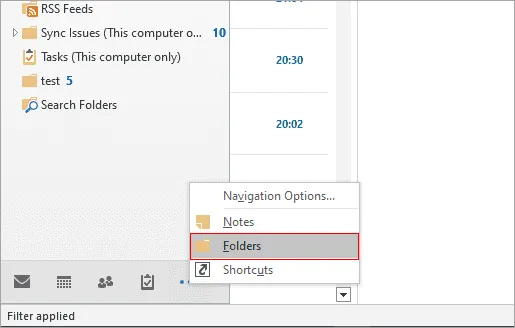
- Click on the menu button and click ‘Folders’
- Step 2: Delete the contents of the local failures folder
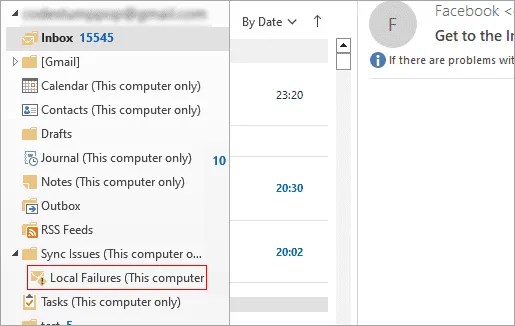
- Expand the Sync Issues folder to find the local issues folder
- Select all the items in the folder and delete them.
- Close and restart the Microsoft Outlook application.
- Step 1: Open Outlook and click the menu icon
- Method 12: Delete the OST file and rebuild Outlook profile
When an Outlook profile is created, a corresponding Offline Storage Table (OST) file is also created. This OST file is a replica of the user's Exchange mailbox and enables offline access to the mailbox data. If the OST file becomes corrupted, it can cause synchronization issues with the Exchange mailbox, which can lead to data loss. Deleting the OST file and rebuilding the Outlook profile creates a new OST file and can often resolve synchronization issues.
- Step 1: Close Outlook and locate the OST file
- Close the Microsoft Outlook application.
- Open File Explorer, navigate to the location where your email account data files are stored, and locate the OST file associated with the email account that is experiencing the sync error.
The OST file is typically located in the following location in Outlook 2019, 2016 and 2013.
C:\Users
\AppData\Local\Microsoft\Outlook The OST file is typically located in the following location in Outlook 2010
C:\Users
\AppData\Local\Microsoft\Outlook The OST file is typically located in the following location in Outlook 2007
C:\Documents and Settings
\Local Settings\Application Data\Microsoft\Outlook
- Step 2: Delete the OST file from your computer
- Right-click on the OST file and select ‘Delete.’
- Confirm the deletion by clicking ‘Yes’ in the confirmation prompt.
- Step 3: Open Control Panel and add a new profile
- Open the Control Panel on your computer.
- Open Mail (32-bit): In the Control Panel, click on the ‘Mail (32-bit)’ option.
- In the Mail Setup window, click on the ‘Show Profiles’ button, then click on the ‘Add’ button.
- Step 4: Name the profile and add an email account
- In the ‘New Profile’ window, provide a name for the new profile and click ‘OK.’
- In the new profile, follow the prompts to add the email account that was previously deleted.
- Close the Mail Setup window and restart the Microsoft Outlook application.
- Check if Outlook is able to connect to the server and the sync issue is resolved.
Note: When you use this method to rebuild or configure a new email profile, Outlook creates a new OST file and syncs it with the mailbox server. As a result, all changes saved in the previous OST file are lost. For instance, if the server goes down and you have important emails in your local OST files, you won't be able to restore them. To completely restore your mailbox data from the local snapshot of the OST, use a third-party converter tool such as EdbMails, as described in the following step.
- Step 1: Close Outlook and locate the OST file
- Method 13: Fix Outlook sync issues by repairing the OST file
EdbMails is the best solution to resolve Outlook not syncing issues in Windows 10, 11, 8, 7, and all versions of Outlook, including 2021, 2019, 2016, 2013, 2010, and 2007. It preserves the data integrity in your Outlook data file and enables you to export all your mailbox data from a current or backup snapshot of an OST file to PST files.
- Step 1: Download and launch EdbMails OST converter
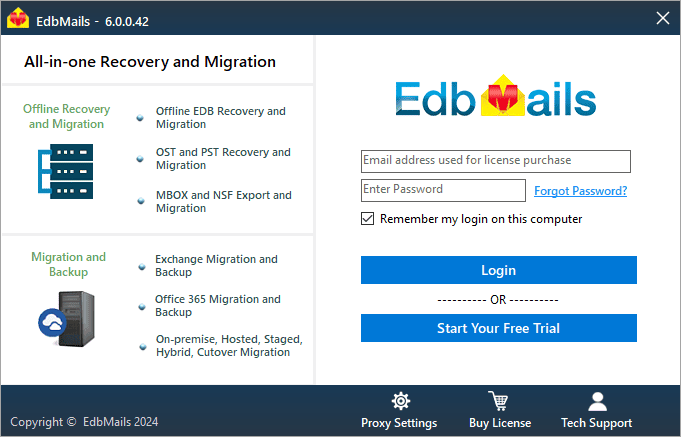
- Install the EdbMails OST to PST Converter on your computer
- Click ‘Start Your Free Trial’ to start using the application
- Select the OST conversion and migration option from the main window
- Step 2: Select the OST file to repair and convert to PST
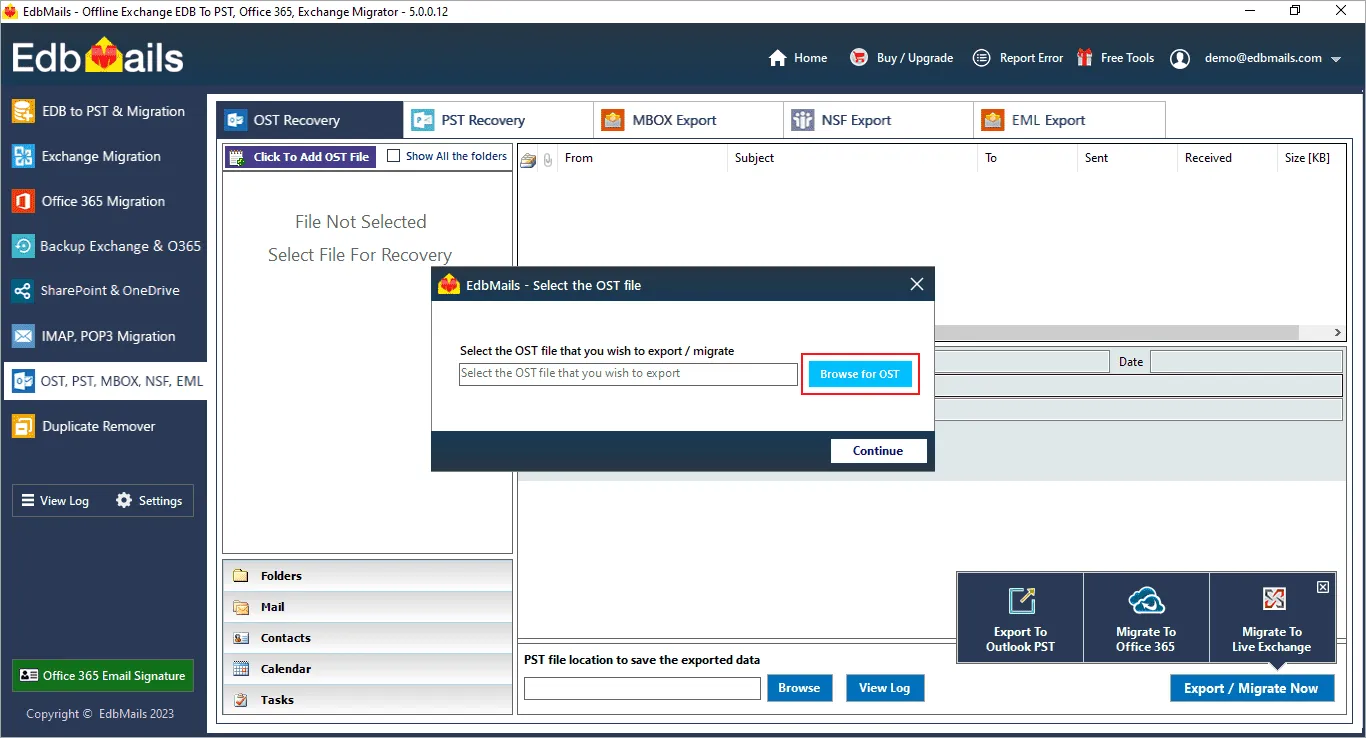
- In the EdbMails application, click ‘Browse’ to add the OST file
- Select the OST file from your computer associated with your email account and the application allows you to open the OST file without Outlook.
- Step 3: Preview the OST file and select the PST saving location
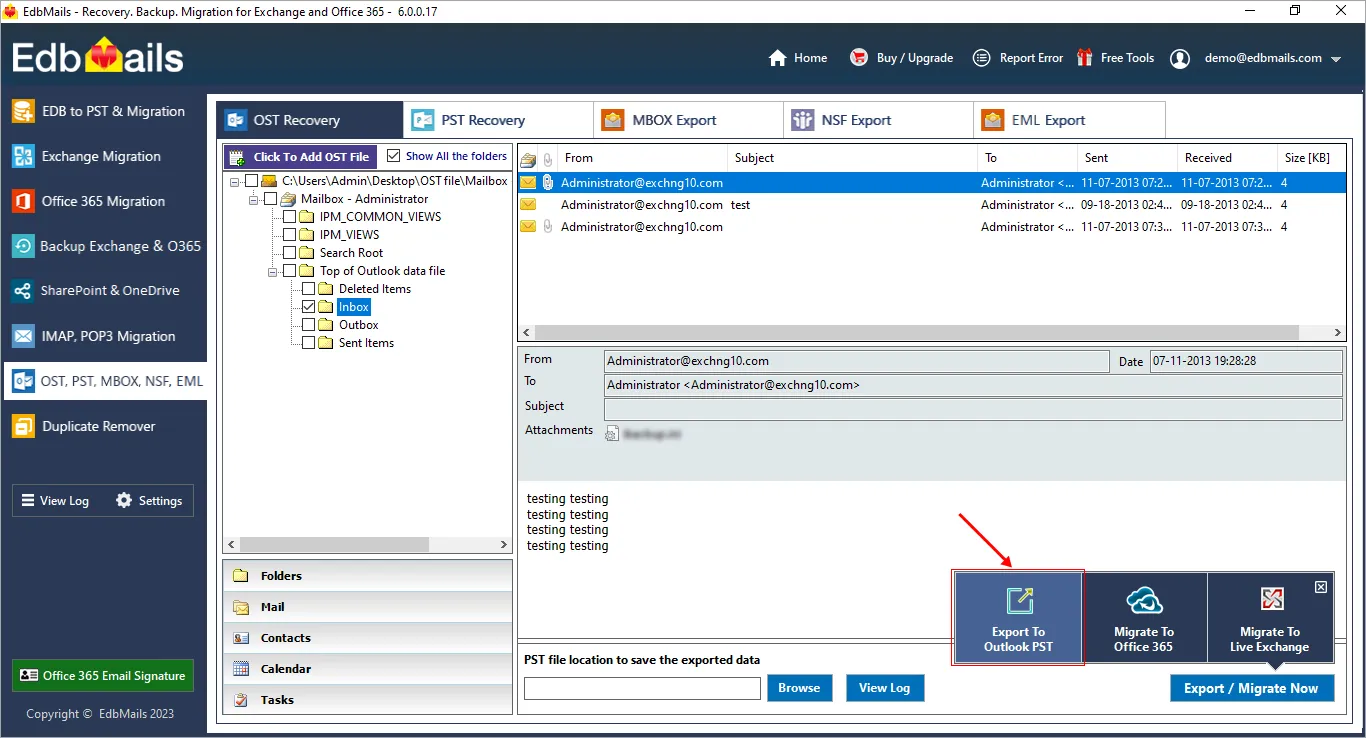
- Preview the contents of the selected OST file and select the mail items that you would like to export.
- Select the ‘Export to Outlook PST’ option to convert the OST file to PST.
Tip: EdbMails also enables you to restore and export deleted items from the OST to PST.
- Step 4: Convert OST to PST and import the mail data into Outlook
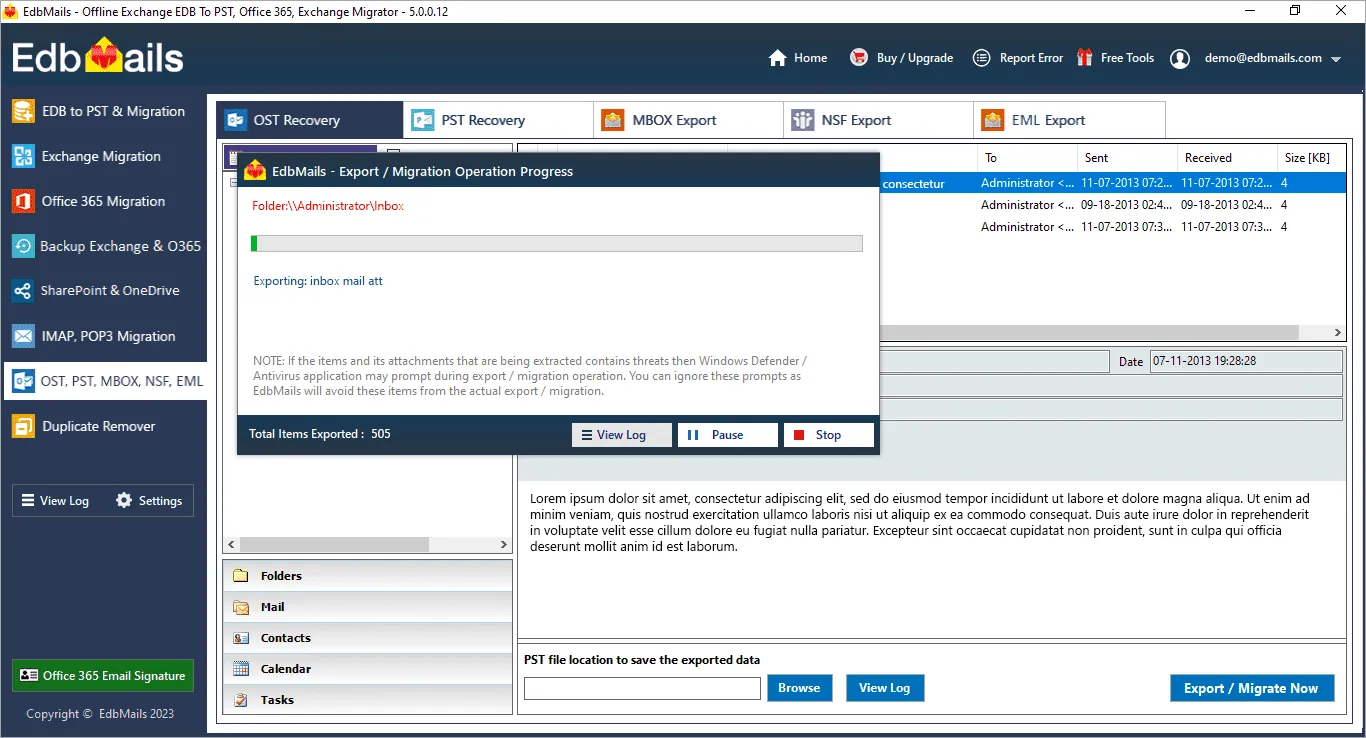
- Choose a location to save the PST file and start the conversion operation.
- Verify the exported emails and mail data with the log report.
- Import the PST file into Outlook and synchronize all your email data with the mailbox server.
- Step 1: Download and launch EdbMails OST converter

