IMAP to Office 365 Shared mailbox migration
Migrating emails from an IMAP server to Office 365 Shared Mailboxes is a common need for organizations aiming to centralize communication and improve team collaboration. IMAP allows basic email access across devices, but it lacks the collaborative features and administrative control that Office 365 Shared Mailboxes offer. Shared Mailboxes enable multiple users to access and manage a single mailbox, making them ideal for support, sales, or info@ email addresses within a business environment.
EdbMails offers a dedicated IMAP Migration Tool that simplifies the entire process. With support for a wide range of IMAP-enabled servers such as Gmail, Outlook, Yahoo, Zimbra, and others, EdbMails allows direct migration of emails into Office 365 Shared Mailboxes. The software maintains email folder structure, metadata, and attachments during migration and offers filter options to migrate specific data as needed. Its intuitive interface ensures even non-technical users can perform the migration without hassle, while ensuring data integrity and security throughout the process.

The following section covers migration planning, prerequisites, step-by-step procedure, post-migration activities, and the benefits of using EdbMails for IMAP to Office 365 Shared Mailbox migration.
IMAP to Office 365 Shared mailbox migration planning
Planning is one of the most important steps before you begin your IMAP to Office 365 Shared mailbox migration. Here is a brief checklist of points to consider before you migrate.
- Remove unused mailboxes, mail items and duplicate files from the source.
- Make an inventory of items before you make the move. These should include but are not limited to the following items.
- User accounts, email addresses and login credentials
- The source and target details, browser and operating systems used
- Network settings, DNS configurations, MX records, firewall settings
- Licensing plans on your current source server
- Active Directory configuration and other dependencies associated with it.
- Determine the size of the data and number of mailboxes you want to migrate.
- Decide if you want to migrate everything at once (cutover migration) or plan to migrate your data in stages (staged migration).
- Based on the preceding factors, estimate the approximate time that may take for the migration.
- Create appropriate user mailboxes on Office 365 and assign licenses to them.
- Ensure you have enough network capacity and bandwidth to migrate.
- Consider the throttling and message size limits on Office 365.
- Communicate the migration plan and changes to your end users and stakeholders.
- Perform a test migration before you start the actual one.
- Start the actual migration, verify the endpoints and update the MX records.
- Check for correct mail flow and configure Outlook for all the users.
- Plan for decommissioning unused apps and their settings post migration
Pre migration activities for IMAP to Office 365 Shared mailbox migration
On source IMAP server:
- Ready with your IMAP server hostname, port number, email address, and password.
- To migrate multiple users, download the sample CSV file from the EdbMails application and update the details such as IMAP server hostname, port number, email address, and password for each user's mailbox you want to migrate.
- If you are connecting to Gmail, create an app password and use it instead of your regular password.
On Office 365 server:
- Prepare your target Office 365 tenant. See tenant roadmap for Microsoft 365.
- Purchase a suitable Office 365 licensing plan. You can also sign up for a 30 day free trial and decide to go with a suitable one later. Compare Office 365 business plans and Compare Office 365 enterprise plans
- Before migrating from IMAP server to Office 365, ensure that you create mailboxes for your user. You can choose EdbMails to automatically create mailboxes on target servers. However, if you want to create the mailboxes manually, refer to the links below
- If you plan to migrate to public folders and shared mailboxes on Office 365, ensure that you create and configure them on the target server.
- Ensure that you have a global admin account with a mailbox for Auto Registration of EdbMails application on your Entra ID (Azure Active Directory). However, you can use either a global admin account or any user account with full access rights in the Manual Registration method.
- If you have a custom email domain to which you want to receive emails after the migration, you must add and verify the domain on Office 365. Steps to add a custom domain to Office 365 and steps to add DNS records to connect your domain.
- Ensure that you meet the network and bandwidth requirements for the migration. See network and migration planning, performance factors and best practices for Office 365 migration.
- Configure Office 365 to send and receive large messages. Follow the steps to increase the message size on Office 365 to 150MB. See message size limits on Office 365 for more information.
Steps to migrate IMAP to Office 365 Shared mailbox
Step 1: Download and install EdbMails software
- Download and install EdbMails on your computer.
See EdbMails system requirements for IMAP to Office 365 Shared mailbox migration
- Launch the application
- Enter your registered email address and password or click the 'Login' button or click the 'Start Your Free Trial' button.

- Select the option ‘IMAP (Gmail, Outlook & more) Migration’
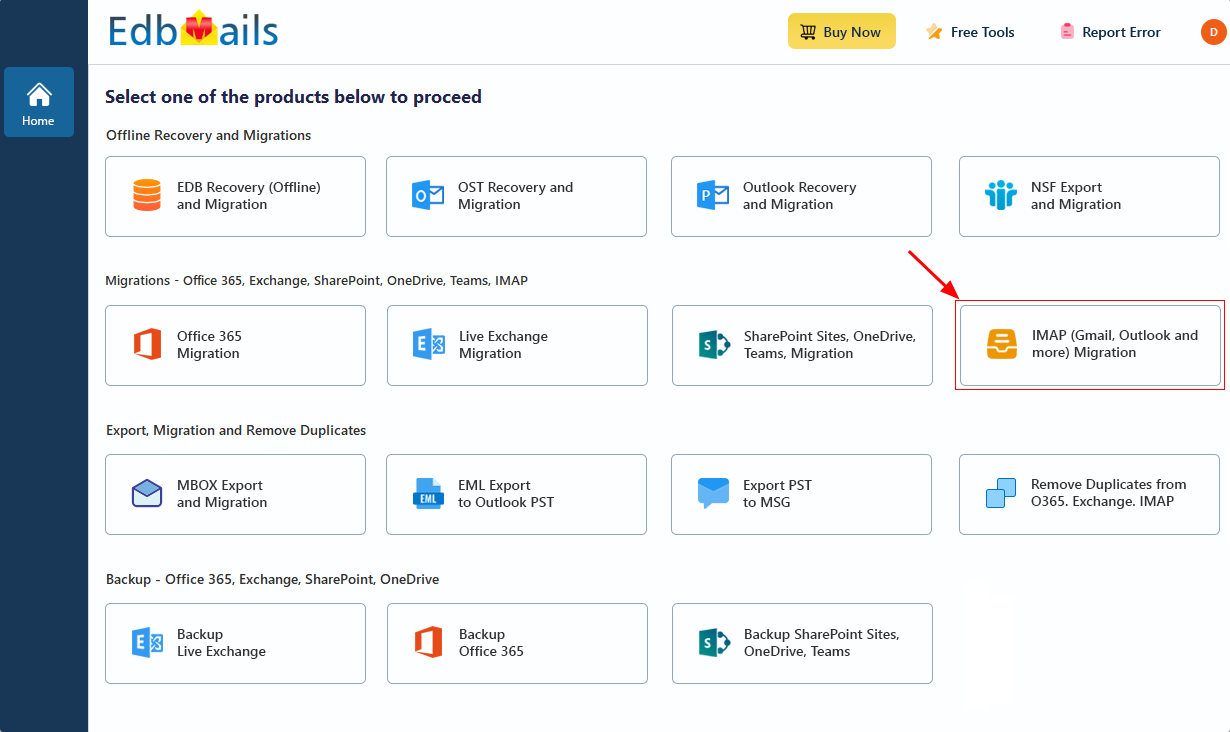
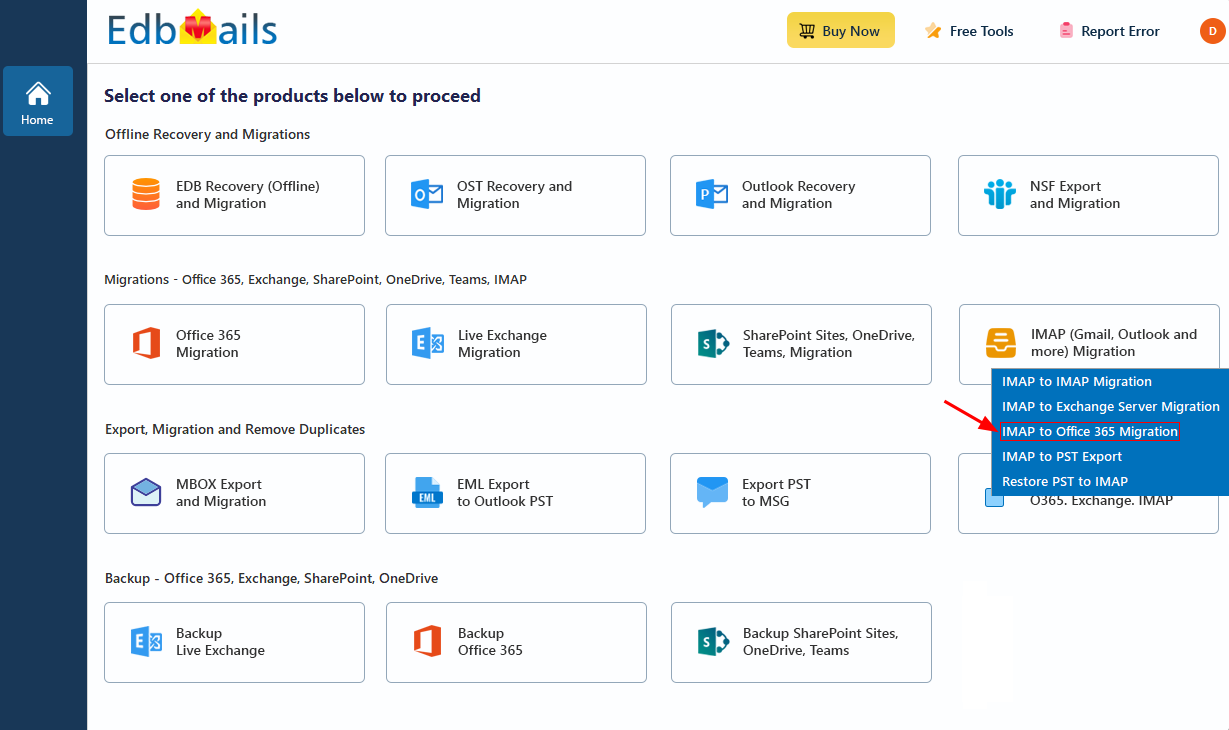
- Select ‘IMAP to Office 365 Migration’.
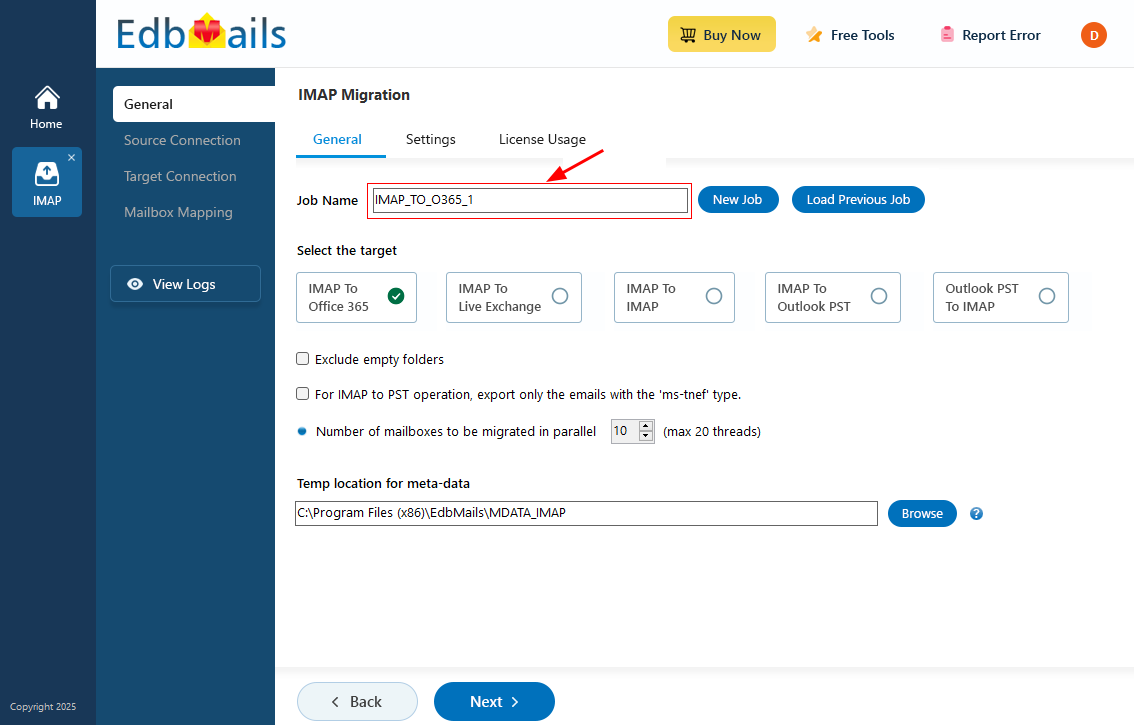
- Use the default job name, or click 'New Job' to modify it and continue.
- Download and install EdbMails on your computer.
Step 2: Connect to source IMAP server
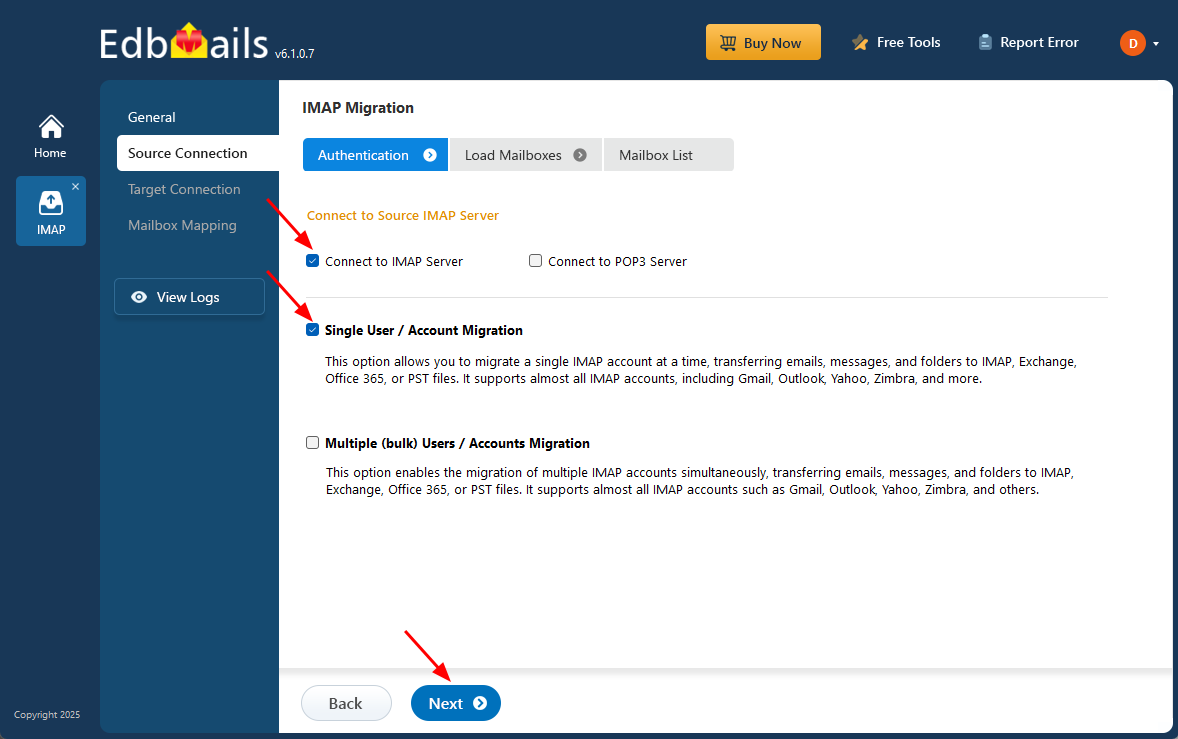
- To connect an individual user account, choose ‘Single User / Account Migration.’ Next, select the appropriate protocol, such as ‘Connect to IMAP Server’ or ‘Connect to POP3 Server,’ and click ‘Next’ to continue.
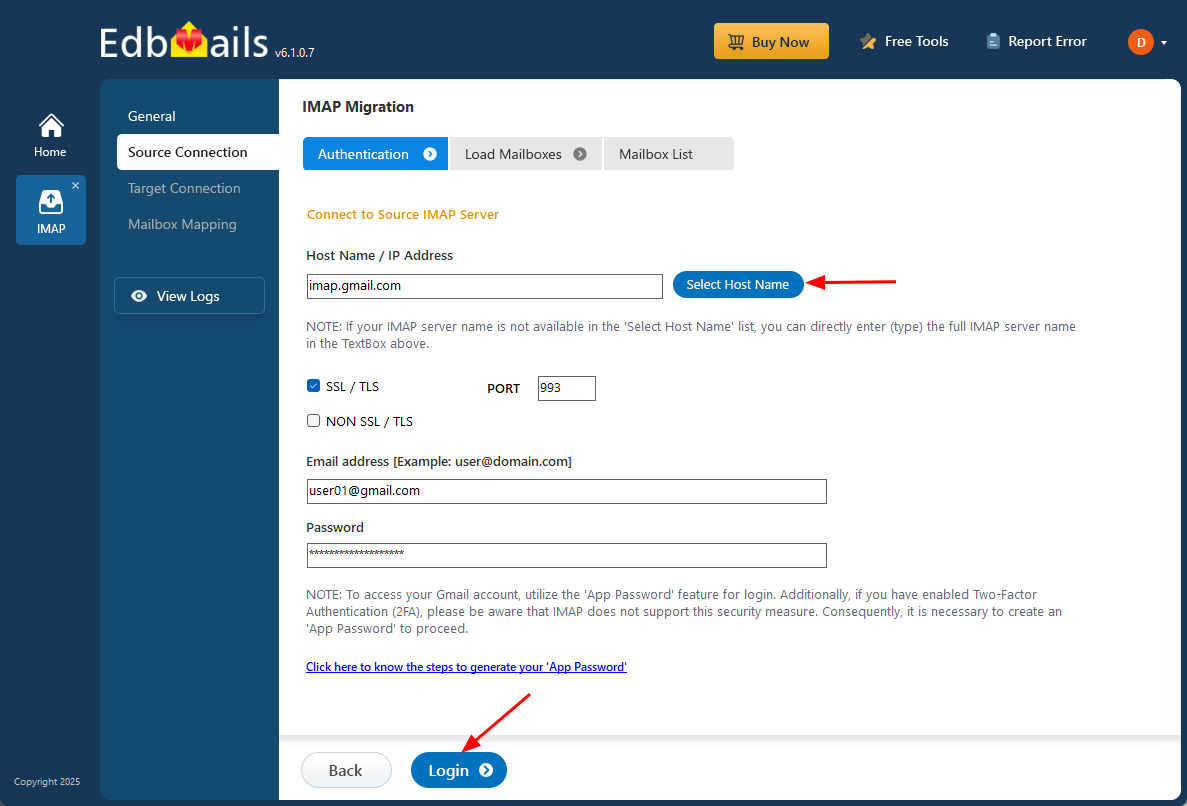
- For single-user login, select your IMAP host name from the list or enter it manually. Then, enter your IMAP email address along with the password.
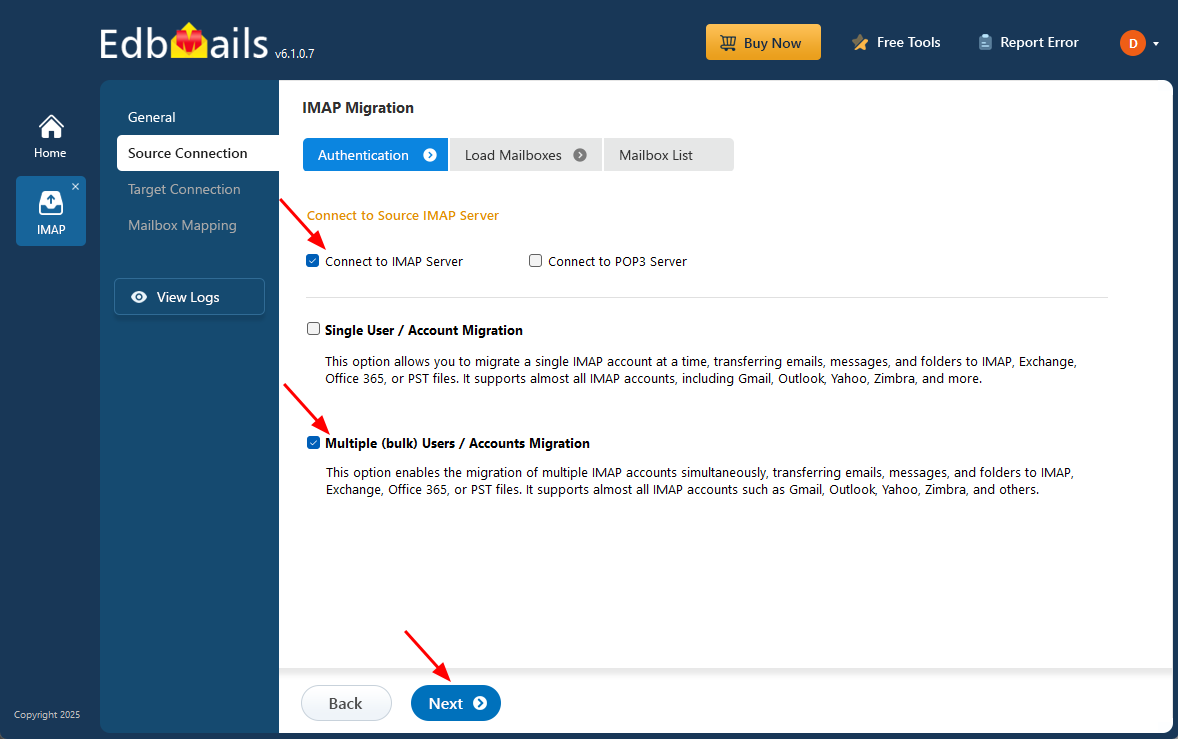
- For migrating multiple mailboxes, select ‘Multiple (Bulk) Users/Accounts Migration' and click ‘Next’.
- Click ‘Download Sample CSV File’
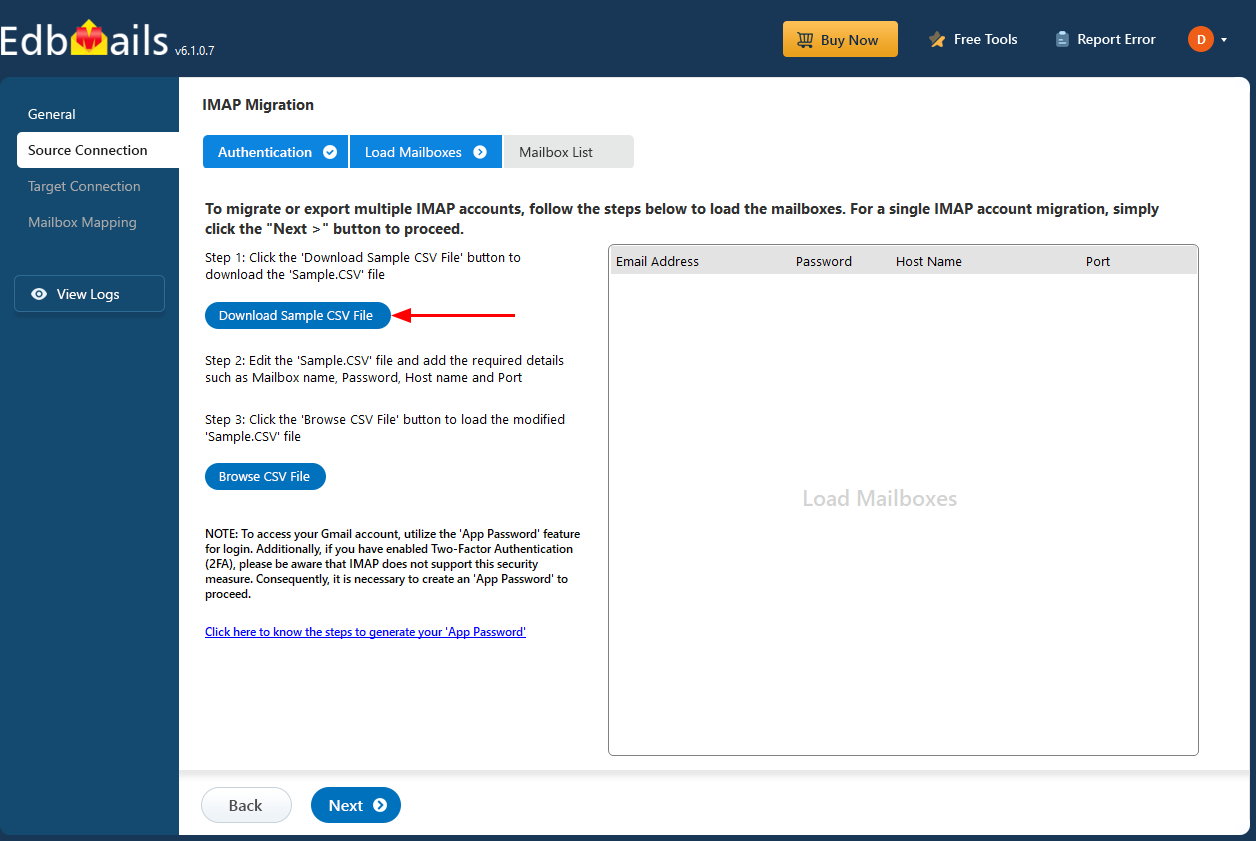
- Modify the CSV file with the required details such as email address, password, host name and port number and save the changes.
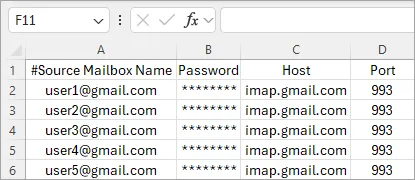
- Close the CSV file, then click 'Browse CSV File' and select the updated file.
Verify the mailboxes and click 'Next' to proceed.

Refer to the EdbMails detailed steps on connecting to single and multiple users during IMAP migration.
- To connect an individual user account, choose ‘Single User / Account Migration.’ Next, select the appropriate protocol, such as ‘Connect to IMAP Server’ or ‘Connect to POP3 Server,’ and click ‘Next’ to continue.
Step 3: Select source IMAP server mailboxes
- Select the mailboxes or folders to migrate, then click ‘Next’.
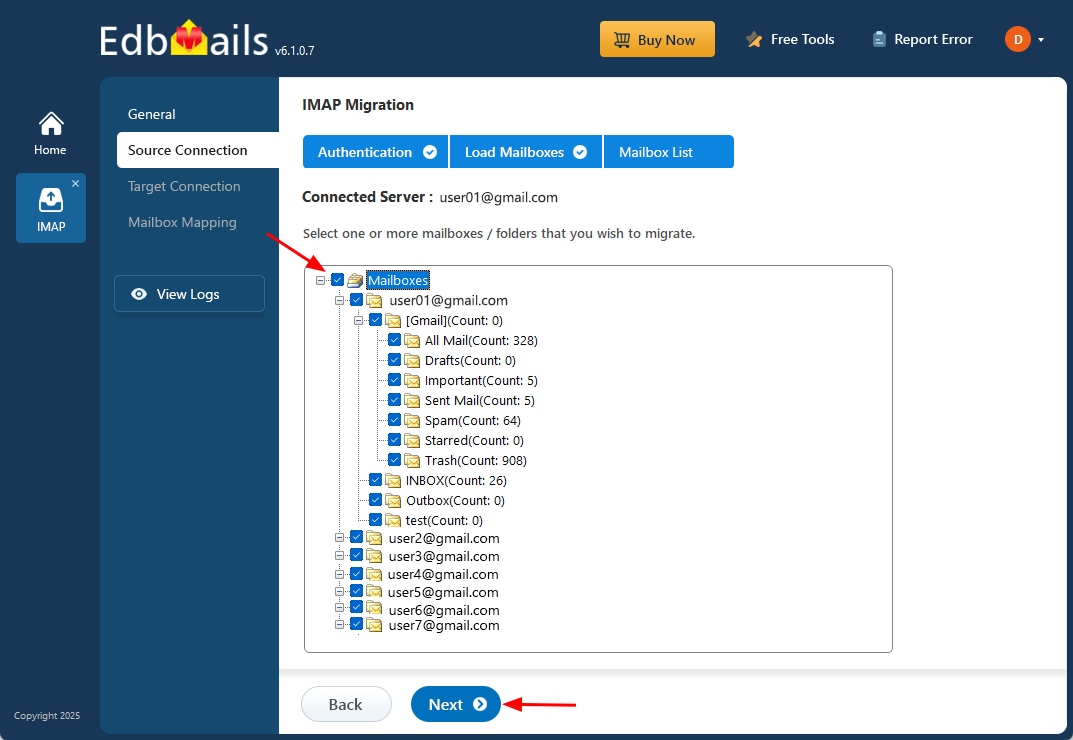
- Select the mailboxes or folders to migrate, then click ‘Next’.
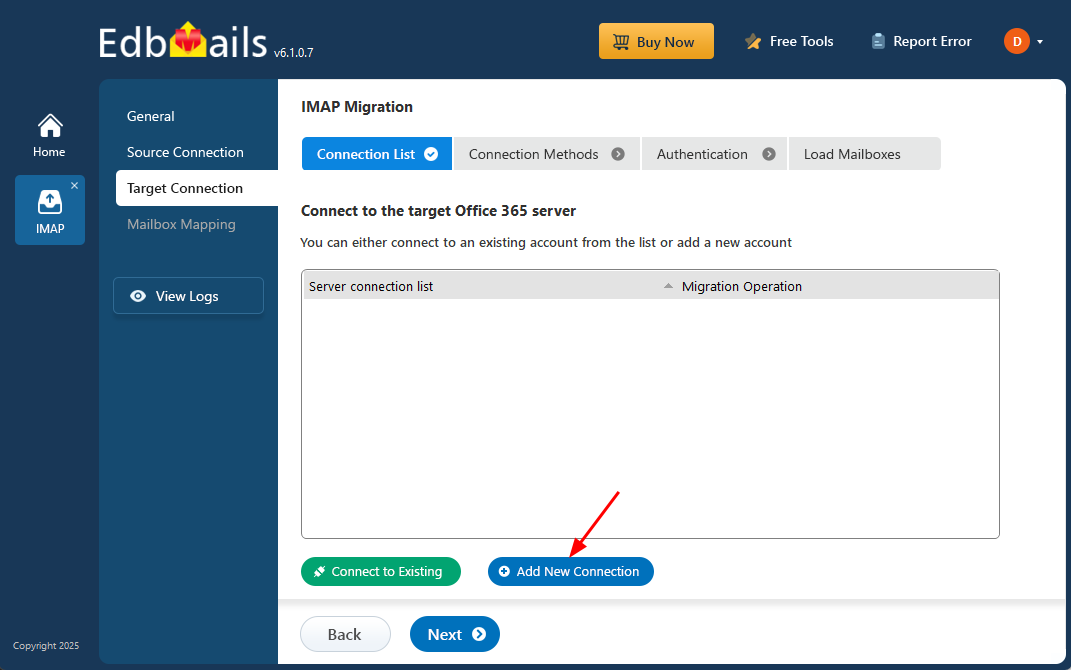
Step 4: Connect to the target Office 365 server
- Click the ‘Add New Connection’ button to establish a new connection to the target Office 365. To use the previous connection, select it from the connection list and click the ‘Connect to Existing’ button to proceed.
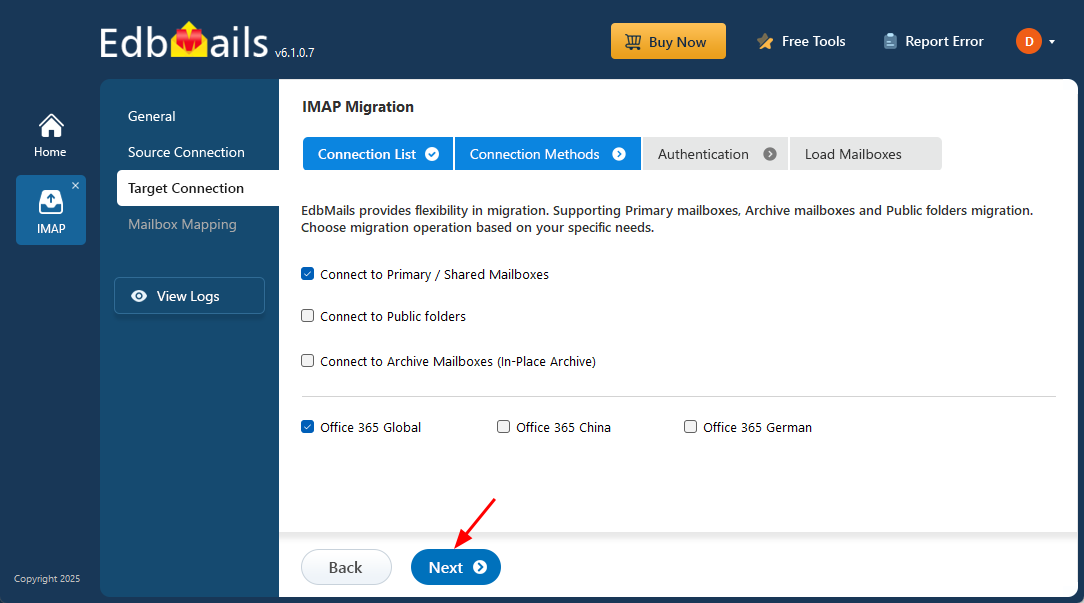
- Select the ‘Connect to Primary/Shared Mailboxes’ option to connect to Office 365 shared mailboxes, then click ‘Next’ to proceed.
- Select one of the authentication methods and Click the ‘Login’ button to continue.
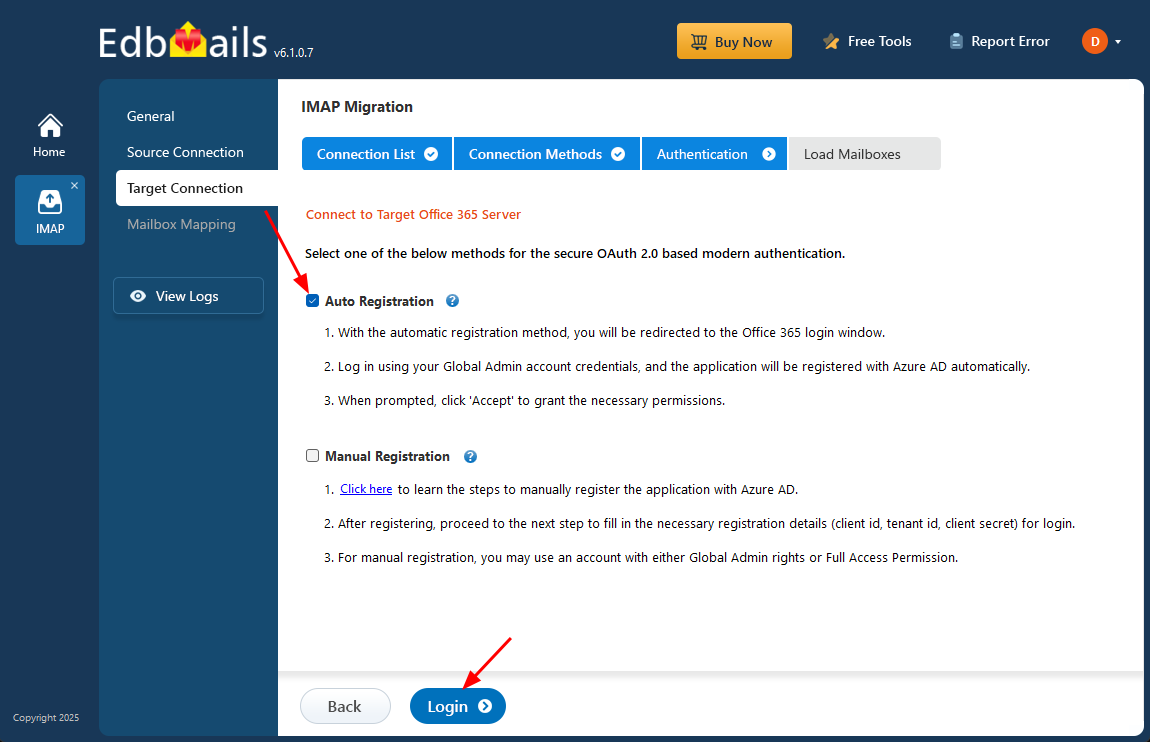
- Authenticate on Microsoft sign-in page.

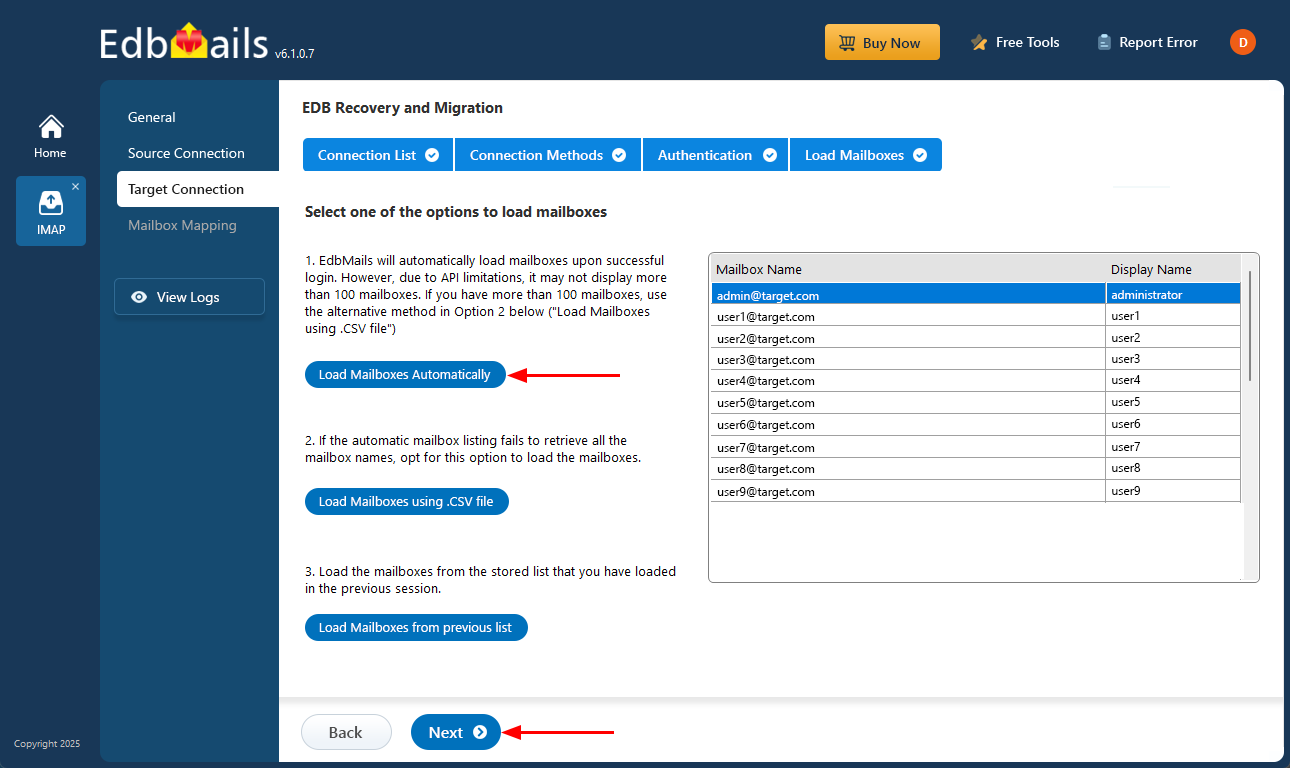
- Select one of the methods to load the mailboxes.
- Due to Microsoft API limitations, the application automatically loads up to 100 mailboxes. If you have more than 100, use a CSV file to load the additional mailboxes and click 'Next'.
- Click the ‘Add New Connection’ button to establish a new connection to the target Office 365. To use the previous connection, select it from the connection list and click the ‘Connect to Existing’ button to proceed.
Step 5: Map source and target mailboxes
- Choose the required mailbox mapping option
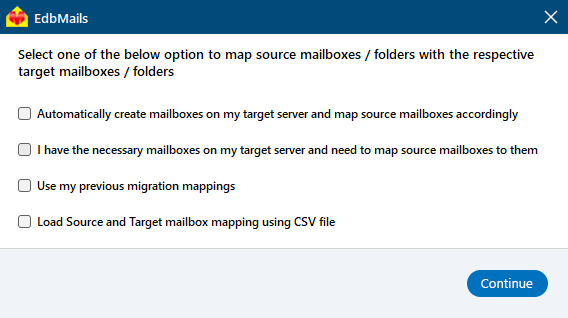
- EdbMails automatically maps source IMAP mailboxes to the target Office 365 Shared Mailboxes, simplifying large-scale migrations. You also have the option to manually map source and target mailboxes.
- Choose the required mailbox mapping option
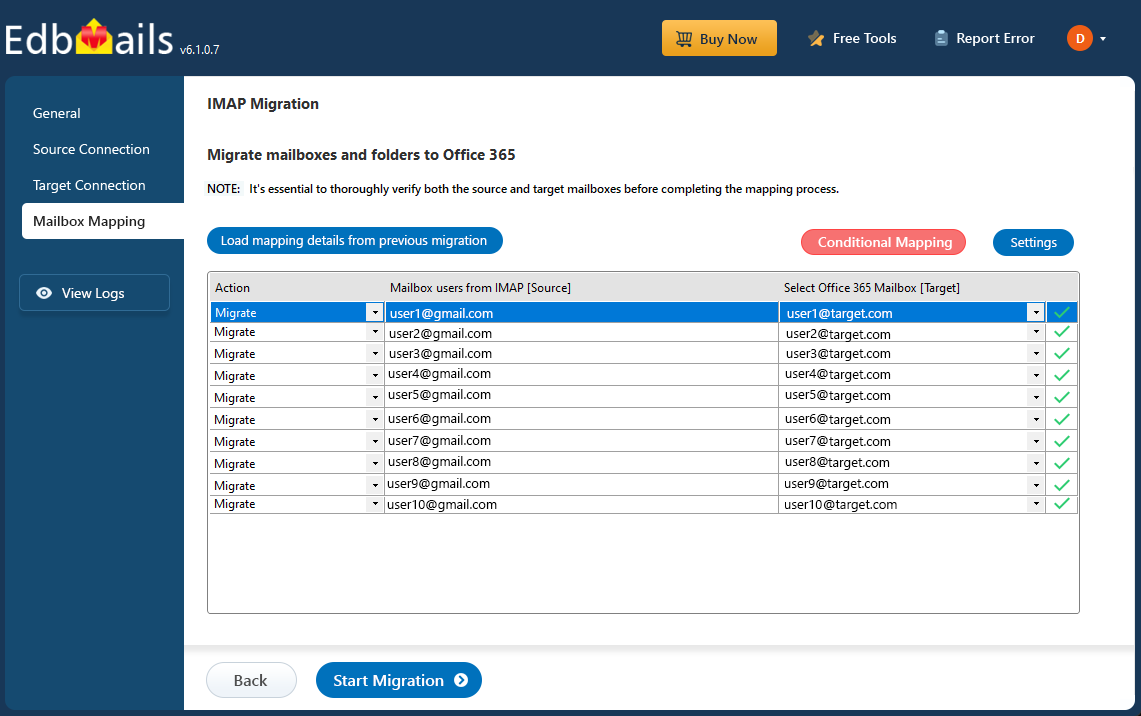
Step 6: Start IMAP to Office 365 shared mailbox migration operation
- After mapping the mailboxes, click the ‘Start Migration’ button and initiate the migration process.
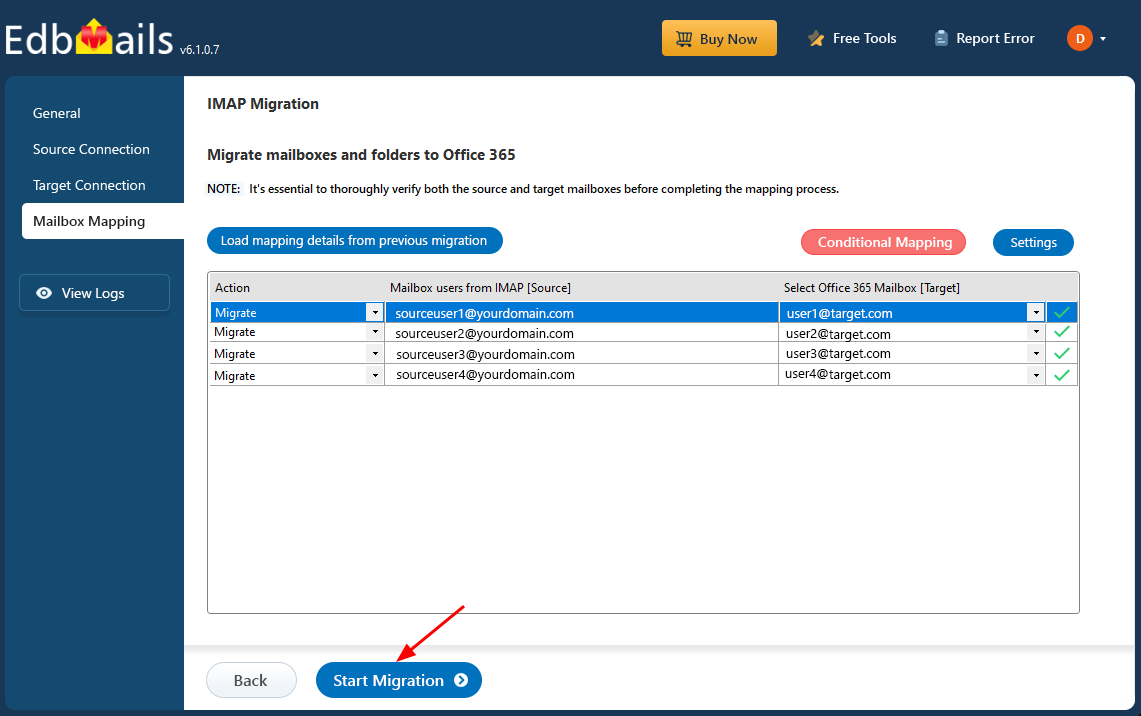
- Click the ‘View Logs’ button to see the IMAP migration report, which provides a detailed summary of the process, including the total number of items migrated and a folder-wise item count.
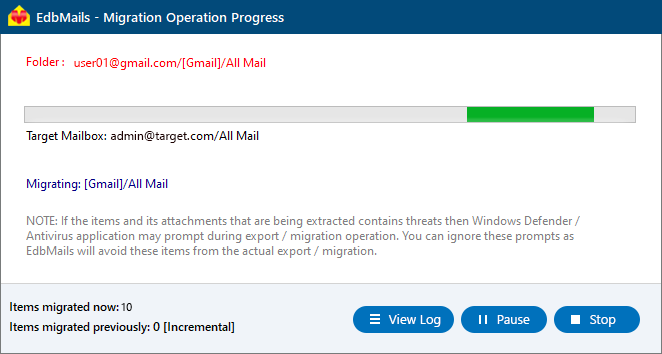
- After mapping the mailboxes, click the ‘Start Migration’ button and initiate the migration process.
IMAP to Office 365 Shared mailbox post-migration activities
- Step 1: Update DNS records (MX record) to point to Office 365
Update your MX records in your DNS to start receiving messages on Office 365. This switch ensures smooth email operation with your newly migrated server. Additionally, set up the Autodiscover record for the Outlook connectivity to the migrated mailboxes.
- Step 2: Create a new Outlook profile for users in the new domain
Remove any previous instances of the email account you may have on Outlook to avoid conflicts with Office 365. Configure and recreate the Outlook profile for each user in your domain after you complete the migration.
- Step 1: Update DNS records (MX record) to point to Office 365
IMAP to Office 365 Shared mailbox migration troubleshooting
For common migration issues, check the knowledge base articles. For more information on EdbMails IMAP migration, visit the frequently asked questions section or contact our support team.
Benefits of EdbMails for IMAP to Office 365 Shared mailbox migration
- Single hop migration
EdbMails ensures a smooth, direct migration from IMAP to Office 365 Shared mailboxes in a single hop, eliminating the need for multiple steps. This saves time and minimizes the risk of data loss during intermediate stages.
- Automatic mailbox mapping
With EdbMails, mailbox mapping is automated, accurately matching IMAP mailboxes with Office 365 counterparts. This feature reduces manual effort and ensures that each user’s data is migrated to the correct destination without errors.
- Metadata integrity
EdbMails preserves the integrity of email metadata during migration, ensuring that crucial information like timestamps, sender details, and folder structure remains intact. This maintains the organization and context of emails after migration.
- Language compatibility
EdbMails supports migration in various languages, making it ideal for international organizations. Emails, regardless of their language or character encoding, are accurately migrated without any data corruption or loss of information.
- Free software updates
EdbMails offers free software updates, ensuring that your migration process stays aligned with the latest Office 365 features and security updates. This guarantees compatibility and up-to-date functionality for a reliable migration.