HostMonster to Office 365 migration
HostMonster, a trusted provider of hosting and domain services since 1996, has expanded its offerings to include VPNs, dedicated hosting, and more. Their hosting packages come with features like unlimited disk storage, a drag-and-drop site builder, multiple webmail options (Horde, RoundCube), cPanel for easy management, IMAP email support, and spam protection. While these features are sufficient for small businesses, as companies grow, the limitations of HostMonster's email services become more apparent.
To address these challenges, many businesses are migrating to Microsoft 365 (Office 365) for its robust and scalable solutions. Office 365 offers advanced tools such as seamless integration with Microsoft Teams, enabling users to schedule and join meetings directly from their inbox. Additionally, Office 365 supports cloud-based document storage and real-time collaboration, empowering teams to work together more efficiently—key features that are lacking in HostMonster’s email solutions.

EdbMails IMAP migration software simplifies this migration process by ensuring a seamless transfer of emails, folders, attachments, and other mail items from HostMonster to Office 365, with no data loss or downtime. Its user-friendly interface eliminates the need for complex scripts, allowing even non-technical users to carry out the migration smoothly. EdbMails supports selective migration, letting businesses choose which items to transfer, and its pause and resume feature gives you full control over the migration timeline. The delta migration option ensures that only newly added or modified items are transferred, preventing duplication. With these advanced features, EdbMails ensures a smooth and efficient HostMonster to Office 365 migration, allowing businesses to leverage the platform's full potential without hassle.
User Query
“Our company is planning to migrate to Office 365. Currently, our website domain is hosted by HostMonster. To ensure a smooth migration, we’re gathering all the necessary information in advance for transferring our emails from Horde to Office 365. We need to retain our current domain name and ensure that emails sent to our HostMonster domain are seamlessly routed to Office 365. Could someone guide us on the best approach to achieve this without experiencing any downtime or issues? Thanks”
HostMonster to Office 365 migration planning
Proper planning is crucial before you begin HostMonster to Office 365 migration. Below is a checklist to ensure a smooth and secure migration process.
- Determine the size of the data and the number of mailboxes you want to migrate.
- Make a list of all the data and permissions from HostMonster email that you want to transfer.
- Create appropriate user mailboxes on Office 365 and assign licenses to them.
- Ensure you have enough network capacity and bandwidth to migrate.
- Communicate the migration plan and flow to your end users.
Pre-migration steps for HostMonster to Office 365
- Have the users email address, passwords, IMAP hostname and port number.
- Find the IMAP server name of your HostMonster server. You can find this information from your server’s dashboard settings or by connecting your email system to Outlook.
- Before you migrate HostMonster to Office 365, ensure that you create mailboxes for your users in your organization and assign suitable licenses to them.
- If you have a custom email domain from your hosting provider to which you want to migrate and receive emails, you must add and verify the domain on Office 365.
Steps to add a custom domain to Office 365 and Steps to add DNS records to connect your domain.
- Configure Office 365 to send and receive large messages.
Follow the steps to increase the message size on Office 365 to 150MB and see tips to optimize IMAP migration to Exchange online.
Steps to migrate from HostMonster to Office 365 using EdbMails
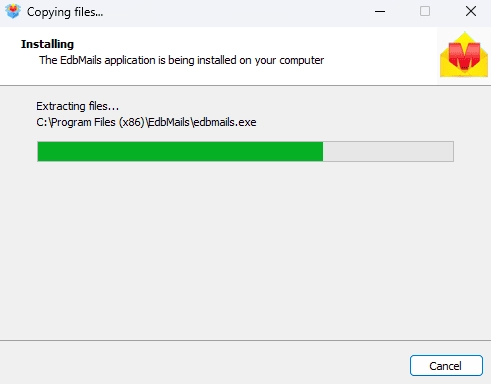
Step 1: Download and Install EdbMails software
- Download and install the EdbMails application on your computer running on Windows OS.
See a detailed list of EdbMails system requirements for IMAP migration.
- Launch the application and log in using your email and password if you already have an account, or click ‘Start Your Free Trial’ to explore the app without signing up immediately.

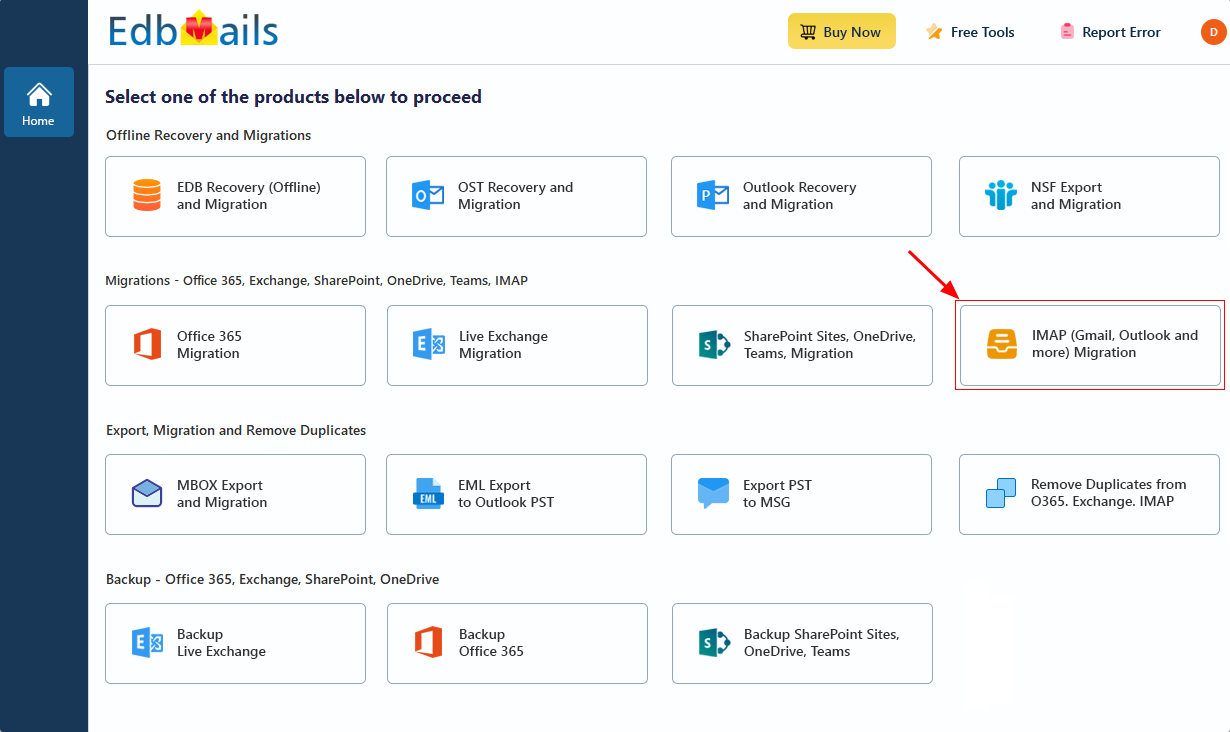
- Select the option ‘IMAP (Gmail, Outlook & more) Migration’.
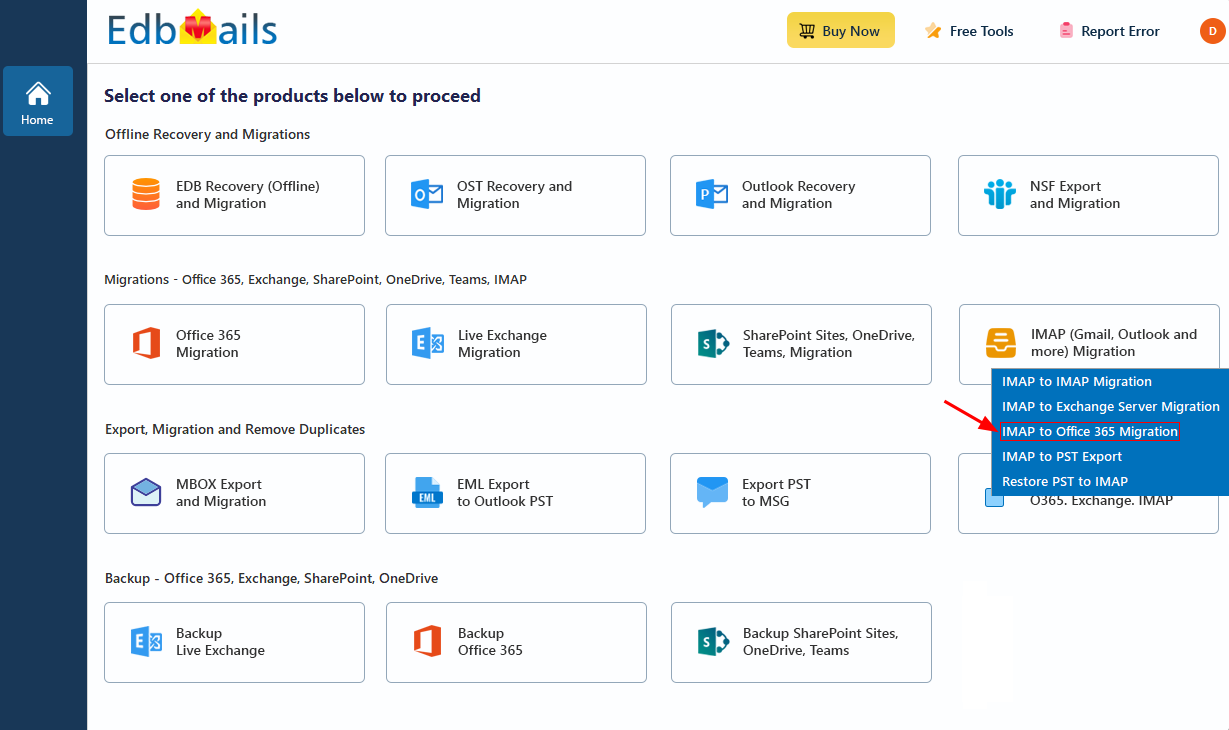
- Select ‘IMAP to Office 365 Migration’.
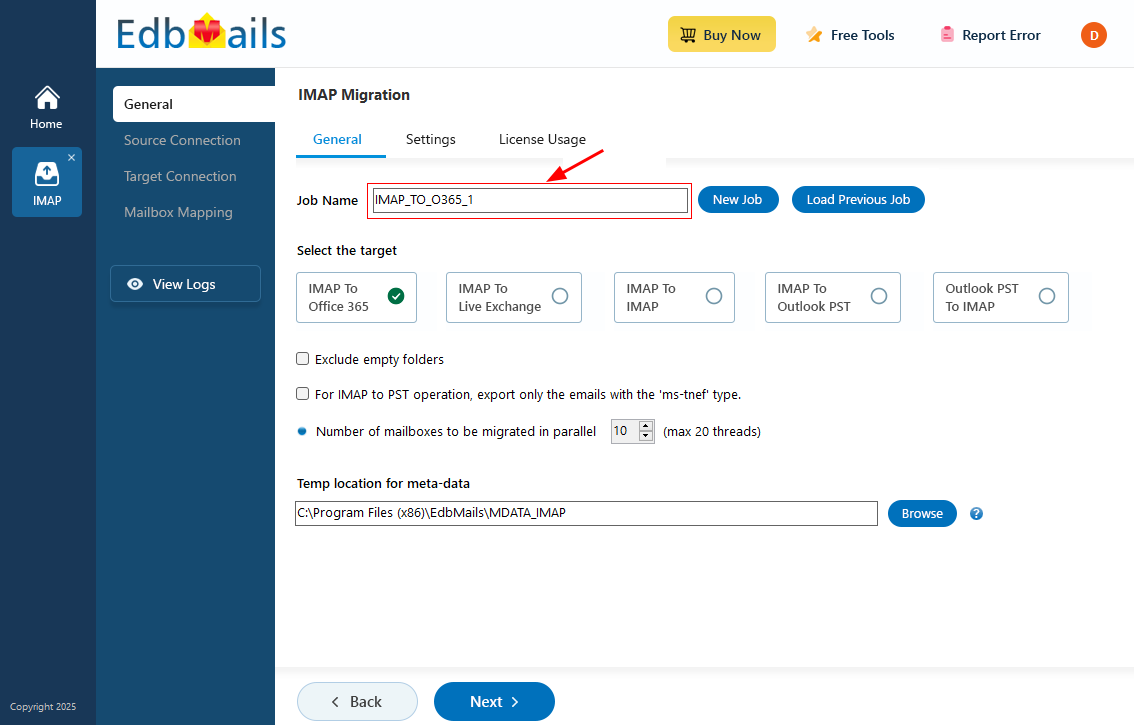
- You can either use the default job name or click on 'New Job' to customize it as needed.
- Download and install the EdbMails application on your computer running on Windows OS.
Step 2: Connect to source Hostmonster server
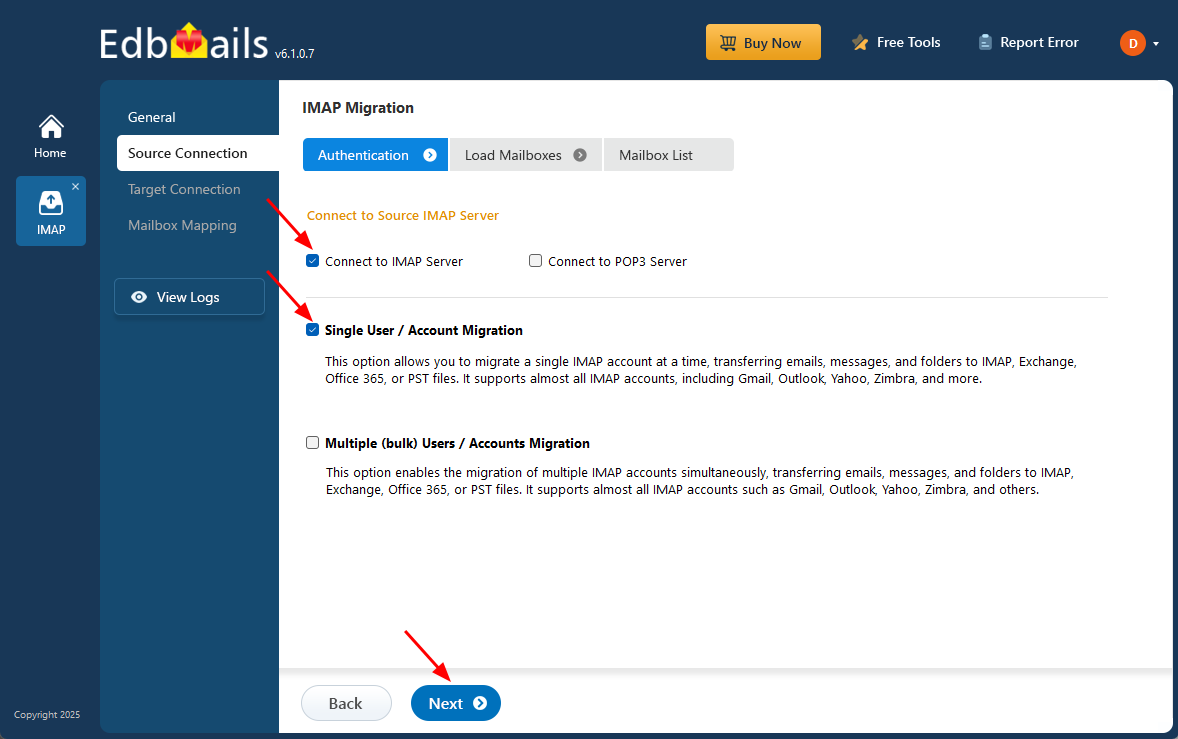
- To begin migrating a single user account, choose the ‘Single User / Account Migration’ option, then click ‘Next’ to move forward with the process.
- From the IMAP host list, select ‘Hostmonster’ or manually enter the IMAP server details specific to your account. Then, provide your full email address and password.
- Click the ‘Login’ button.

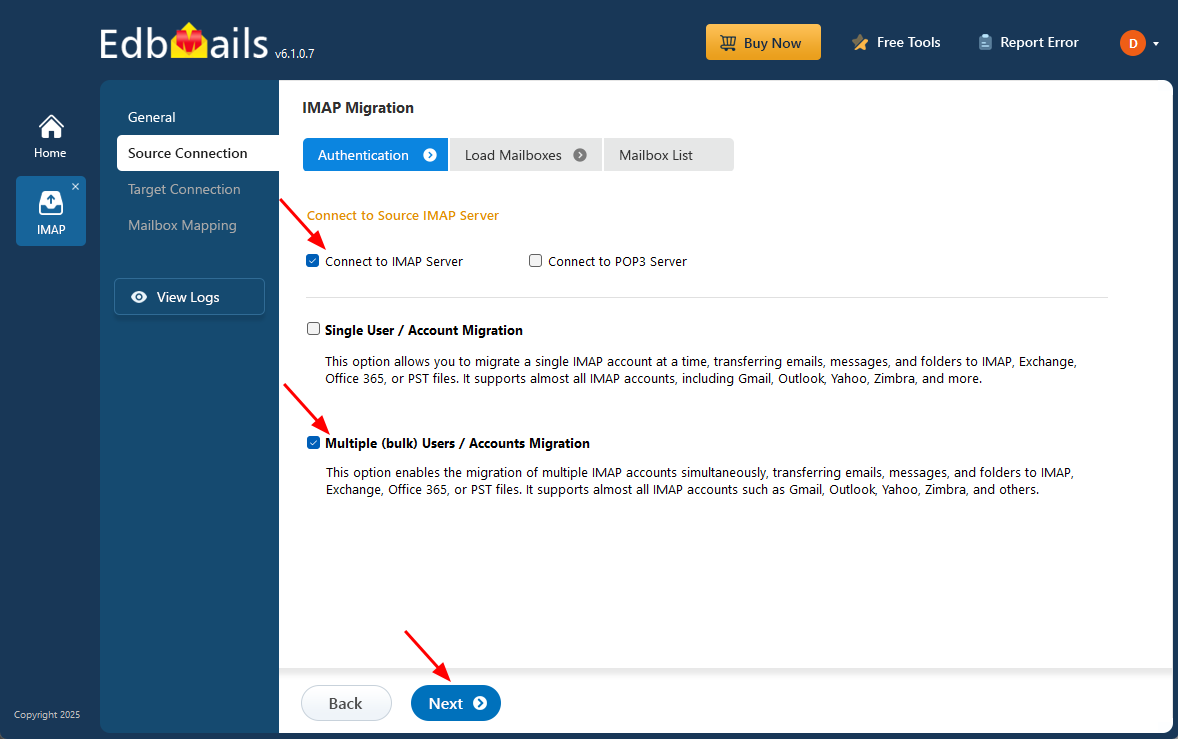
- To perform a bulk migration of multiple Hostmonster mailboxes, select the ‘Multiple (Bulk) Users/Accounts Migration’ option and click ‘Next’ to proceed with the configuration.
- Click ‘Download Sample CSV File’.
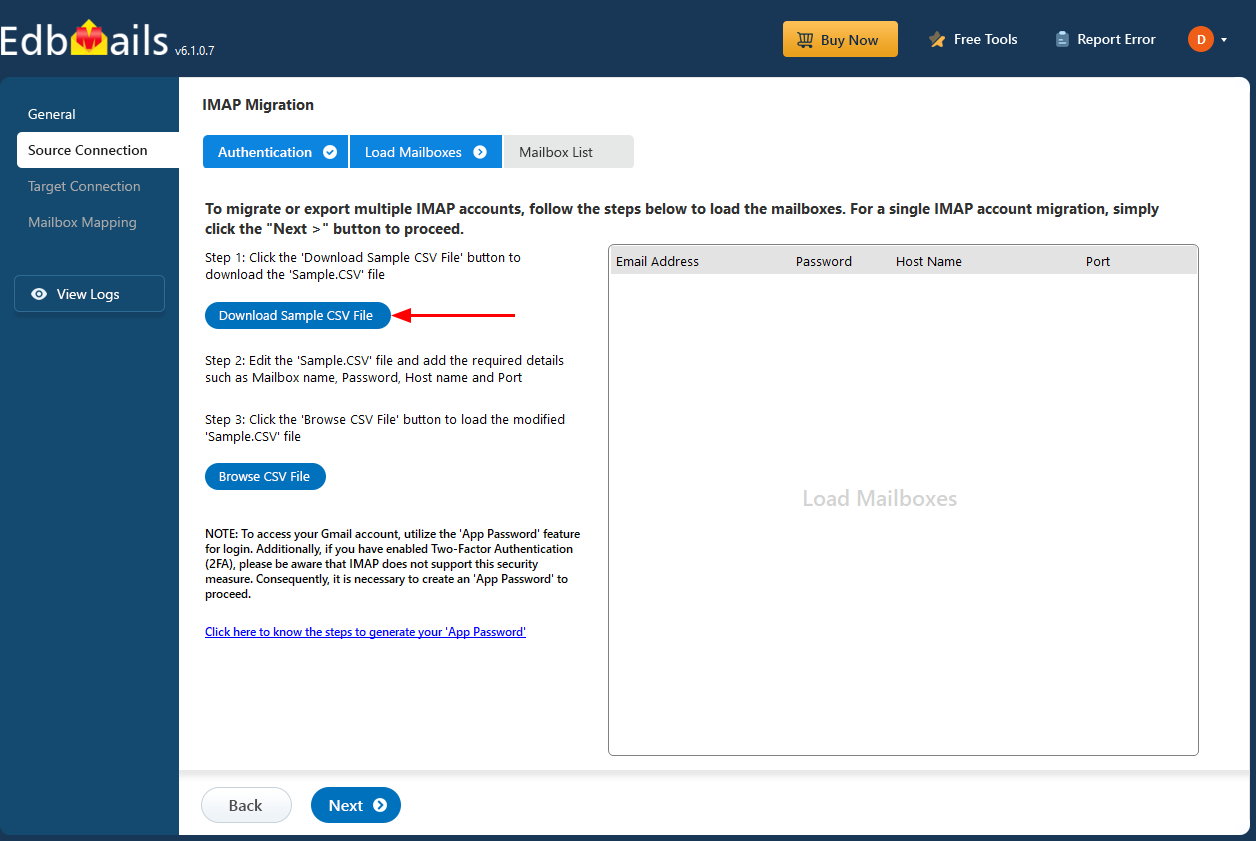
- Open the CSV file and enter the necessary details for each Hostmonster account you wish to migrate. This includes the user's email address, account password, IMAP server name, and the corresponding port number. After filling in all the required fields, save the file to proceed with the migration setup.

- Once you've updated the CSV file with all the necessary mailbox details, save and close the file.
- Then, click the 'Browse CSV File' button, navigate to the saved location, select your file, and upload it to continue with the migration process.

- To begin migrating a single user account, choose the ‘Single User / Account Migration’ option, then click ‘Next’ to move forward with the process.
Step 3: Select source HostMonster server mailboxes
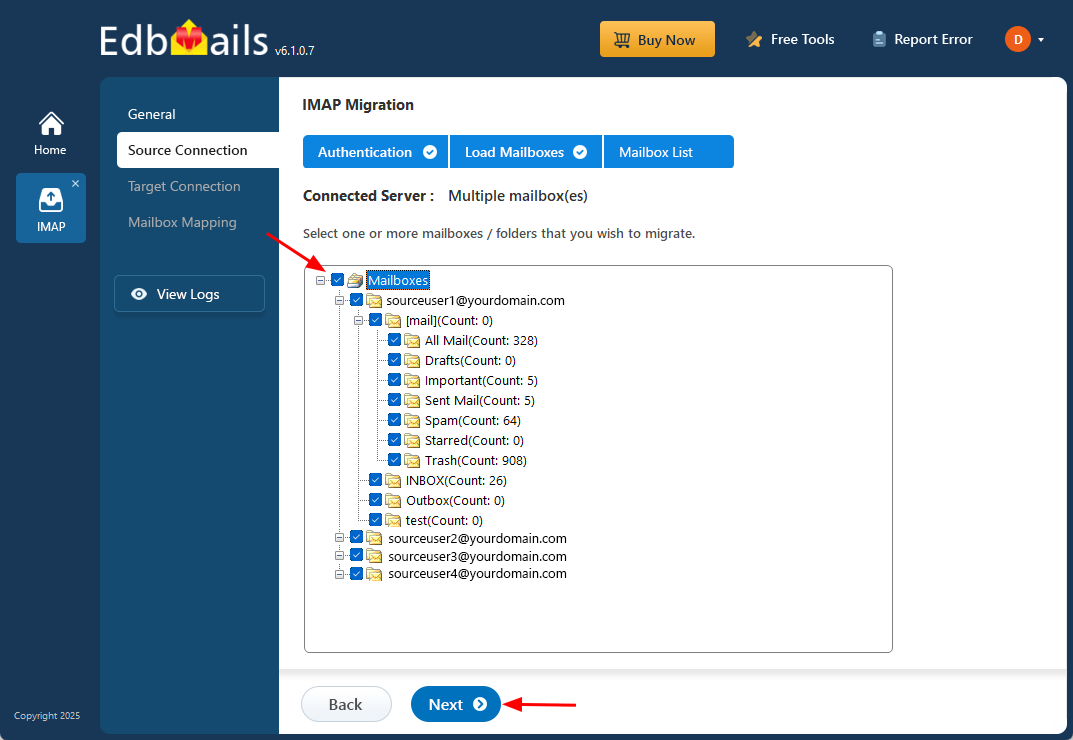
- Select the mailboxes or individual folders you want to include in the migration. Once you've made your selection, click ‘Next’ to move forward with the process.
- Select the mailboxes or individual folders you want to include in the migration. Once you've made your selection, click ‘Next’ to move forward with the process.
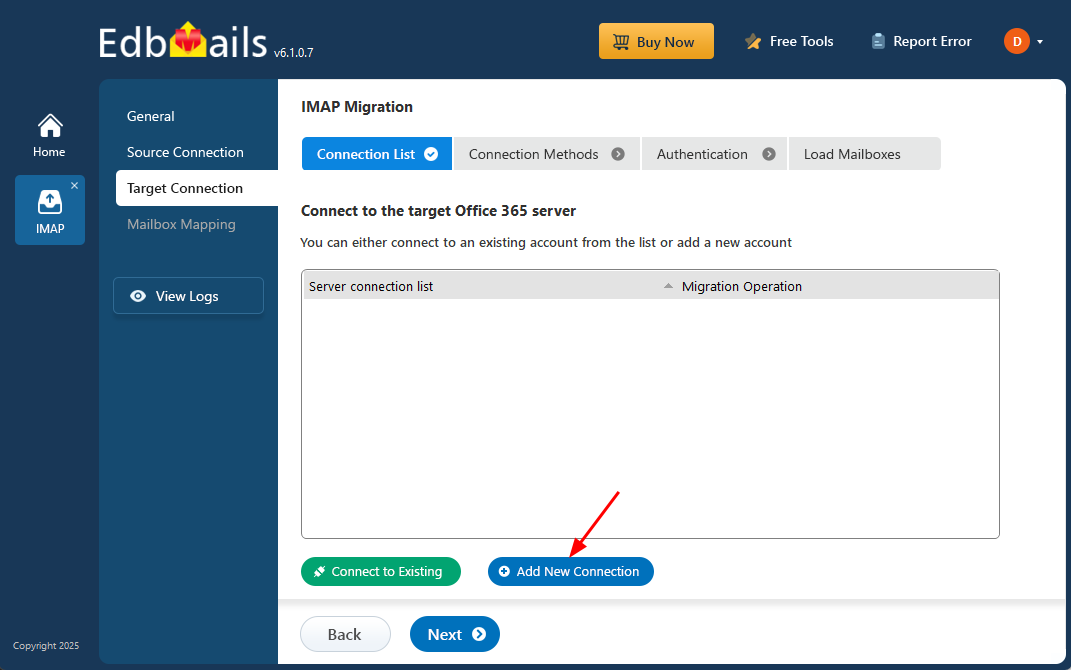
Step 4: Connect to target Office 365 server
- Click the ‘Add New Connection’ button to establish a new connection to the target Office 365. To use the previous connection, select it from the connection list and click the ‘Connect to Existing’ button to proceed.
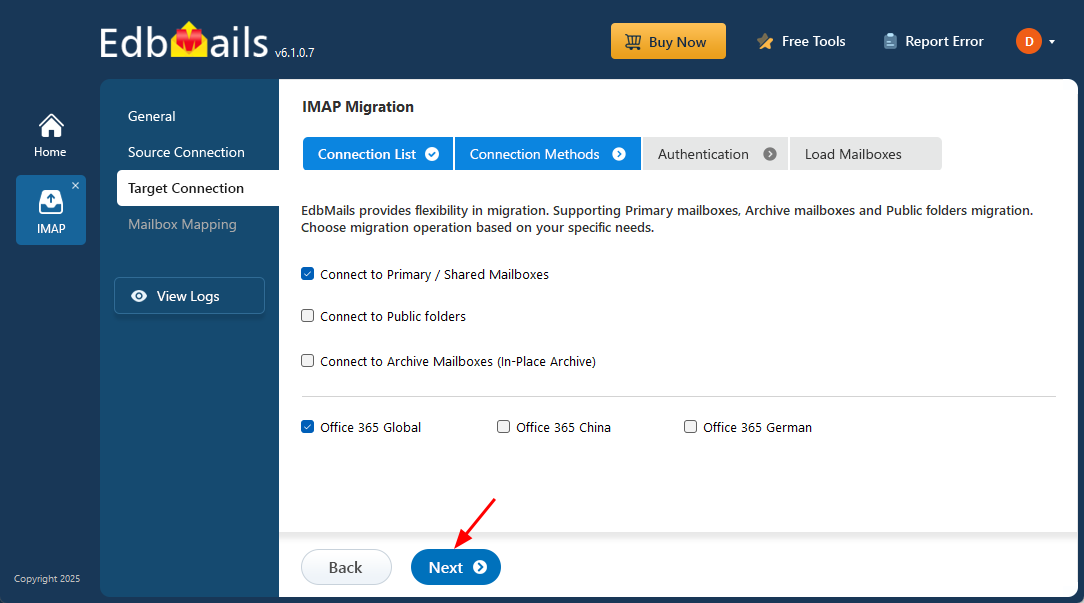
- Select the appropriate connection settings based on your migration requirements, then click ‘Next’ to proceed with the migration.
- Select your preferred secure authentication method for connecting to the target Office 365 account, then click the ‘Login’ button to establish the connection.
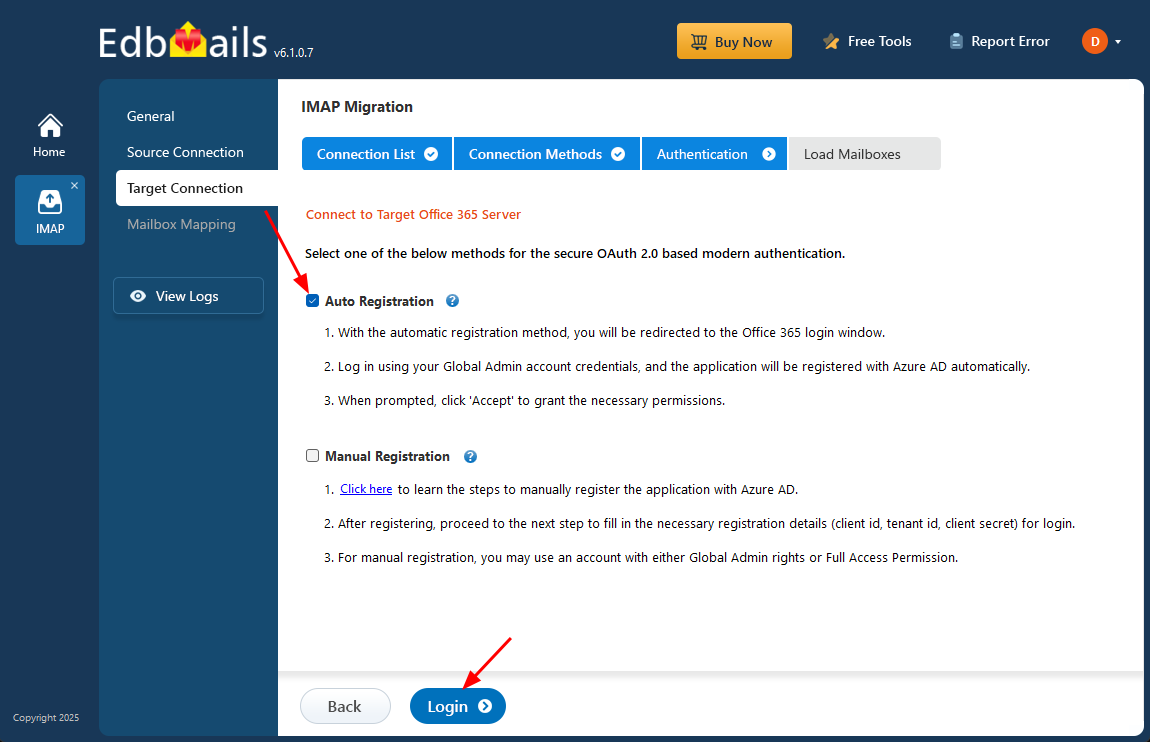
- Authenticate on Microsoft sign-in page.

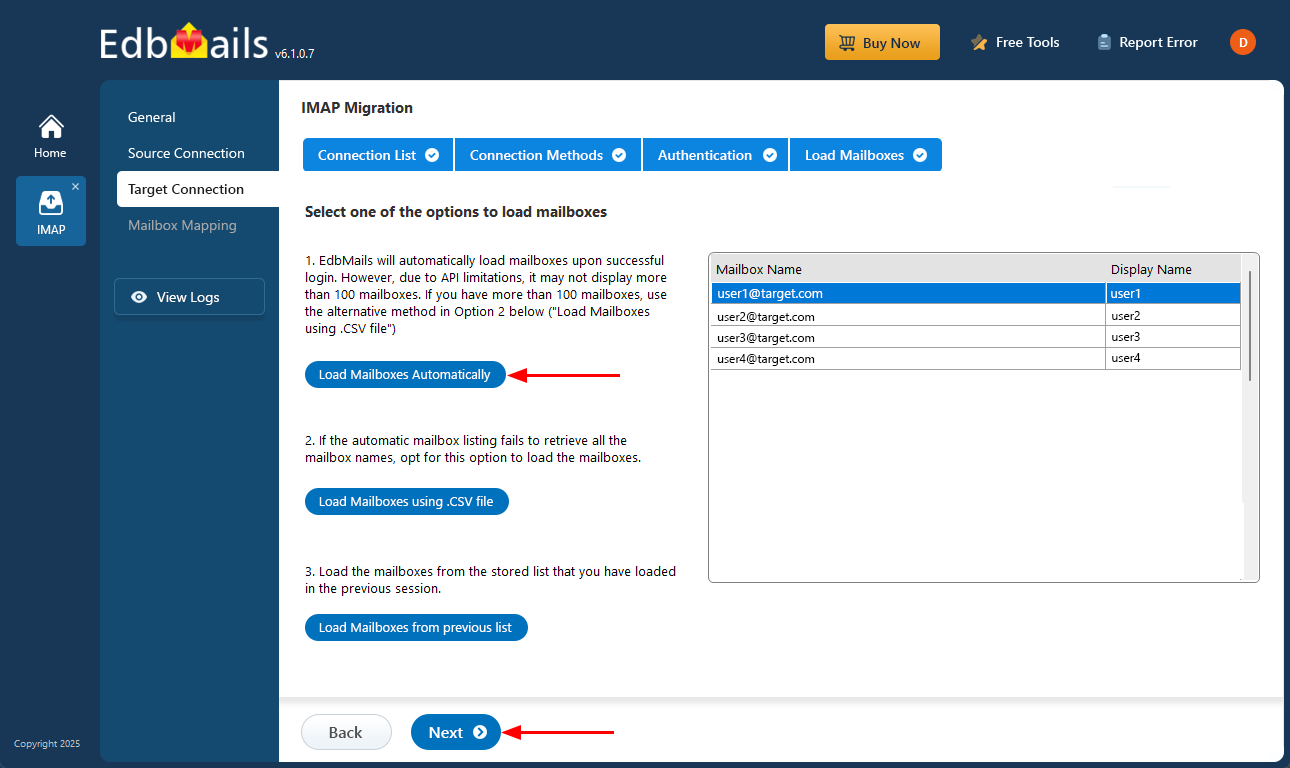
- Once logged into your target Office 365 server, decide how you want to load the mailboxes. EdbMails will list available mailboxes automatically, however, due to Microsoft API restrictions, only up to 100 mailboxes will be shown. To load more than 100 mailboxes, select the ‘Load Mailboxes using .CSV file’ option
- Click the ‘Add New Connection’ button to establish a new connection to the target Office 365. To use the previous connection, select it from the connection list and click the ‘Connect to Existing’ button to proceed.
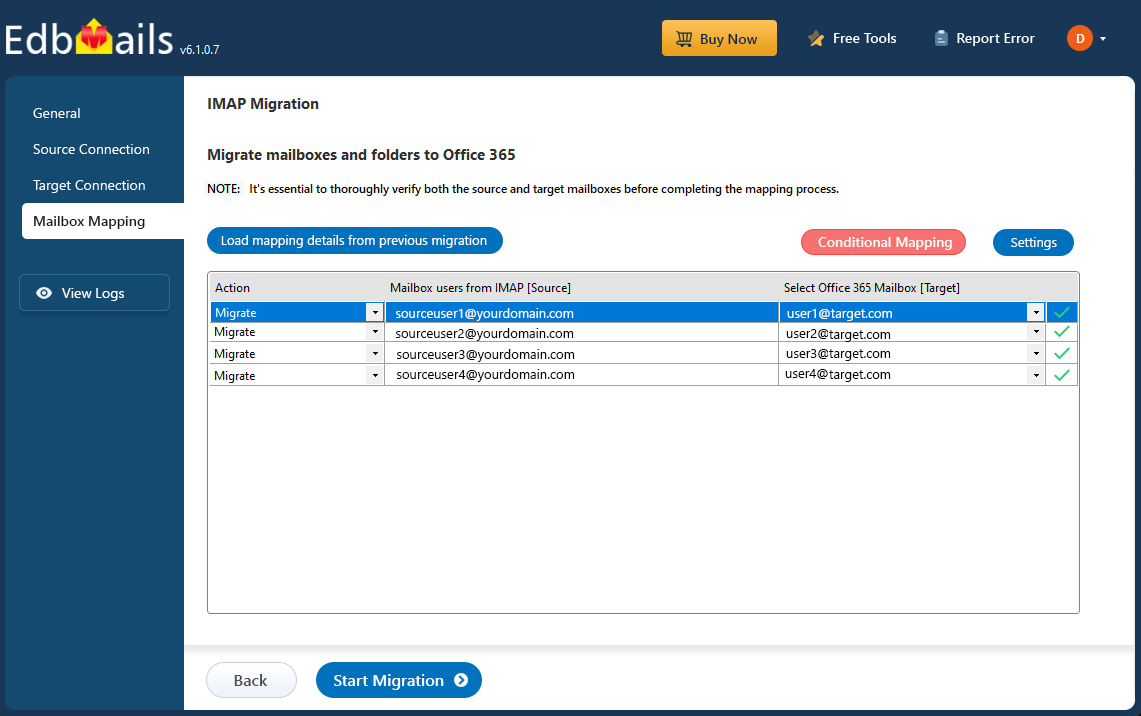
Step 5: HostMonster to Office 365 mailboxes mapping
- Choose your preferred method to map the source mailboxes and folders to their corresponding mailboxes and folders on the target Office 365 account.
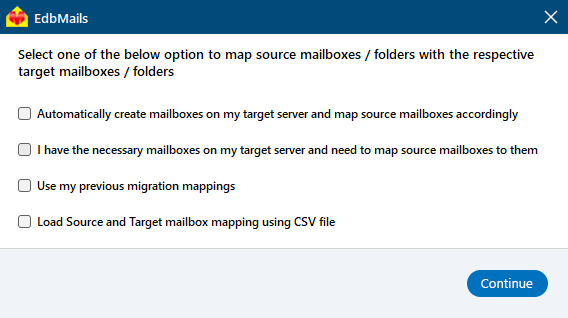
- EdbMails lets you automatically create the required mailboxes in your target Office 365 account.
- It also automatically maps your source Hostmonster mailboxes and folders to the matching ones in Office 365, making large migrations easier to manage.
- Choose your preferred method to map the source mailboxes and folders to their corresponding mailboxes and folders on the target Office 365 account.
Step 6: Start HostMonster to Office 365 migration
- Review the mailbox mapping for accuracy, then click the ‘Start Migration’ button to initiate the migration process.
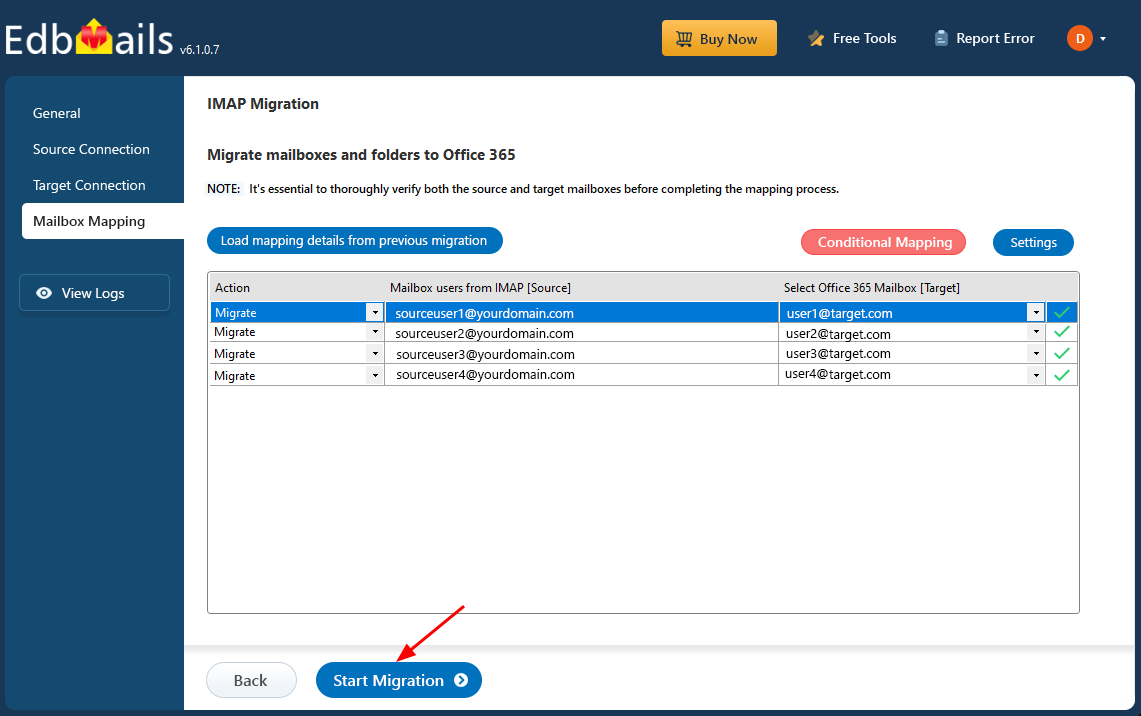
- Click the ‘View Logs’ button to open the detailed migration report. This report includes comprehensive information, such as mailbox mapping, a summary of the migration process, and the item count for each migrated mailbox and folder.

- Review the mailbox mapping for accuracy, then click the ‘Start Migration’ button to initiate the migration process.
HostMonster to Office 365 post-migration tasks
- Step 1: Update the MX records to point to Office 365
Update DNS records to enable and receive email messages on the target Office 365 server. In addition to this setup, configure the Autodiscover record to allow Outlook to connect to the migrated mailboxes.
- Step 2: Create a new Outlook profile for users in the new domain
Configure and recreate the Outlook profile for each user in your domain if Outlook has problems connecting to Office 365 mailboxes.
- Step 1: Update the MX records to point to Office 365
HostMonster to Office 365 migration troubleshooting
For troubleshooting, visit Knowledge Base.
For more queries, check Frequently Asked Questions or contact support.
Benefits of EdbMails to migrate from HostMonster to Office 365
- Bulk migration option
EdbMails enables bulk migration from HostMonster to Office 365, allowing you to transfer multiple mailboxes simultaneously. This significantly reduces time and effort, ensuring that large-scale migrations are completed efficiently without disrupting business operations.
- Data intactness for complete accuracy
EdbMails ensures complete data integrity during migration, transferring all email components such as attachments and folder structure without loss or modification. This guarantees an exact replica of your original mailbox in Office 365.
- Highly secure mailbox migration with OAuth 2.0
EdbMails provides industry-leading security through OAuth 2.0 authentication, ensuring your HostMonster to Office 365 migration is highly secure. By using this authorization, it protects your credentials and data from unauthorized access, maintaining compliance with modern security standards.
- Personalize your migration destination folder choice
With EdbMails, you have the flexibility to map and personalize the destination folders in Office 365. This feature allows you to reorganize your data during the migration, ensuring that mail items are transferred to their appropriate locations seamlessly.
- Transparent pricing with no hidden costs
EdbMails offers transparent, upfront pricing for HostMonster to Office 365 migrations, with no hidden fees or unexpected charges. This ensures clarity in your budgeting and provides you with a cost-effective solution that scales to your business needs.

