Enterprise Vault to Office 365 migration
Veritas Enterprise Vault, a long-standing enterprise information archiving platform, has been instrumental in helping organizations archive Microsoft Exchange, SharePoint, files, and emails for eDiscovery, legal, and compliance purposes. Initially, it provided critical solutions to businesses needing robust data archiving. However, with the evolution of modern technologies, Enterprise Vault is now often viewed as supplementary, particularly by organizations seeking a unified solution. Microsoft 365 users, for example, increasingly see Enterprise Vault as outdated, given that Office 365 offers built-in archiving and eDiscovery features. Additionally, Enterprise Vault's archives, typically stored on-premises or in cloud services like AWS or Azure, introduce extra management overhead.
EdbMails PST migration tool is a trusted Microsoft partner for migrating PST archives from Enterprise Vault to Office 365, equipped with advanced features designed for efficiency and security. Its granular control option enables users to precisely select and migrate only the necessary data, ensuring a tailored migration process. EdbMails also supports multilingual environments, making it highly adaptable for organizations with diverse language requirements. The platform employs secure authentication protocols such as OAuth 2.0 and TLS encryption, ensuring robust protection of data throughout the migration. Additionally, EdbMails delivers significant cost savings, with pricing up to 50% lower than competitors, making it an affordable yet powerful option for businesses looking to modernize their archive management without compromising on quality or security.
Top reasons for Enterprise Vault to Office 365 migration
- Though newer versions of Enterprise Vault are being released, it appears to be an additional burden when it comes to paying for license maintenance and upkeep.
- Enterprise Vault being an on-prem solution does not directly allow individual users to access their archive data the control remains with the IT Team.
- Exporting and managing archives must be done separately in Enterprise Vault, whereas in Office 365, everything is accessible through a single login.
- Office 365 combines a plethora of collaboration tools and features, as well as email and archives, making it extremely popular among small and large businesses.
- If users have already moved to Exchange online, it is extremely difficult for them to retain archives with Enterprise Vault if they do not wish to pay.
User Query
"We have Enterprise Vault archives that we would like to transfer to Office 365. Is there a suitable method we can use to easily migrate them to Office 365? We were unable to find a step-by-step instruction while searching for online solutions. Could you please point us in the right direction? Thank you for any suggestions."
Enterprise Vault to Office 365 migration plan
Planning is one of the most important steps before you begin the Enterprise Vault to Office 365 migration. Here is a checklist of points to consider before you migrate.
- Determine the size of the data and the number of mailboxes you want to migrate.
- Make a list of all the data and permissions from the Enterprise Vault that you want to transfer.
- Create appropriate user mailboxes on Office 365 and assign licenses to them.
- Ensure you have enough network capacity and bandwidth to migrate.
- Communicate the migration plan and flow to your end users.
Enterprise Vault migration to Office 365 prerequisites
- Create Office 365 mailboxes and assign licenses to them
- If you plan to migrate the Enterprise Vault archive to Office 365 Public folders, ensure that you create and configure the Public folder mailboxes on the target server.
- Similarly, if you want to migrate to the Office 365 In-Place archive, enable them from the admin center.
- If you have a custom email domain from the source which you want to retain and receive emails to, you must add and verify the domain on Office 365.
Steps to add a custom domain to Office 365 and Steps to add DNS records to connect your domain.
- Configure Office 365 to send and receive large messages.
Follow the steps to increase the message size on Office 365 to 150MB. See message size limits on Office 365 for more information.
Steps to migrate Enterprise Vault to Office 365 with EdbMails
Step 1: Download and Install EdbMails software
- Download and install the EdbMails application on your Windows computer.
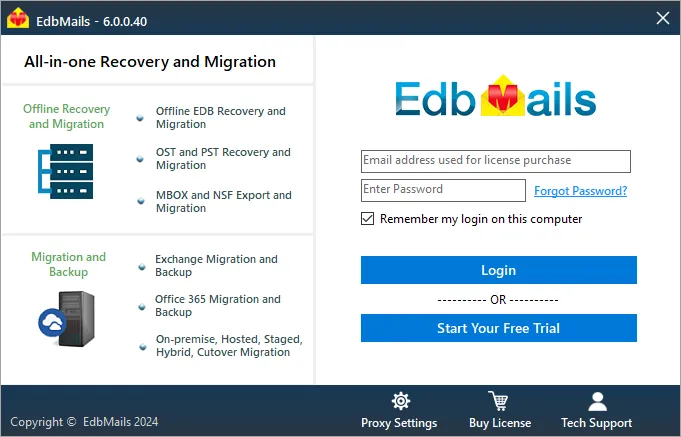
- Launch the application and click 'Login' or 'Start Your Free Trial' to log in.
Know more details on EdbMails system requirements for PST to Office 365 migration.
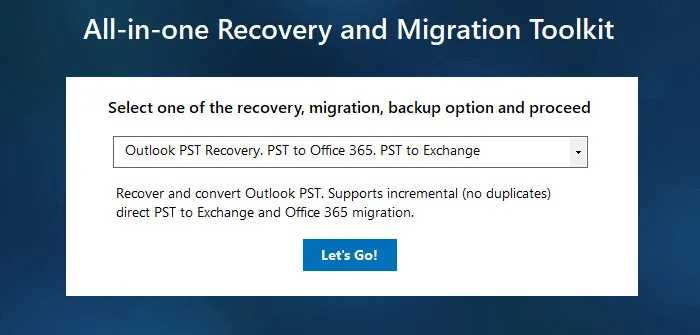
- Select the migration technique as ‘Outlook PST Recovery. PST to Office 365. PST to Exchange’ in the main window.
Step 2: Browse and open Enterprise Vault PST files
- Export your data from Enterprise Vault into a PST file.
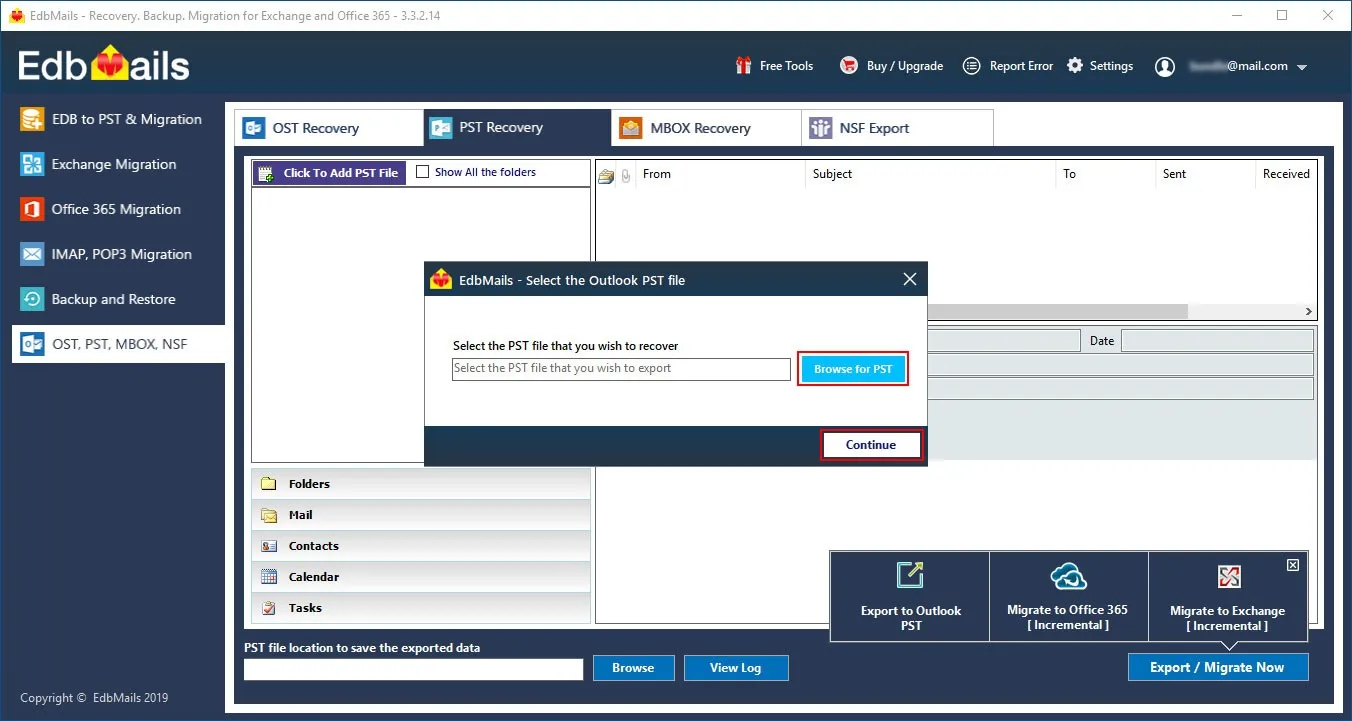
- Select the PST file to migrate to Office 365. Locate the PST file from your computer, select and add it in EdbMails
Step 3: Select mailboxes
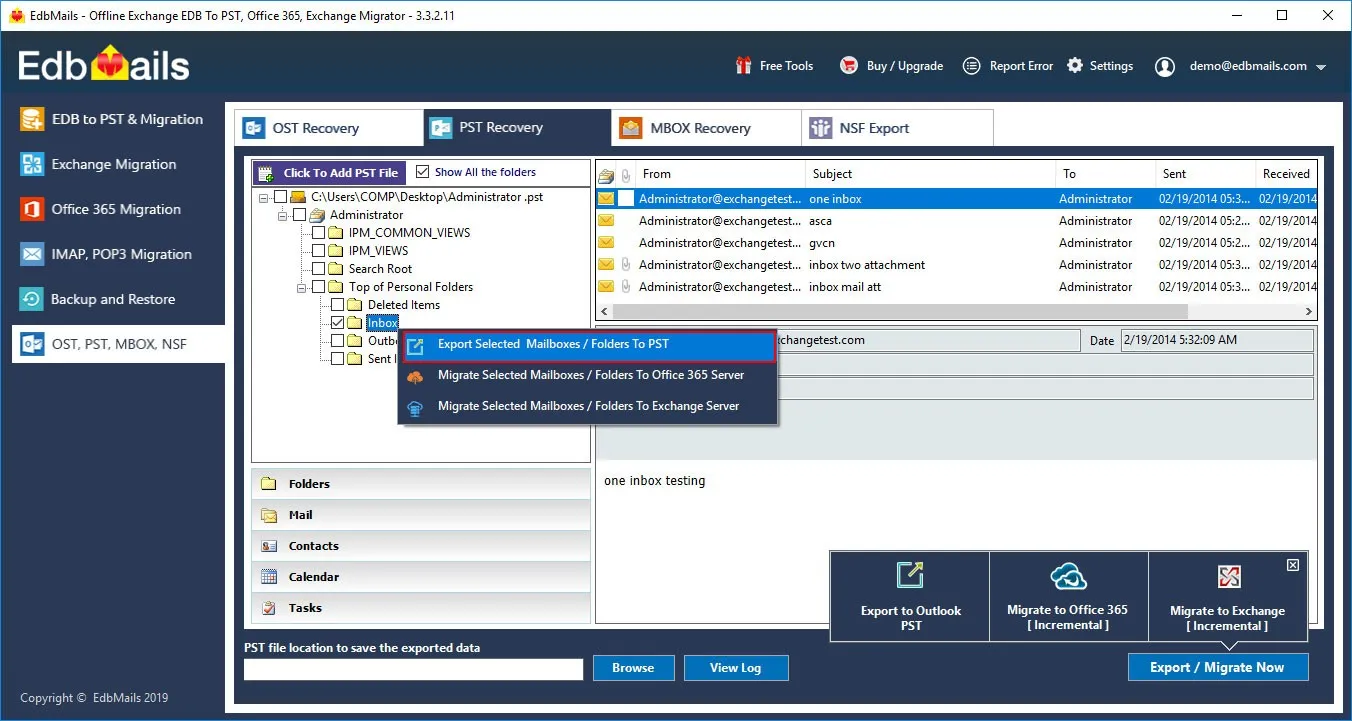
- Select the mailboxes and folders you want to migrate from the left panel.
- Click ‘Migrate to Office 365’ to set up the connection with the target server.
Step 4: Connect to target Office 365 server
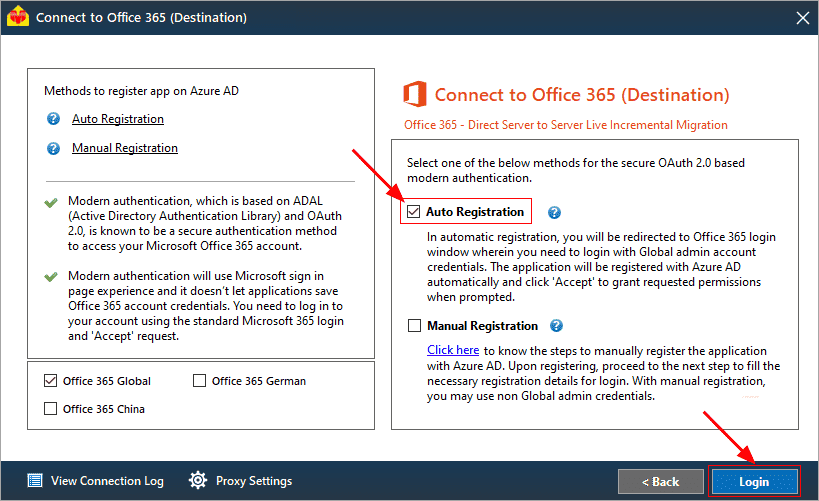
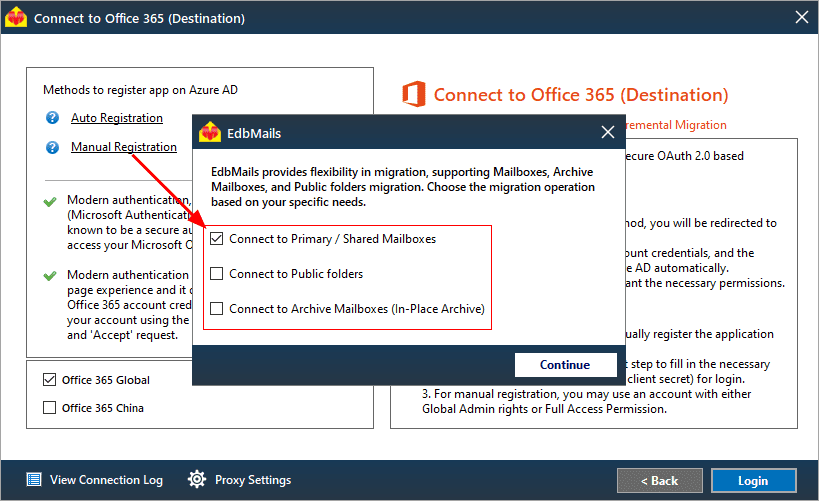
- Choose your preferred method for secure OAuth-based modern authentication. The default option, ‘Auto Registration’, requires Global admin access. Alternatively, you can use the Manual Registration method, which works with either a Global admin account or any user account with full administrative privileges.
- Next, choose the migration option and log in through the Microsoft sign-in page.
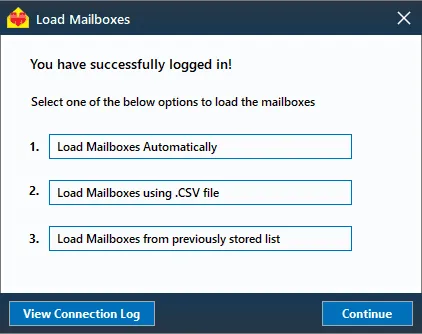
- After logging in successfully, choose one of the options to load the mailboxes from the target Office 365 server. You can also load mailboxes using a CSV file.
Step 5: Map mailboxes
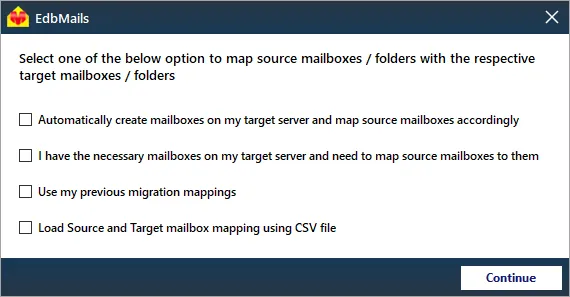
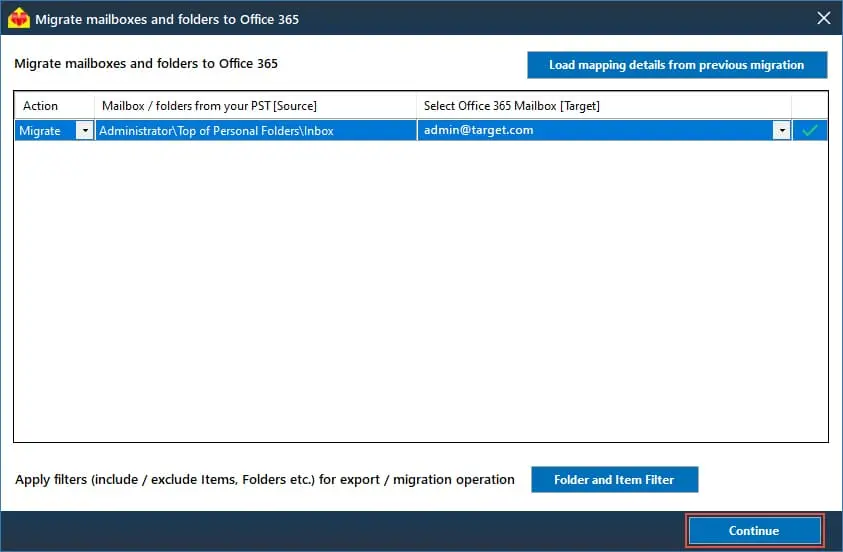
- Choose the desired mailbox mapping option.
- EdbMails enhances the migration process with automated mailbox creation for Office 365, ensuring accurate mapping of mailboxes and folders automatically from the Enterprise Vault to the target Office 365 mailboxes. This feature significantly accelerates migrations involving large volumes of mailboxes, reducing manual errors and ensuring an efficient, seamless transition to Office 365.
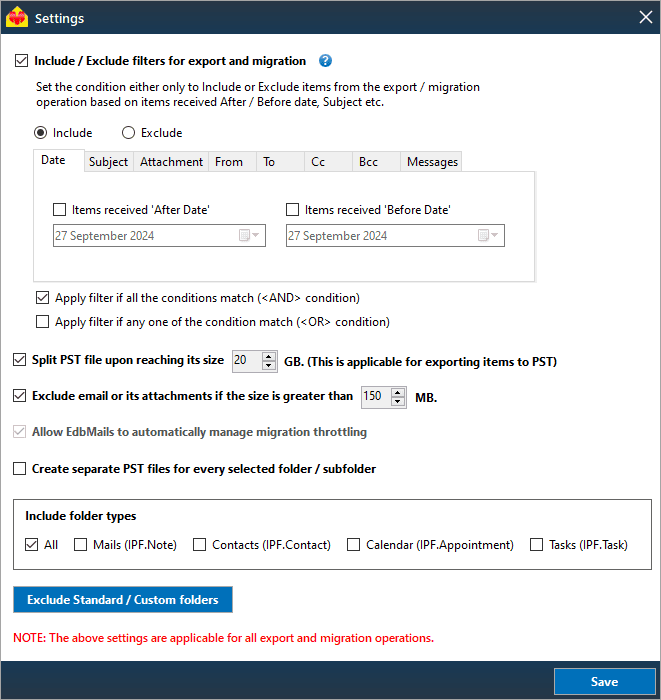
- Click the ‘Folder and Item Filter’ button to set a filter for your migration. For instance, you can choose to migrate data only within a specific date range by applying a date filter. Additionally, you can exclude both standard and custom folders from the migration.
Step 6: Start Enterprise Vault to Office 365 migration
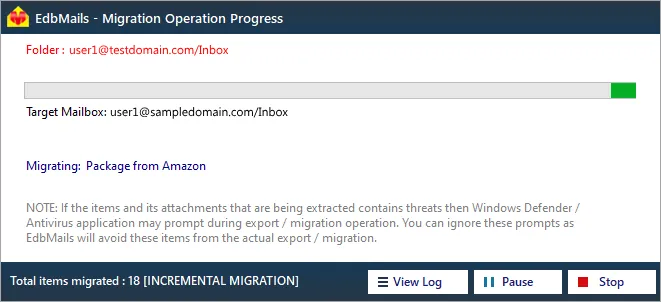
- After mapping the mailboxes, assign a job name and start the migration. To view the detailed migration report, click the 'View Log' button, which shows a summary of the migration, including the number of emails, folders, and mailbox items transferred successfully.
Enterprise Vault to Office 365 post migration tasks
- Step 1: Update the MX records to point to Office 365
If you have not done this step previously, change the DNS records known as MX records to enable email and receive messages on the target Office 365 server. In addition, configure the Autodiscover record to allow Outlook to connect to the migrated mailboxes.
- Step 2: Create a new Outlook profile for users in the new domain
Configure the Outlook profile for each user in your domain if Outlook has problems connecting to Office 365 mailboxes.
- Step 1: Update the MX records to point to Office 365
Enterprise Vault to Office 365 migration troubleshooting
Refer to the knowledge base articles for solutions to common issues. For additional details on EdbMails PST to Office 365 migration, check the frequently asked questions or reach out to our customer support team.
Benefits of EdbMails to migrate Enterprise Vault to Office 365
- Import of multiple PST files to Microsoft 365
EdbMails facilitates the migration of multiple PST files to Microsoft 365 in a single batch, ensuring efficiency and reducing manual effort. This feature streamlines the migration process by handling bulk data, saving time and effort while maintaining high accuracy.
- No powershell scripting required
EdbMails eliminates the need for complex PowerShell scripting. Its intuitive interface simplifies the migration process, allowing users to migrate archives from Enterprise Vault to Office 365 effortlessly, without requiring technical expertise, making it ideal for organizations without dedicated IT teams.
- Preserving data integrity
EdbMails ensures the integrity of all data during Enterprise Vault to Office 365 migration. Every email, attachment, folder structure, and metadata is preserved exactly as it was in Enterprise Vault. This guarantees no data loss or corruption, maintaining complete fidelity to the original archives.
- Delta migration for efficient transfers
With EdbMails, delta migration enables the transfer of only the data that has changed since the last migration session. This feature ensures that only new or modified items are transferred, preventing data duplication and minimizing server load while maintaining up-to-date archives.
- Zero downtime migration
EdbMails offers zero downtime during Enterprise Vault to Office 365 migration, ensuring continuous access to emails and data throughout the process. By running migrations in the background without disrupting regular operations, EdbMails guarantees that business continuity is maintained while performing the archive migration.

