Rackspace to Office 365 Migration
As businesses increasingly shift toward modern cloud technologies, many organizations are moving from Rackspace Email to Microsoft Office 365. While Rackspace has been a dependable email hosting solution for years, the need for integrated communication, collaboration, and advanced productivity features is driving businesses toward more comprehensive cloud platforms.
Microsoft Office 365 provides much more than just email. It brings together a complete set of productivity tools like Word, Excel, PowerPoint, Teams, OneDrive, and SharePoint to improve teamwork and simplify daily tasks. With benefits such as expanded mailbox storage, enterprise-level security, automatic updates, and smooth access across multiple devices, it serves as a powerful solution for organizations ready to move beyond the constraints of traditional email hosting.
Although moving to Office 365 brings many benefits, the migration itself can come with challenges such as data mapping mismatches, user account synchronization issues, compatibility concerns, and possible downtime. To achieve a smooth and successful transition, it is important to plan carefully and rely on a reliable and efficient migration tool.

EdbMails makes Rackspace to Office 365 migration simple with its Exchange to Office 365 and IMAP migration options, effectively handling common migration challenges. The delta migration feature migrates only the changes made after the initial migration, which helps minimize downtime and ensures continuous access to mailboxes. Its advanced filtering options allow you to migrate emails selectively based on date, folder, or specific criteria, so only the required data is moved. With a clear, step-by-step migration wizard, EdbMails removes the need for complex scripting and guides you smoothly through the entire process.
In addition, automated mailbox mapping accurately matches user accounts, preventing manual mistakes and data mismatches. Altogether, these capabilities make EdbMails a reliable solution for organizations looking for a seamless, efficient, and error-free migration from Rackspace to Office 365.
User Query
"We are attempting to migrate from Rackspace to Exchange online and have tried a number of solutions with no success. We currently host Exchange 2013 on Rackspace and want to transition to Office 365 as smoothly as possible without exporting our mailboxes to PST. Could you please walk us through each step so that we can complete the operation without disrupting our users?"
Rackspace to Office 365 Migration Planning
Careful planning is essential before starting your migration from Rackspace to Office 365. Use the following checklist to ensure you're fully prepared for a smooth and successful transition.
- Remove unused mailboxes, mail items and duplicate files from the source.
- Create a detailed inventory of all mailbox items and resources before initiating the migration. This list should include, but is not limited to, the following components.
- User accounts, email addresses and login credentials
- The source and target details, browser and operating systems used
- Network settings, DNS configurations, MX records, firewall settings
- Outlook settings and version you are using in your organization.
- Licensing plans on your current source server
- Active Directory configuration and other dependencies associated with it.
- Prepare a detailed list of mailboxes, folders, and user permissions from Rackspace that need to be migrated to Office 365.
- Determine the size of the data and number of mailboxes you want to migrate.
- Decide if you want to migrate everything at once (cutover migration) or plan to migrate your data in stages (staged migration).
- Decide if you plan to migrate Public folders, In-Place Archive, and Shared mailboxes along with the primary mailboxes.
- Decide if you want to migrate SharePoint, OneDrive and Teams data.
- Based on the preceding factors, estimate the approximate time that may take for the migration.
- Create appropriate user mailboxes on Office 365 and assign licenses to them.
- Confirm that your network bandwidth and infrastructure are capable of supporting the migration workload to avoid delays or interruptions during the transition.
- Consider the throttling and message size limits on Office 365.
- Communicate the migration plan and changes to your end users and stakeholders.
- Perform a test migration before you start the actual one.
- Start the actual migration, verify the endpoints and update the MX records.
- Check for correct mail flow and configure Outlook for all the users.
- Plan for decommissioning unused apps and their settings post migration
Why Choose Microsoft 365 Over Rackspace?
Microsoft 365 delivers a complete productivity and collaboration platform, while Rackspace is primarily focused on email hosting. With Microsoft 365, you get integrated apps like Outlook, Teams, Word, Excel, SharePoint, and OneDrive, enabling real-time communication and file sharing. It offers larger mailbox storage, 1 TB of cloud space per user, enterprise-grade security, and automatic updates, ensuring reliability and data protection. Accessible from any device, Microsoft 365 provides the flexibility, scalability, and collaboration tools modern businesses need, making it a clear upgrade from Rackspace’s traditional email services.
Rackspace to Office 365 Migration Prerequisites
- Ensure you have the users’ email addresses, passwords, IMAP hostname, and port number ready before starting the migration. You can identify the IMAP server hostname for your Rackspace email by checking the server’s dashboard settings or by adding the Rackspace email account to Outlook and viewing the incoming mail server details.
- Set up mailboxes on the target Office 365 server. With EdbMails, you can either create them automatically or follow the manual method using the Microsoft documentation linked below.
- If you have a custom email domain from your hosting provider to which you want to migrate and receive emails, you must add and verify the domain on Office 365.
Steps to add a custom domain to Office 365 and Steps to add DNS records to connect your domain.
- Configure Office 365 to send and receive large messages.
Follow the steps to increase the message size on Office 365 to 150MB and see tips to optimize IMAP migration to Exchange online.
Steps to Migrate from Rackspace to Office 365
EdbMails supports secure and seamless migration from Rackspace to Office 365 using multiple migration methods. Select the appropriate method below based on your source environment and migration requirements.
Method 1: Migrate from Rackspace Hosted Exchange to Office 365
Method 2: Migrate from Rackspace Office 365 Tenant to Office 365
Method 3: Migrate from Rackspace to Office 365 using an IMAP connection
Method 1 : Migrate from Rackspace Hosted Exchange to Office 365
Step 1: Download and Install EdbMails Exchange migration software
- Download and Install EdbMails on any Windows-based computer that is connected to the source Exchange server.
System requirements for Hosted Exchange to Office 365 migration
- Start the EdbMails application on your computer.
- Enter your registered email ID and password, then click ‘Login’. If you are accessing EdbMails for the first time, choose ‘Start Your Free Trial’ to continue with the trial version.Note: The trial version lets you migrate all mailboxes with 30 items per folder. For migrating all the items, purchase Live Exchange migration license from EdbMails website.
Click here to know the live Exchange Migration Pricing Details.
Once the purchase is completed, close the software and reopen it. Log in again with the same email ID and password used during the purchase to activate the license.
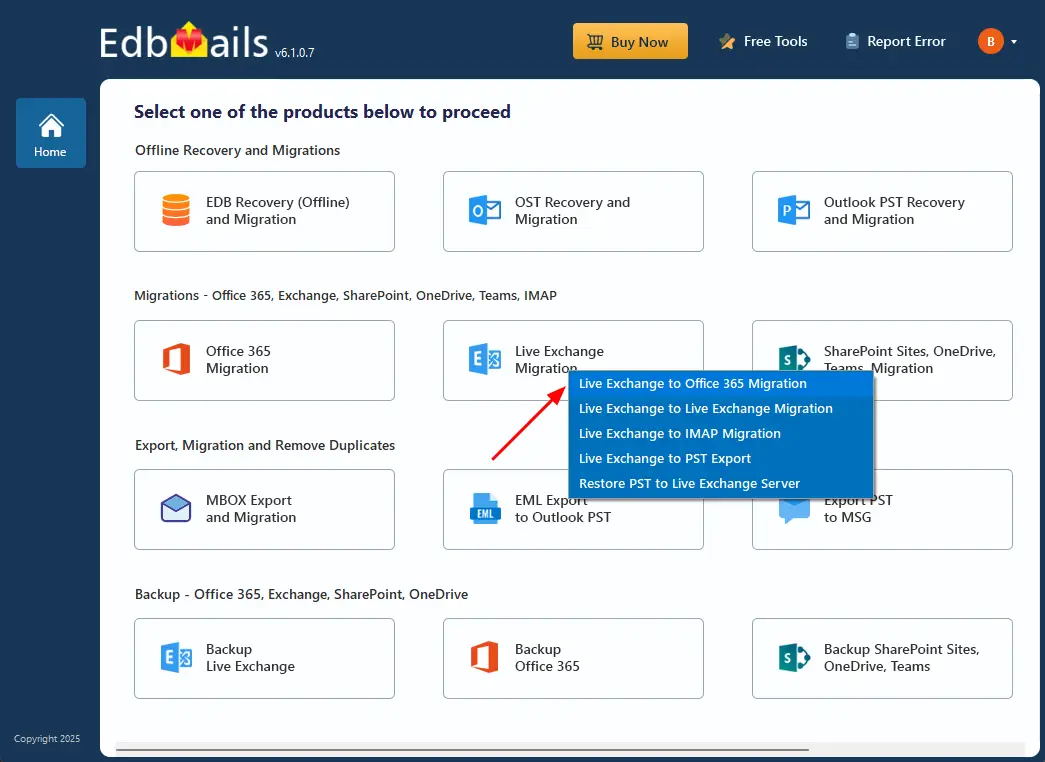
- Select 'Live Exchange migration' option.

- Select the ‘Live Exchange to Office 365 Migration’ option to initiate the seamless migration process from your Rackspace Hosted Exchange to Office 365
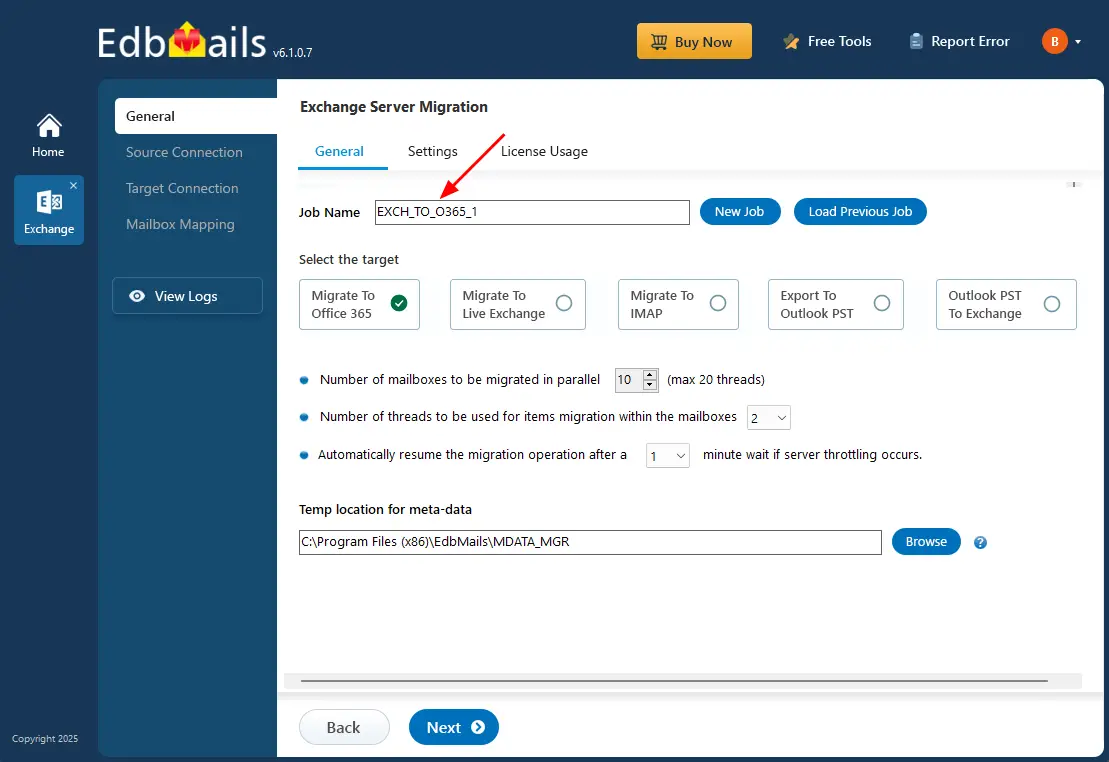
- You can keep the default job name or select ‘New Job’ to create a custom name, making it easier to identify and manage your migration tasks efficiently.
- Download and Install EdbMails on any Windows-based computer that is connected to the source Exchange server.
Step 2: Connect to source Rackspace Hosted Exchange
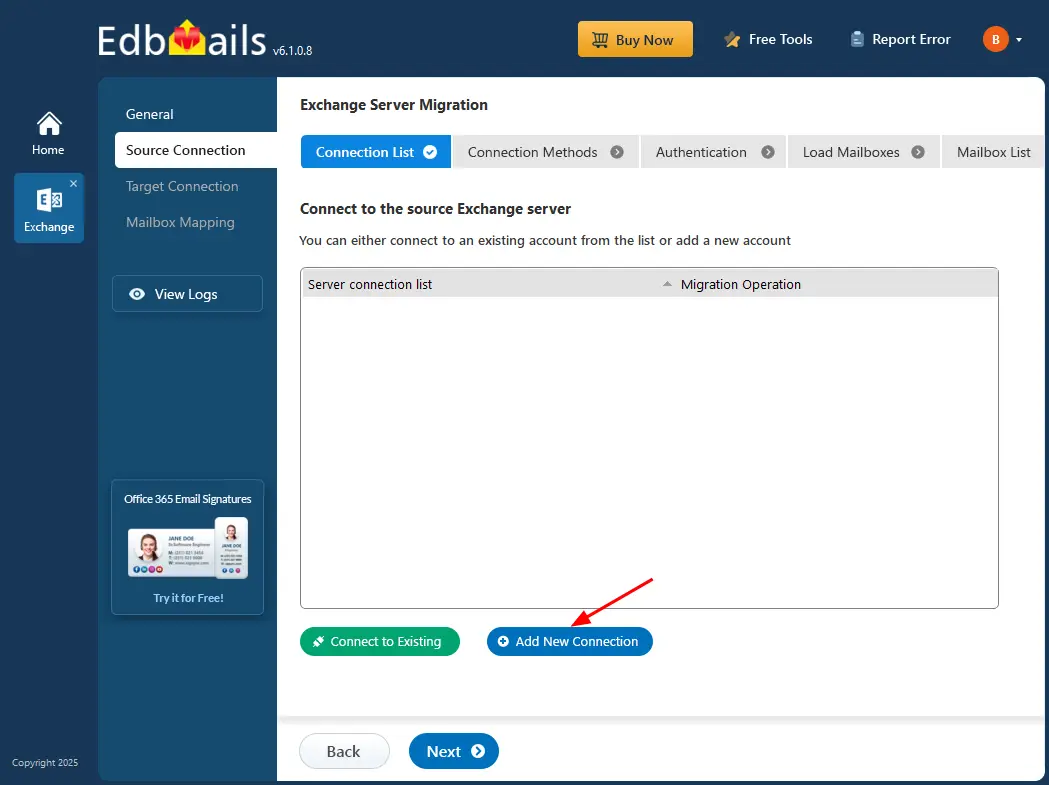
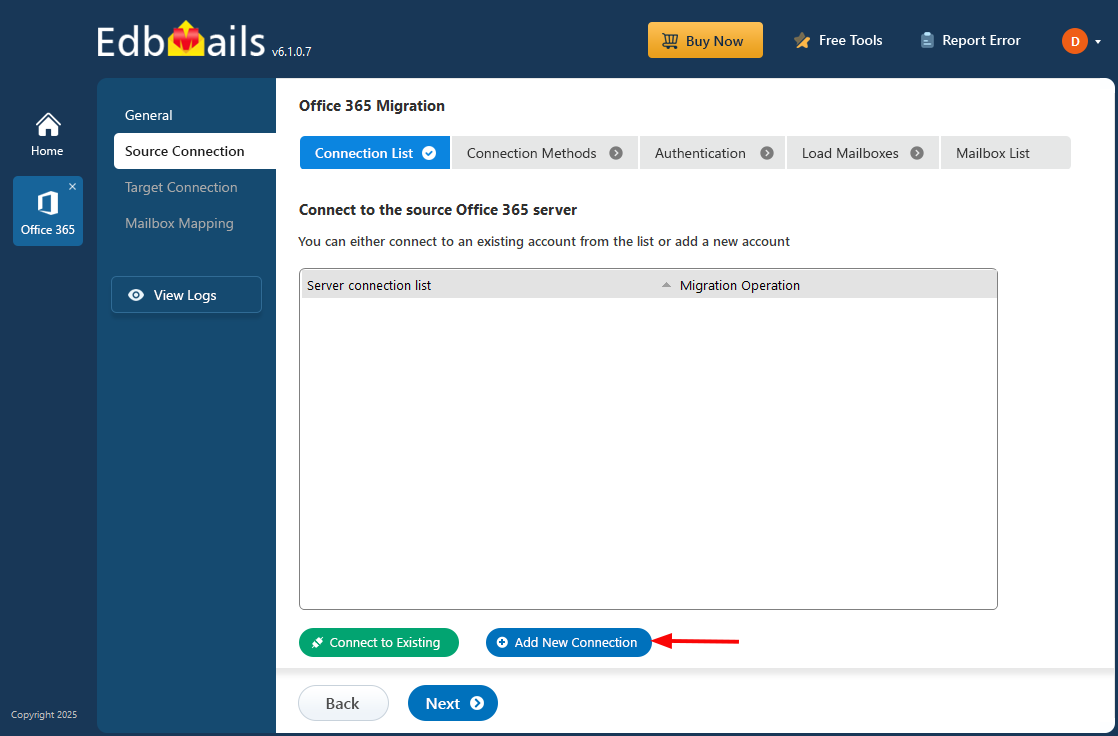
- To create a new connection with the source Exchange server, select ‘Add New Connection’. If a connection has already been set up previously, choose it from the available list and click ‘Connect to Existing’ to proceed.
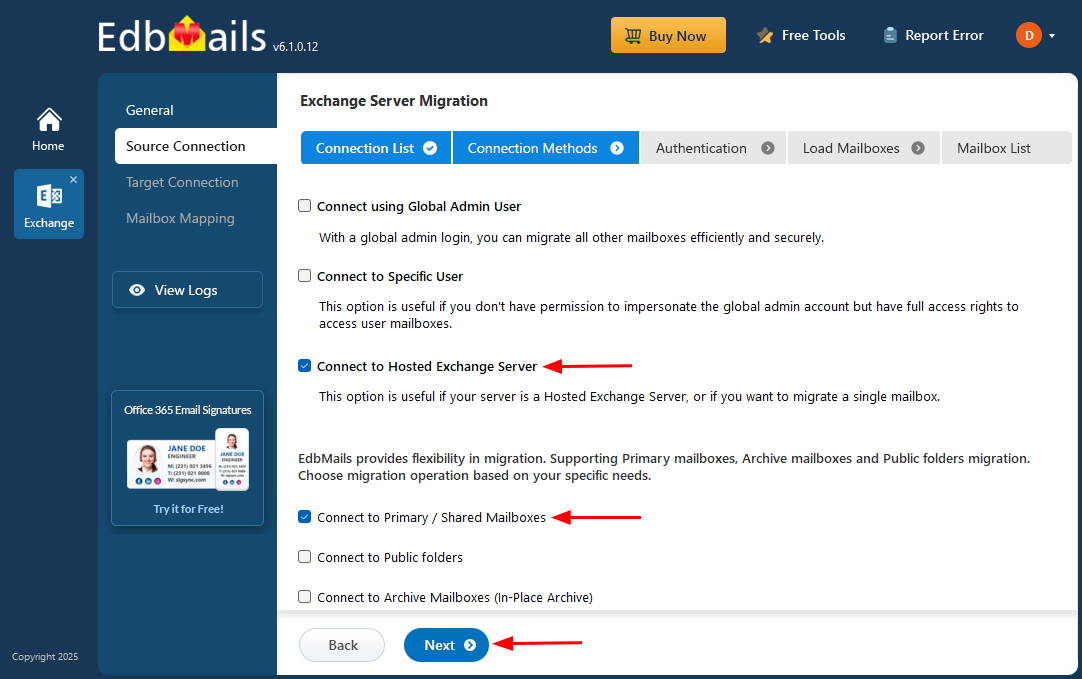
- Choose ‘Connect to Hosted Exchange Server’ when your server is a hosted Exchange server or when you need to migrate an individual mailbox.
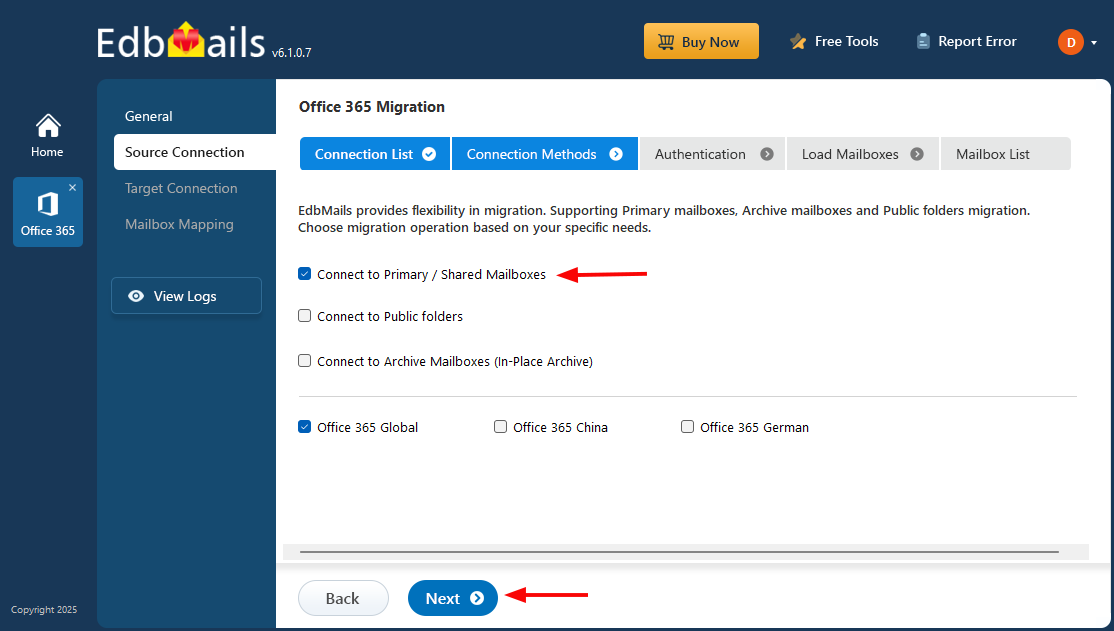
- EdbMails provides flexible migration options, allowing you to migrate primary mailboxes, archive mailboxes, and public folders seamlessly in a single solution.
Various methods for establishing a connection to your Hosted Exchange server.
With EdbMails, you can migrate mailboxes, public folders, and archive mailboxes from Hosted Exchange to Office 365.
- Choose the required connection options and click the ‘Next’ button.
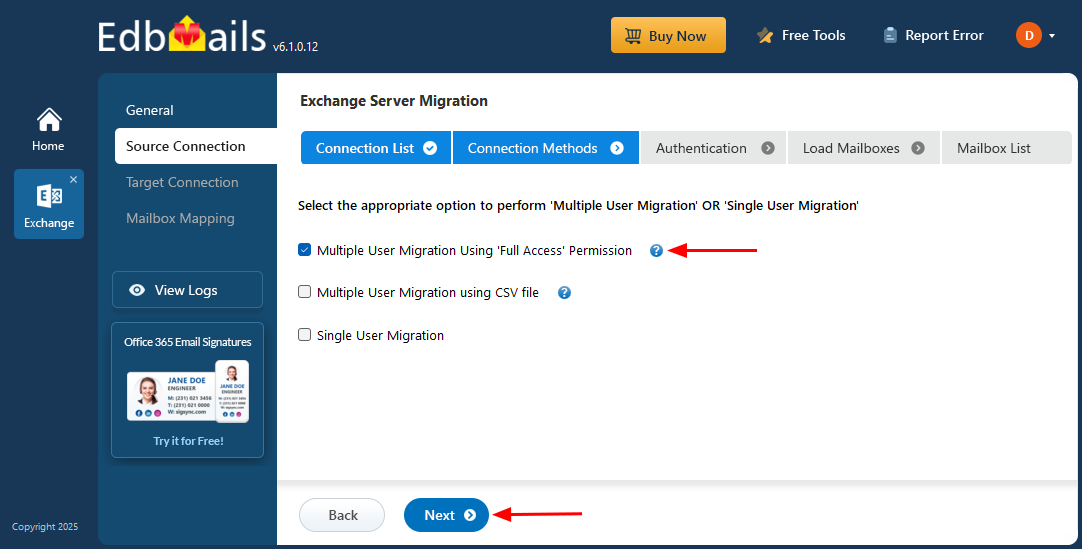
- Select the appropriate option to perform ‘Multiple User Migration’ or ‘Single User migration’.
- Click the ‘Next’ button to continue.
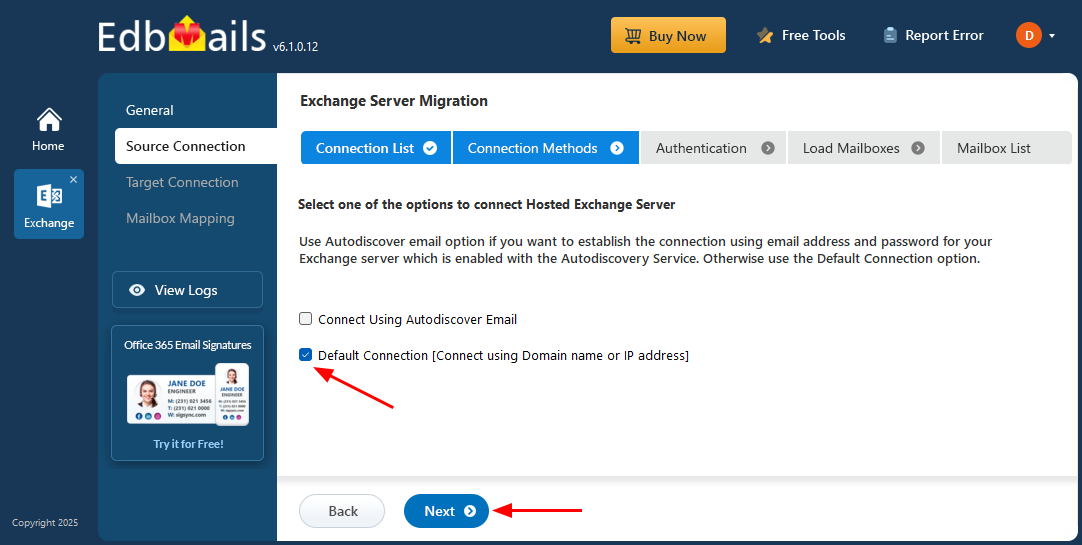
- Choose ‘Connect Using Autodiscover Email’ to set up the connection with your Hosted Exchange server by entering your email address and password, provided that the Autodiscovery service is enabled on the server, allowing the connection to be configured automatically using your login credentials.
- Alternatively, use 'Default Connection' to connect via the server's domain name or IP address.
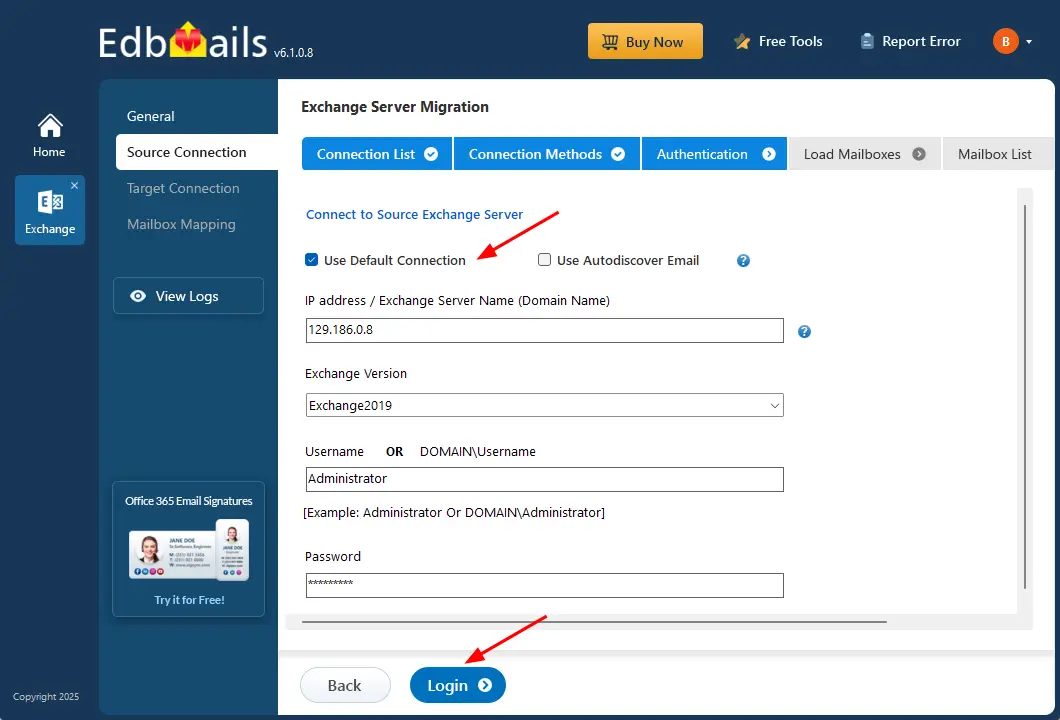
- Enter the required details of the source Hosted Exchange server, then click ‘Login’ to authenticate and establish the connection.
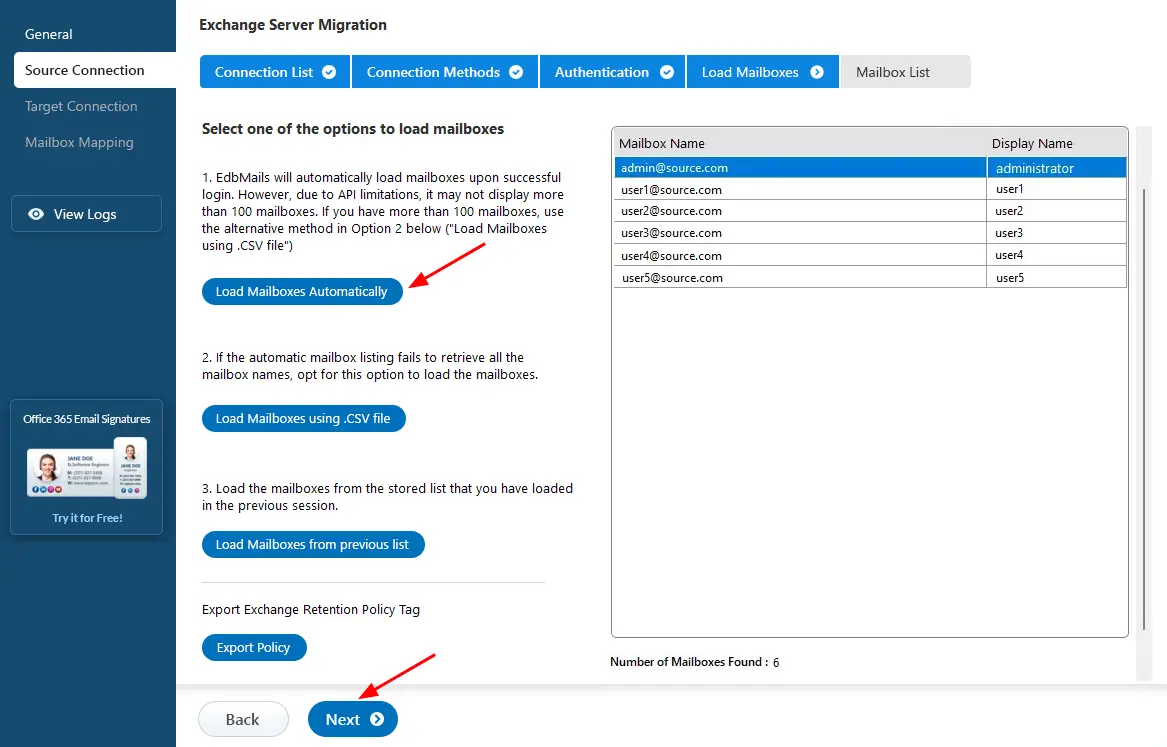
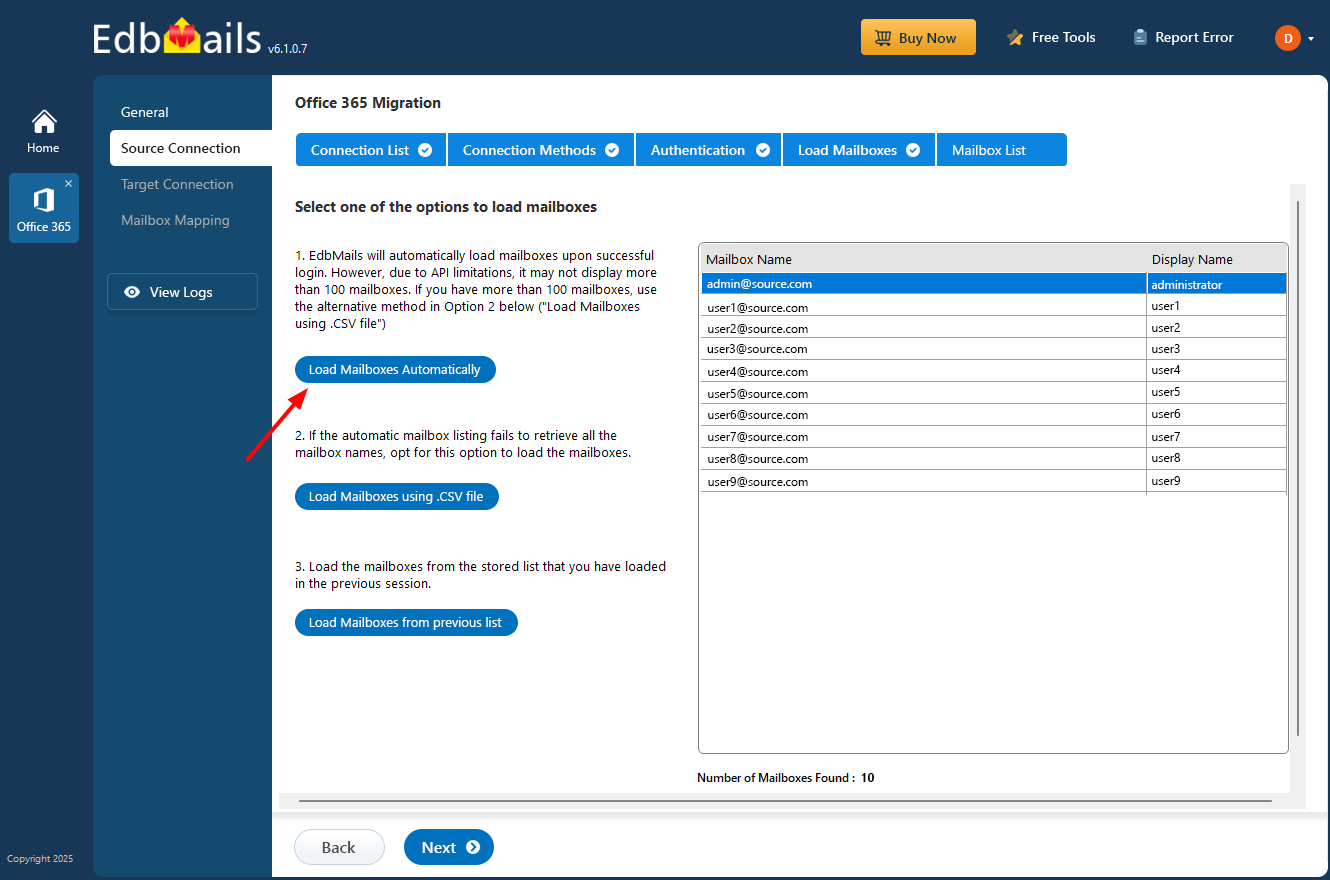
- After successful authentication, choose any one of the following options to load the mailboxes:
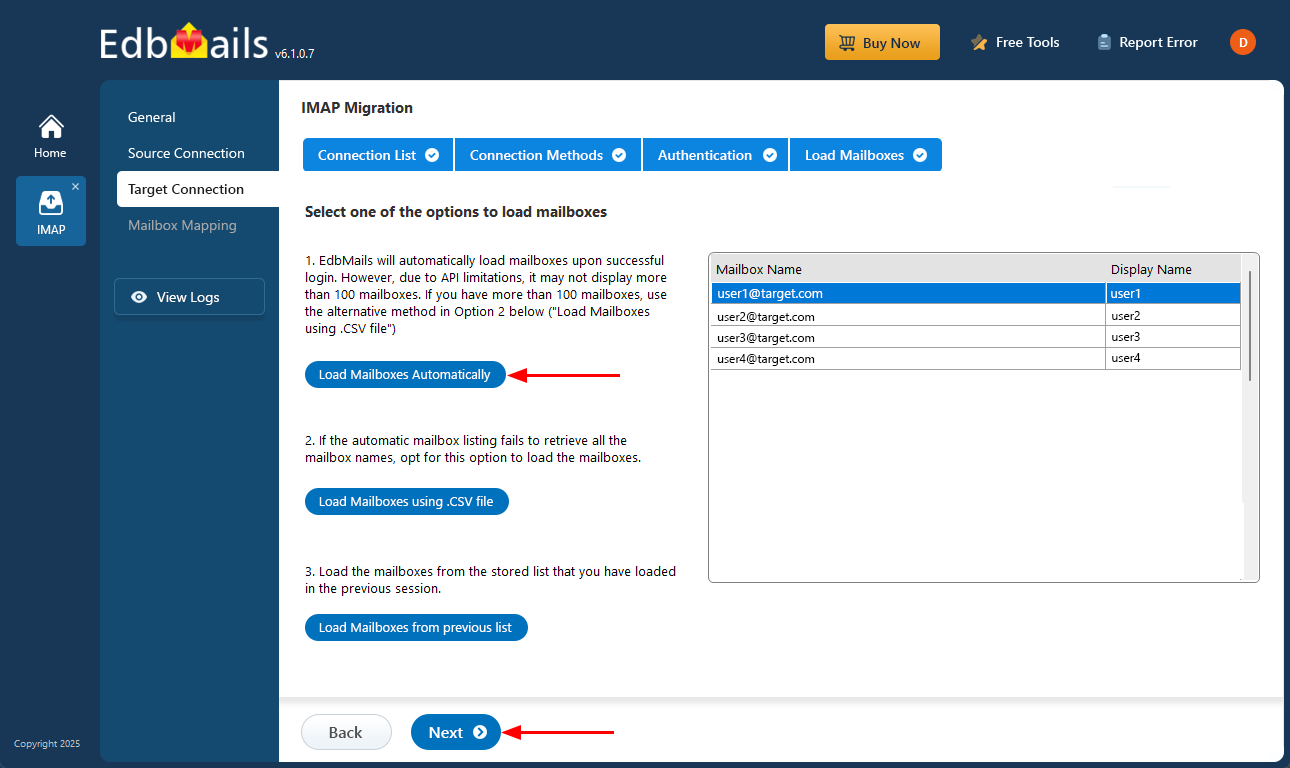
- i) Load Mailboxes Automatically: EdbMails loads and displays the mailboxes automatically once you sign in, simplifying the configuration process. Due to Microsoft API restrictions, it may display only up to 100 mailboxes. If your environment contains more than 100 mailboxes, use the alternative option below.
- ii) Load Mailboxes using CSV file: If the automatic method does not retrieve all mailbox names, select the ‘Load Mailboxes using .CSV file’ option to manually import and load the required mailboxes.
- iii) Load Mailboxes from previous list: Quickly access the mailboxes from the previously saved list imported during your last session.
- Choose ‘Load Mailboxes Automatically’ and click ‘Next’ to continue.
- To create a new connection with the source Exchange server, select ‘Add New Connection’. If a connection has already been set up previously, choose it from the available list and click ‘Connect to Existing’ to proceed.
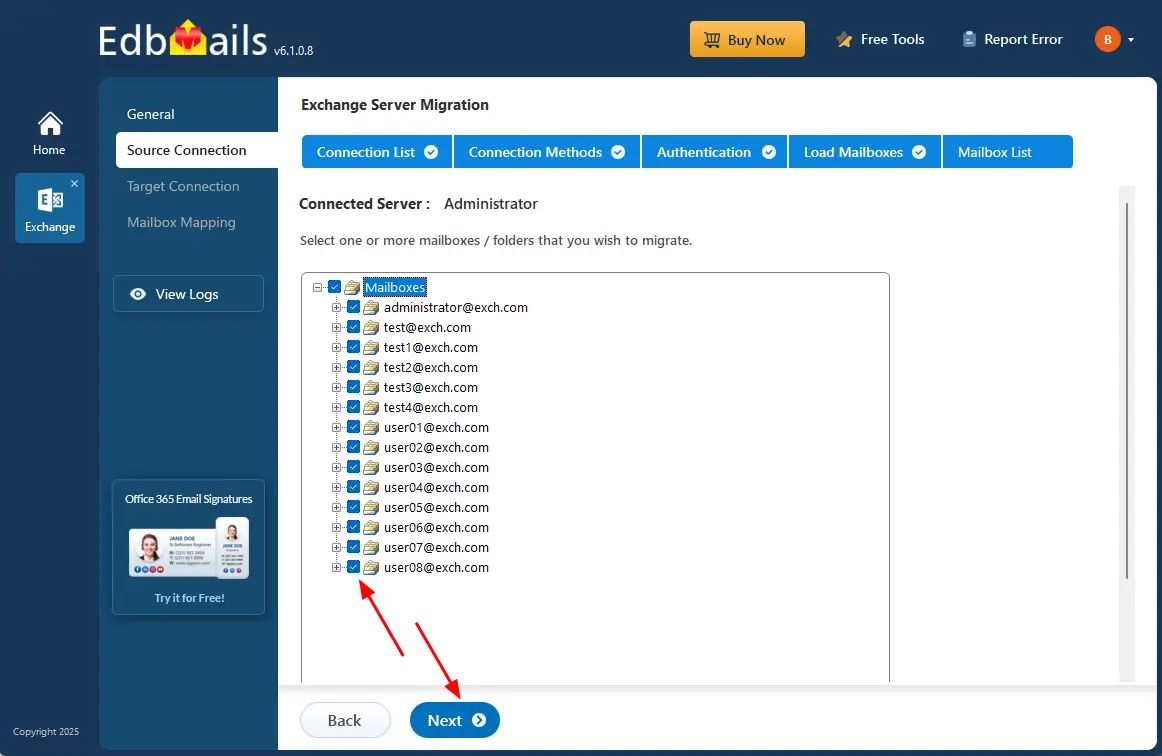
Step 3: Select source Rackspace Hosted Exchange mailboxes
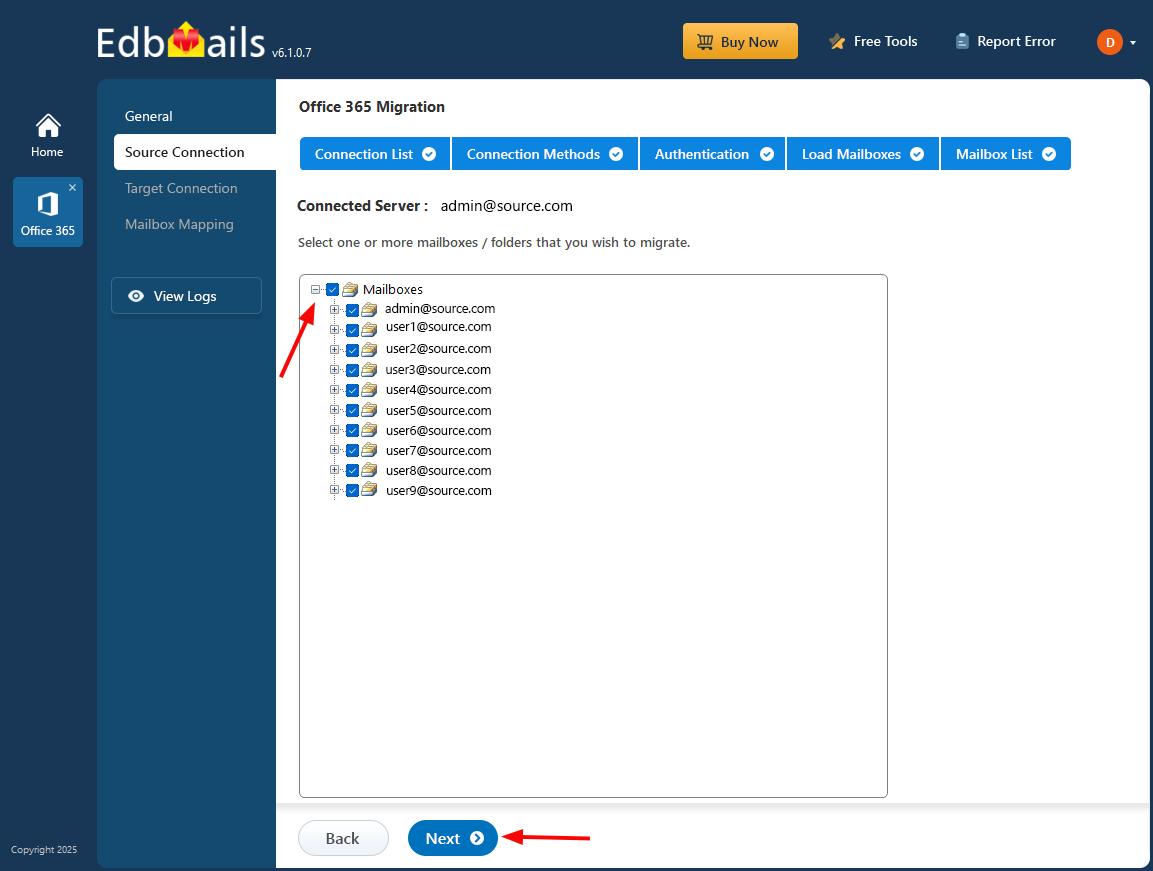
- Choose the specific mailboxes folders you wish to migrate to the destination Office 365 server, ensuring they are appropriate for the migration process.
- Choose the specific mailboxes folders you wish to migrate to the destination Office 365 server, ensuring they are appropriate for the migration process.
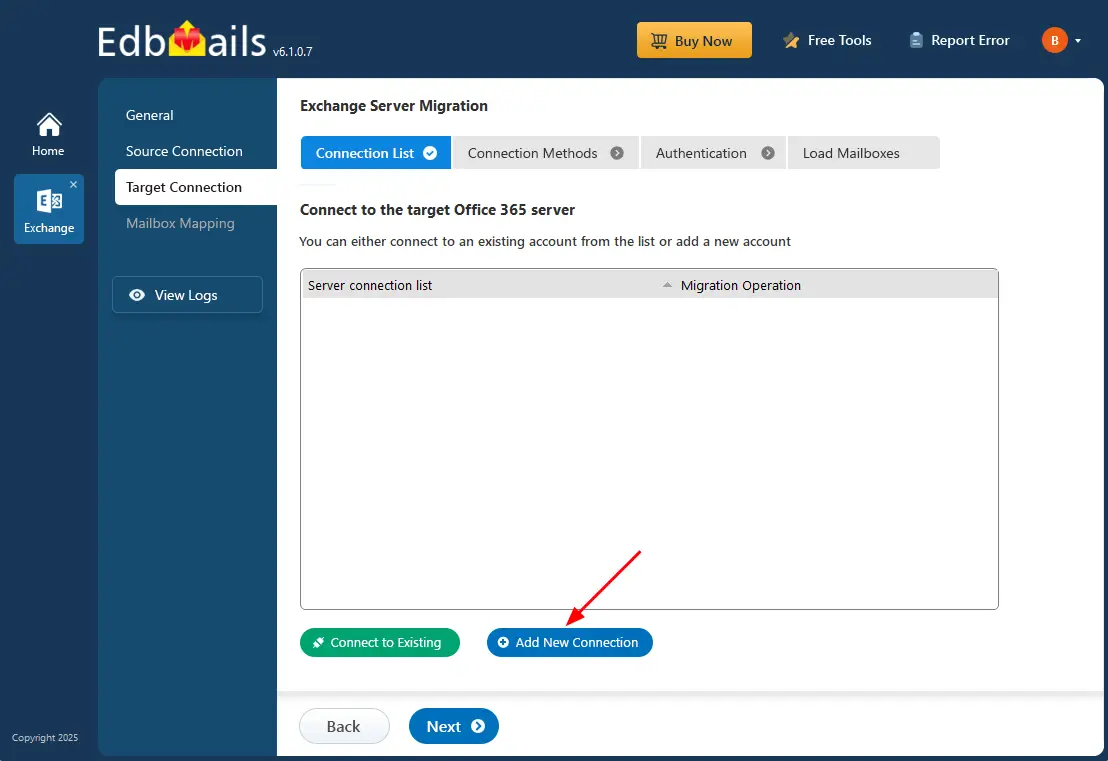
Step 4: Connect to the target Office 365 server
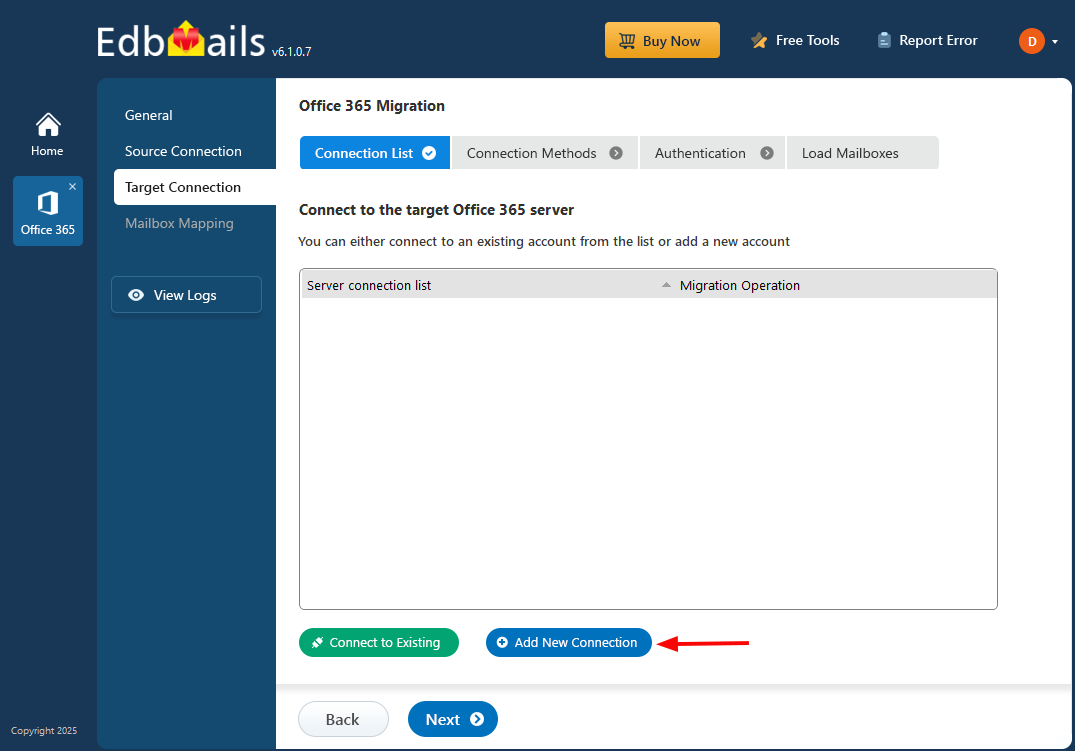
- Select ‘Add New Connection’ to create a new connection with your target Office 365 account.
- If you have already configured a connection, choose it from the list and click ‘Connect to Existing’ to proceed.
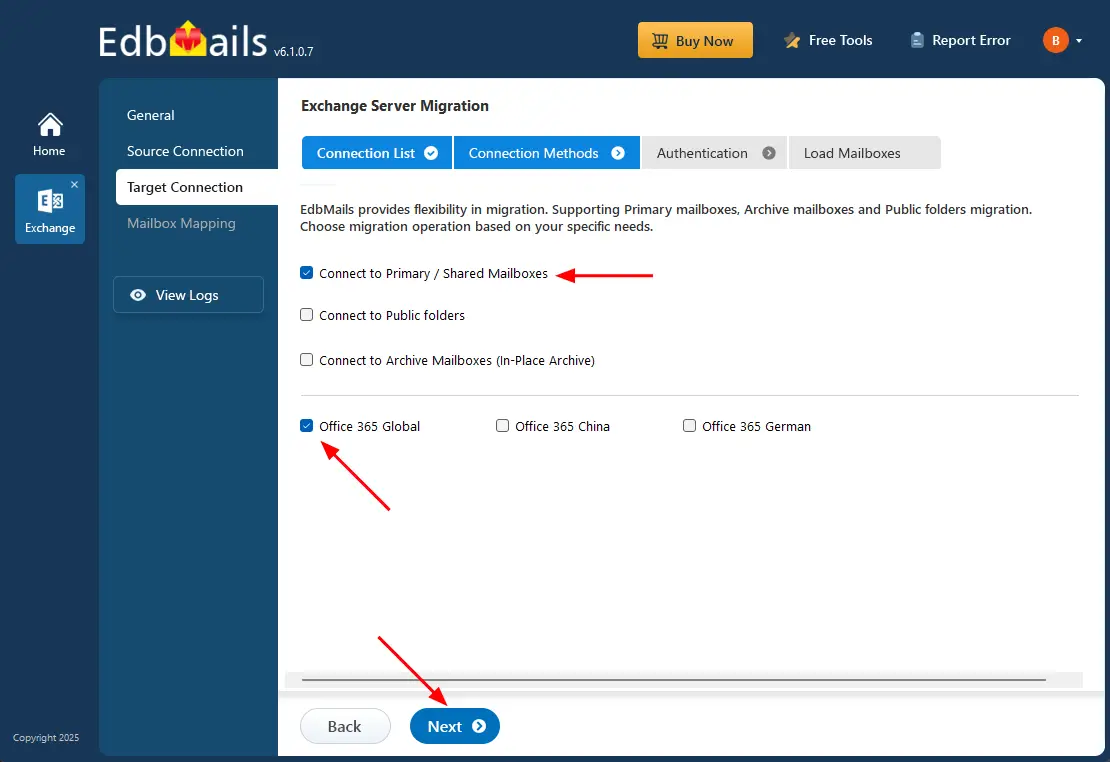
- EdbMails provides flexible migration options that allow you to seamlessly migrate primary mailboxes, archive mailboxes, and public folders, all through a single, comprehensive solution.
- Choose the appropriate connection settings and click the ‘Next’ button to proceed.
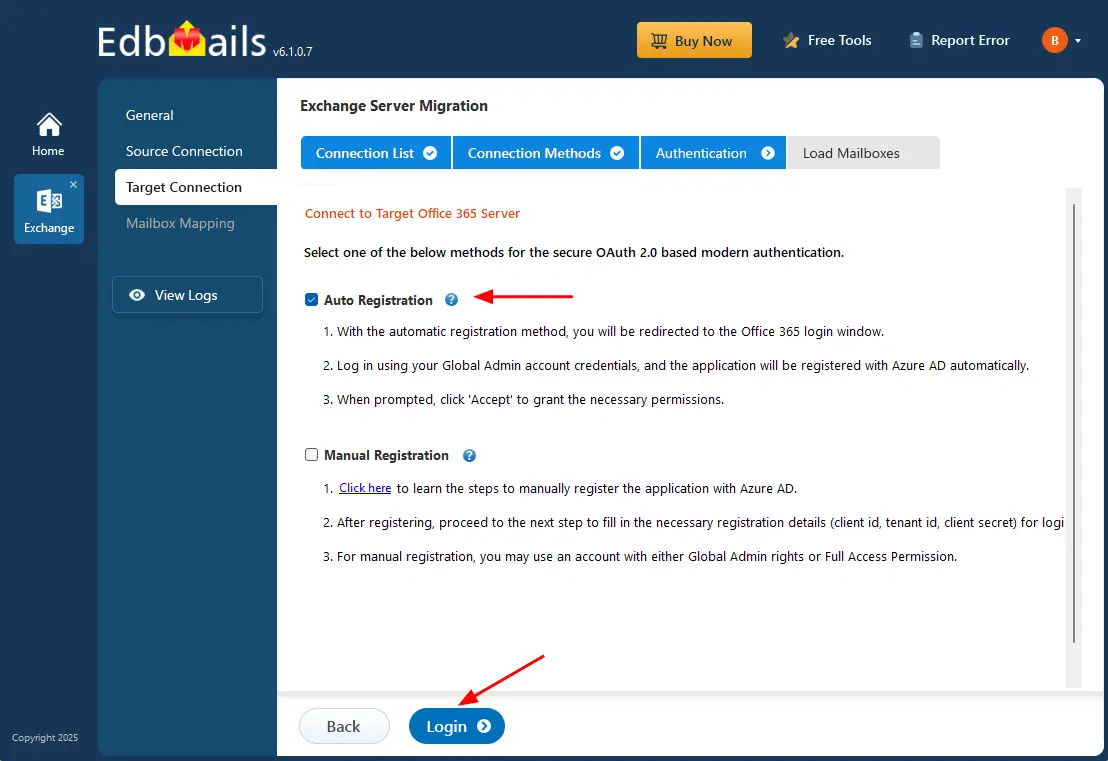
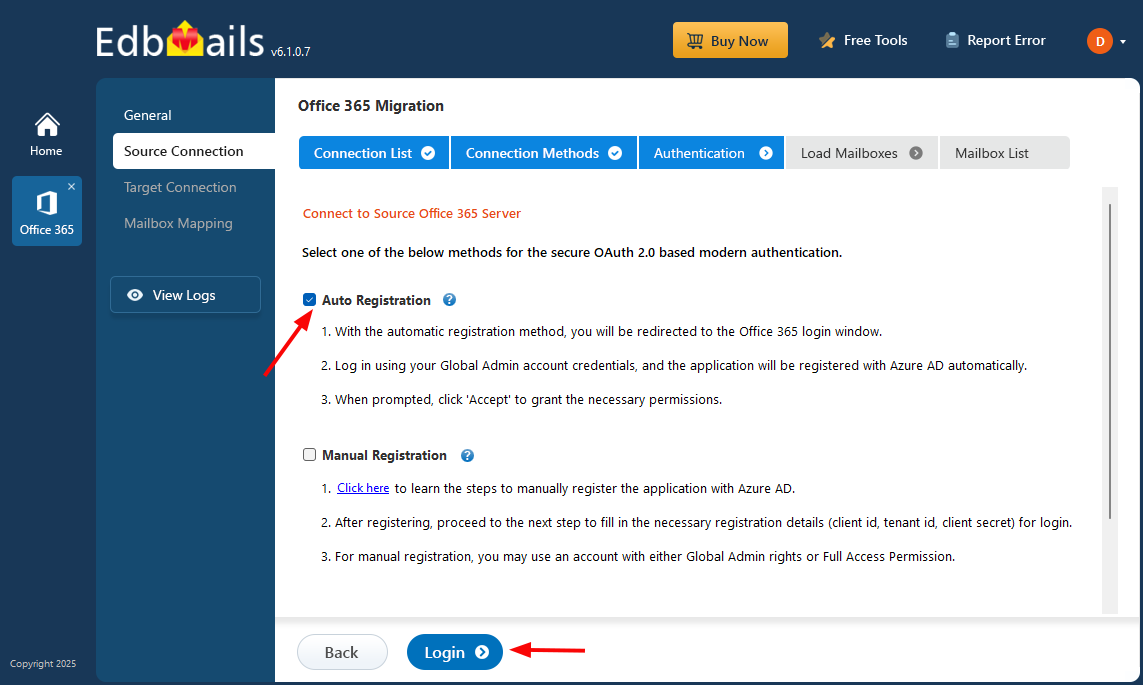
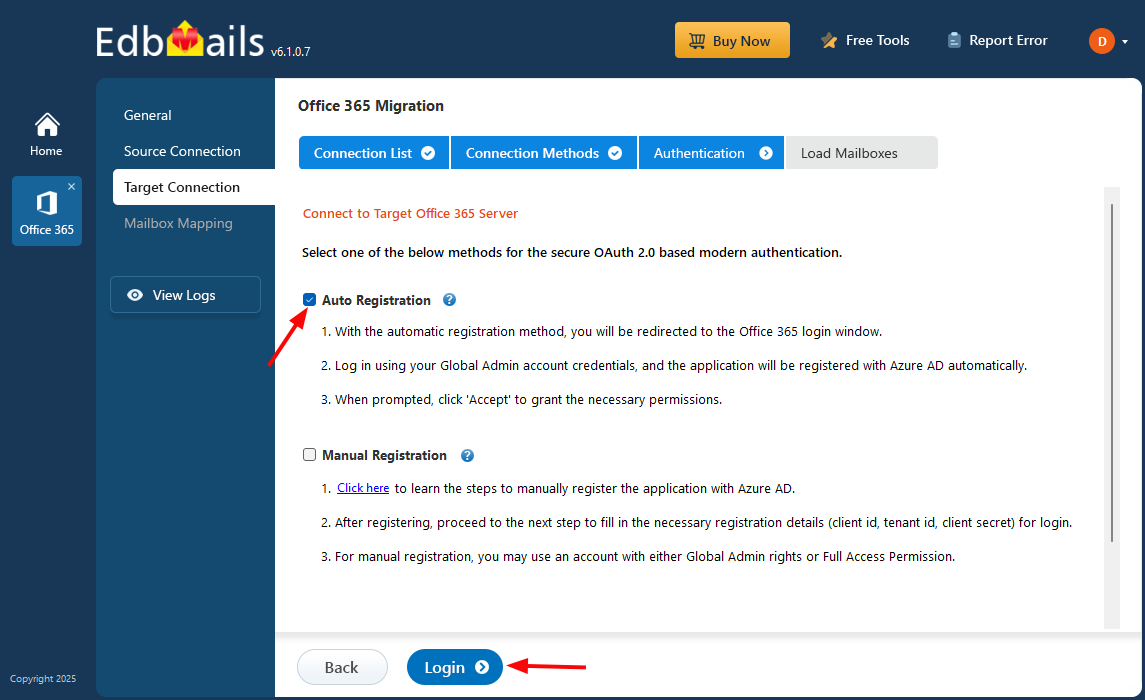
- Choose any of the available options to create a secure connection using OAuth 2.0 modern authentication.
- Select Auto Registration for a quick and hassle-free setup. Simply sign in with a Global Admin account and approve the required permissions to automatically register the application in Azure AD.
- Or select Manual Registration if you prefer to provide the Azure AD application details yourself. This method supports both Global Admin accounts and accounts with Full Access permissions.
- Click ‘Login’ to proceed.
- Authenticate on the Microsoft sign-in page.

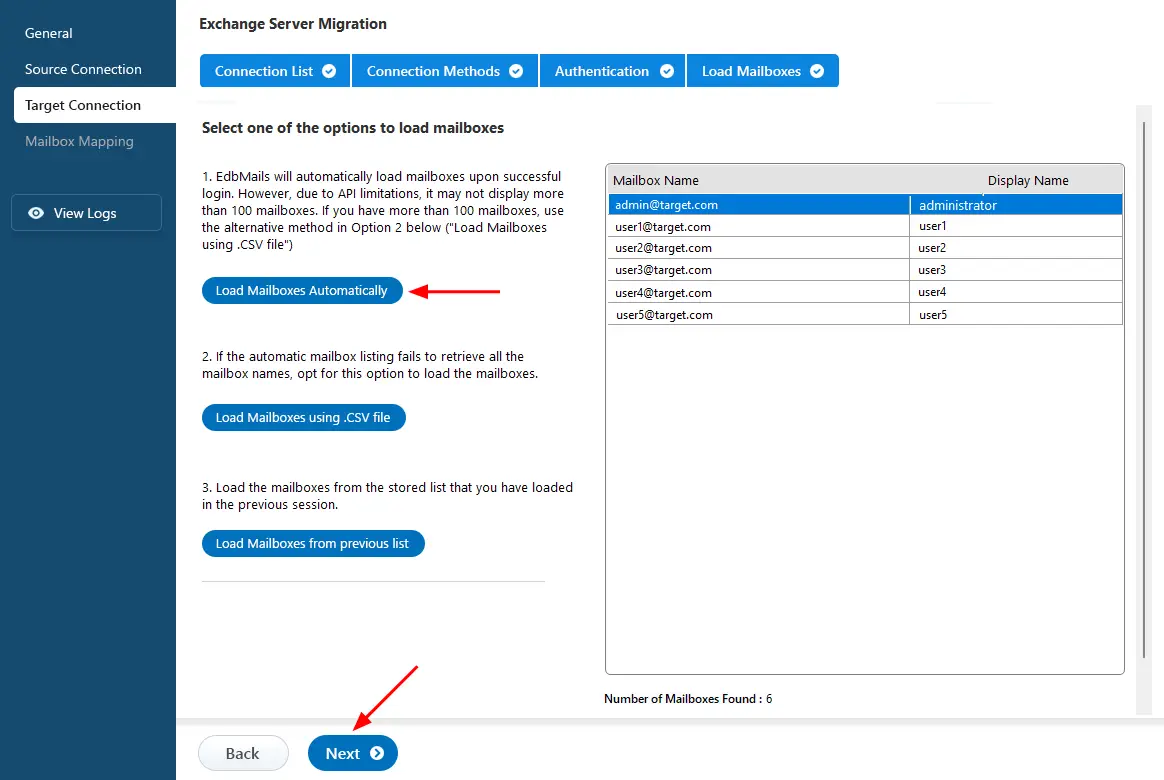
- Choose a method to load the mailboxes. Either select ‘Load Mailboxes Automatically’, 'Load Mailboxes using .CSV file’ or ‘Load Mailboxes from previous list’.
- Then, click the ‘Next’ button.
Step 5: Rackspace Hosted Exchange to Office 365 mailboxes mapping
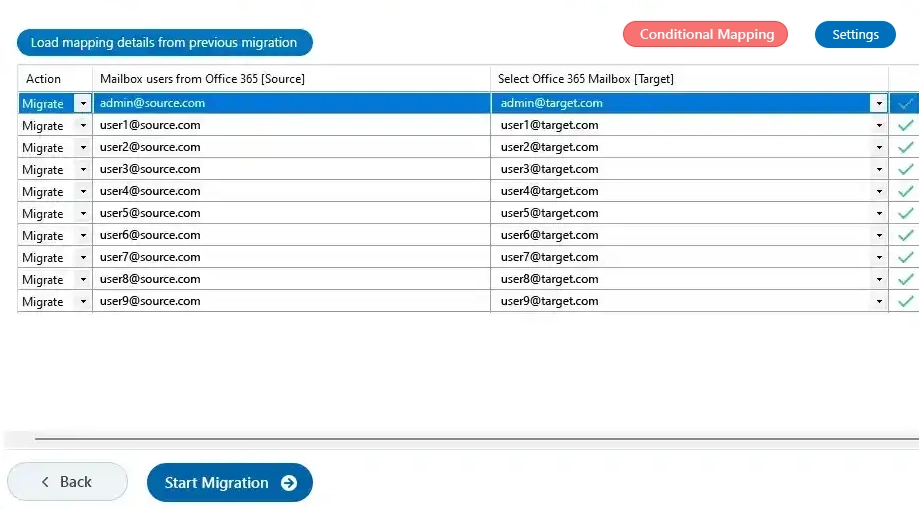
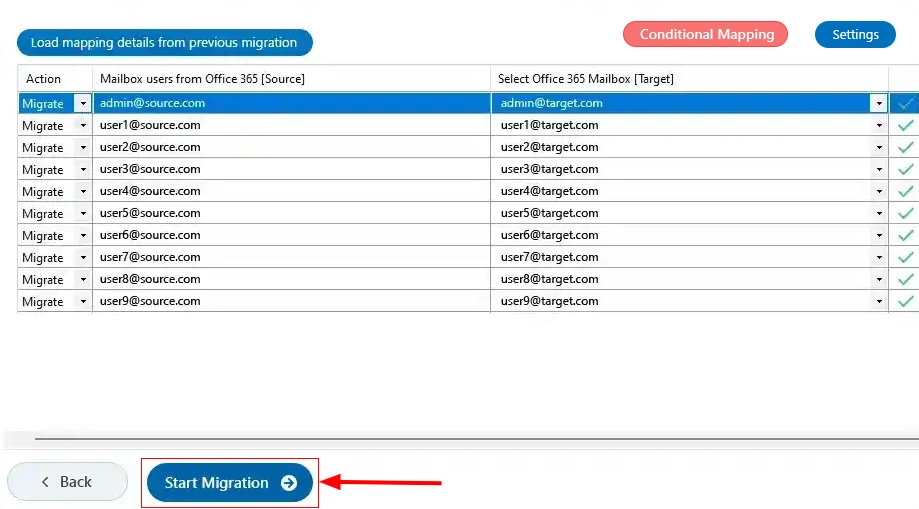
- Choose the required mailbox mapping option to map source mailboxes or folders to the respective target mailboxes or folders.
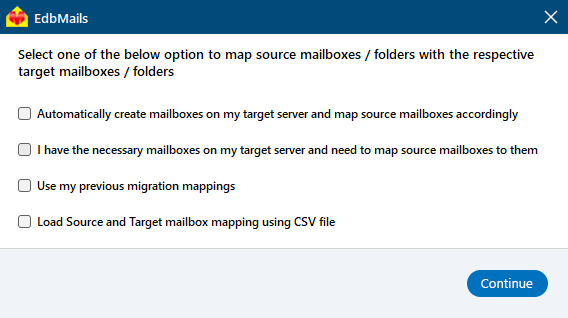
- EdbMails automatically creates mailboxes on your target Office 365 server.
Learn more about the automatic mailbox creation process on the target Office 365 server.
- Choose the required mailbox mapping option to map source mailboxes or folders to the respective target mailboxes or folders.
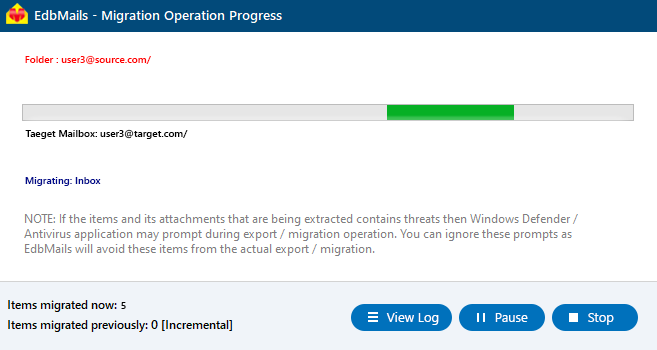
Step 6: Start Rackspace Hosted Exchange to Office 365 migration
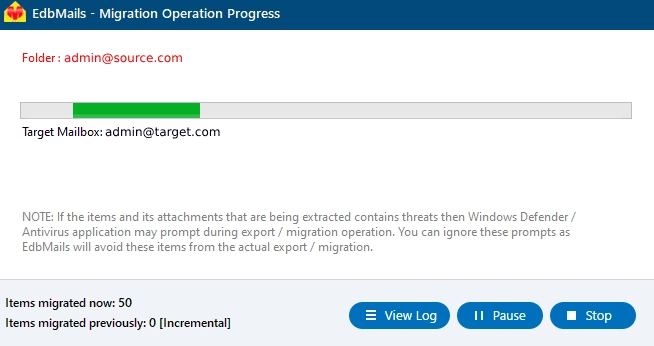
- Click the 'Start Migration’ button to initiate the migration process.
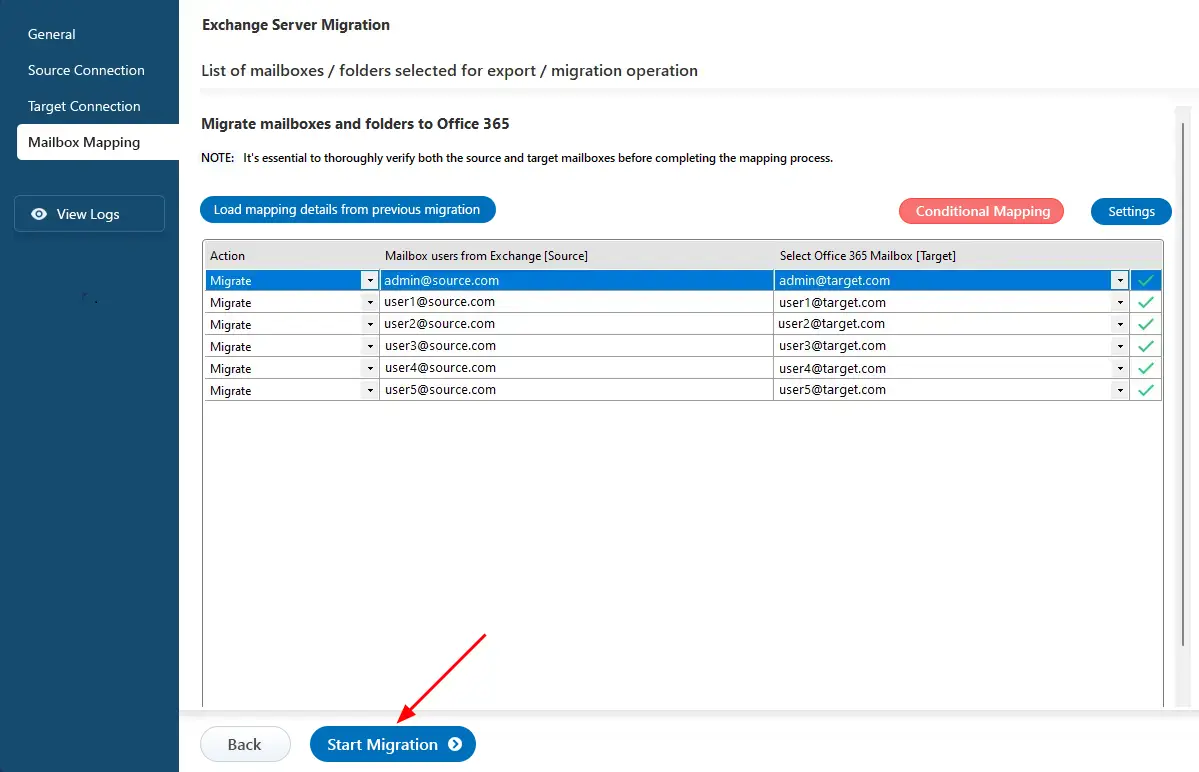
- Monitor the migration progress using the progress bar. Once the migration is complete, EdbMails will prompt you to review the status. Click the ‘View Logs’ button to access the migration report.
- Click the 'Start Migration’ button to initiate the migration process.
Method 2 : Migrate from Rackspace Office 365 Tenant to Office 365
- If you have your Office 365 tenant on Rackspace, then an Office 365 to Office 365 migration is the best approach.
- Download and install EdbMails on your computer and follow the below steps.
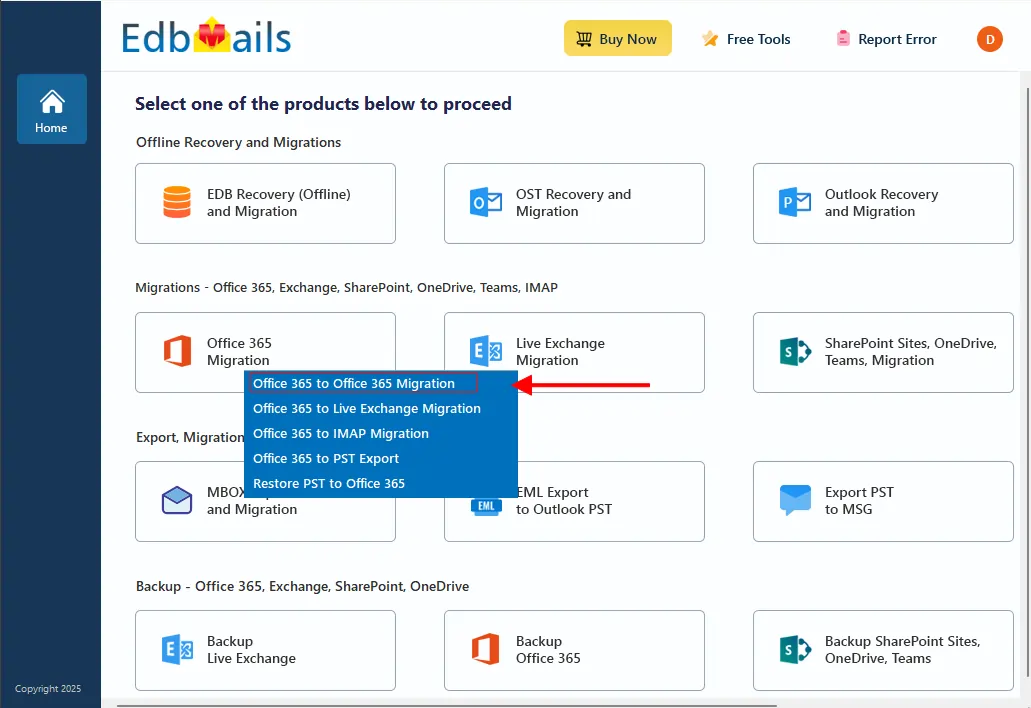
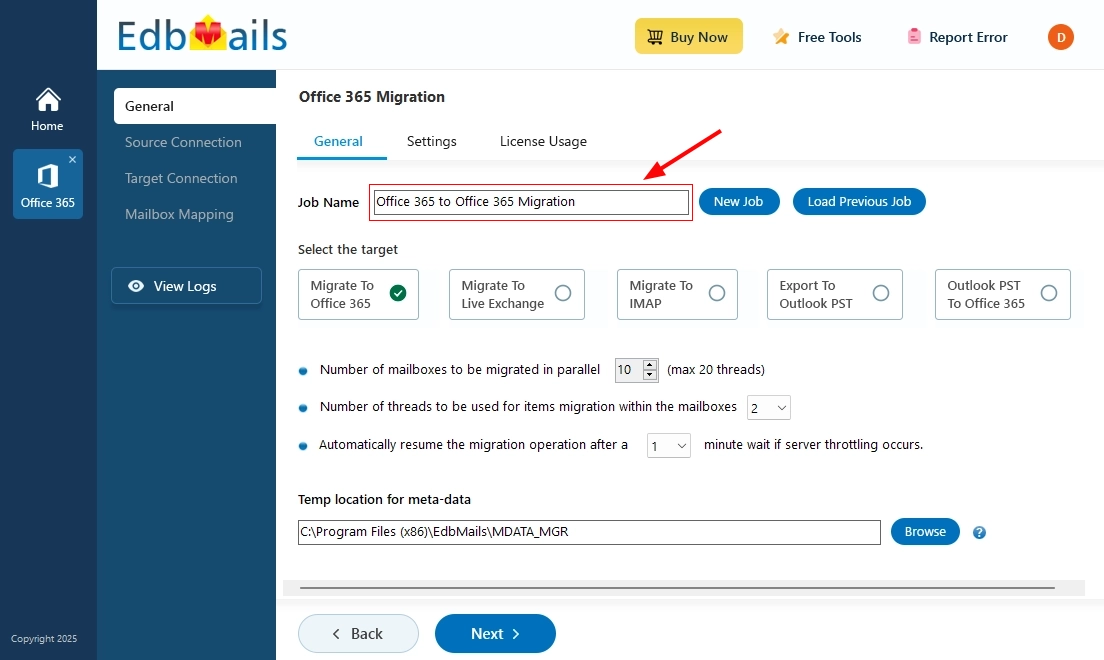
Step 1: Select and Configure Office 365 to Office 365 Migration
- Select ‘Office 365 to Office 365 Migration’
- Keep the default job name, or click the ‘New Job’ button to create a custom name of your choice.
- Select ‘Office 365 to Office 365 Migration’
Step 2: Connect to source Rackspace Office 365 tenant
- Click the ‘Add New Connection’ button to establish a new connection to the source Office 365. To use the previous connection, select it from the connection list and click the ‘Connect to Existing’ button to proceed.
- EdbMails delivers versatile migration features that enable you to move primary mailboxes, archive mailboxes, and public folders smoothly using a single, unified solution.
- Choose the required connection options and click the ‘Next’ button.
- Choose the secure authentication method you want to use for the target Office 365 account.
- You will then be redirected to the official Microsoft sign-in page, where your credentials are securely validated through OAuth 2.0 for safe and protected access.
- Click ‘Login’ to proceed.
Connect to Office 365 server using secure modern authentication
- Authenticate on Microsoft sign-in page.

- After successfully connecting to your Office 365 server, select an option to load the mailboxes. Alternatively, you can also load the mailboxes using a CSV file.
- Click the ‘Add New Connection’ button to establish a new connection to the source Office 365. To use the previous connection, select it from the connection list and click the ‘Connect to Existing’ button to proceed.
Step 3: Select source Rackspace Office 365 tenant mailboxes
- Select the mailboxes you want to migrate from the source Office 365 server.
- Click ‘Next’ to proceed.
Step 4: Connect to target Office 365 server
- Select ‘Add New Connection’ to create a fresh connection with the target Office 365 account. If you have already set up a connection earlier, choose it from the list and click ‘Connect to Existing’ to continue.
- Select the required connection options and click the ‘Next’ button.

- Select the appropriate target connection method.
- Click the ‘Login’ button to continue.
- Authenticate on Microsoft sign-in page.
- Select one of the methods to load the mailboxes. You can also load the mailboxes using a CSV file.

- Select ‘Add New Connection’ to create a fresh connection with the target Office 365 account. If you have already set up a connection earlier, choose it from the list and click ‘Connect to Existing’ to continue.
Step 5: Map source and target mailboxes
- Choose the required mailbox mapping option
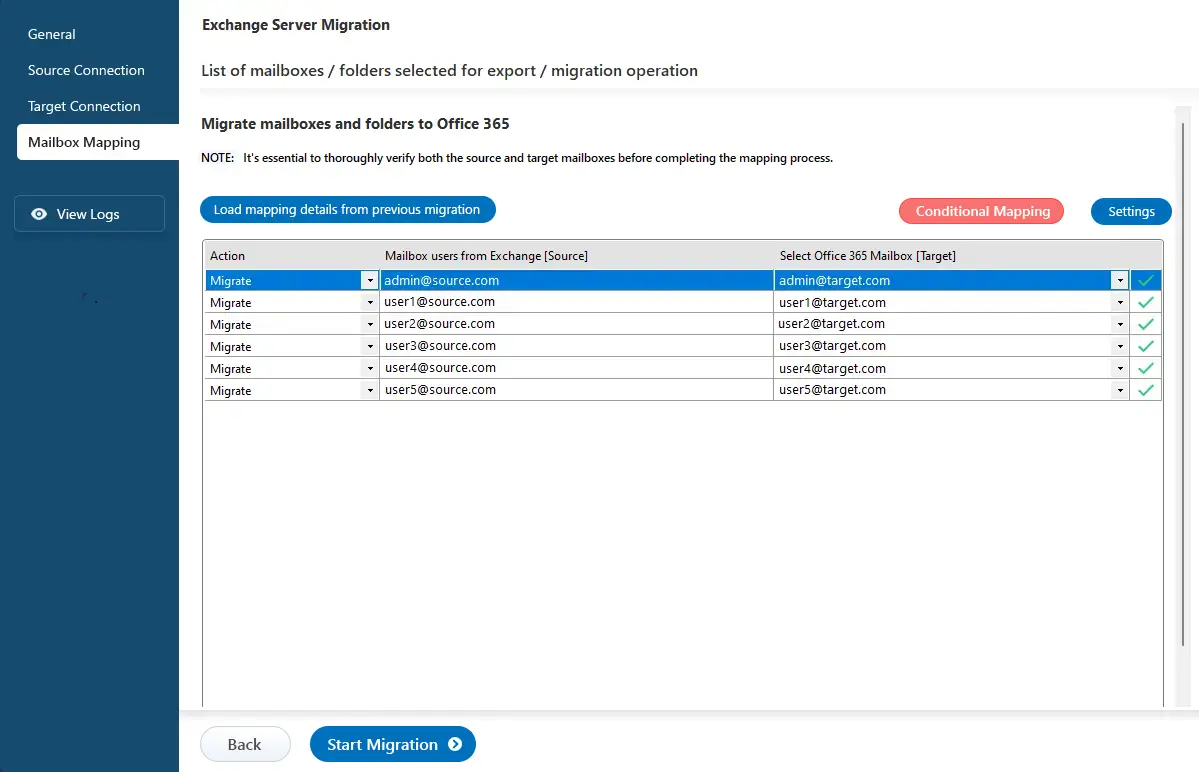
- After successfully creating mailboxes on your target server, EdbMails automatically maps mailboxes and folders between source and target tenants, which is particularly beneficial for large-scale migrations. Alternatively, you have the flexibility to manually map source folders and subfolders to specific target locations as needed.
- Choose the required mailbox mapping option
Step 6: Start Office 365 to Office 365 migration operation
- Click the 'Start Migration’ button to initiate the migration process.
- EdbMails will automatically initiate the migration and notify you once it's complete. You can review the migration details in the migration log report provided. Additionally, if needed, you have the flexibility to pause or resume the migration at any time.
- Click the 'Start Migration’ button to initiate the migration process.
Method 3 : Migrate from Rackspace to Office 365 with IMAP connection
Step 1: Download and Install EdbMails IMAP migration software
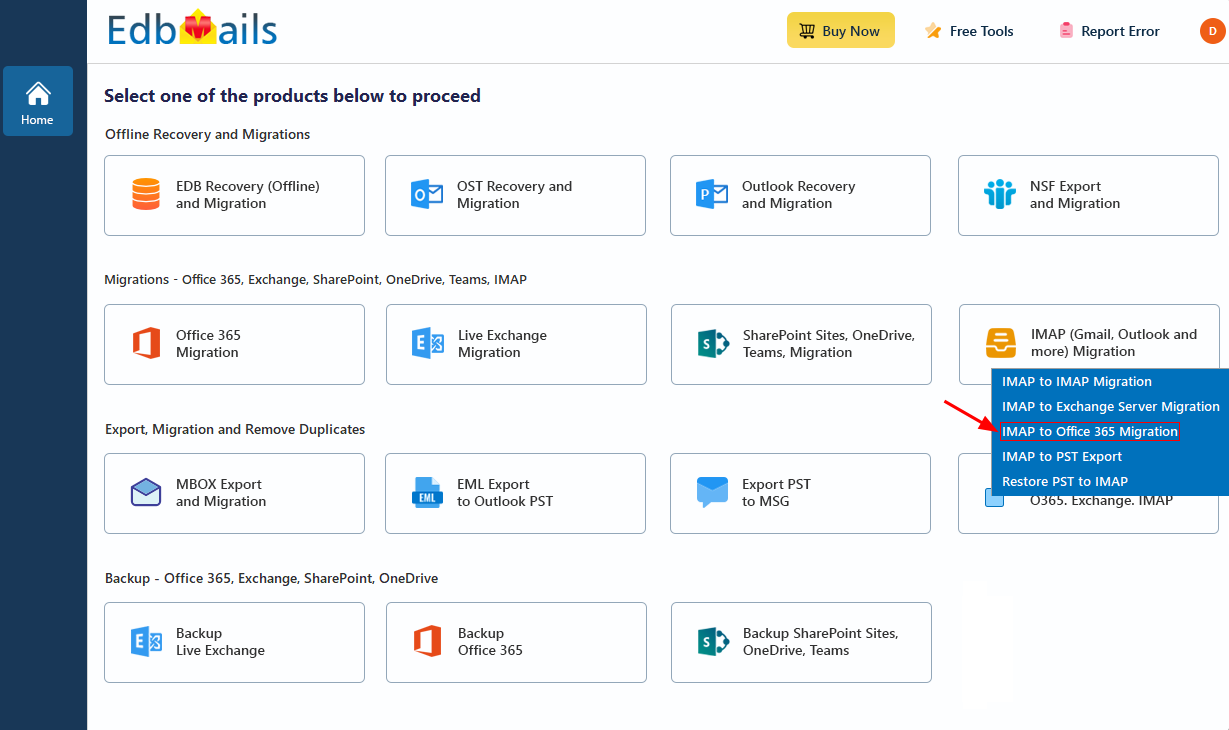
- First, download and install EdbMails on your computer running on Windows operating system. Once installed, launch the application and choose the ‘IMAP Migration’ option from the main dashboard to proceed with the migration setup.
- Select ‘IMAP to Office 365 Migration’.
Step 2: Connect to source Rackspace IMAP server
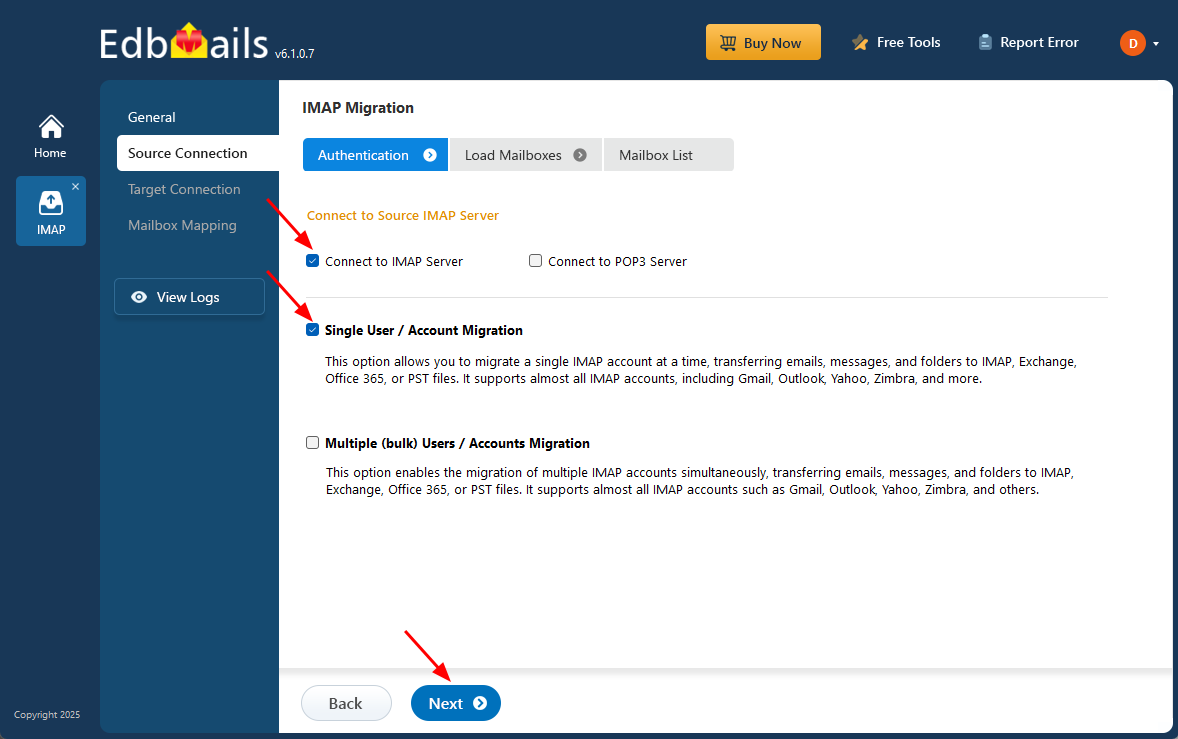
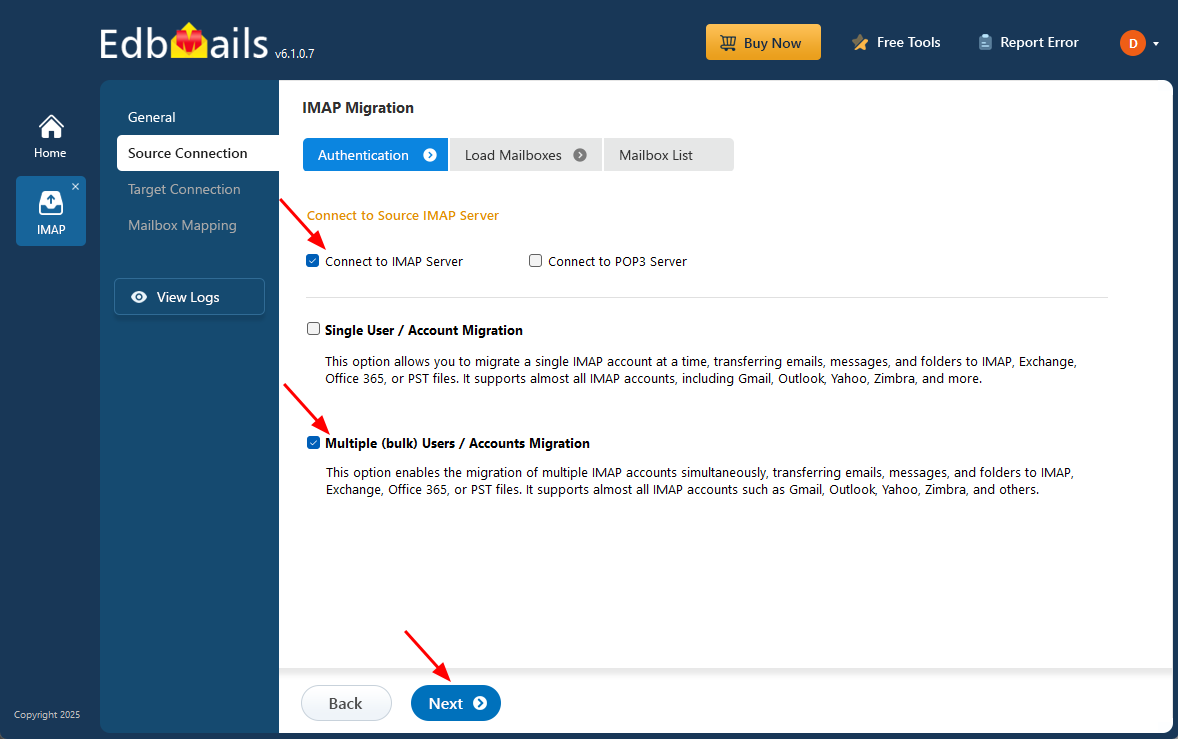
- To connect a single cPanel account for migration, click ‘Single User / Account Migration’, choose the suitable connection option such as ‘Connect to IMAP Server’ or ‘Connect to POP3 Server’.
- Click ‘Next’ to proceed.
- Select the appropriate IMAP host name for your rackspace server from the list, or manually enter the server hostname such as mail.userdomain.com.
- Then enter the required login details including your email address, password, and the SSL port number, usually 993 when SSL is enabled.
- Click the ‘Login’ button to proceed.

- To migrate multiple rackspace mailboxes at once, select ‘Multiple (bulk) Users/Accounts Migration’, choose the suitable connection method such as ‘Connect to IMAP Server’ or ‘Connect to POP3 Server’.
- Then proceed by clicking ‘Next’.
- Click ‘IMAP Migration CSV File’
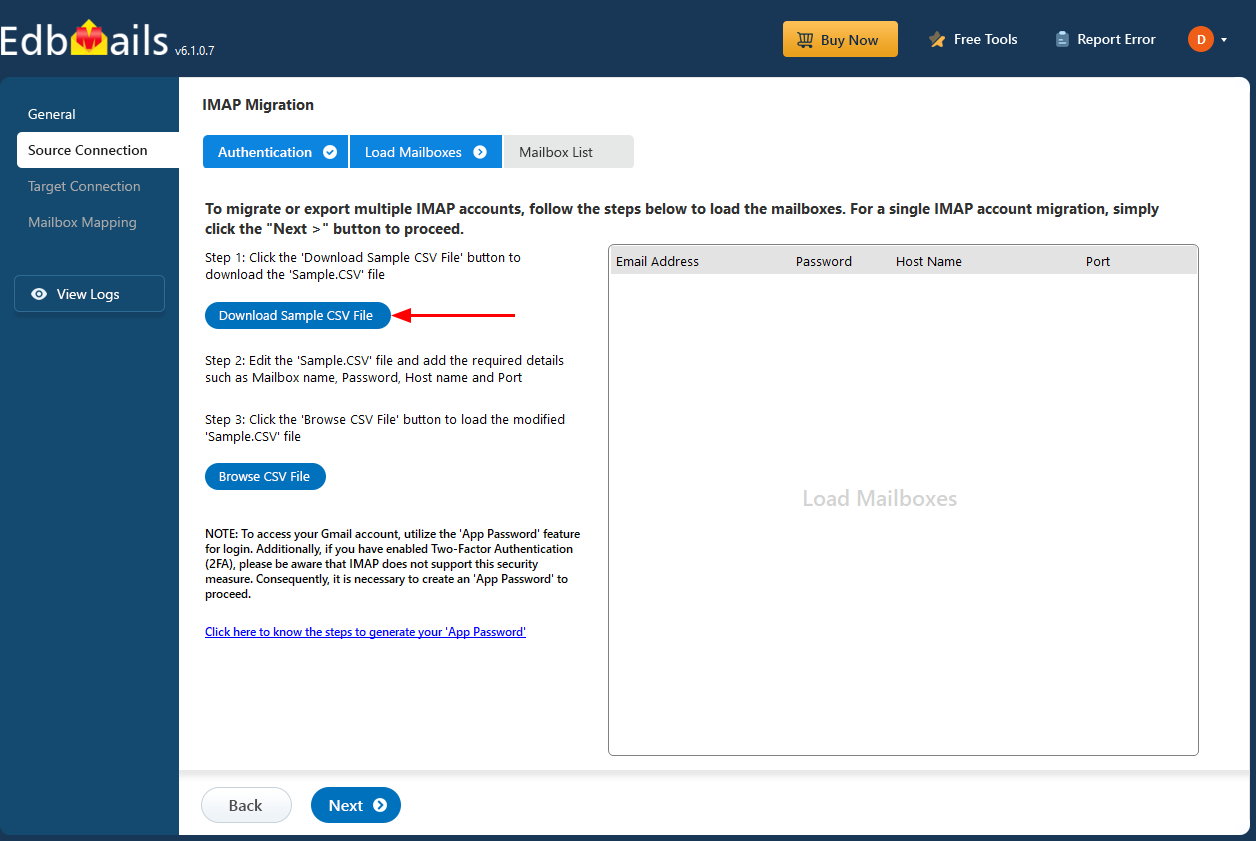
- Open the sample CSV file and enter the required details, such as the email address, password, host name, and port number.

- After entering the required details in the CSV file, save your changes and close the file to continue with the next steps.
- Next, click the 'Load Modified CSV File' button, locate your updated CSV file, select it, and open it to proceed.

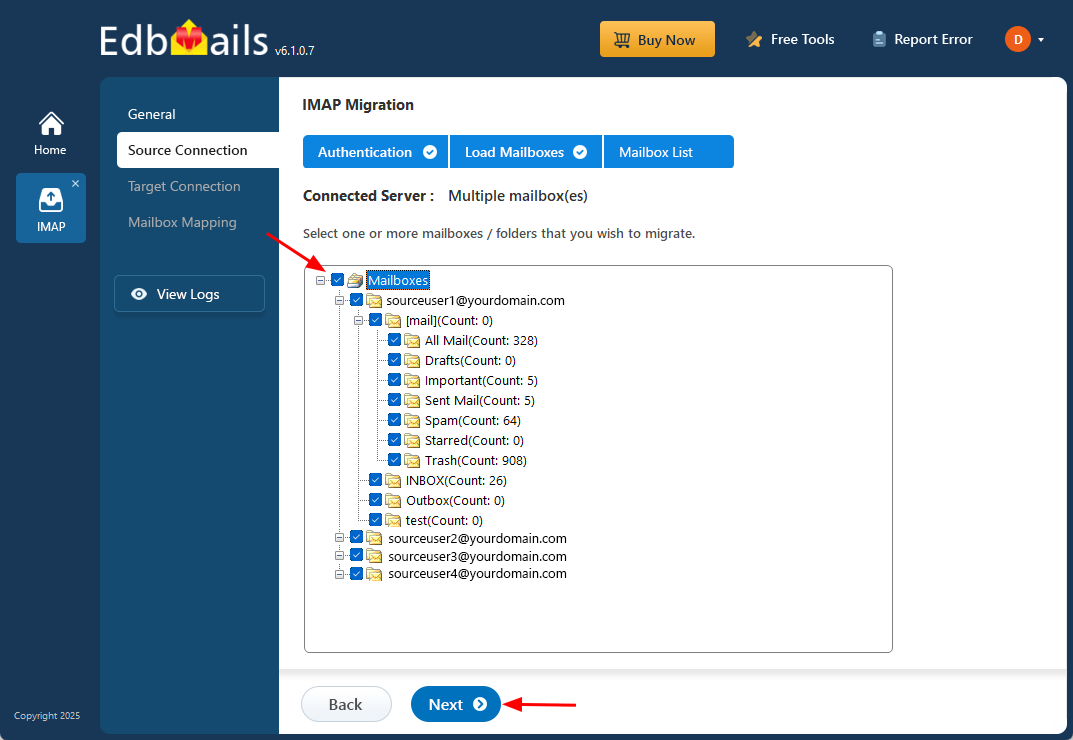
Step 3: Select source Rackspace server mailboxes
- Choose the specific mailboxes or individual folders you wish to migrate. Once your selection is complete, click ‘Next’ to continue.
- Choose the specific mailboxes or individual folders you wish to migrate. Once your selection is complete, click ‘Next’ to continue.
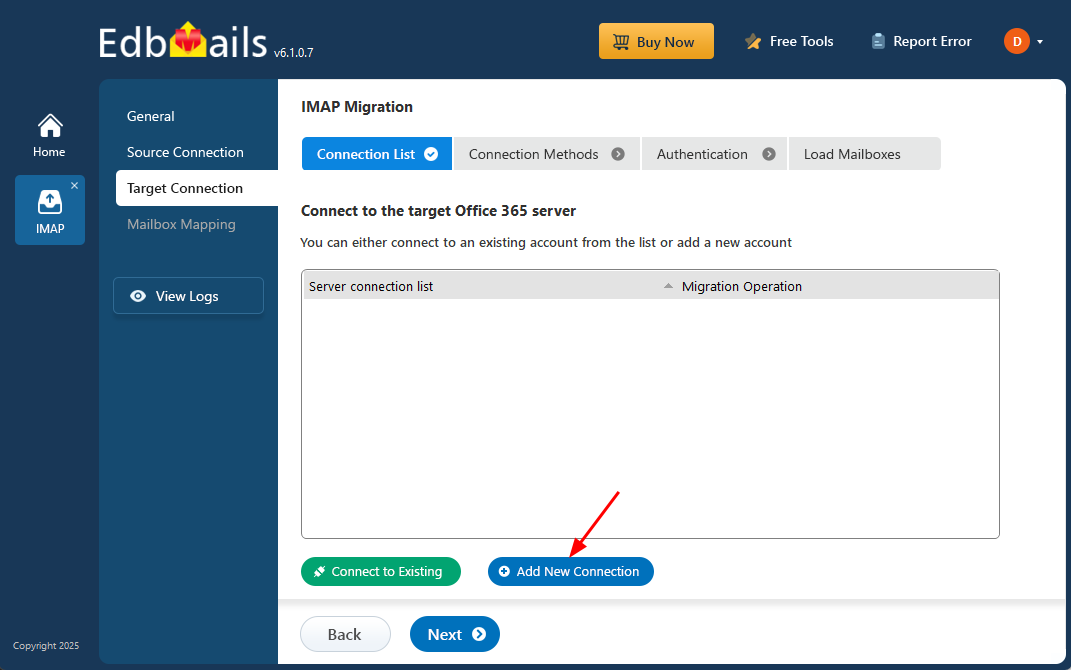
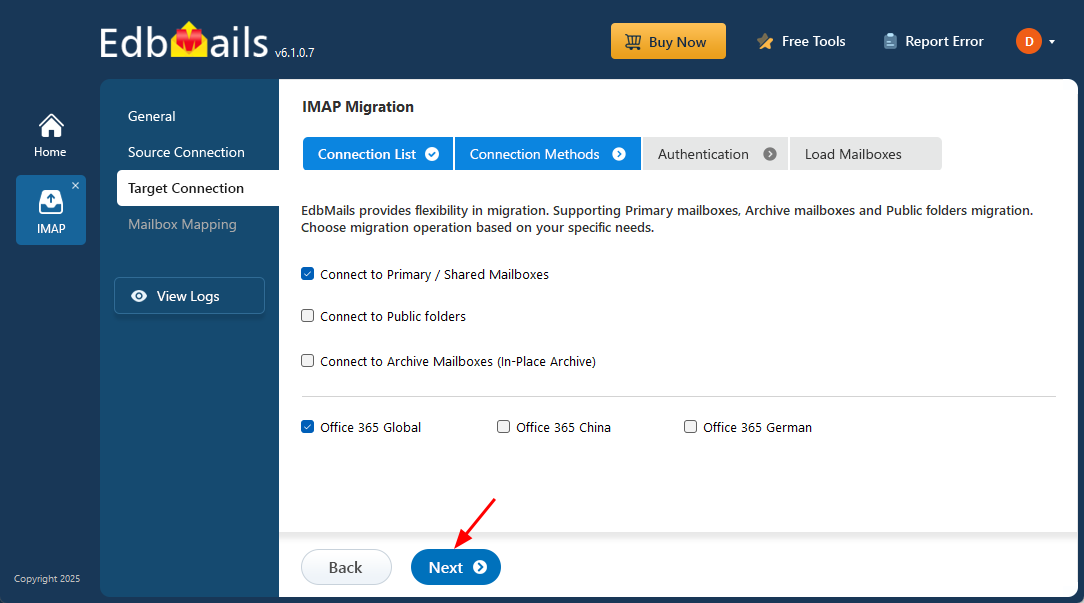
Step 4: Connect to target Office 365 server
- Click the ‘Add New Connection’ button to configure a fresh connection to your target Office 365 account. If you have already set up a connection, select it from the list and click ‘Connect to Existing’.
- Choose the desired connection options and click ‘Next’ to proceed.
- Choose your preferred authentication method and click the ‘Login’ button to proceed.
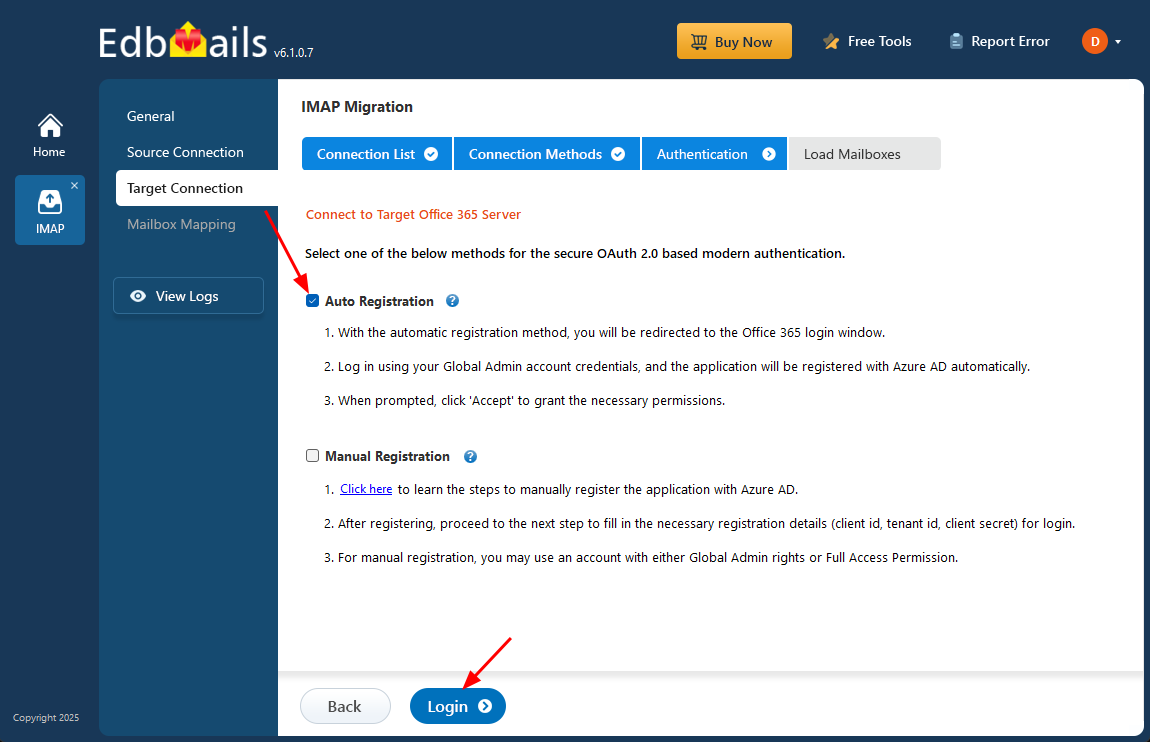
- Authenticate on Microsoft sign-in page.
- Select one of the methods to load the mailboxes. EdbMails automatically loads Office 365 mailboxes. However, due to Microsoft API limitations, it displays only the first 100 mailboxes. For loading more than 100, use the CSV file option and proceed by clicking ‘Next’.
- Click the ‘Add New Connection’ button to configure a fresh connection to your target Office 365 account. If you have already set up a connection, select it from the list and click ‘Connect to Existing’.
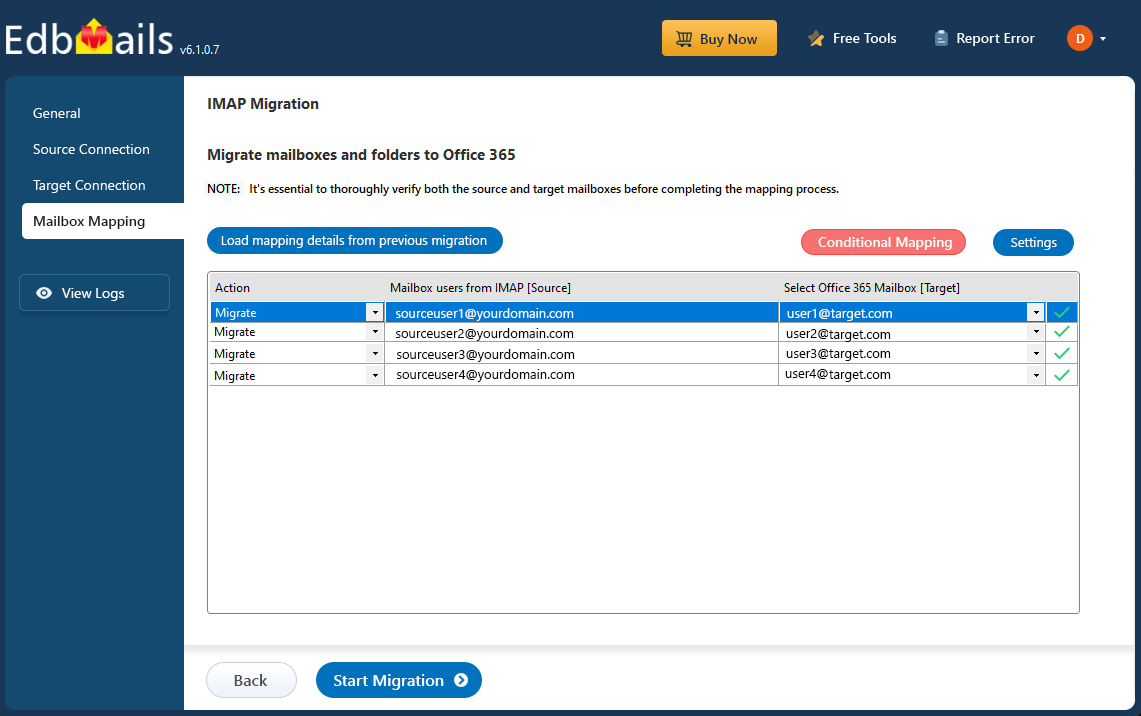
Step 5: Rackspace to Office 365 mailboxes mapping
- Choose one of the available options to map the source and target mailboxes
- You can choose the option to let EdbMails automatically create mailboxes on your target Office 365 tenant if they don’t already exist, simplifying the setup process.
- EdbMails automatically maps the source and target mailboxes based on matching display names. You can also manually map mailboxes if needed. With manual mapping, the target mailbox folders are fetched and listed, giving you the option to match the source folders with the corresponding target folders or create custom folder mappings as required.
- Choose one of the available options to map the source and target mailboxes
Step 6: Start Rackspace to Office 365 migration
- Once the mailboxes are mapped, click the 'Start Migration' button to begin the migration process.
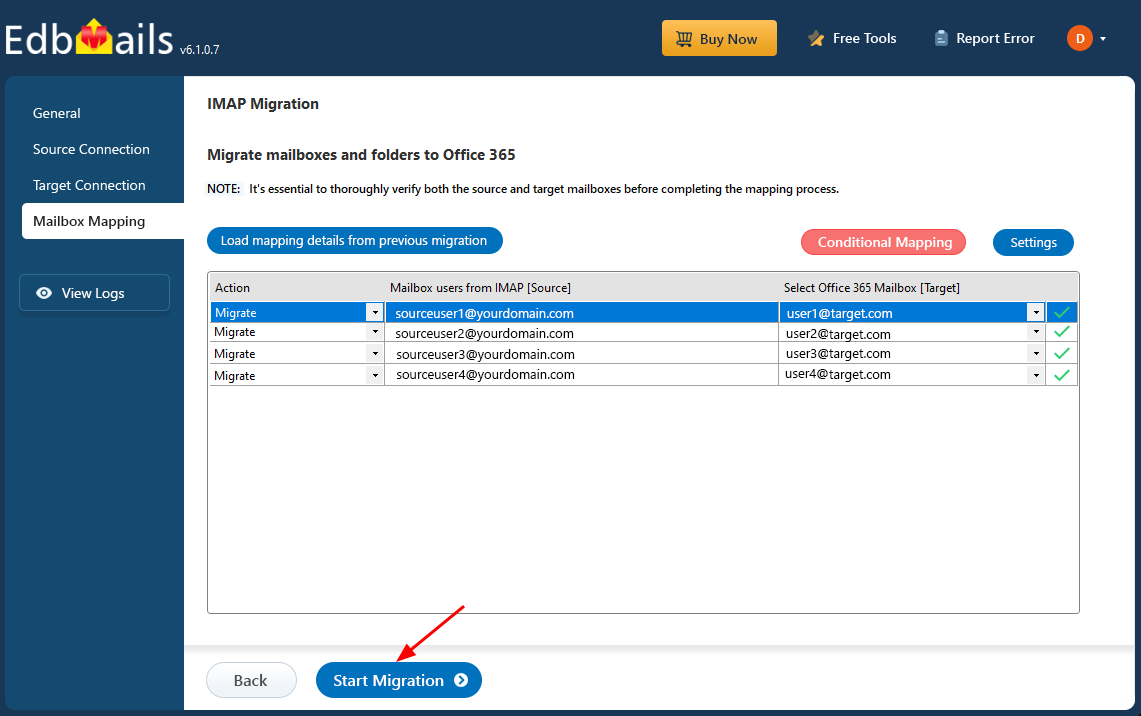
- Click the 'View Logs' button to access the migration report, which provides detailed information on the items migrated from each folder and mailbox. The report includes mapping details, the number of emails migrated, and any issues encountered during the migration process, helping you track and verify the migration of your data.
- Also log into your target server to verify the migrated items.

- Once the mailboxes are mapped, click the 'Start Migration' button to begin the migration process.
Rackspace to Office 365 Post Migration Tasks
- Step 1: Update the MX records to point to Office 365
To ensure email delivery is directed to Office 365 after migration, the first step is to update the MX (Mail Exchange) records in your domain's DNS settings. Additionally, configure the Autodiscover record to enable Outlook to automatically connect to the migrated mailboxes, ensuring a smooth setup for users.
- Step 2: Create a new Outlook profile for users in the new domain
Configure the Outlook profile for each user in your domain if Outlook has problems connecting to Office 365 mailboxes.
- Step 1: Update the MX records to point to Office 365
Troubleshooting Guide for Rackspace to Office 365 Migration
Hosted Exchange to Office 365 migration feature:
For troubleshooting, visit Knowledge Base articles.
For more queries, check Frequently Asked Questions or contact support.
Office 365 to Office 365 migration feature:
IMAP to Office 365 migration feature:
Benefits of EdbMails for Rackspace to Office 365 Migration
When you migrate from Rackspace to Office 365, EdbMails offers a comprehensive and efficient solution to ensure a smooth transition. Here's how EdbMails stands out with its powerful features designed to simplify the process.
- Simplest Graphical User Interface (GUI)
EdbMails offers an incredibly simple and intuitive graphical user interface (GUI), making the migration process easy to follow. No technical knowledge is needed, allowing users to effortlessly navigate through each step for a smooth and straightforward experience.
- Maintain Folder Structure
EdbMails preserves the original folder structure during migration, ensuring that emails remain organized and easy to navigate. This feature is essential for maintaining consistency and continuity, allowing users to seamlessly transition without any disruption to their folder hierarchy.
- Any IMAP Server to Server Migration
In addition to Rackspace to Office 365 migration, EdbMails also supports seamless migrations to a wide range of platforms, including Gmail, G Suite, Outlook.com, Yahoo Mail, Roundcube, Yandex Mail, Zoho Mail, Zimbra Webmail, IMAP, and more. This versatility ensures that users can efficiently transition to various email services with the same high-quality results.
- Concurrent Migration
EdbMails optimizes the migration process with concurrent mailboxes migration support. This means multiple mailboxes can be migrated at the same time, significantly reducing the overall migration time and minimizing downtime.
- Free Trial
EdbMails offers a free trial, allowing users to evaluate its capabilities before purchasing. This provides peace of mind, letting you test the migration process and assess the quality of the transfer without any initial investment.

