Gmail to Tutanota migration
Gmail is one of the most widely used email platforms, known for its clean interface, powerful email management features, and seamless integration with Google’s productivity tools. However, rising concerns over data privacy and targeted advertising have led many users to explore more secure alternatives. Tutanota—a Germany-based email provider—offers a privacy-first solution with built-in end-to-end encryption, ensuring that only the sender and recipient can access email content.
Unlike Gmail, which relies on ad revenue and data scanning to serve targeted promotions, Tutanota delivers an ad-free experience while encrypting all user data, including emails, contacts, and calendars. This makes it a strong choice for individuals and businesses seeking a secure and private communication platform.

While Gmail’s feature-rich environment is appealing, users looking to switch to Tutanota should be prepared for a few challenges. Migrating large volumes of emails, contacts, and attachments requires careful execution to avoid data loss. Additionally, Gmail users may need time to adapt to Tutanota’s simplified interface and independent ecosystem. Despite these considerations, migrating from Gmail to Tutanota is a valuable step for those who prioritize data protection, transparency, and digital privacy.
EdbMails IMAP migration software simplifies this transition by streamlining the entire migration process. It ensures a precise, risk-free transfer with advanced capabilities. The batch migration feature allows users to efficiently migrate multiple mailboxes at once, significantly reducing the time and effort required. EdbMails' advanced filtering options give users full control over what data is migrated, allowing them to select specific emails, attachments, and contacts. The automatic mapping feature removes the need for manual configuration, ensuring seamless mailbox mapping between Gmail and Tutanota. With EdbMails, users can enjoy a smooth, uninterrupted migration experience, ensuring data integrity while making the switch to Tutanota with confidence and ease.
Gmail to Tutanota migration plan
- Assess your specific needs, including the number of users, data volume, and desired migration timeframe.
- Depending on your requirements, create a Tutanota account. Configure the necessary settings and ensure your Tutanota account is ready to receive the migrated data.
- Configure IMAP migration settings: If you opt for an IMAP migration tool, configure the necessary settings, such as providing the source Gmail Mail server details, target Gmail server details, authentication credentials, and migration options.
- Before migrating all data, perform a test migration to ensure that the process works smoothly. Verify that emails, contacts, and other data are successfully transferred from Gmail to Tutanota.
- Inform all users about the upcoming migration. Provide instructions on how to access their new Tutanota accounts and any necessary setup steps.
- Once you have completed the necessary preparations and testing, initiate the full migration process. Monitor the progress to ensure that all data is transferred correctly.
- After the migration, carefully review the migrated data in Tutanota to ensure that everything is intact and accurately transferred. Cross-check emails, contacts, and other important information to confirm their completeness.
- Once you have verified the successful migration and ensure data integrity, you can proceed to decommission your Gmail Mail accounts.
Pre-migration activities for Gmail to Tutanota migration
- Ensure that IMAP settings are enabled on both the source (Gmail) and target (Tutanota) servers to facilitate migration.
- Keep a record of the email addresses and passwords for all users you plan to migrate from the Zimbra server.
- Confirm that you have the email addresses for all users on Gmail. If using Gmail, create an app password for the account.
Click here for steps to create an app password for a Gmail account.
Gmail to Tutanota migration using EdbMails
Download and install EdbMails IMAP migration software
- Download application on your computer running the Windows operating system.
See the list of EdbMails system requirements for Gmail to Tutanota migration.
- Launch the application and click the 'Login' button by entering the email address and password, or click the 'Start Your Free Trial' button.

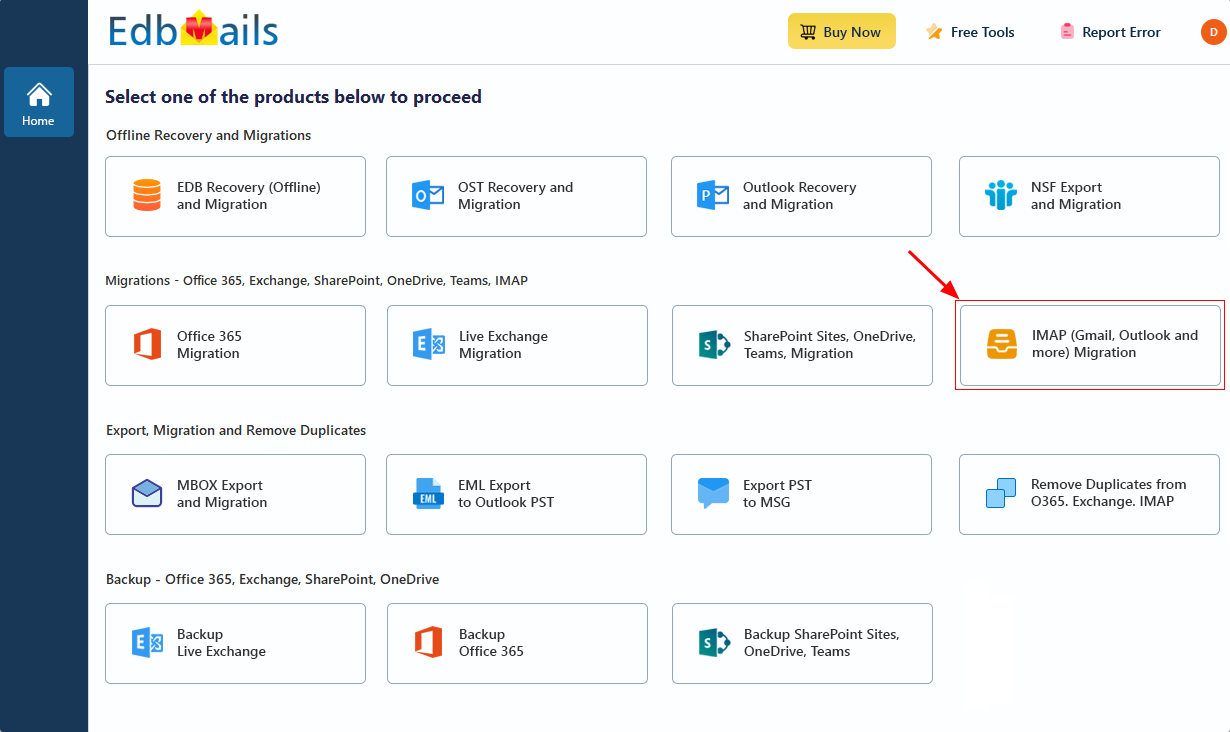
- Select the ‘IMAP (Gmail, Outlook & more) Migration’.
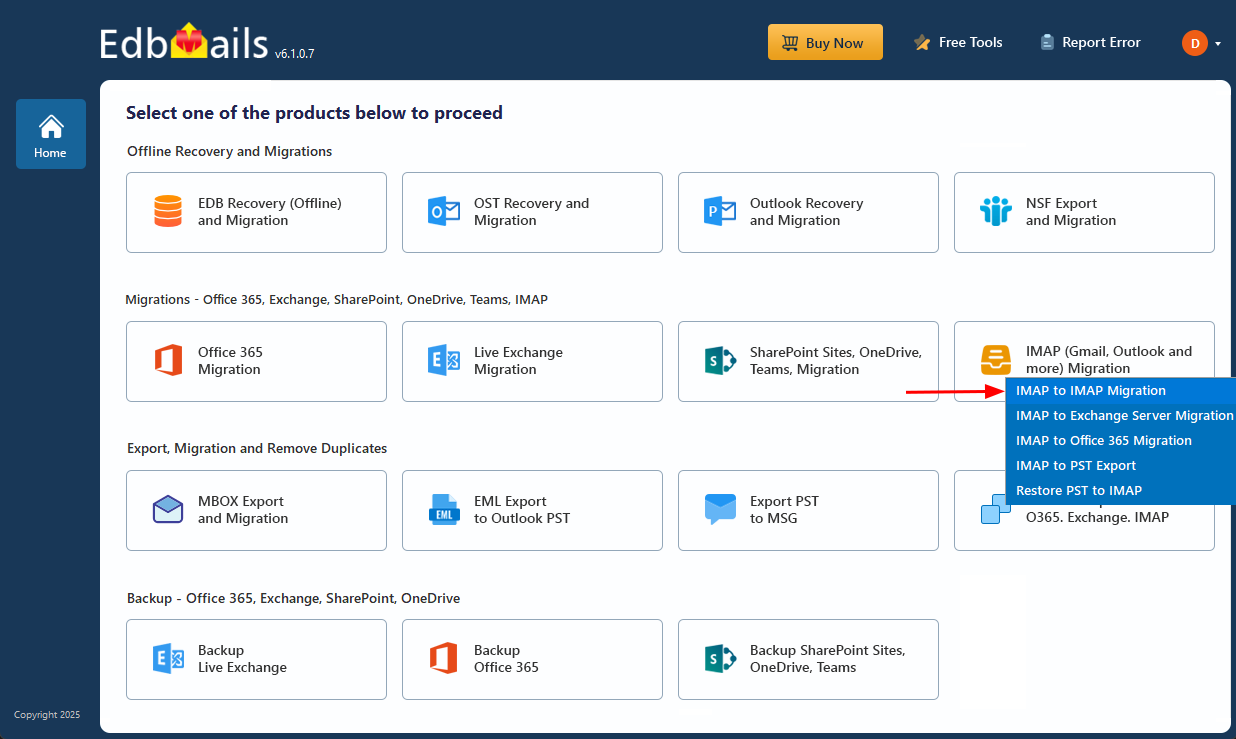
- Select ‘IMAP to IMAP Migration’.
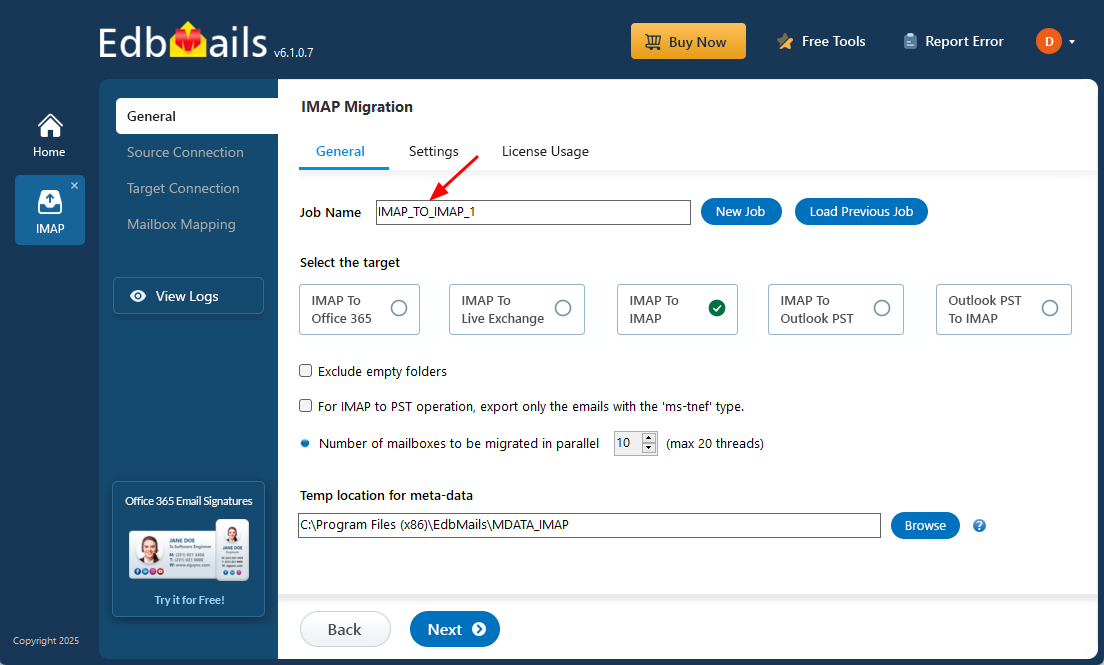
- Proceed with the default job name or click ‘New Job’ to assign a custom name for easier identification before continuing.
- Download application on your computer running the Windows operating system.
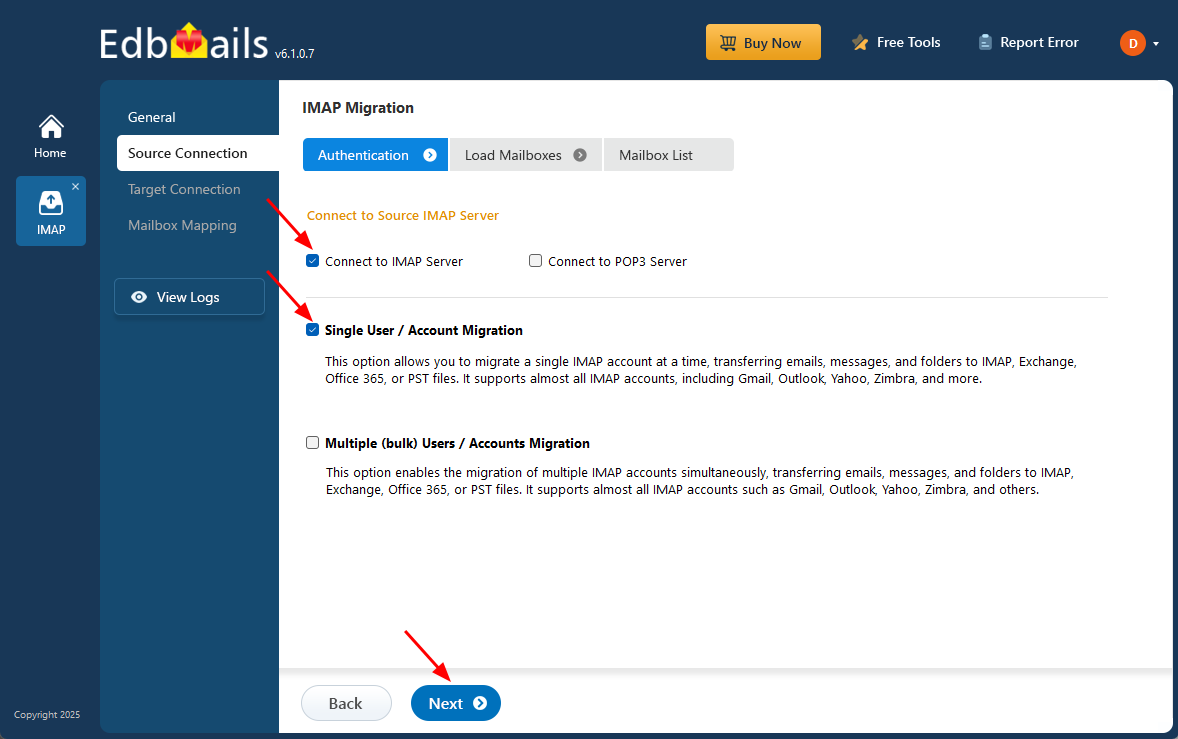
Step 2: Connect to the source Gmail server
- To migrate a single Gmail Server, choose the ‘Single User / Account Migration’ option and then click ‘Next’ to proceed.
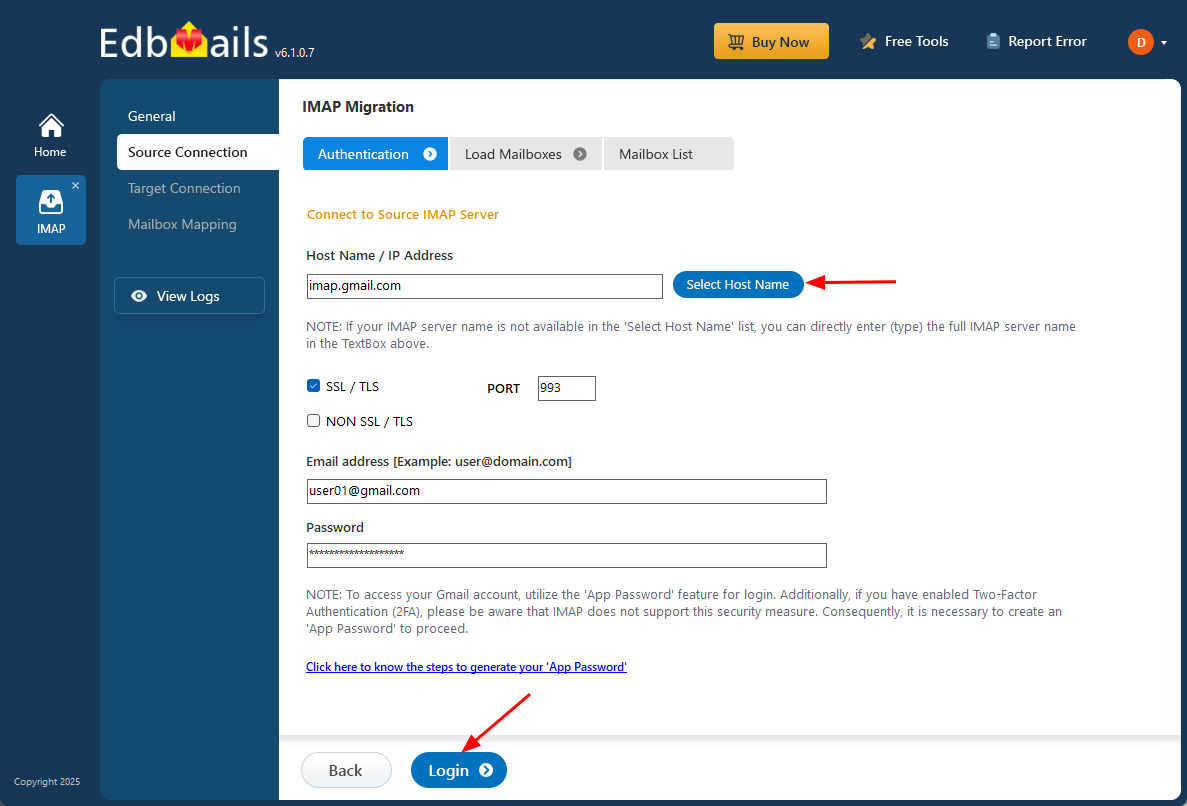
- Choose Gmail (imap.gmail.com) as the IMAP host name from the list. Then, provide your email address and app password.
- Click the ‘Login’ button.
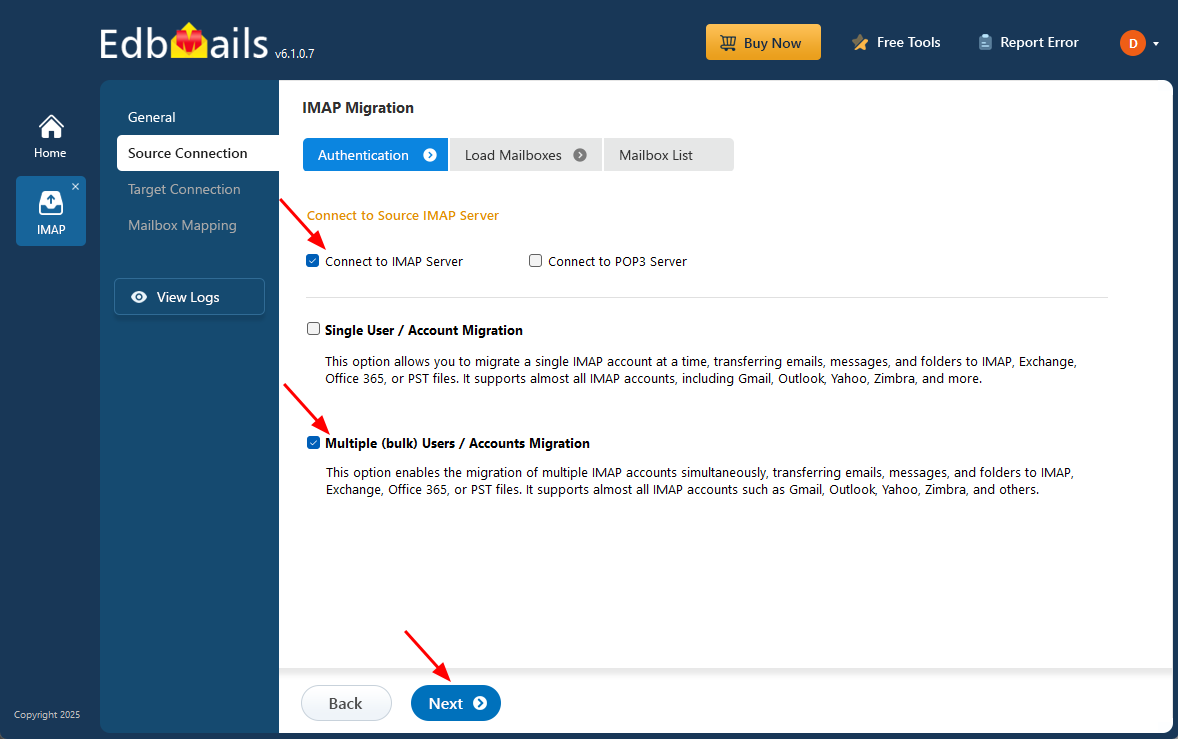
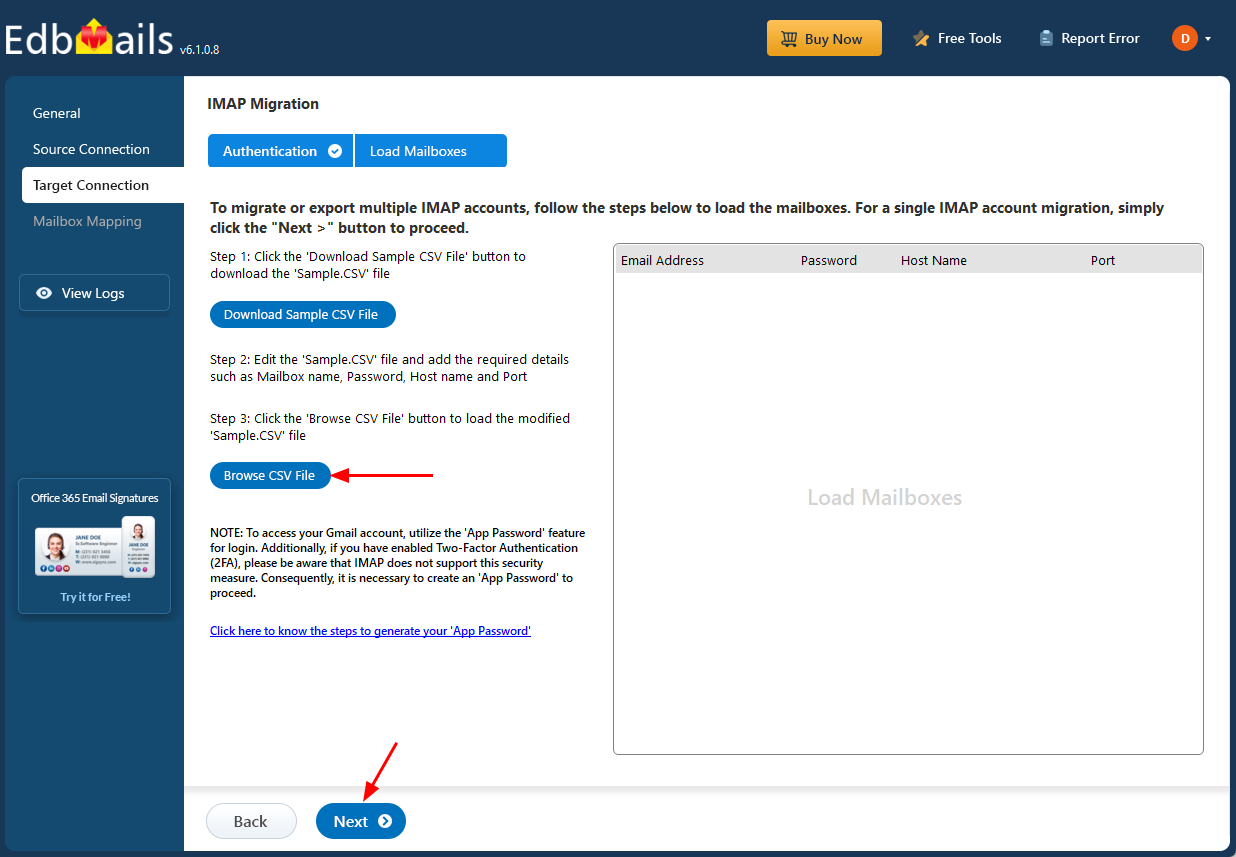
- To migrate multiple Gmail mailboxes at once, choose ‘Multiple (Bulk) Users/Accounts Migration’ and click ‘Next’ to proceed.
- Click ‘Download Sample CSV File’.
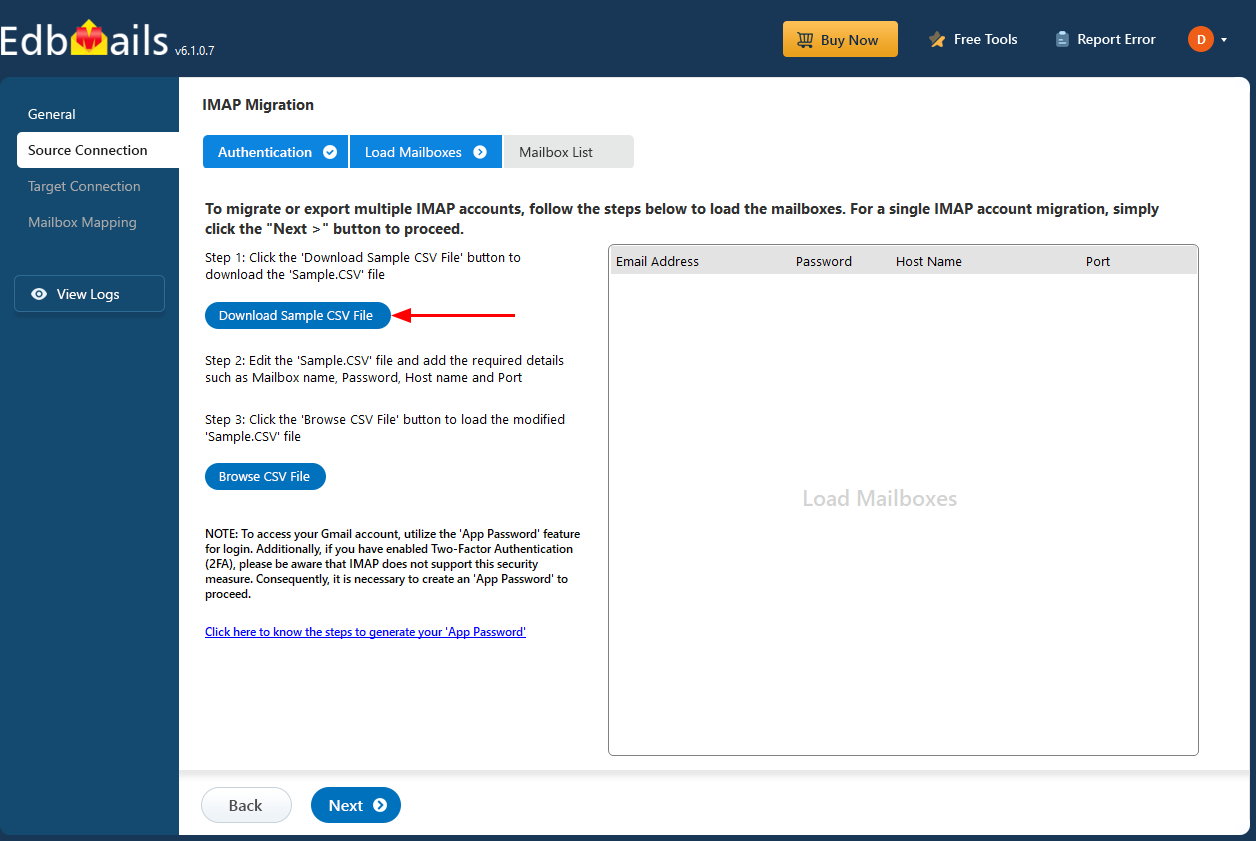
- Update the CSV file with the required details such as email address, password, server host, and port number. Once done, save the file to keep the changes.
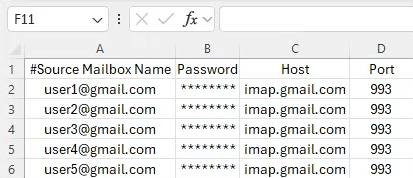
- Close the CSV file and click ‘Browse CSV File’ to upload it. Check the listed mailboxes to confirm that all details are correct, then click ‘Next’ to proceed.

- To migrate a single Gmail Server, choose the ‘Single User / Account Migration’ option and then click ‘Next’ to proceed.
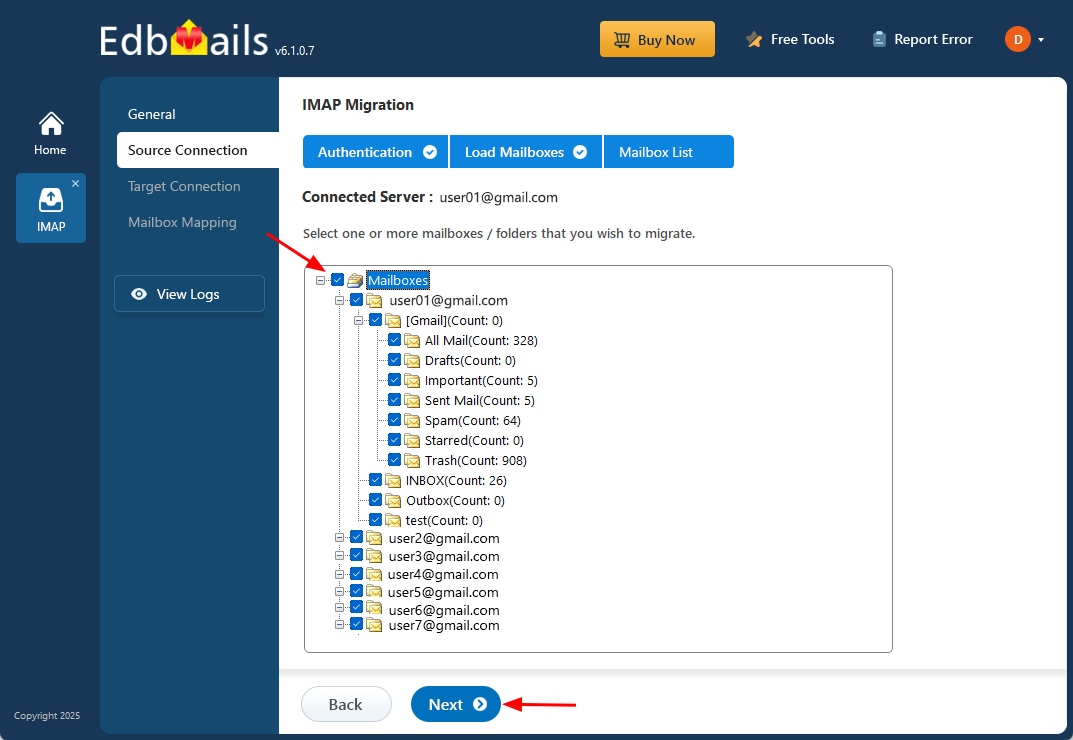
Step 3: Select the source Gmail mailboxes
- Select the Gmail mailboxes or folders to migrate, then click ‘Next’.
- Select the Gmail mailboxes or folders to migrate, then click ‘Next’.
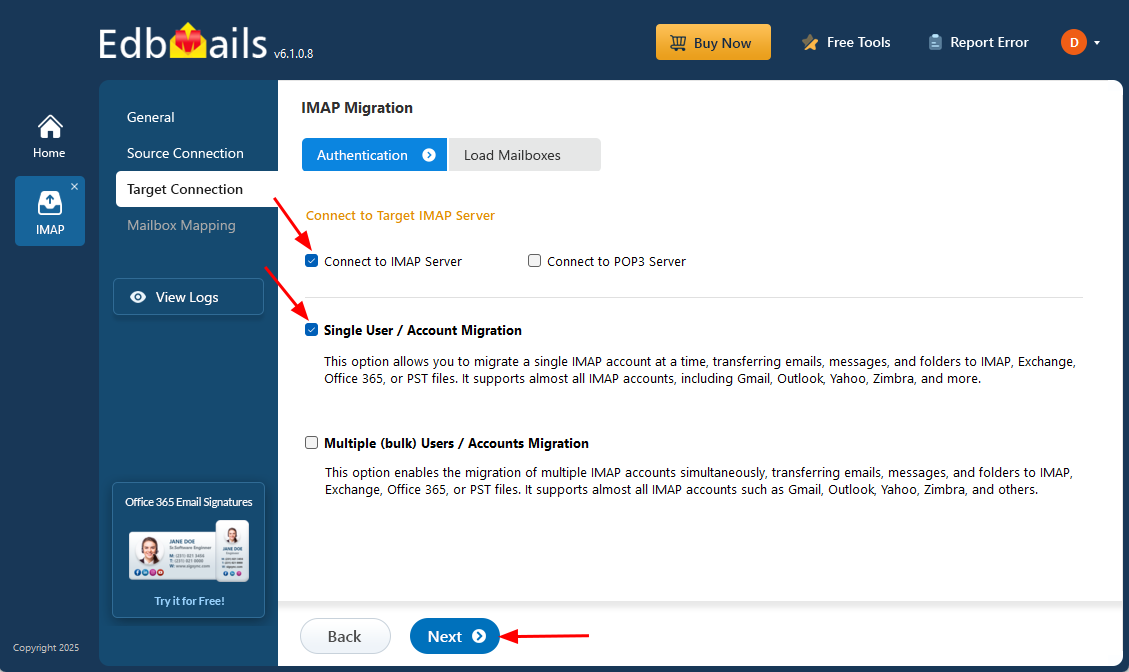
Step 4: Connect to the target Tutanota server
- To connect a single user account, select ‘Single User / Account Migration’. Then, choose the required protocol, such as ‘Connect to IMAP Server’ or ‘Connect to POP3 Server’, and click ‘Next’ to proceed.
- Choose the correct target Tutanota IMAP server from the list, or type it in manually. After that, enter the email address and its password.
- Click the ‘Login’ button.

- To set up a connection for multiple target Tutanota mailboxes, choose the ‘Multiple (Bulk) Users/Accounts Migration’ option and click ‘Next’ to continue.

- Click ‘Download Sample CSV File’.
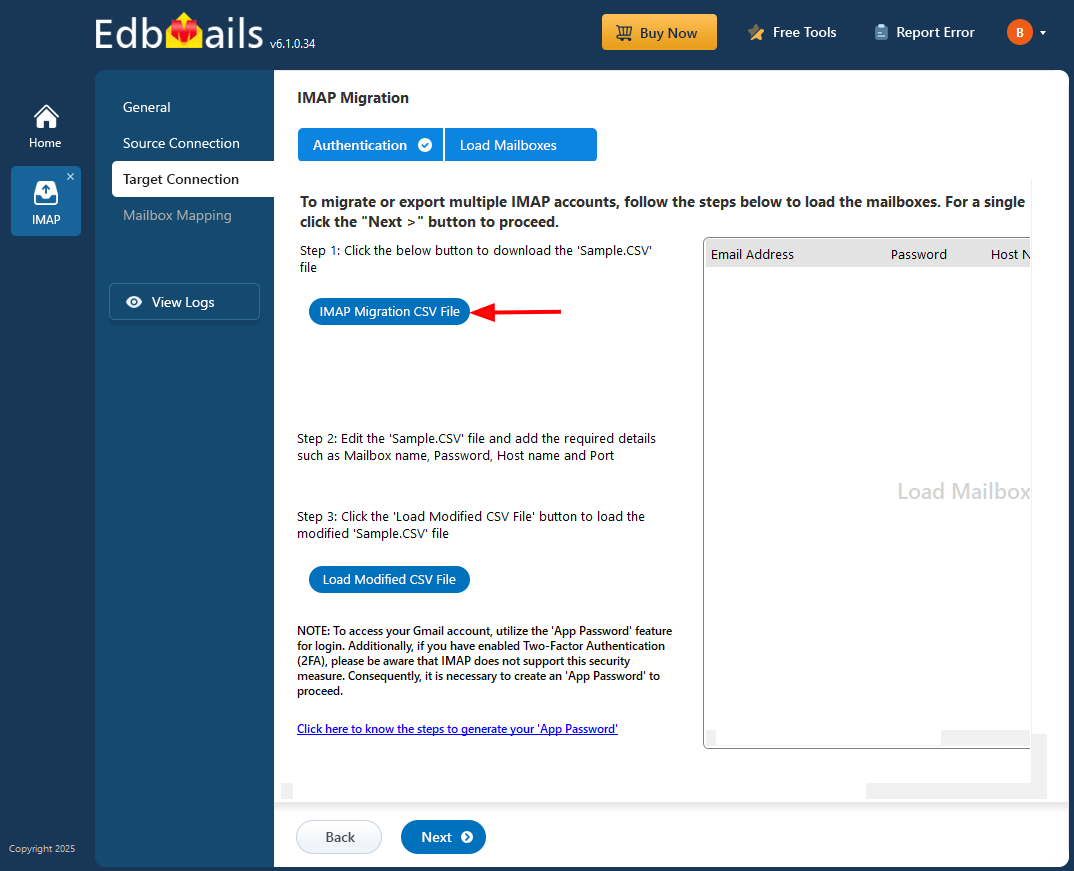
- Edit the CSV file by entering the required target Tutanota details, including the email address, password, hostname, and port number.

- Once completed, save the CSV file to apply the changes.
- Click the ‘Browse CSV File’ button and select the updated CSV file from your system.
- Confirm that the mailbox details are correct, then click 'Next' to continue.
- To connect a single user account, select ‘Single User / Account Migration’. Then, choose the required protocol, such as ‘Connect to IMAP Server’ or ‘Connect to POP3 Server’, and click ‘Next’ to proceed.
Step 5: Start Tiscali email to Gmail migration
- Select one of the mailbox mapping options.
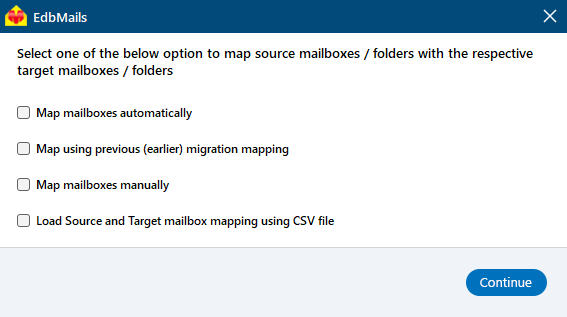
- EdbMails automatically maps mailboxes between the source and target servers. You also have the option to manually map mailboxes if needed.

- Select one of the mailbox mapping options.
Step 6: Start the Gmail to Tutanota migration operation
- After mapping the mailboxes, click the ‘Start Migration’ button to initiate the migration process.

- Click on the ‘View Logs’ button to open the migration report. It gives you a detailed overview of the process, showing how many emails, folders, and mailbox items were migrated.

- After mapping the mailboxes, click the ‘Start Migration’ button to initiate the migration process.
Gmail to Tutanota post-migration tasks
- Step 1: Update the MX records to point to Office 365
Make the necessary changes to the MX records in your DNS provider's portal. This ensures that incoming email traffic is redirected to Tutanota instead of Gmail.
- Step 2: Create a new Outlook profile for users in the new domain
Include the AutoDiscover (CName) setting in your DNS configuration. This setting helps with the automatic configuration of email clients for a seamless transition to Tutanota.
- Step 3: Set up Gmail Mail Forwarding
To ensure that no emails are missed during the migration process, set up mail forwarding in Gmail. This will forward any incoming messages to your Tutanota account until the transition is complete.
- Step 1: Update the MX records to point to Office 365
Gmail to Tutanota migration troubleshooting
For common migration issues, check the knowledge base articles. For more information on EdbMails IMAP migration, visit the frequently asked questions (FAQs) section or contact our support team.
Advantages of EdbMails for Gmail to Tutanota migration
- Maintain privacy and security
EdbMails prioritizes your data’s privacy and security during the Gmail to Tutanota migration. With end-to-end encryption, it ensures your emails and sensitive information remain secure and accessible only to you and the recipient.
- Standalone interface platform
EdbMails offers a fully standalone platform for migration. This means you don’t need additional software or tools to transfer your Gmail data to Tutanota. The intuitive interface simplifies the entire process for seamless migration.
- Support for all Microsoft Windows versions
EdbMails is compatible with all major Microsoft Windows versions, including Windows 7, 8, 10, and 11. This ensures that users can perform Gmail to Tutanota migration smoothly, regardless of their system configuration or setup.
- Concurrent migration
With EdbMails, you can perform concurrent migration, transferring multiple mailboxes simultaneously. This feature is especially beneficial for users or organizations needing to migrate large volumes of data quickly and efficiently without delays.
- Step-by-step wizard instructions and tutorials
EdbMails offers a clear, step-by-step wizard to guide users through the migration process. Accompanied by tutorials, it ensures even non-technical users can easily follow along, making the entire migration process smooth and error-free.

