Migrate between Hosted Exchange servers
Hosted Exchange servers, offered by providers like GoDaddy, DreamHost, and LiquidWeb, deliver cloud-based email services without requiring on-premises infrastructure. They enable businesses to manage emails, calendars, and contacts while ensuring access across devices for improved collaboration. Migration between Hosted Exchange providers is often driven by the need for better pricing, enhanced features, stronger performance, or improved security. Organizations may also migrate to benefit from advanced tools, lower downtime, reliable support, and compliance with changing regulations—making it a strategic choice for boosting productivity and reducing operational complexity.
EdbMails Exchange Migration software simplifies Hosted Exchange migration by providing a direct, end-to-end solution. It transfers complete mailbox data including emails, contacts, calendars, and public folders without the need for intermediate steps like PST file. The software ensures secure migration while preserving folder hierarchy and maintaining data integrity throughout the process.
EdbMails features incremental migration transfers only new or modified data after the initial migration, saving bandwidth and time. Automatic mailbox mapping reduces manual setup by intelligently pairing source and target mailboxes, while throttling management ensures stable performance even during peak hours.
With advanced filtering, you can migrate specific data by date or folder, giving you complete control over what gets transferred. EdbMails is built with a user-friendly interface suitable for both IT professionals and non-technical users. Whether you're migrating for improved performance, enhanced security, or cost efficiency, EdbMails guarantees a zero downtime migration, and secure data transfer making it a trusted choice for businesses of all sizes.
Hosted Exchange migration: pre-requisites
- Conduct an inventory of mailbox sizes, folder structures, and custom configurations to understand the scope of the migration.
- Analyze available bandwidth to ensure it can handle the data transfer without impacting ongoing operations.
- Communicate the migration timeline, expected downtime, and any changes in access to users to prepare them for the transition.
- Create a sandbox environment for pilot migrations to identify potential issues before the full migration.
- Grant full access permissions for the mailboxes on both the source and the target servers if you are using full access permission method to connect to source and the target Hosted Exchange servers
- Specify email address and passwords in the CSV file if you are connecting to multiple users using the CSV file.
- Get email address and passwords if you are connecting as a specific user on both the source and the target servers.
- Set impersonation rights for the global admin account if you are connecting to source and target Hosted Exchange servers using a global admin account.
Steps to migrate Hosted Exchange server using EdbMails
Step 1: Download and Install the EdbMails application
- Download and install EdbMails on your computer.
- Follow the instructions that appear to complete the installation.
System requirements for EdbMails Hosted Exchange migration.
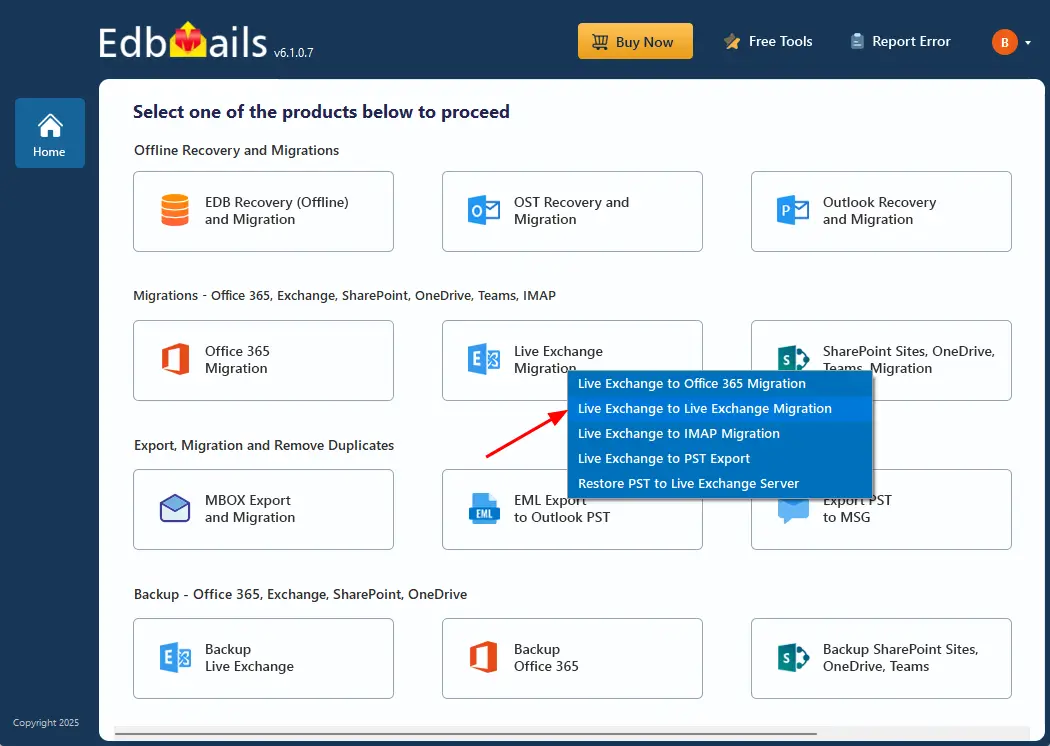
- Open EdbMails software and enter your email address and password to ‘login’, or select ‘Start Your Free Trial’.
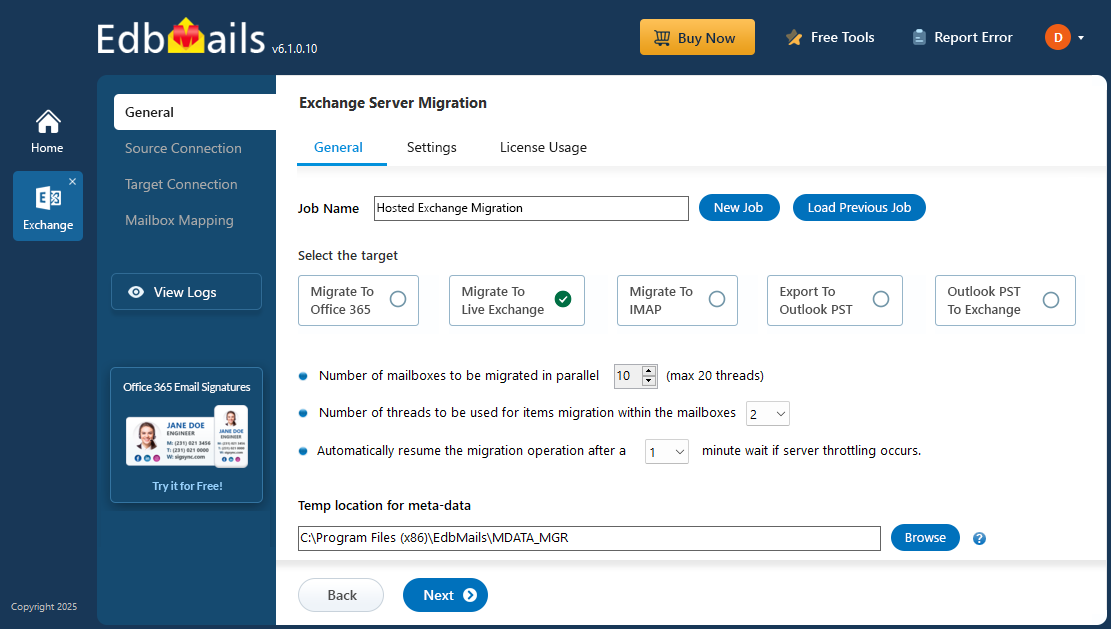
- Select 'Live Exchange Migration'.
- Select 'Live Exchange to Live Exchange’.
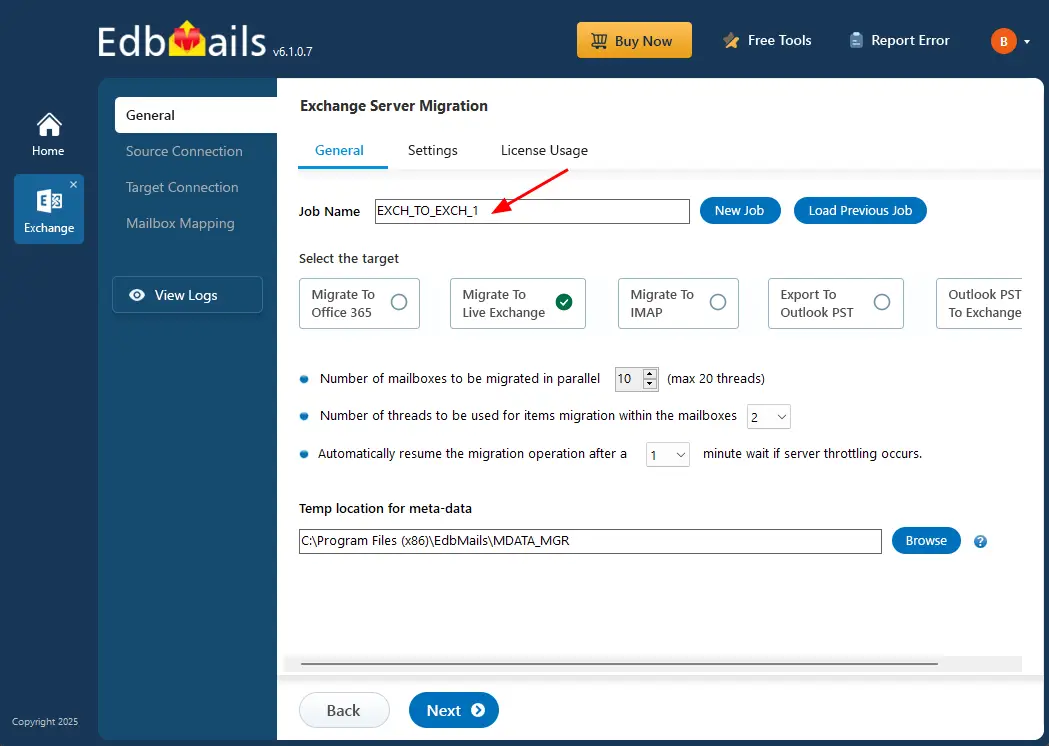
- To personalize the job name, click on the ‘New Job’ button. otherwise, you can proceed with the name that’s already set.
Step 2: Connect to source Hosted Exchange server
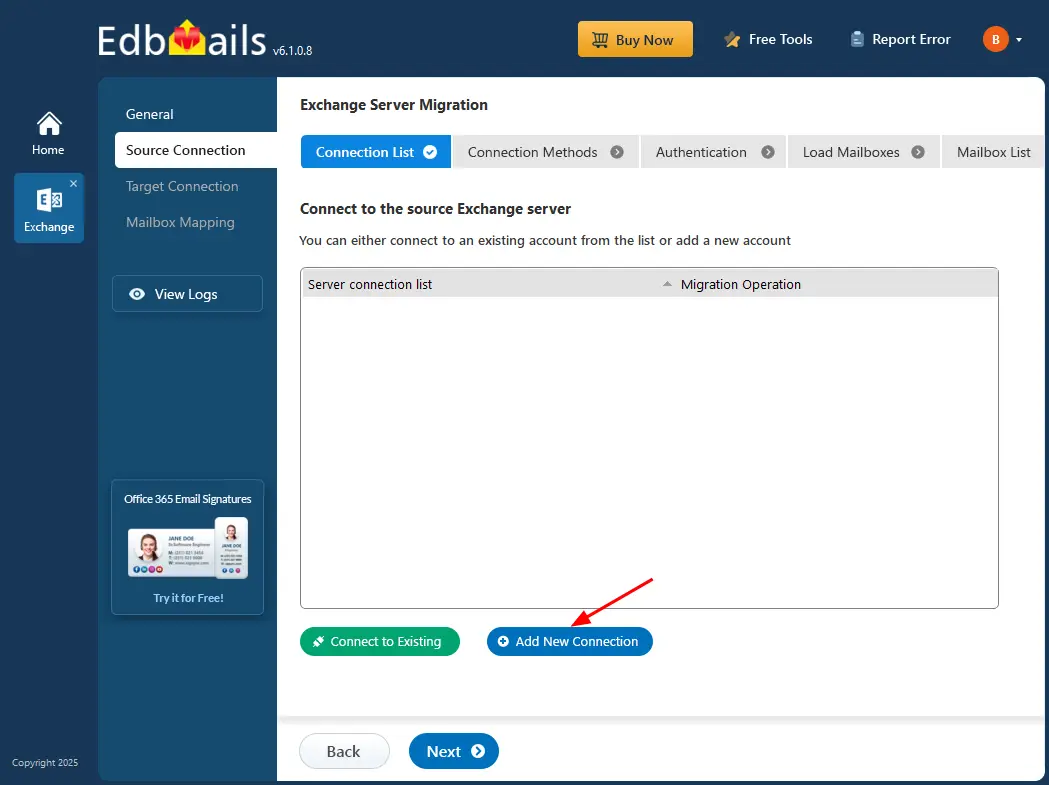
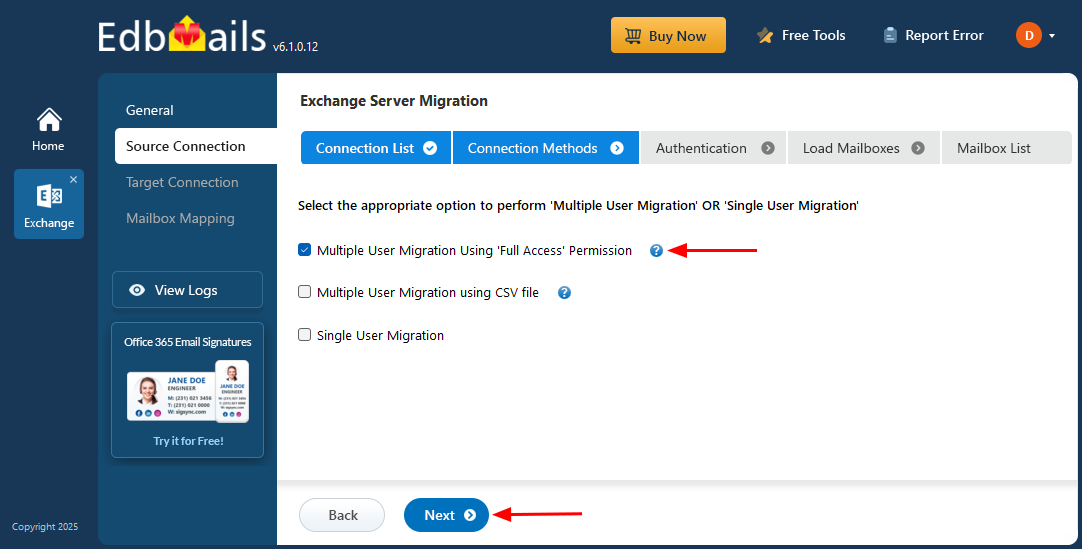
- To set up a new connection to the source Exchange server, click the ‘Add New Connection’ button. If you've connected before, simply select the existing connection from the list and click ‘Connect to Existing’ to proceed..
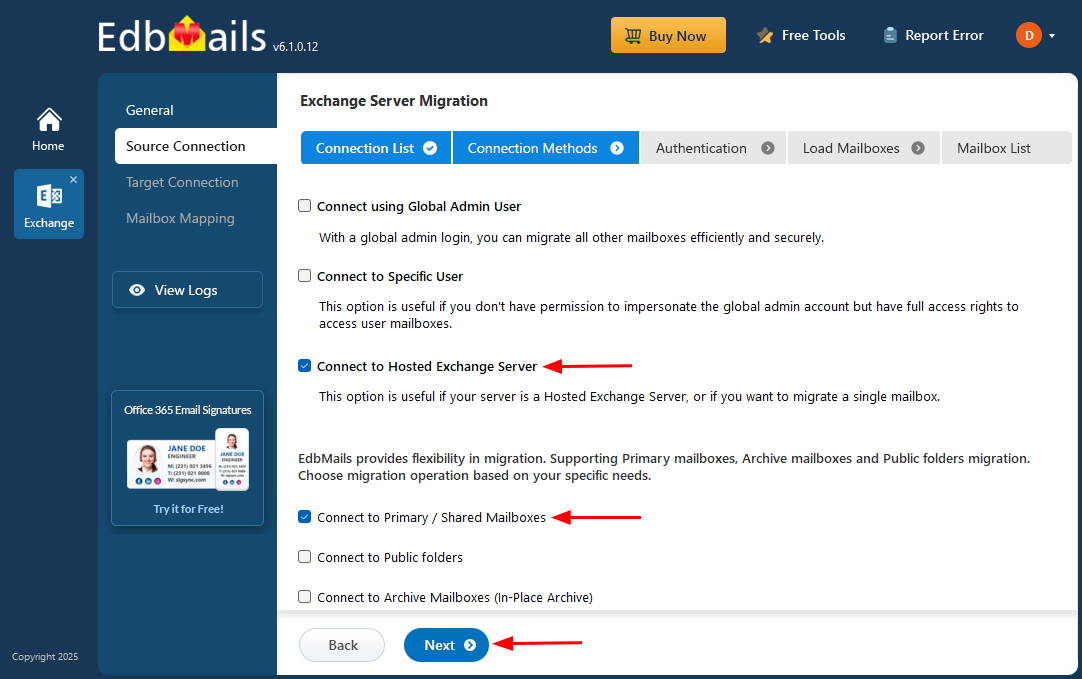
- Select ‘Connect to Hosted Exchange Server’ to connect to your Hosted Exchange server.
- Select the required options, Then click the ‘Next’ button.
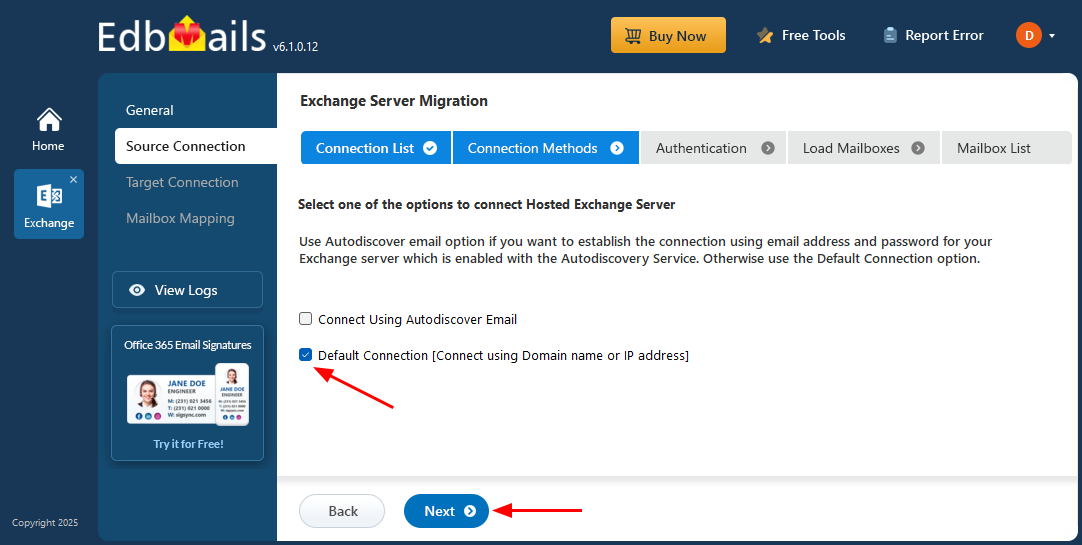
- Select an option to connect to your Hosted Exchange server, ‘Connect Using Autodiscover Email’ with your email address and password or ‘Default Connection’ using a domain name or IP address.
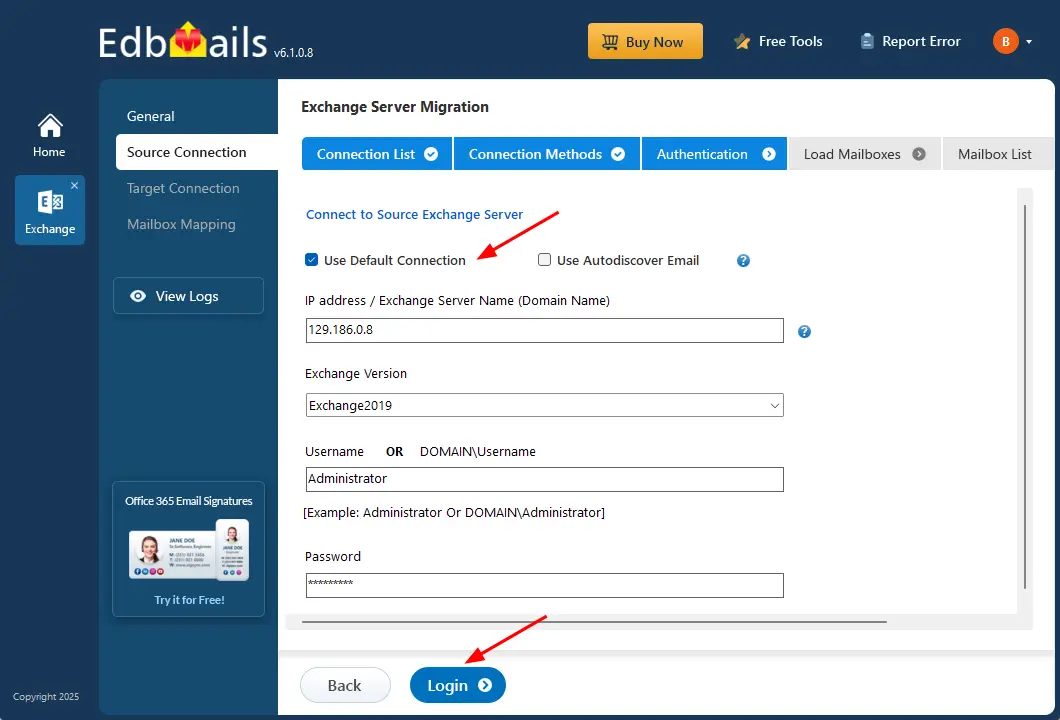
- Enter the Hosted Exchange server details and click the ‘Login’ button
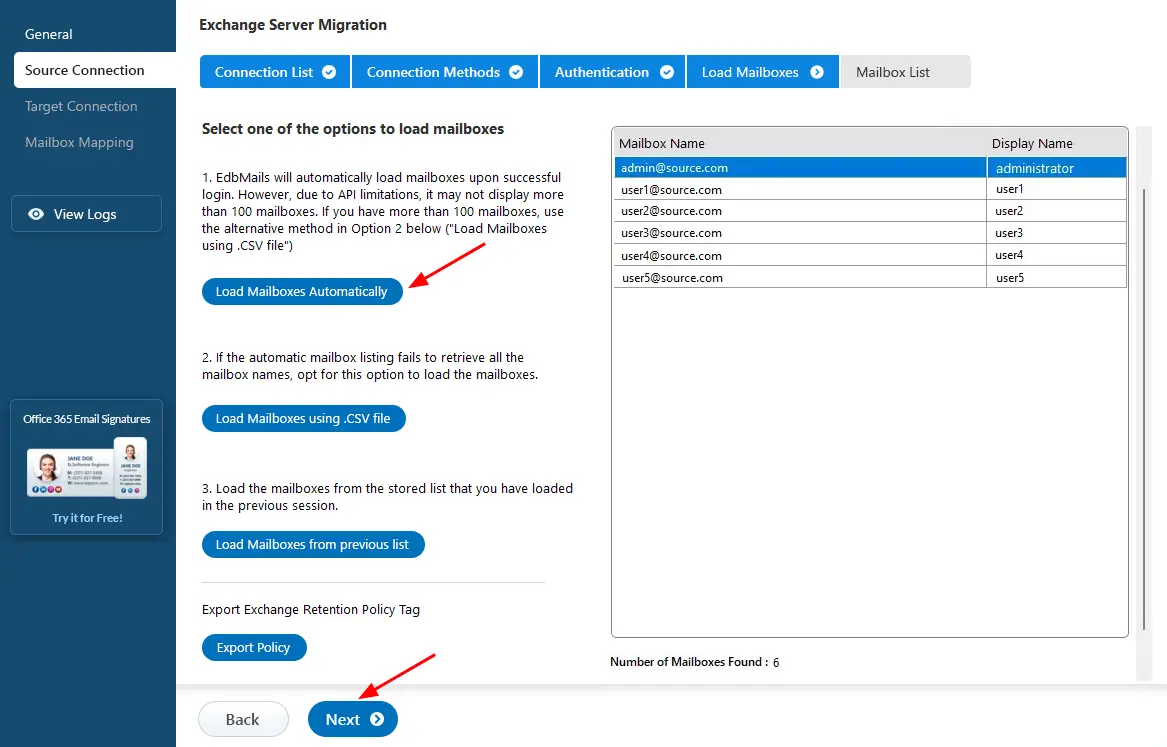
- Select the required option to load the mailboxes. EdbMails automatically loads your source server mailboxes. You can also load mailboxes using a csv file.
Step 3: Select Hosted Exchange server mailboxes
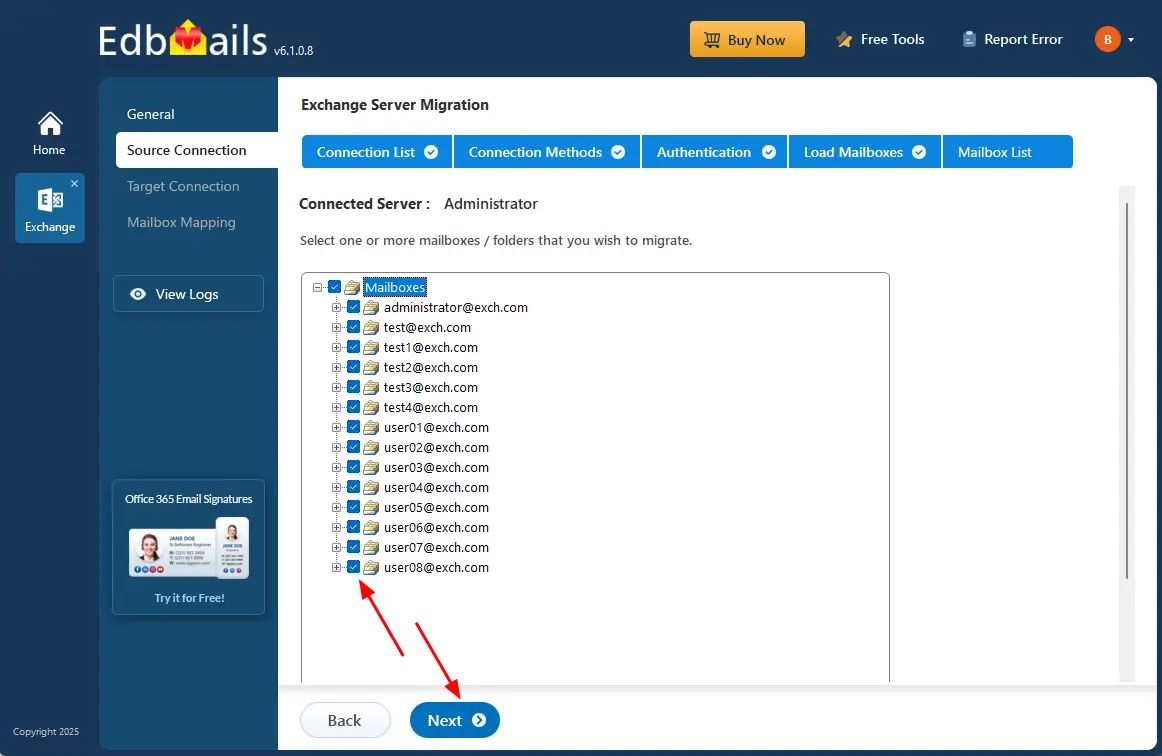
- Select the mailboxes/folders you want to migrate from the source Hosted Exchange server.
- Then, click the ‘Next’ button.
Next, click ‘Migrate to Live Exchange’.
Step 4: Connect to target Hosted Exchange server
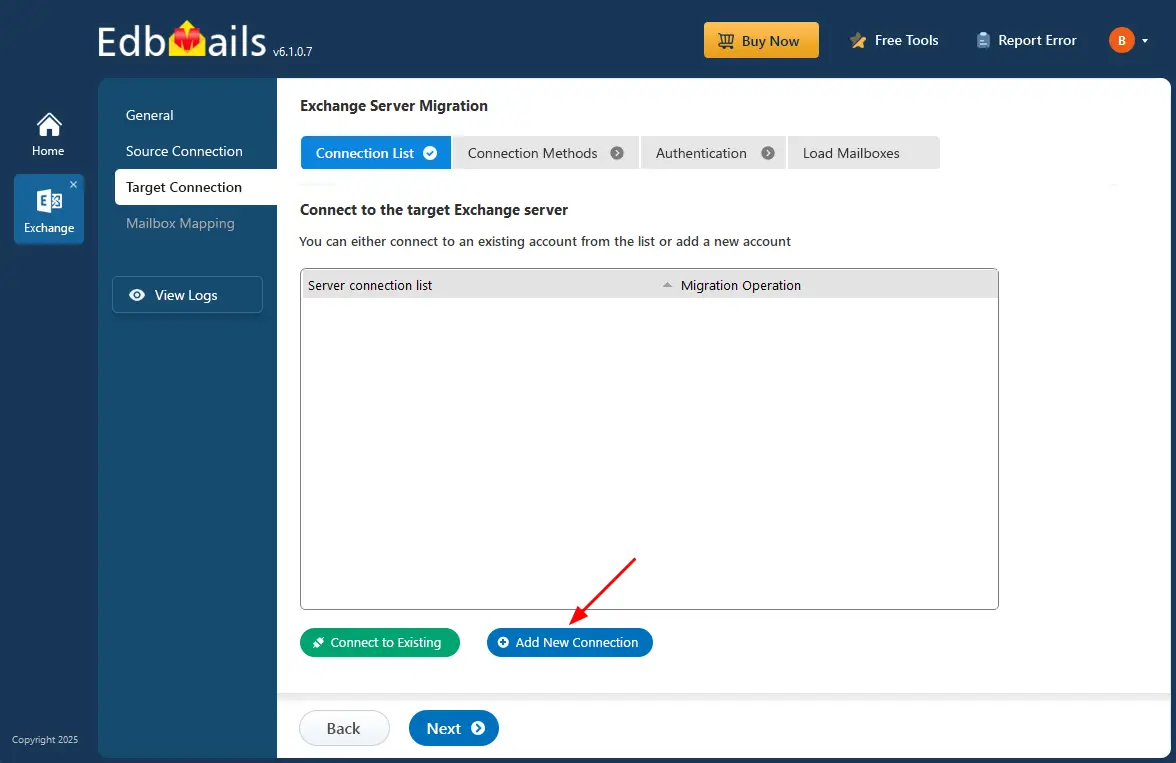
- Establish a new connection to the target Exchange server by clicking the ‘Add New Connection’ button. If you want to reconnect to a previous one, just pick it from the list and hit ‘Connect to Existing’.
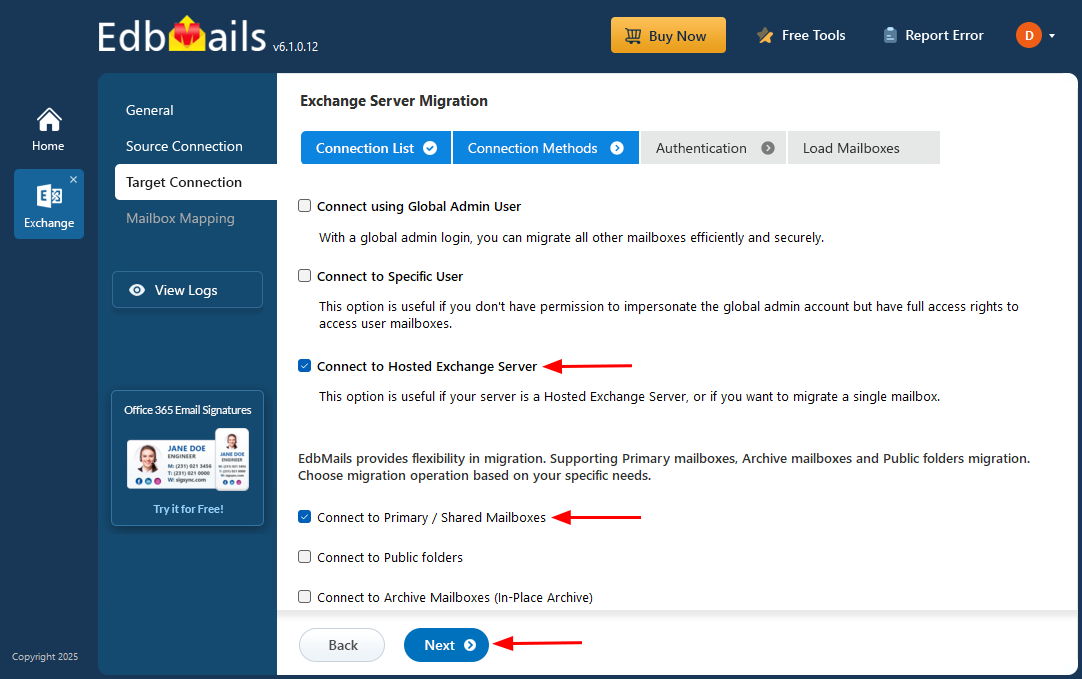
- Select ‘Connect to Hosted Exchange Server’ to connect to your Hosted Exchange server.
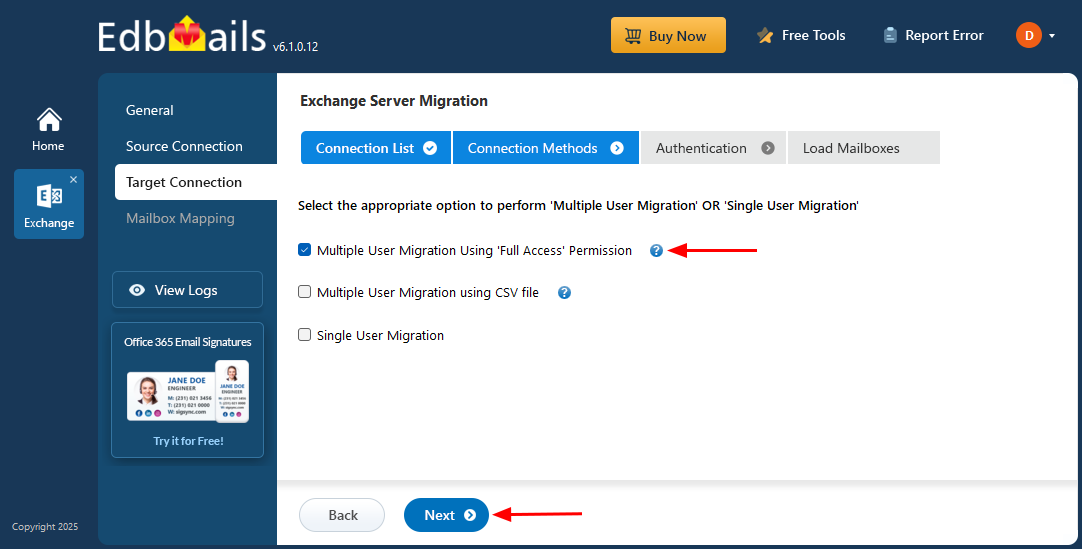
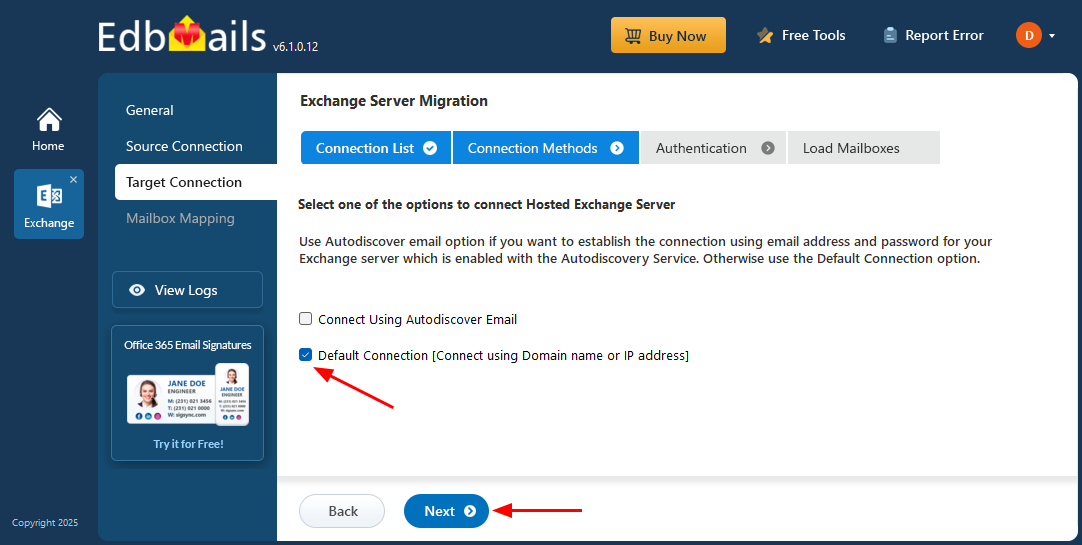
- Select the required options. And click the ‘Next’ button.
- Choose one of the following options to connect to your Hosted Exchange server. use ‘Connect Using Autodiscover Email’ with your email and password if Autodiscover is enabled, or select ‘Default Connection’ to connect using the server’s domain name or IP address.
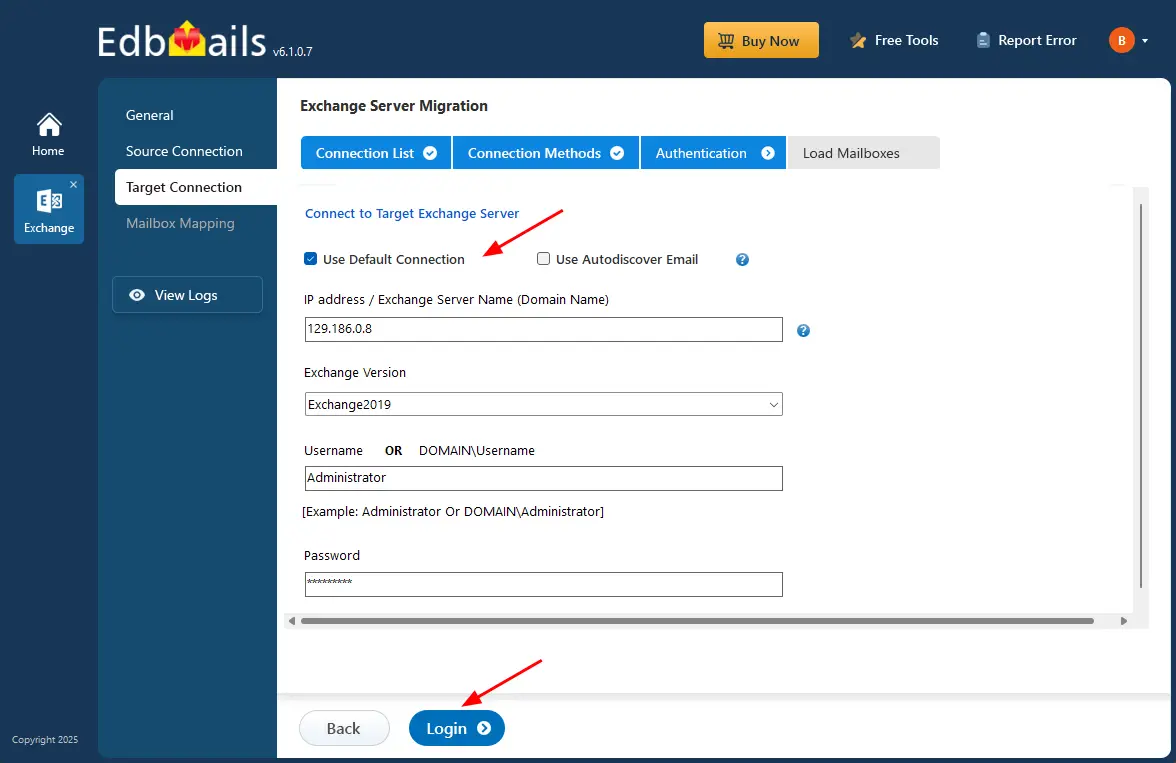
- Enter the target Hosted Exchange server details and click the ‘Login’ button.
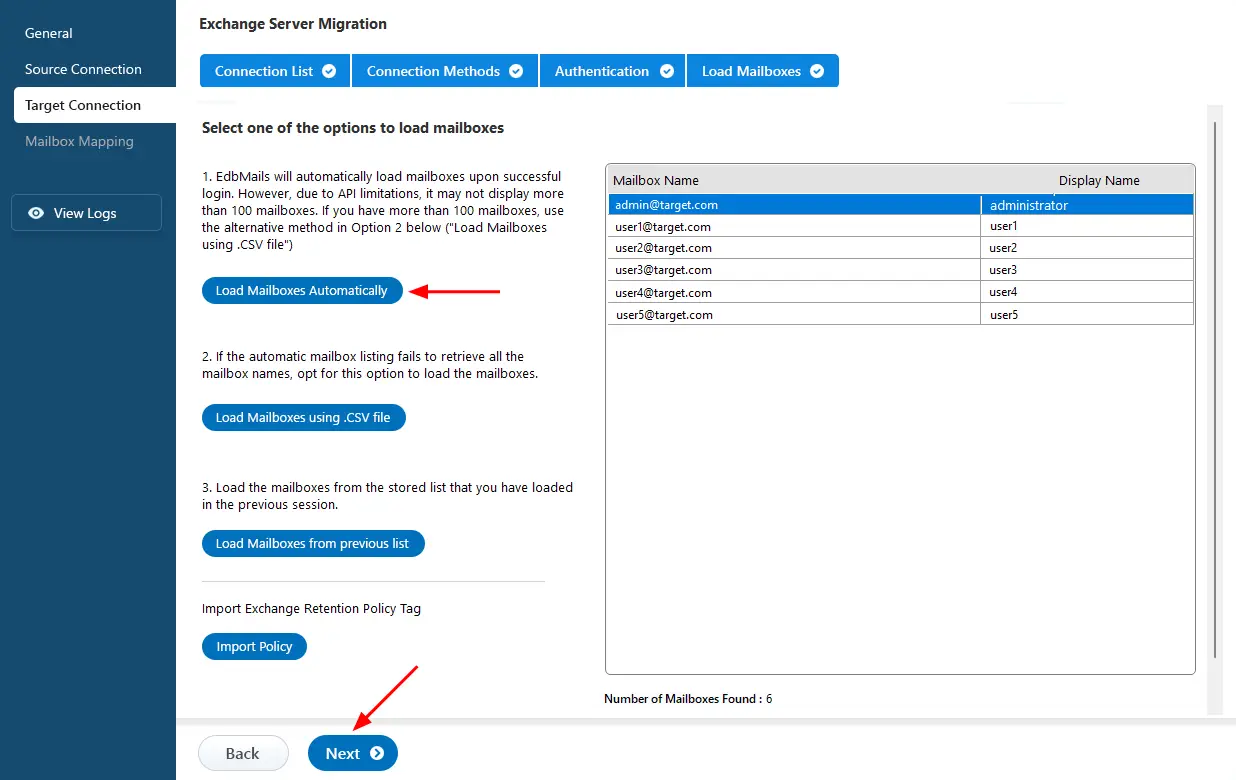
- Select the required option to load the mailboxes. EdbMails automatically loads your target server mailboxes. You can also load mailboxes using a csv file.
Step 5: Mailbox mapping between Hosted Exchange servers
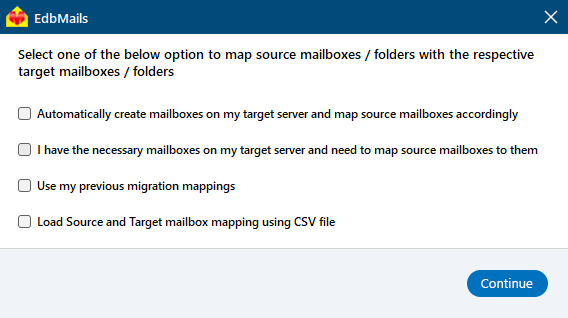
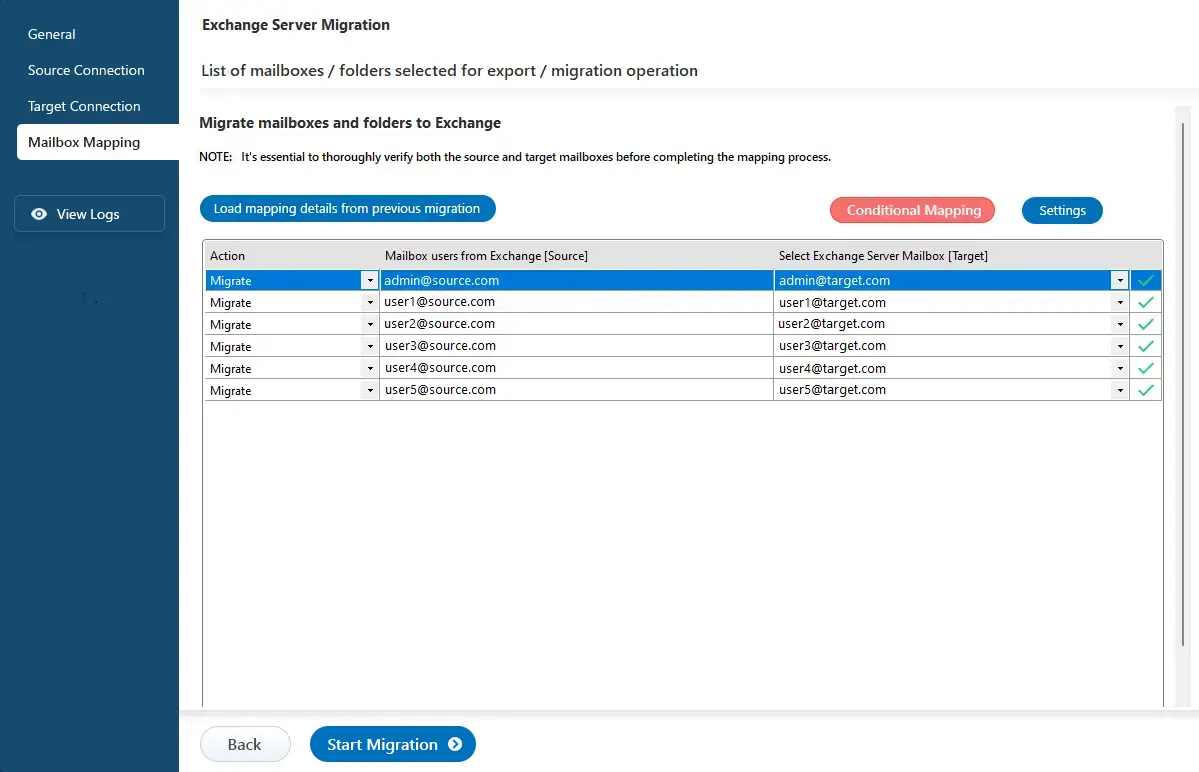
- Select the required mapping option.
- EdbMails automatically maps mailboxes between the source and target Hosted Exchange servers. This capability is especially beneficial when migrating a large number of mailboxes, as it reduces manual effort and accelerates the overall migration process.
Step 6: Start Hosted Exchange migration
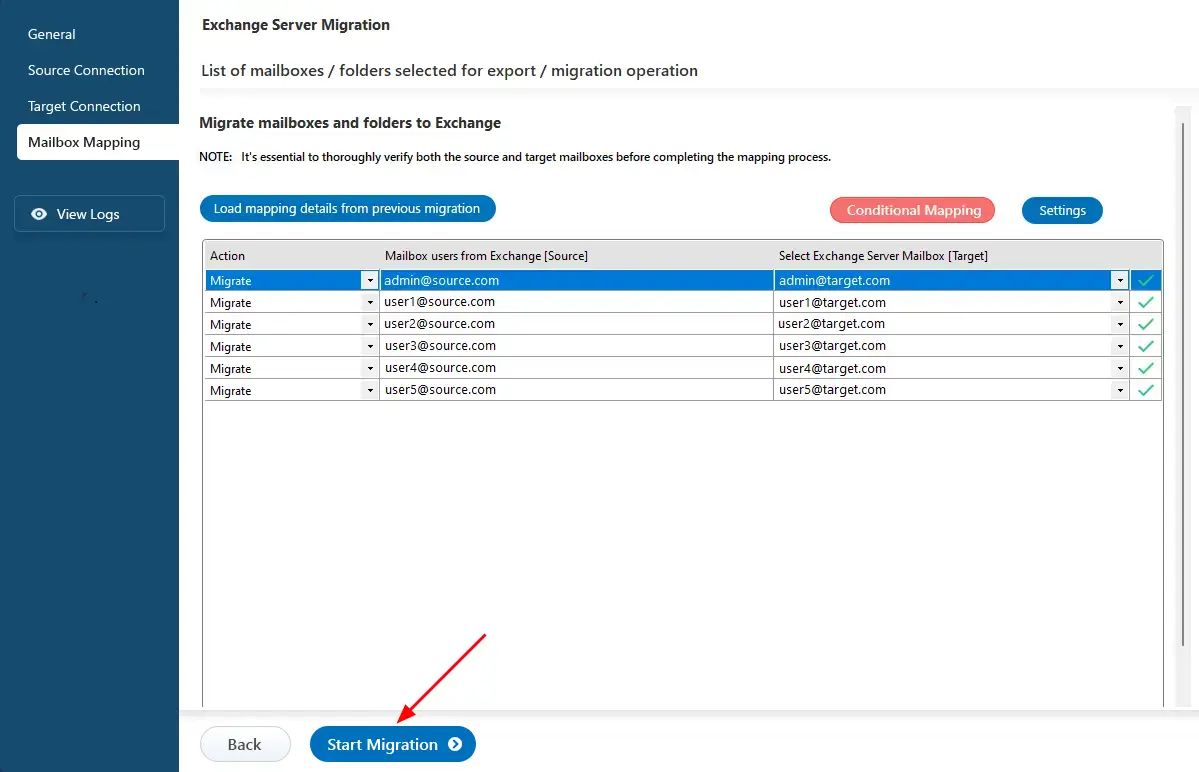
- Click the ‘Start Migration’ button to initiate the process.
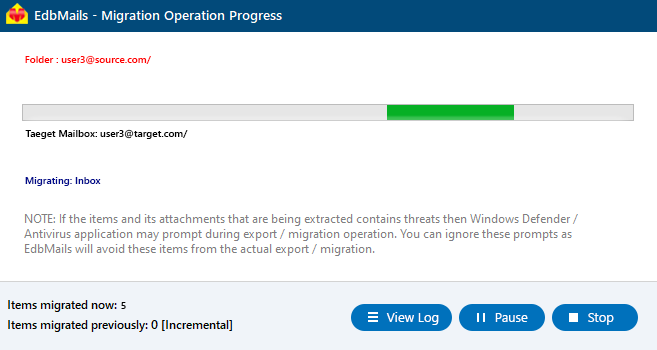
- Once the migration is successfully finished, EdbMails prompts the migration completion message. Click the 'View Log' button to check the migration report.
Hosted Exchange post-migration tasks
- Confirm that all emails, contacts, calendars, and tasks were successfully transferred.
- Send and receive test emails to ensure proper mail flow.
- Ensure all user accounts are correctly set up in the new environment.
- Modify MX records to direct emails to the new server.
- Assist users in configuring their email clients with the new server settings.
- Test connectivity for mobile devices using ActiveSync.
- Gather feedback from users regarding their experience post-migration.
- Shut down old servers after confirming successful migration and user satisfaction.
Hosted Exchange migration troubleshooting guide
Check the Hosted Exchange migration troubleshooting guide for insights into resolving any migration errors. For further information about the EdbMails Exchange migration tool, please review the frequently asked questions section.
Benefits of EdbMails for Hosted Exchange migration
- Granular brick-level migration
EdbMails provides granular brick-level migration for Hosted to Hosted Exchange transfers, allowing users to selectively migrate individual mailboxes, folders, or specific items. This precise control ensures that only the necessary data is moved, and optimizes the migration process while maintaining data integrity throughout.
- Incremental migration EdbMails supports incremental migration, capturing changes made after the initial migration. This synchronizes new emails and modifications without re-migrating the entire mailbox, optimizing internet bandwidth
- Zero downtime migration EdbMails maintains zero downtime during the Hosted Exchange migration operation, enabling users to continuously access their Hosted Exchange environment. This ensures that email and other functionalities remain available without interruption.
- Automatic mapping of mailboxes
EdbMails automates the mapping of mailboxes from the source to target Hosted Exchange servers. This saves time and reduces the manual effort.
- User-friendly interface
EdbMails features an intuitive interface that simplifies the Hosted Exchange migration process, enabling users to navigate migration options efficiently, even if they lack specialized knowledge in migration operation.
- Concurrent mailbox migration
EdbMails supports concurrent mailbox migration, allowing multiple mailboxes to be migrated simultaneously, which accelerates the overall migration timeline for organizations with many users.
- Detailed migration reports EdbMails generates detailed migration reports that outline the items migrated, any errors encountered, and key statistics, facilitating post-migration audits and confirming successful migration operation.


