


Earthlink email to Office 365 Migration
Office 365, now branded as Microsoft 365, offers far more than just email. It provides a complete productivity suite designed for both individuals and businesses. With seamless integration across applications like Outlook, Word, Excel, and Teams, users benefit from enhanced collaboration and workflow efficiency.
In terms of storage, Office 365 offers 50 GB of mailbox space by default, expandable up to 100 GB, far exceeding what EarthLink provides. Your data is stored securely in the cloud, reducing the risk of loss due to device failure or local issues. Additionally, Microsoft 365 includes advanced security features such as Multi-Factor Authentication (MFA), Data Loss Prevention (DLP), and Advanced Threat Protection (ATP), ensuring your email communications are well-protected against cyber threats.
For users seeking a reliable and forward-looking email solution, migrating from EarthLink to Office 365 is a smart and strategic choice.

To streamline this migration from EarthLink to Office 365, EdbMails IMAP migration software offers a robust and efficient solution that makes the process seamless. With EdbMails, you can transfer all your EarthLink email data, including metadata, attachments, and folder structure, to your Office 365 account with ease. EdbMails supports concurrent migration, allowing multiple mailboxes to be transferred simultaneously, which significantly reduces time and effort. The advanced filtering options enable you to select specific emails based on emails received after and before dates, sender address, recipient address, email subject, attachments etc, making migration more tailored. For bulk transfers, EdbMails offers batch migration support, ideal for businesses migrating large amounts of data efficiently. Additionally, a free personalized demo is available, allowing you to explore the tool’s capabilities before purchasing the license.
User Query
I’ve been using EarthLink for years, but it no longer meets my needs. I want to migrate to Office 365 for better features and security, but I’m concerned about losing important email data. Can you recommend a professional tool to migrate EarthLink emails, attachments, and folder structure to Office 365? – John, New York
EarthLink email to Office 365 Migration Plan
Planning is one of the most important steps before you begin the EarthLink email to Office 365 migration. Here is a checklist of points to consider before you migrate.
- Stakeholder Communication & Change Management: Before migration, communicate with all users about the plan, timeline, and expected changes. Provide training sessions or guides on using Outlook and Microsoft 365 tools to ensure a smooth transition and reduce user confusion after migration.
- Migration Scheduling (“Who Should Migrate When”): Start with a pilot migration, move a small department or a few users first to test the process and identify any issues. Once the pilot succeeds, proceed to migrate larger groups in phases for better control and minimal disruption.
- Licensing Considerations: Compare EarthLink and Office 365 plans to understand the cost differences and feature upgrades. Choose appropriate Microsoft 365 licenses based on each user’s needs such as storage, desktop apps, and collaboration tools.
- Compliance, Retention & Governance: Highlight how Office 365 enhances data management with features like Data Loss Prevention (DLP) and retention policies. These help meet business compliance standards, secure sensitive data, and maintain legal data retention requirements.
- Ensure Sufficient Network Capacity and Bandwidth: Before starting the migration, verify that your internet connection can handle large data transfers without interruptions. Adequate network speed and bandwidth ensure faster mailbox uploads, prevent timeouts, and minimize migration delays.
EarthLink email to Microsoft 365: Pre-migration activities
- Have the users email address, passwords, IMAP hostname and port number.
- Find the IMAP server name of your EarthLink email server. You can find this information from your server’s dashboard settings or by connecting your email system to Outlook.
- Before you migrate EarthLink email to Office 365, ensure that you create mailboxes for your users in your organization and assign suitable licenses to them.
- If you have a custom email domain from your hosting provider to which you want to migrate and receive emails, you must add and verify the domain on Office 365.
Steps to add a custom domain to Office 365 and Steps to add DNS records to connect your domain. - Configure Office 365 to send and receive large messages.
Follow the steps to increase the message size on Office 365 to 150MB and see tips to optimize IMAP migration to Exchange online.
Steps to Migrate emails from EarthLink to Office 365
Step 1: Download and install EdbMails IMAP migration software
- Download EdbMails and install the application on any computer running Windows OS
- Start the EdbMails application on your system.
- Log in with your registered email address and password, then click ‘Login’. New users can select ‘Start Your Free Trial’ to access the trial version.Note: The trial version gives access to all major features and supports migration of up to 30 items per folder. For unlimited migration, purchase an IMAP Migration license from the official EdbMails website.After purchasing the license, exit and relaunch the application. Then log in using the same email address and password used during the purchase to complete the license activation.
See a detailed list of EdbMails system requirements for IMAP migration.

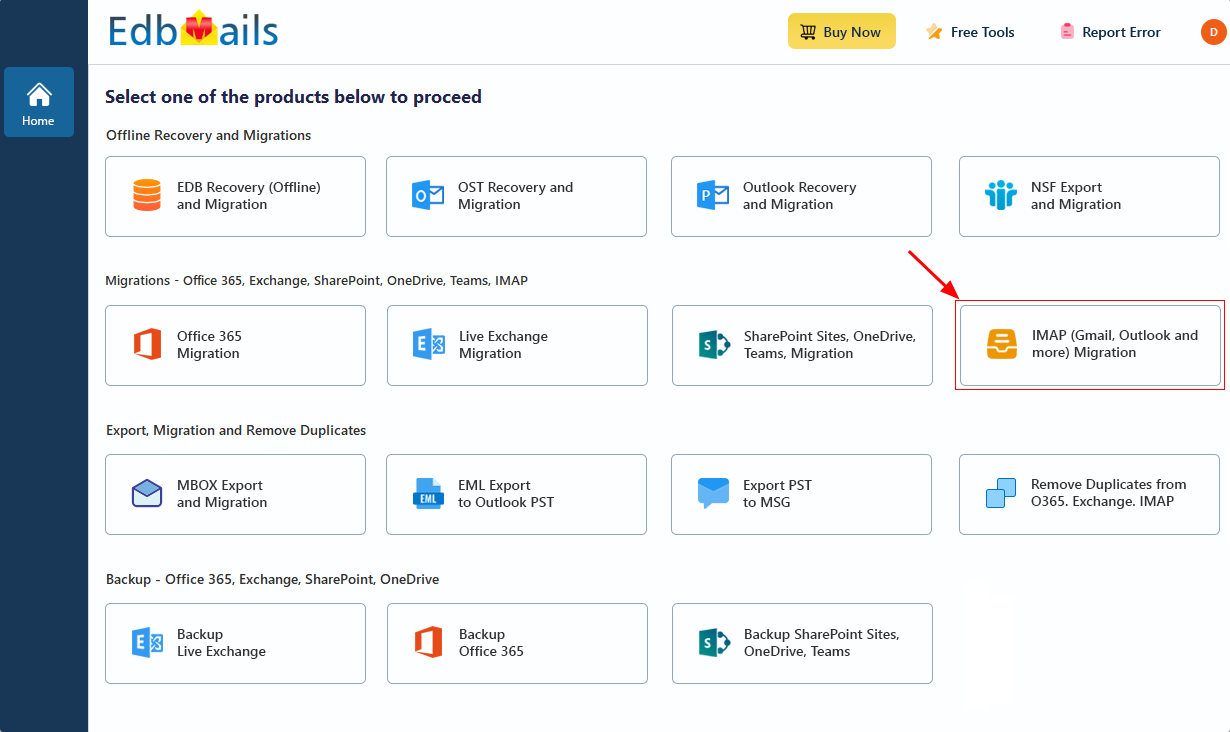
- Select the option ‘IMAP (Gmail, Outlook & more) Migration’.
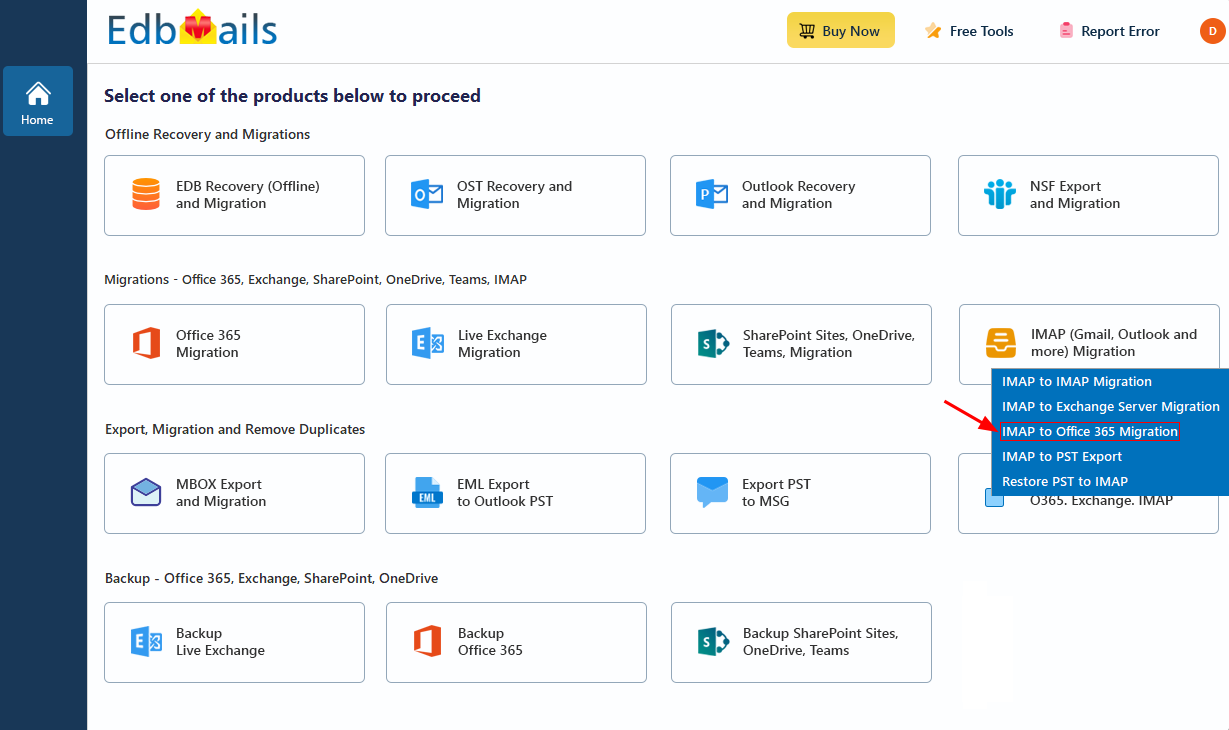
- Select ‘IMAP to Office 365 Migration’.
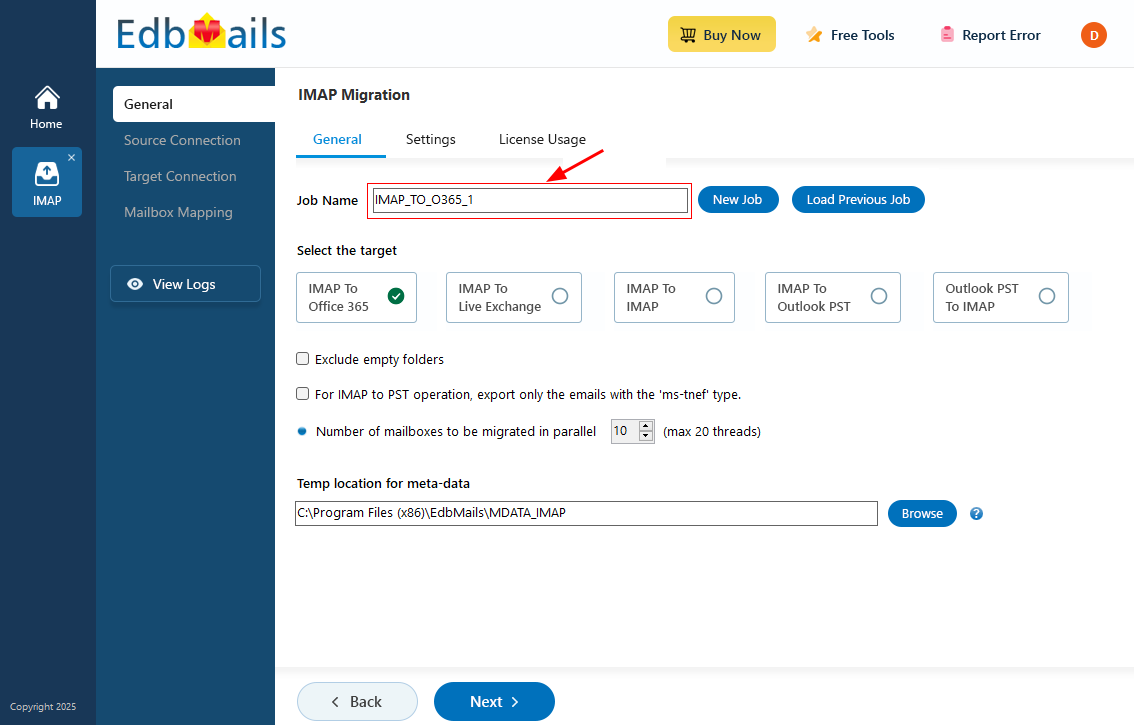
- Use the default job name or select 'New Job' to customize the name.
- Download EdbMails and install the application on any computer running Windows OS
Step 2: Connect to the source EarthLink email server
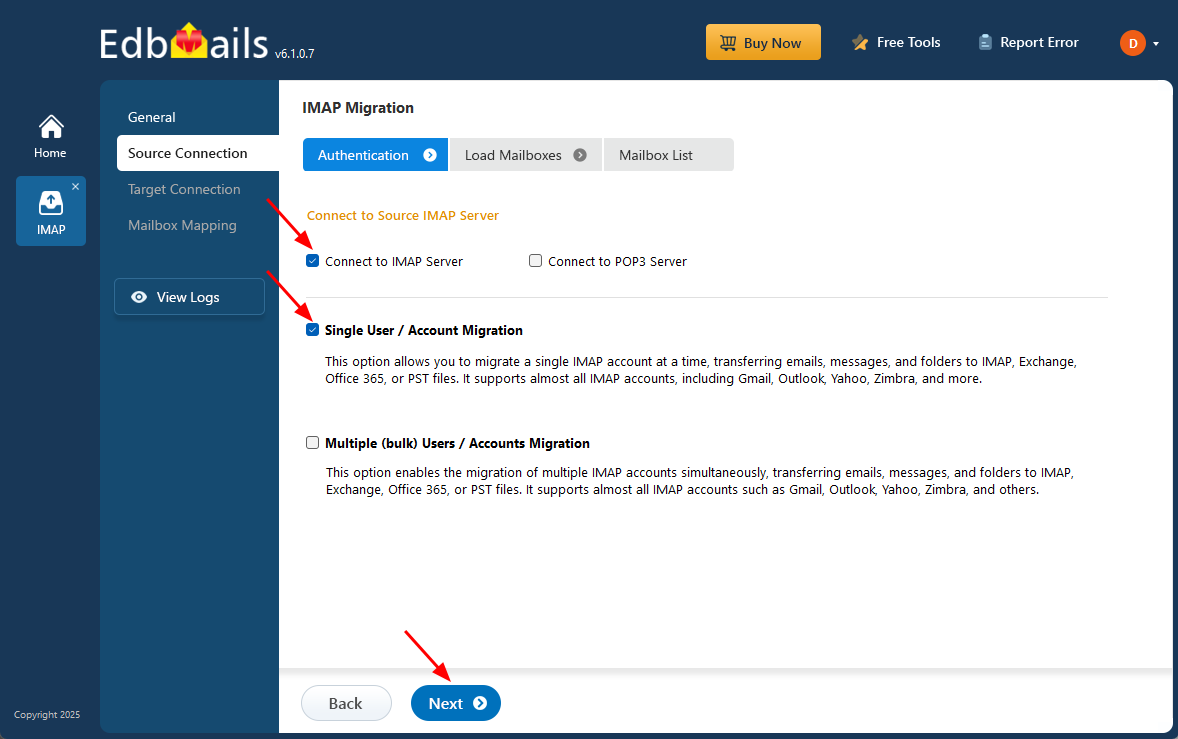
- To connect a single earthlink email account for migration, click ‘Single User / Account Migration’, choose the suitable protocol, like ‘Connect to IMAP Server’ or ‘Connect to POP3 Server’.
- Click ‘Next’ to proceed.
- Select the appropriate IMAP host name for your earthlink email server from the list, or manually enter it if it’s not available. In most cases, the hostname will be in the format mail.userdomain.com, and if needed, you may also use the server’s IP address.
- For IMAP connections, select port 993 and make sure SSL/TLS encryption is enabled to ensure a secure connection. Then enter the email address and password of your source account to connect successfully.
- EdbMails does not save or store your credentials and relies on secure OAuth 2.0 authentication when logging in to Office 365.
- Click the ‘Login’ button to proceed.

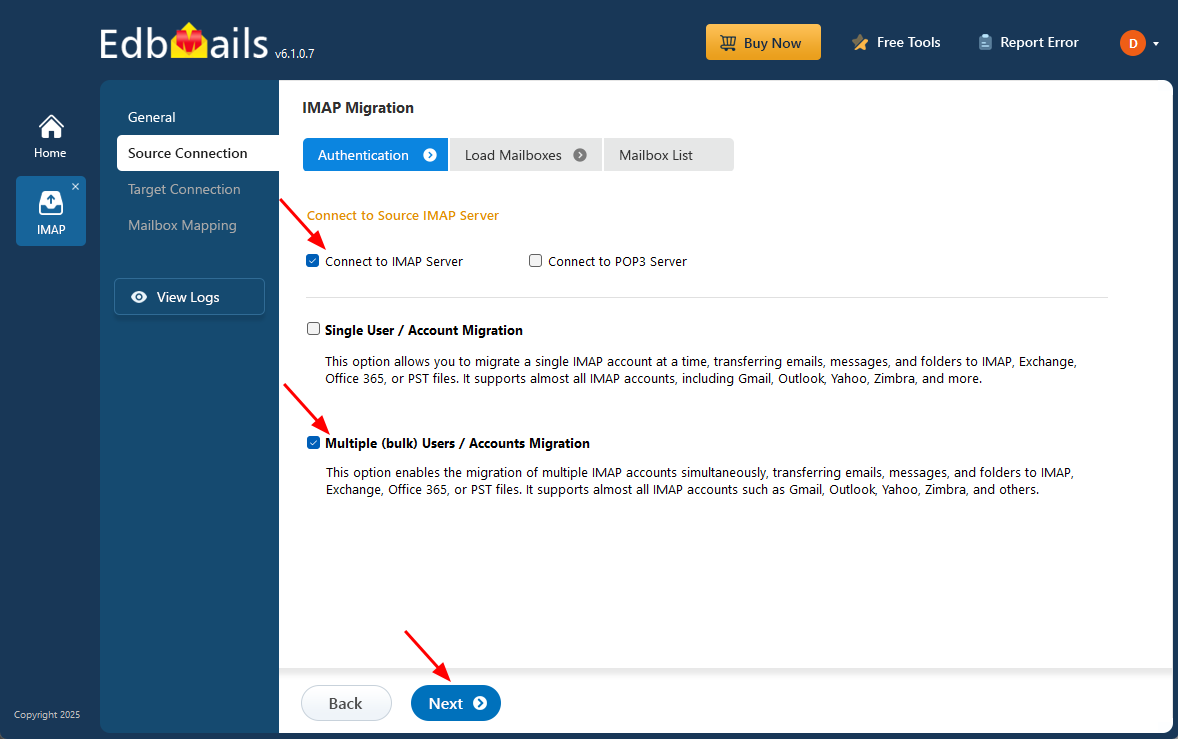
- For migrating multiple Earthlink mailboxes simultaneously, choose ‘Multiple (Bulk) Users/Accounts Migration’, then select the appropriate connection option such as ‘Connect to IMAP Server’ or ‘Connect to POP3 Server’.
- Click ‘Next’ to continue.
- Click ‘IMAP Migration CSV File’. It will load the sample CSV file to your local drive.
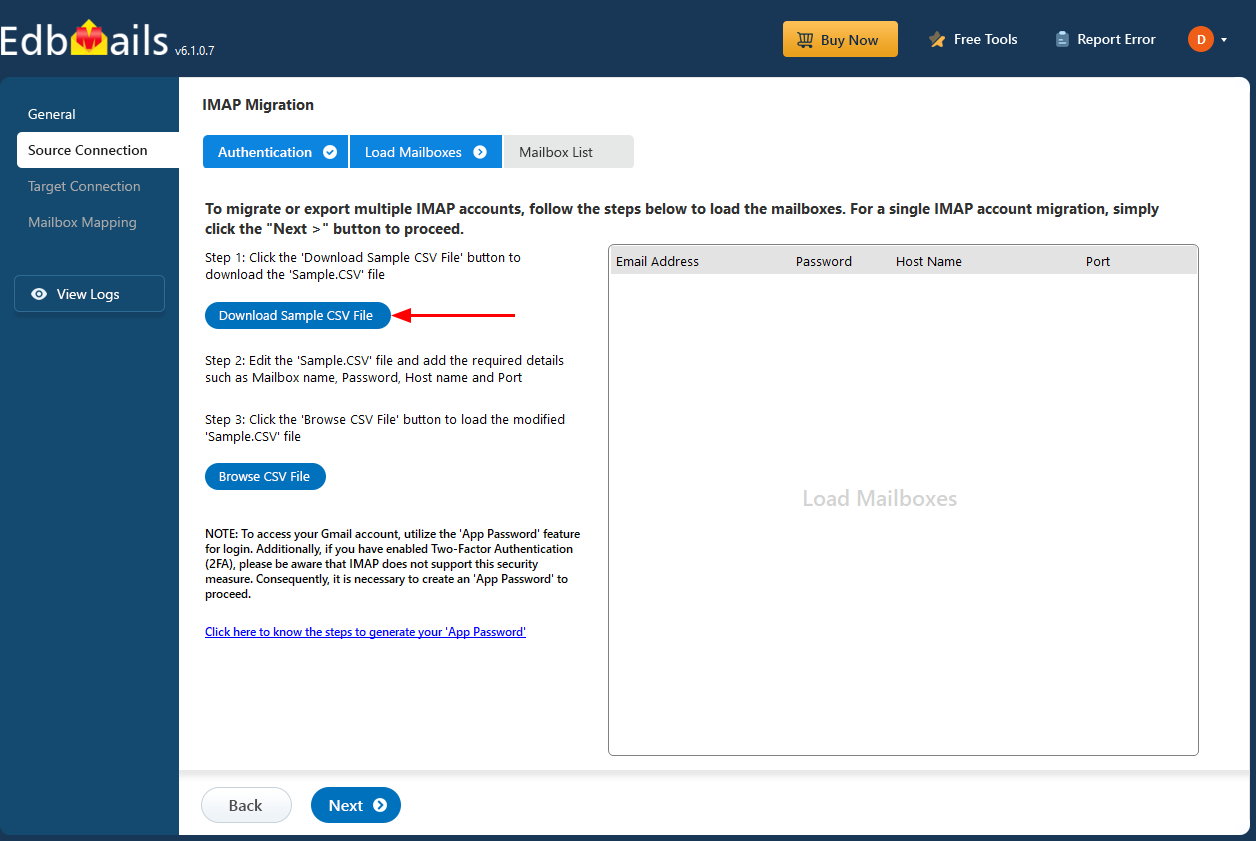
- Open the CSV file and fill in the necessary details, including the email address, password, IMAP server hostname, and port number for each mailbox. After completing the entries, save the file to proceed with the migration.

- Once you've made the necessary changes to the CSV file, save and close it.
- Then, click the 'Load Modified CSV File' button, open the CSV file and click ‘Next’ to proceed.

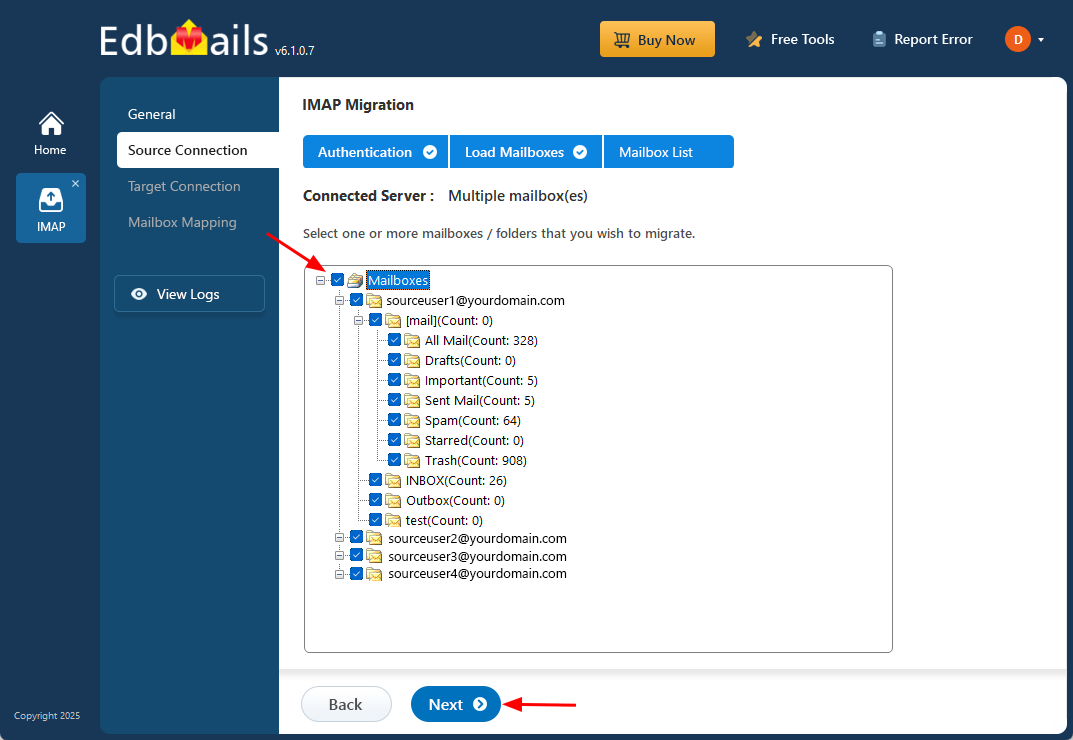
Step 3: Select the mailboxes or folders to migrate
- Select the mailboxes or specific folders you want to migrate, then click ‘Next’ to proceed with the migration process.
- Select the mailboxes or specific folders you want to migrate, then click ‘Next’ to proceed with the migration process.
Step 4: Connect to the target Office 365 server
- Click the ‘Add New Connection’ button to establish a new connection to the target Office 365. To use the previous connection, select it from the connection list and click the ‘Connect to Existing’ button to proceed.
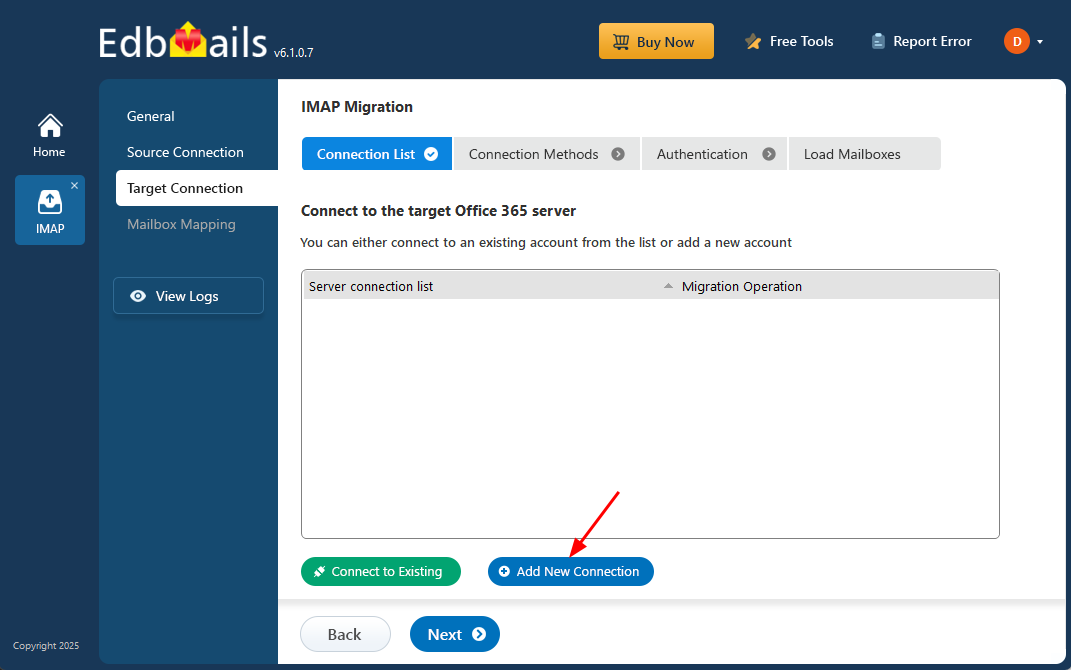
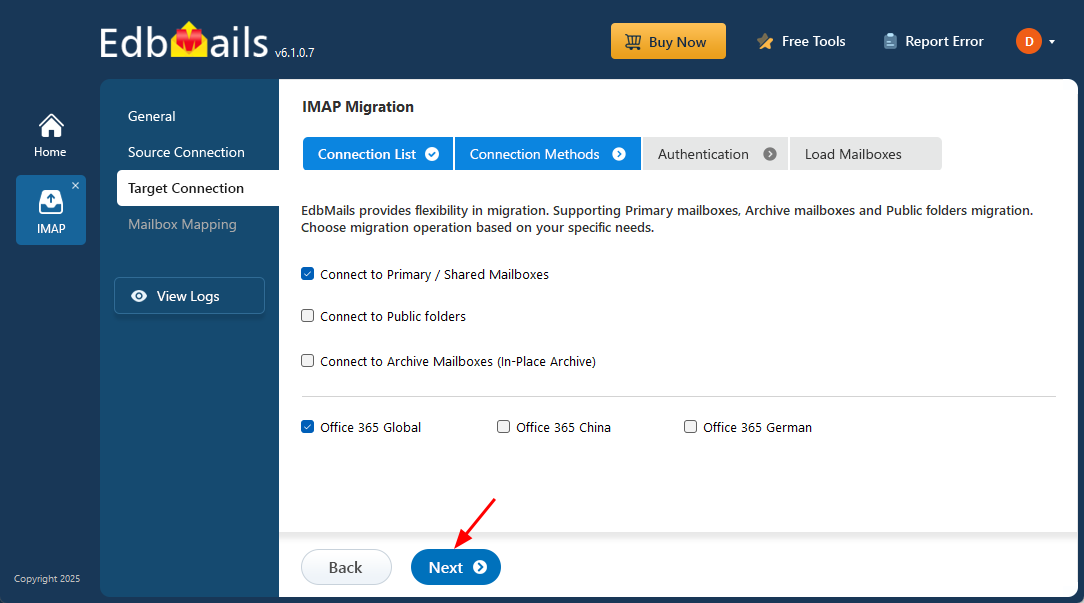
- Select the required connection options and click the ‘Next’ button.
- Select the authentication method and click the ‘Login’ button to continue.
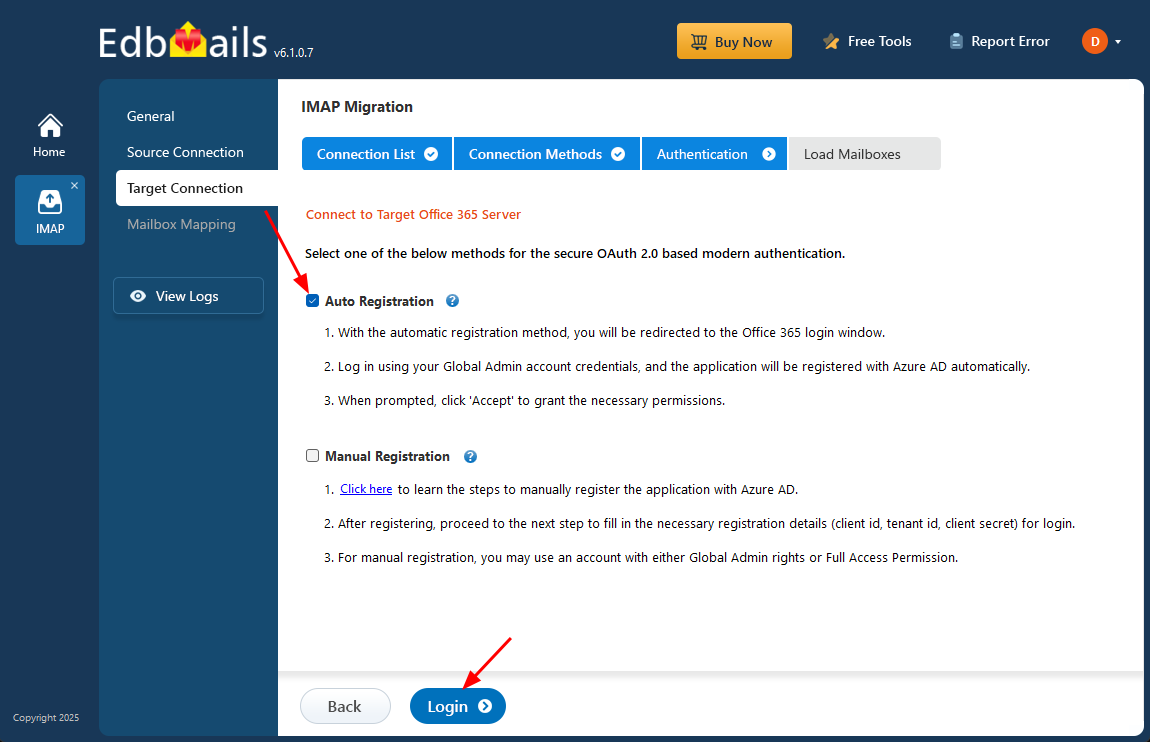
- Authenticate on the Microsoft sign-in page.

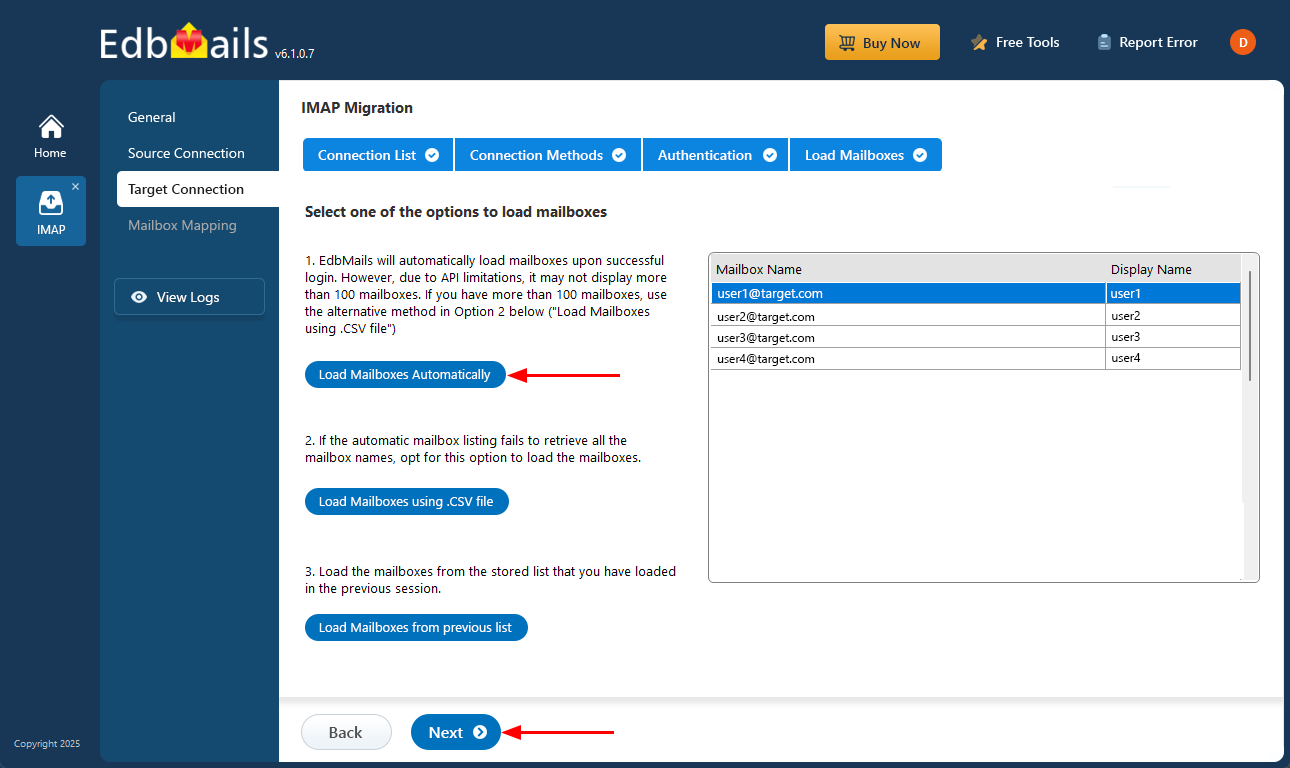
- EdbMails allows you to load mailboxes automatically, which is quick and convenient. However, due to Microsoft API limitations, the automatic method can list up to 100 mailboxes at a time. For larger environments or to include specific mailboxes beyond this limit, you can use the CSV file method to load mailboxes manually, giving you full control over the selection process.
- Click the ‘Next’ button to continue
- Click the ‘Add New Connection’ button to establish a new connection to the target Office 365. To use the previous connection, select it from the connection list and click the ‘Connect to Existing’ button to proceed.
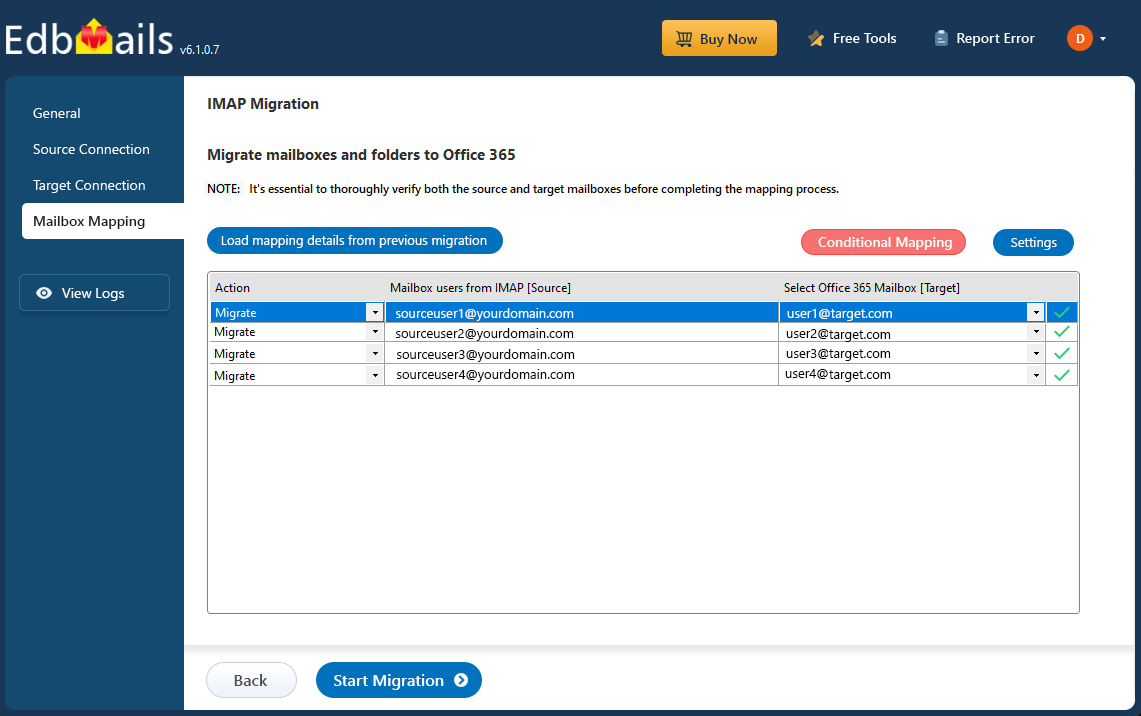
Step 5: EarthLink email to Microsoft 365 mailboxes mapping
- Select the required mapping option
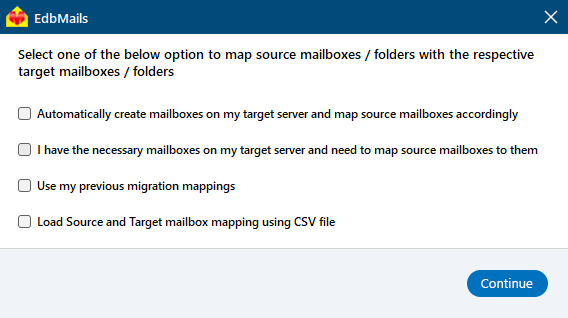
- You can choose to let EdbMails automatically create mailboxes in Office 365 and map them between the source and target servers. This feature is especially useful for large-scale migrations, saving time, reducing manual effort.
- Select the required mapping option
Step 6: Start the Earthlink to Office 365 migration
- After mapping the mailboxes, click the ‘Start Migration’ button to initiate the migration process.
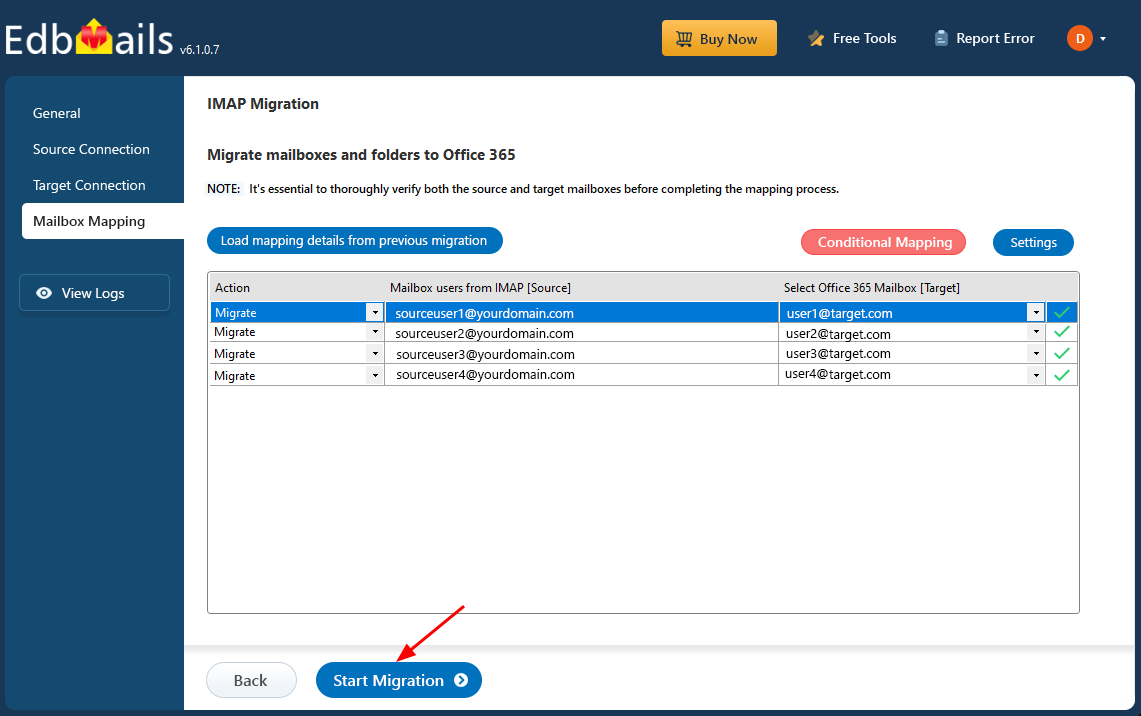
- Click the ‘View Log’ button to view the migration report, which includes mapping details and the total count of migrated emails.

- Log in to your target server and verify the items.
- After mapping the mailboxes, click the ‘Start Migration’ button to initiate the migration process.
EarthLink email to Office 365 Post-migration Tasks
- Step 1: Modify MX records to direct email to Office 365.
Update MX records for directing email to the new server. Additionally, configure the Autodiscover record to ensure that migrated mailboxes connect smoothly with email clients like Outlook.
- Step 2: Set up a new Outlook profile for users in the new domain
If users encounter issues connecting Outlook to Office 365 mailboxes, manually configure their Outlook profiles in the new domain.
- Step 1: Modify MX records to direct email to Office 365.
Troubleshooting Guide for EarthLink email to Office 365 Migration
For troubleshooting, check out our knowledge base articles. If you have additional questions, browse the FAQs or contact our dedicated support team for personalized assistance.
Benefits of EdbMails for EarthLink email to Office 365 Migration
- Huge Time-saver
Migrating from EarthLink to Office 365 can be time-consuming without the right tool. EdbMails helps you save valuable time by automating the process, allowing multiple mailboxes to be migrated concurrently. This parallel migration significantly reduces the time needed to move large volumes of data.
- Preserving Data Integrity
During migration, it is critical to ensure the integrity of your data. EdbMails guarantees that all your emails, attachments, folder structures, and metadata are preserved exactly as they are in EarthLink. This attention to detail ensures a seamless transition with no loss or corruption of your email data
- Efficient Data Migration
EdbMails uses an efficient approach to migrate your EarthLink email to Office 365 with minimal disruption. The tool employs advanced algorithms to speed up the migration while maintaining a high level of precision. This ensures that your data reaches the new system without unnecessary delays or complications.
- Free Trial
To help users evaluate the software before making a commitment, EdbMails offers a free trial. This allows you to test its capabilities and see firsthand how well it handles the migration process. You can ensure it meets your requirements before investing in the full version.
- Free 24/7 Technical Support
EdbMails provides free 24/7 technical support to assist you throughout the migration process. If you encounter any issues, you can rely on their team of experts to guide you through the steps. This support ensures a smooth and hassle-free transition to Office 365.
Frequently Asked Questions (FAQ)
- Will my contacts/calendars migrate from EarthLink via IMAP?
No, the IMAP protocol only supports the migration of emails, folders, and attachments.
- Will folder structure/attachments/metadata remain intact?
Yes. EdbMails IMAP migrates all the meta-data and header information and maintains a mirrored replica of the original source folder structure and that attachments are included.
- How long will the migration take for X GB of data and Y mailboxes?
EdbMails migration time depends on factors such as mailbox size, number of accounts, and network speed.

