Migrate Exchange 2016 public folders to Office 365
Migrating Exchange 2016 public folders to Office 365 is a crucial step for organizations seeking to overcome challenges like limited scalability, complex management, and permission issues that often arise in on-premises setups. Office 365 provides a cloud-based solution that simplifies administration, increases performance, and enhances data security. It also resolves common issues in hybrid environments where Exchange 2016 coexists with older versions, improving overall system reliability.
EdbMails Exchange Migration software offers a high-performance solution for migrating Exchange 2016 public folders to Office 365. It removes the need for manual PowerShell scripting, efficiently migrating both small and large public folders without size restrictions, while ensuring that all folder hierarchy and permissions are preserved for a seamless transition.
EdbMails supports incremental migration, allowing you to transfer only newly added or modified data in subsequent migration operations, optimizing bandwidth and time efficiency. Additionally, it enables parallel mailbox migrations, facilitating the simultaneous migration of multiple mailboxes, thereby speeding up the entire process. The intuitive interface ensures that organizations can complete migrations in just a few steps, with zero downtime and no impact on user mailboxes.
EdbMails supports migration across any Exchange servers including legacy servers such as Exchange 2010, 2007 as well as newer versions Exchange 2019, 2016 and 2013. EdbMails features automatic mapping of public folders and advanced filtering options. These capabilities ensure seamless public folders connections and selective item transfers, delivering a smooth migration experience.
Exchange 2016 public folder migration to Office 365 planning
Before initiating the migration of public folders from Exchange 2016 to Office 365, it is imperative to evaluate the migration requirements and prerequisites. The following checklist will assist in identifying and preparing your environment accordingly.
- Assess whether your current migration environment is Hybrid or non-Hybrid.
- Evaluate the size and quantity of the public folders you intend to migrate.
- Set up public folders in Office 365 and ensure they are mail-enabled
- Decide if you prefer to migrate all at once or in multiple phases.
- Verify your internet connection speed and network setup.
- Determine whether you will transfer public folders to public folders, primary mailboxes, or shared mailboxes on the destination server.
Check out the prerequisites for migrating Public folders to Office 365.
Exchange 2016 public folder to Office 365 pre-migration activities
- Step 1: Assign admin permission to the public folders on the source server
Steps to assign admin permissions to all the public folders on the source Exchange server
- Step 2: Create public folders on the target Office 365 server
Ensure to create Public folders on the target Office 365 servers and assign the admin permissions.
Create Office 365 Public folder and assign admin permissions
If your mailboxes are in a Hybrid environment, it is not possible to migrate the Public folders directly to Office 365. Refer to this workaround solution to migrate Public folders in a hybrid environment.
- Step 3: Add a custom domain to Office 365 (Optional)
If you have a custom email domain from your hosting provider to which you want to migrate and receive emails, you must add and verify the domain on Office 365.
- Step 4: Install cumulative updates (CU) on Exchange server 2016
For migrating Exchange server 2016 to Office 365, it is required that you have latest cumulative updates (CU4 or later) installed on the source server (2016)
Note: For migrating Public folders to Office 365 with EdbMails, you do not require PowerShell scripts. The following steps describe the public migration method by using EdbMails graphical user interface (GUI).
- Step 1: Assign admin permission to the public folders on the source server
Steps to migrate Exchange 2016 public folders to Office 365 using EdbMails
Step 1: Download and install EdbMails software
- Download and set up EdbMails on any computer running on Windows OS and can be connected to your source Exchange server.
System requirements to migrate Exchange 2016 public folders to Office 365.
- Launch the EdbMails software and click ‘log-in’ with your email id and password or you can use 'Start Your Free Trial'.
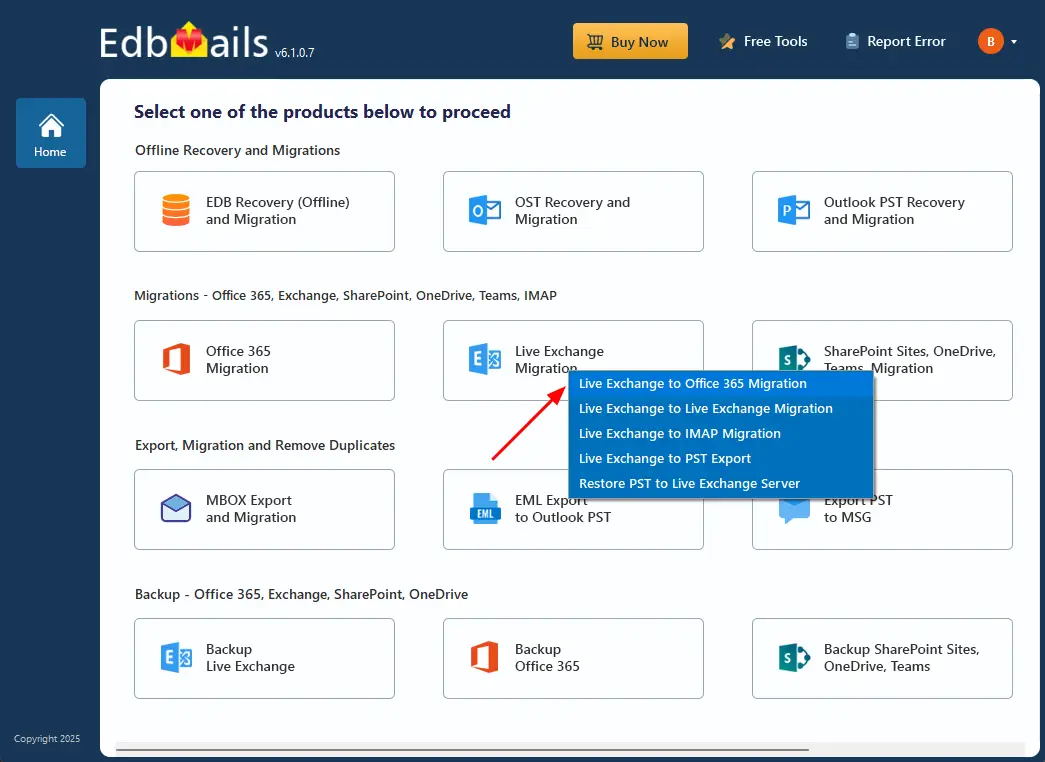
- Select ‘Live Exchange migration’ option.
- Select 'Live Exchange to Office 365 Migration'
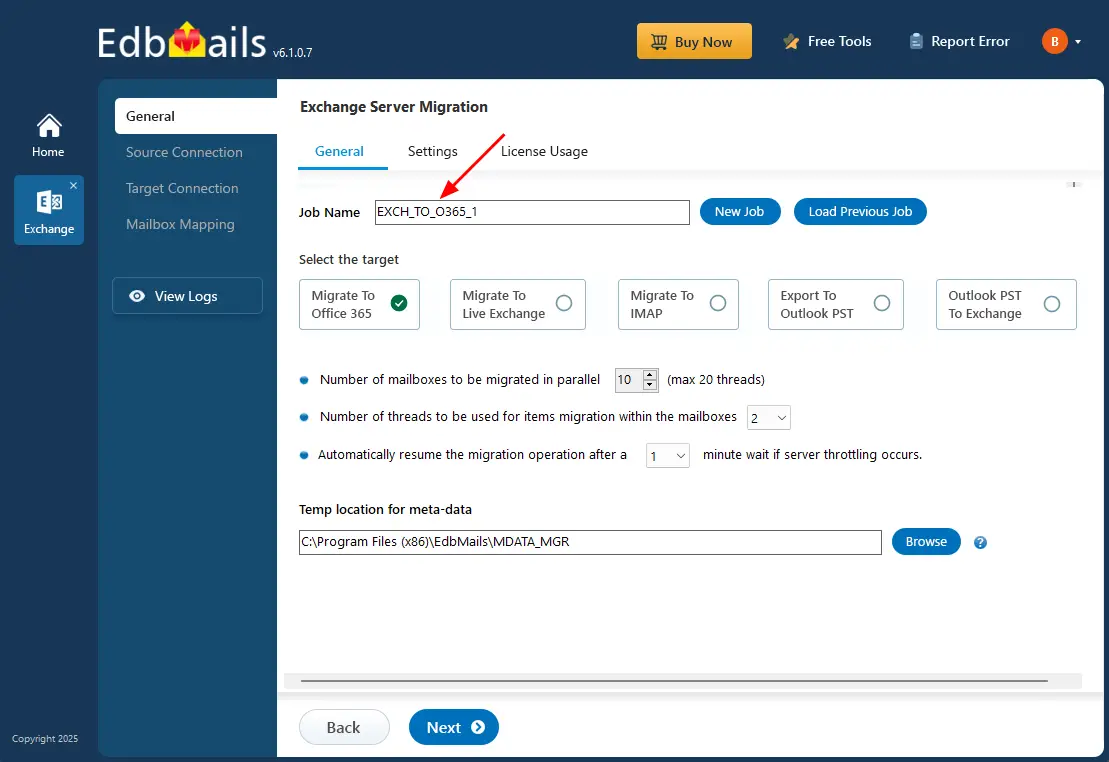
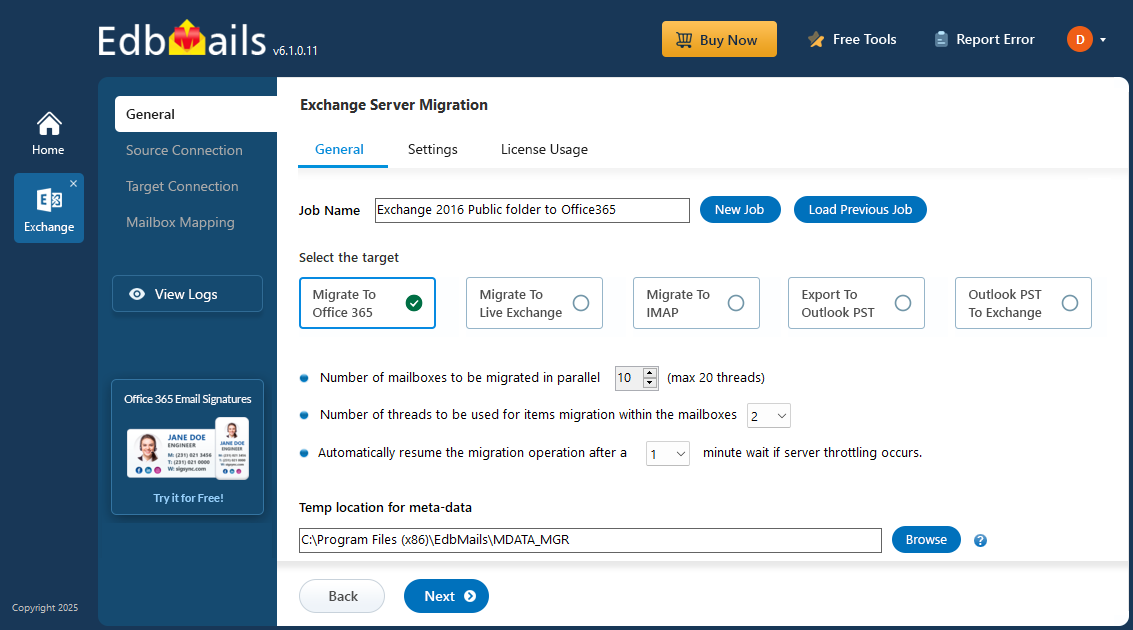
- You can either keep the default job name or click the ‘New Job’ button to change the job name.
- Download and set up EdbMails on any computer running on Windows OS and can be connected to your source Exchange server.
Step 2: Connect to source Exchange 2016 server
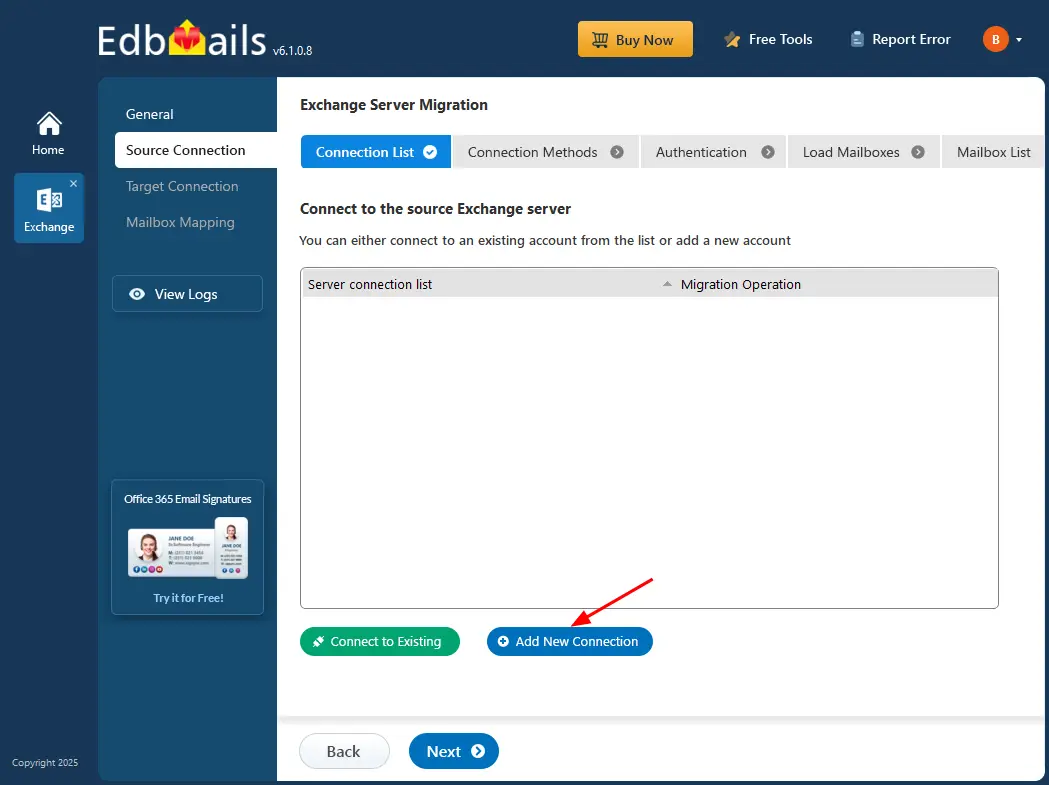
- To set up a new connection to the source Exchange server, click ‘Add New Connection’. If you want to use a previously established connection, select it from the list and click ‘Connect to Existing’.
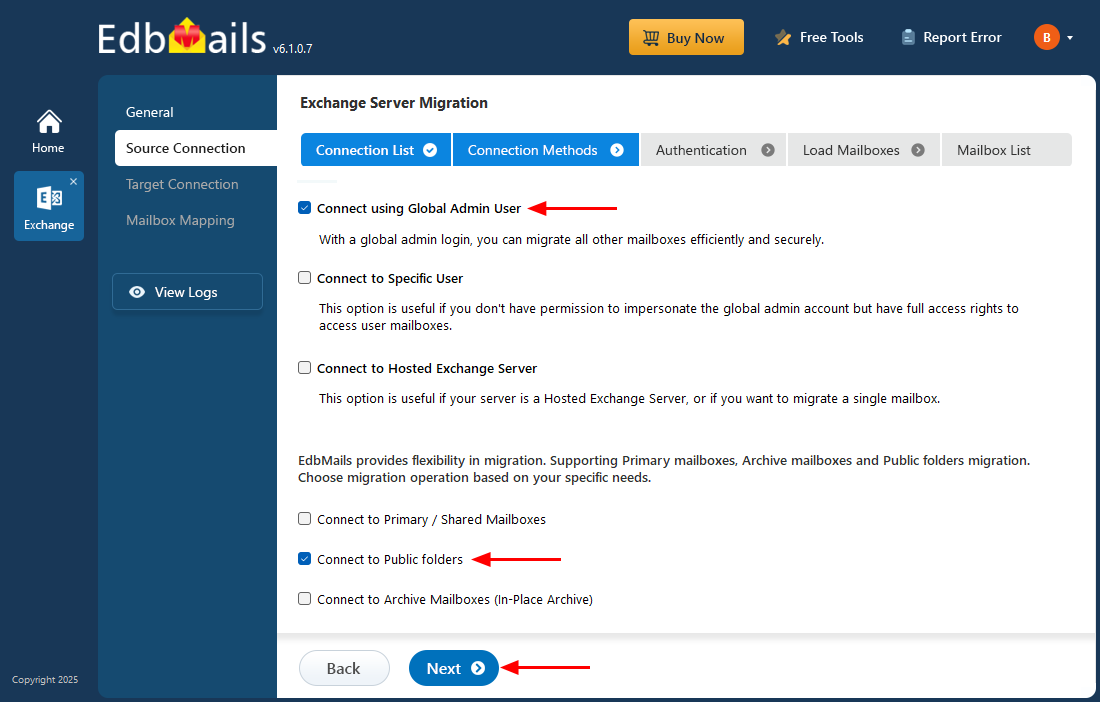
- ️Select the ‘Connect to Public folders’ option and click the ‘Next’ button
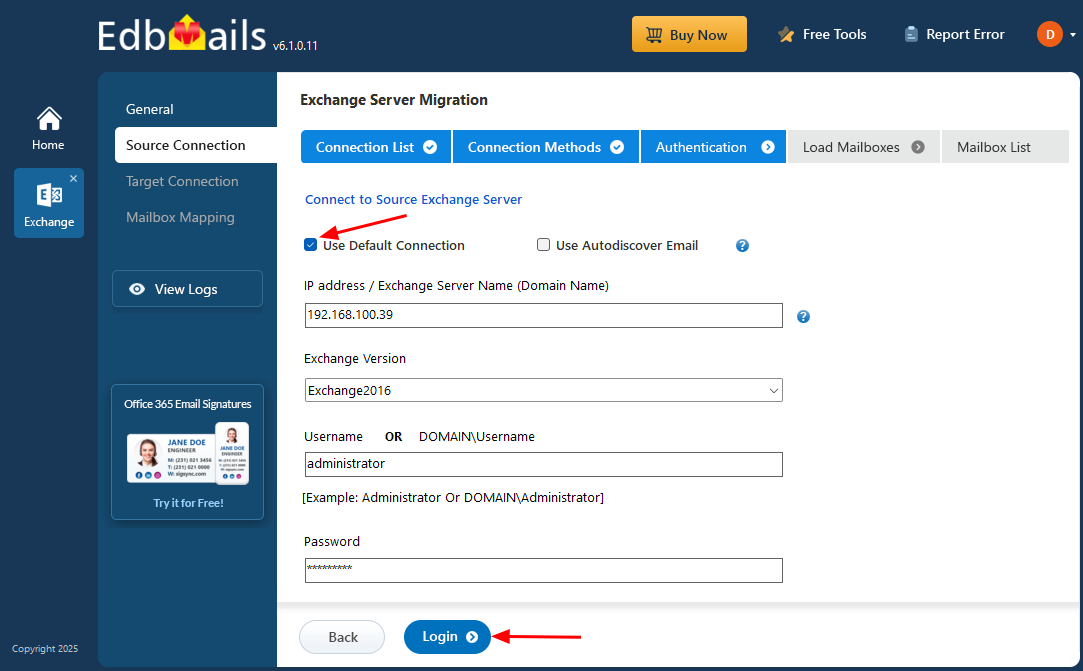
- Enter the Exchange 2016 server details and hit the ‘Login’ button
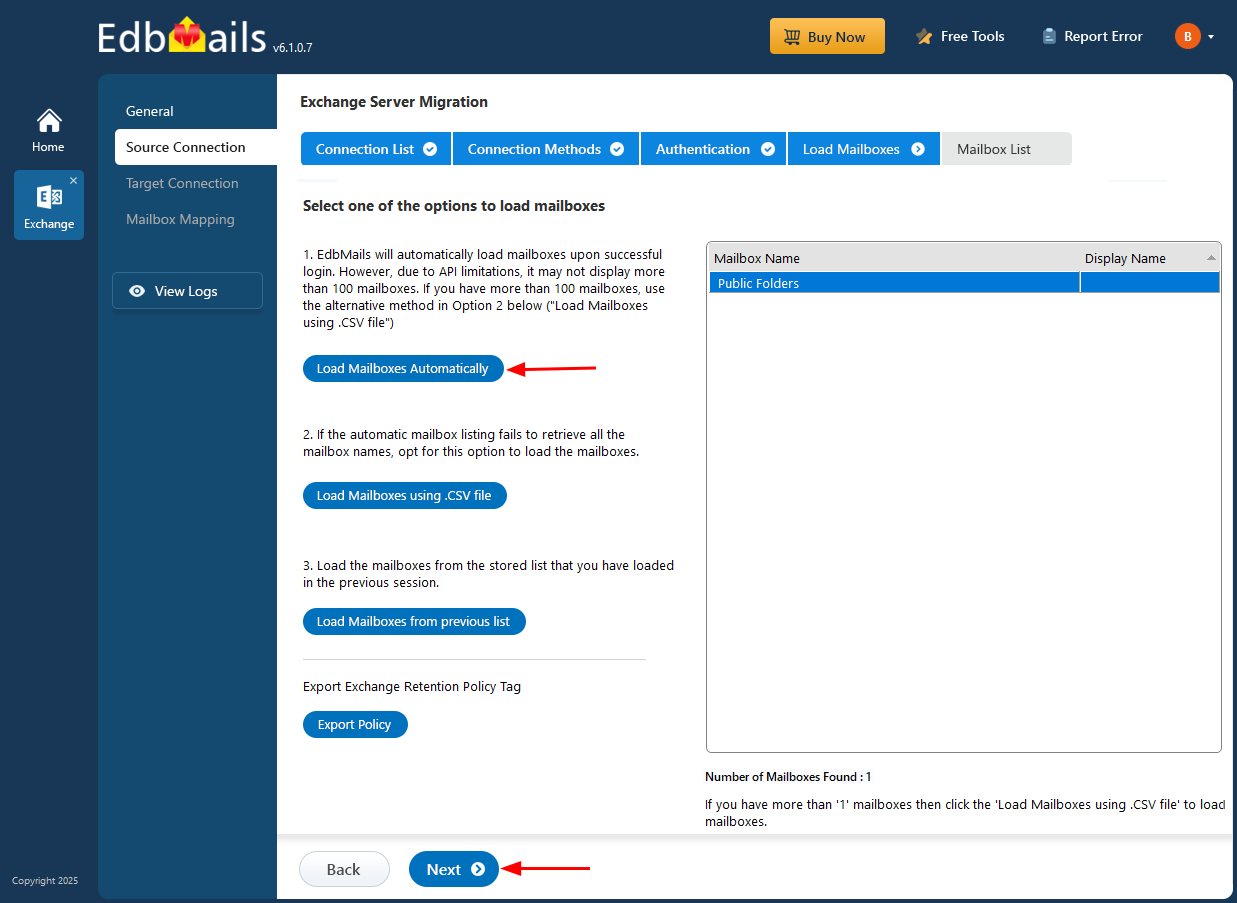
- Select one of the methods to load the Public folders.
Step 3: Select Exchange 2016 server public folders
- After successfully logging in to the source Exchange 2016 server, EdbMails displays all the public folders and subfolders in a tree view. You can select the required public folders or choose to migrate all the public folders.
- Then, click 'Migrate to Office 365' to establish a connection with the target server.
- If this is your initial migration using EdbMails, the process will be classified as a full migration. For any subsequent migrations from the same source to the target, the process will be considered incremental migration.
Step 4: Connect to target Office 365 server
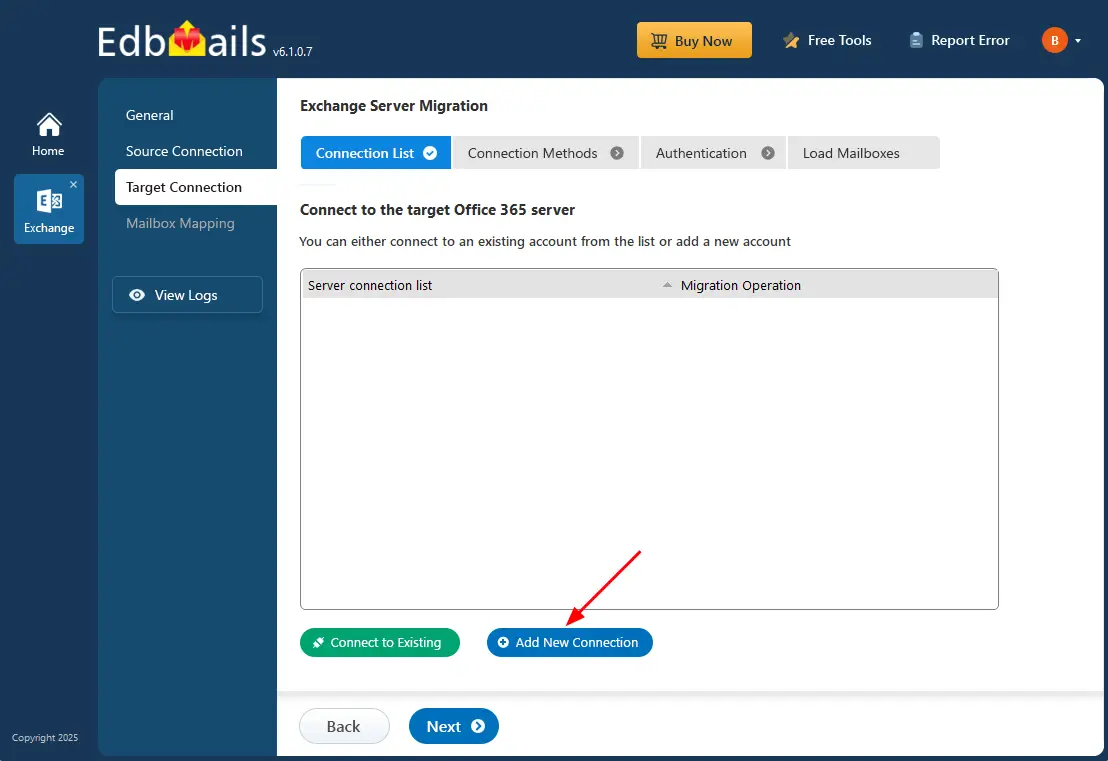
- To create a new connection to the target Exchange server, click ‘Add New Connection’. To reconnect to an existing one, select it from the list and click ‘Connect to Existing’.
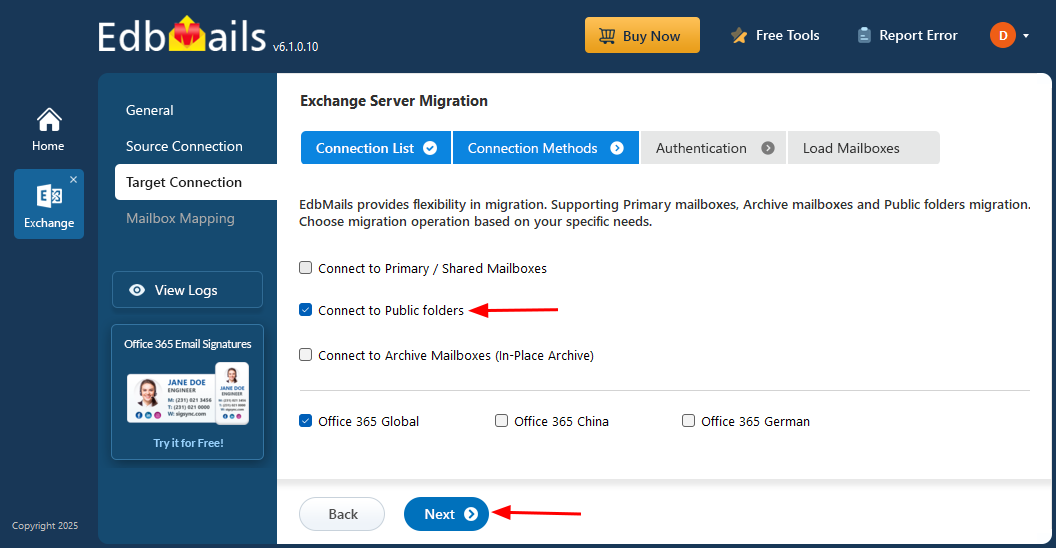
- Choose ‘Connect to Public Folder’ as your connection method, then click the ‘Continue’ and login on Microsoft Sign in page.
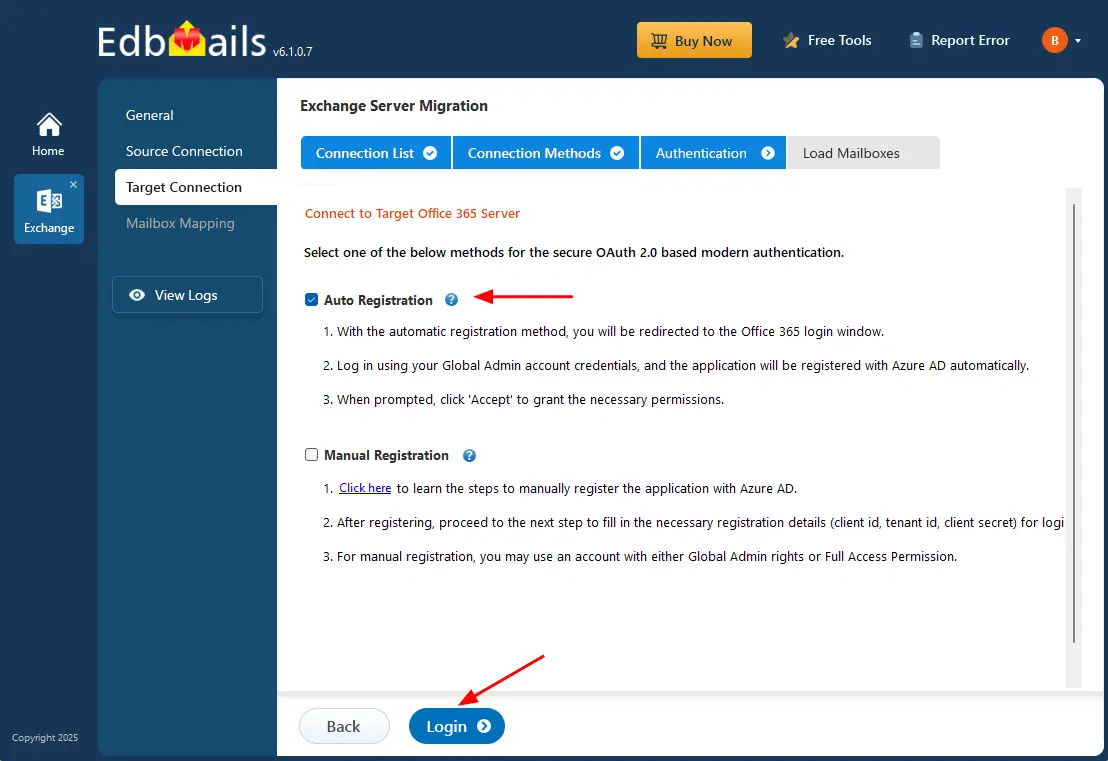
- Choose one of the authentication methods and click the ‘Login’ button.
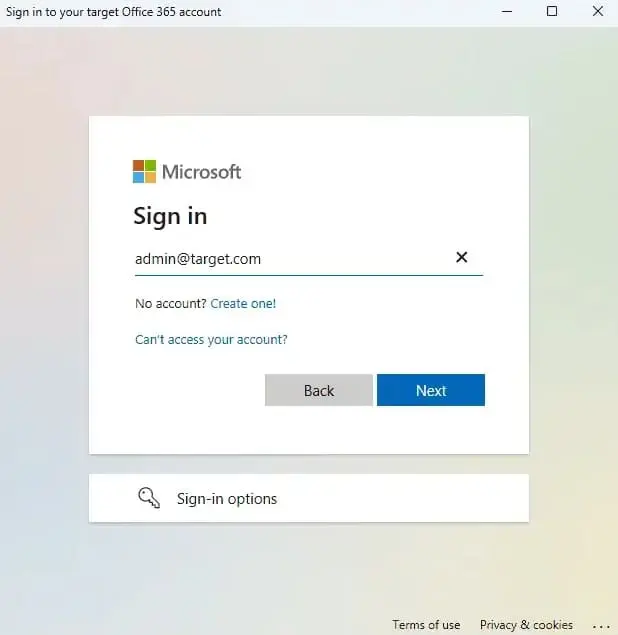
- Authenticate on Microsoft sign-in page.
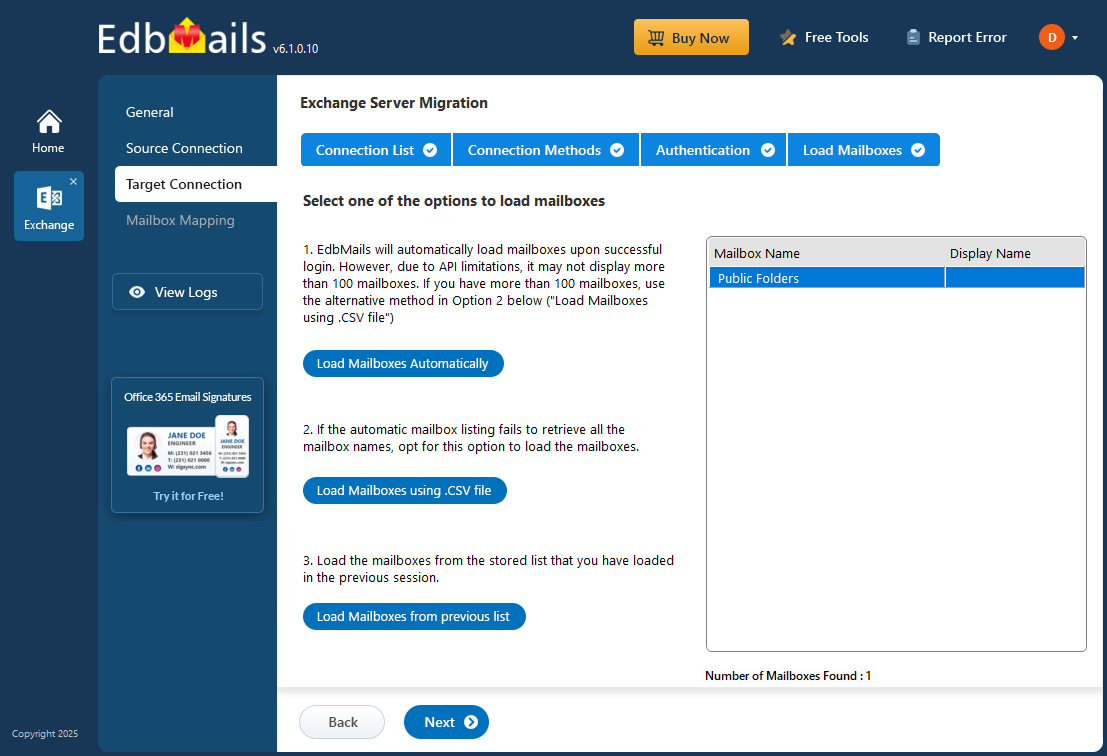
- Select one of the methods to load the public folders and click ‘Next’.
Step 5: Exchange 2016 to Office 365 public folder mapping
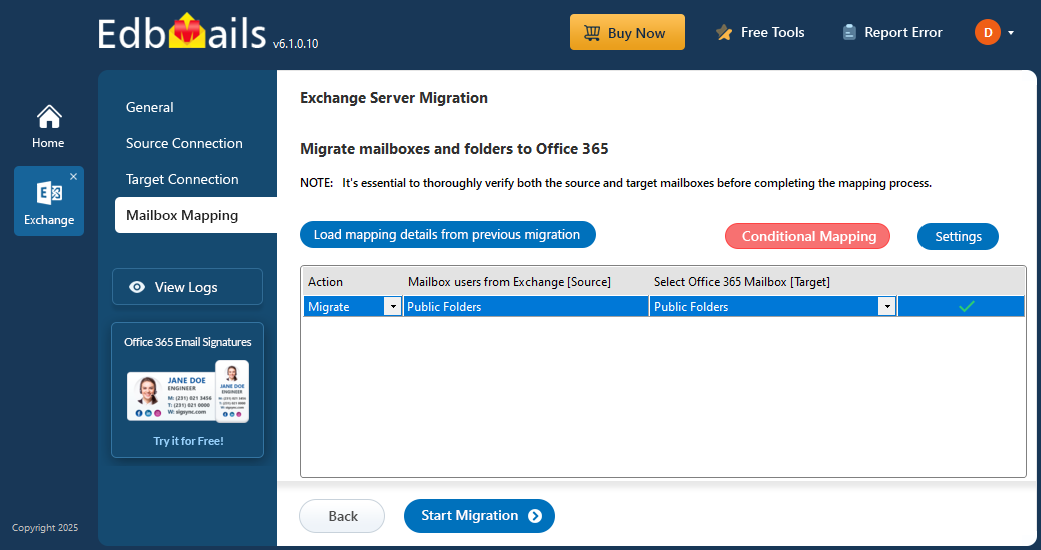
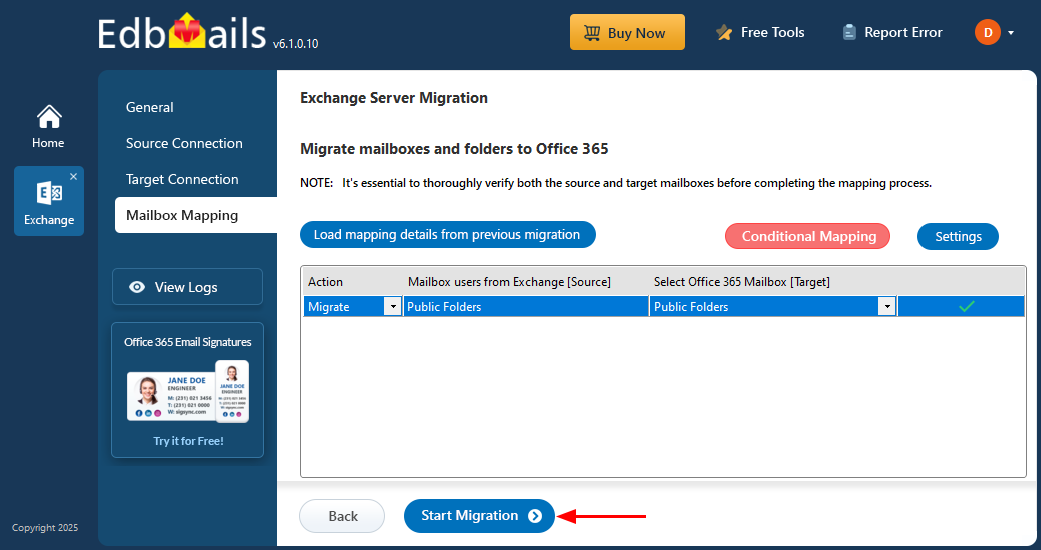
- EdbMails simplifies the mapping of public folders between the Exchange 2016 server and Office 365 automatically.
Step 6: Start Exchange 2016 public folder migration to Office 365
Click the ‘Settings’ button to customize the migration. You can apply a date filter to migrate items within a specific date range or filter by subject, attachments, sender, recipient, CC, BCC, and read/unread status. You can also exclude standard and custom folders.
Click the ‘Start Migration’ button to begin the process.
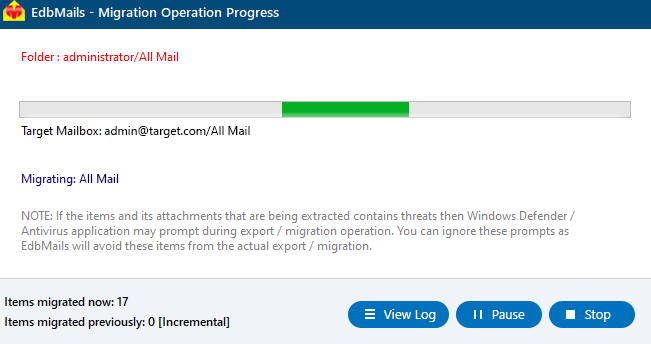
- You can monitor the migration progress through the progress bar, and pause or resume the operation as needed, once the migration is complete, click the ‘View Log’ button to access the migration report.
Exchange 2016 public folder migration to Office 365 troubleshooting
See the Exchange migration troubleshooting guide along with the Public folder troubleshooting resources for possible solutions to migration errors. For additional information on EdbMails Exchange migration, navigate to the frequently asked questions
Solution for Public folders migration failure due to insufficient permissions.
Benefits of using EdbMails to migrate Exchange 2016 public folders to Office 365
- Direct migration: EdbMails Exchange migration software supports you to directly migrate Exchange 2016 public folders to Office 365 without any intermediate hops.
- User-friendly interface: With EdbMails user-friendly interface, you can easily migrate Public folders without the need for PowerShell scripts or manual import methods.
- Public folder to Shared mailbox migration: With EdbMails, you can effortlessly migrate public folders to shared mailboxes, ensuring a smooth migration while maintaining data integrity and folder structure. This process enhances collaboration and access for your team, making it easier to manage shared resources.
- Broad compatibility: EdbMails supports migration from Exchange versions 2007, 2010, 2013, 2016, and 2019.
- Incremental migration: EdbMails facilitates incremental migration by avoiding duplicate items during subsequent transfers to the same target. This feature transfers only newly added or modified items since the last migration, ensuring efficiency and preserving data integrity while reducing internet bandwidth usage.
- Zero downtime: EdbMails ensures zero-downtime during the migration of public folders, allowing users to continue accessing their emails and resources without interruptions or data loss. This approach maintains business continuity while safeguarding valuable data throughout the migration process.


