Zimbra to Office 365 migration : Step-by-Step Guide
As businesses grow, many are choosing to migrate from Zimbra to Office 365 to take advantage of Microsoft 365’s scalability and advanced features, such as seamless integration with Teams, SharePoint, and OneDrive. While Zimbra remains a cost-effective email platform, it often lacks the comprehensive tools required by modern enterprises. However, the transition to Office 365 comes with challenges, including data compatibility, accurate mailbox mapping, and maintaining uptime. Hybrid environments can also complicate authentication and security protocols.
EdbMails IMAP Migration Tool, a Microsoft-partnered solution, streamlines Zimbra to Office 365 migration with an intuitive interface suitable for small and large organizations. It enables direct, efficient transfers, supports granular migrations (e.g., selective emails), and preserves metadata like timestamps and attachments. Its incremental migration feature prevents data duplication, ensuring only new or updated items are transferred, making Zimbra email migration to Office 365 both reliable and optimized.
User Query Response
Query: “Hello EdbMails team. Previously, we used Zimbra for email communication. However, as our organization has grown across the globe, we intend to migrate to Microsoft Office 365. We have no idea how to migrate large amounts of data. Can you recommend a solution or a step-by-step procedure to make our move go as smoothly as possible?”
What makes migrating from Zimbra to Microsoft 365 a smart choice?
Microsoft 365 offers a powerful suite of tools that integrates seamlessly with business workflows. It combines email, collaboration, security, and cloud storage features that Zimbra lacks for meeting modern enterprise needs.
- Enhanced security and compliance
Microsoft 365 provides enterprise-grade security features, including multi-factor authentication (MFA), advanced threat protection, and data loss prevention. Zimbra’s security capabilities fall short, making Microsoft 365 a superior choice for regulatory compliance. With EdbMails, you can ensure a secure migration while maintaining the integrity of all data during the transfer.
- Scalability for growing businesses
As your business expands, Microsoft 365 scales effortlessly with unlimited cloud storage and advanced user management. Zimbra, being more limited in this regard, struggles to keep up with growth.
- Seamless collaboration with Microsoft tools
Office 365 integrates perfectly with Teams, SharePoint, and OneDrive, enhancing collaboration. Zimbra lacks these tools, requiring third-party solutions for collaboration, which adds complexity and limits productivity.
- Automatic updates and future-proofing
With Microsoft 365, updates are automated, ensuring you always have the latest features and security patches. Zimbra requires manual updates, potentially leaving systems vulnerable or outdated. EdbMails simplifies migration to the latest version of Microsoft 365, ensuring your systems are always up-to-date and secure.
- Ensuring business continuity
Office 365 allows users to access their applications and data from any location with an internet connection, ensuring business continuity during disruptions and supporting remote work. EdbMails ensures seamless migration to Microsoft 365, maintaining your business’s ability to stay connected and productive from anywhere.
- Enhanced security and compliance
Zimbra to Office 365 migration planning
Planning is one of the most important factors before you migrate email from Zimbra to Office 365. You must prepare the source and target environments and have a backup plan in place to avoid potential risks and data loss. Here is a checklist of points to consider for the migration.
- Determine the size of the data and number of mailboxes you want to migrate from Zimbra to Office 365.
- Make a list of all the data and permissions from Zimbra that you want to transfer.
- Create appropriate user mailboxes on Office 365 and assign licenses to them.
- Ensure you have enough network capacity and bandwidth to migrate.
- Communicate the migration plan to your end users and inform the stakeholders.
- Perform a test or pilot migration before you start the actual one
Zimbra to Office 365 migration prerequisites
On the Zimbra Server:
- Ensure you have the Zimbra Mail server’s hostname, port number, email address, and password ready.
- If you’re migrating multiple users, download the sample CSV file from the EdbMails application, update it with the necessary details like email address, password, IMAP hostname, and port number, then save the file
On the Office 365 Server:
Before beginning the migration from Zimbra to Office 365, ensure that all user mailboxes are set up and properly licensed. You have two options for mailbox creation:
- Allow EdbMails to automatically create mailboxes for your users.
- Alternatively, manually create mailboxes through the Office 365 Admin Center. You can refer to the following guides for assistance:
- How to add users and assign licenses in Office 365?
- Adding multiple users at once in Office 365
- Assigning Microsoft 365 licenses to user accounts
If you're using a custom email domain from Zimbra and want to continue receiving emails after migration, make sure to add and verify the domain in Office 365.
You’ll need to follow the steps to:
- Add a custom domain to Office 365
- Set up the DNS records to connect your domain to Office 365
Additionally, configure Office 365 to handle larger emails by following the steps to increase the maximum email size.
Steps to migrate email from Zimbra to Office 365
Step 1: Download and install EdbMails IMAP migration Software
- Download EdbMails and install it on a Windows-based computer to get started with the Zimbra to Office 365 migration process.
- Launch the application and click ‘Login’ to sign in using your registered email address and password. If you haven’t created an account yet, click ‘Start Your Free Trial’ to begin.
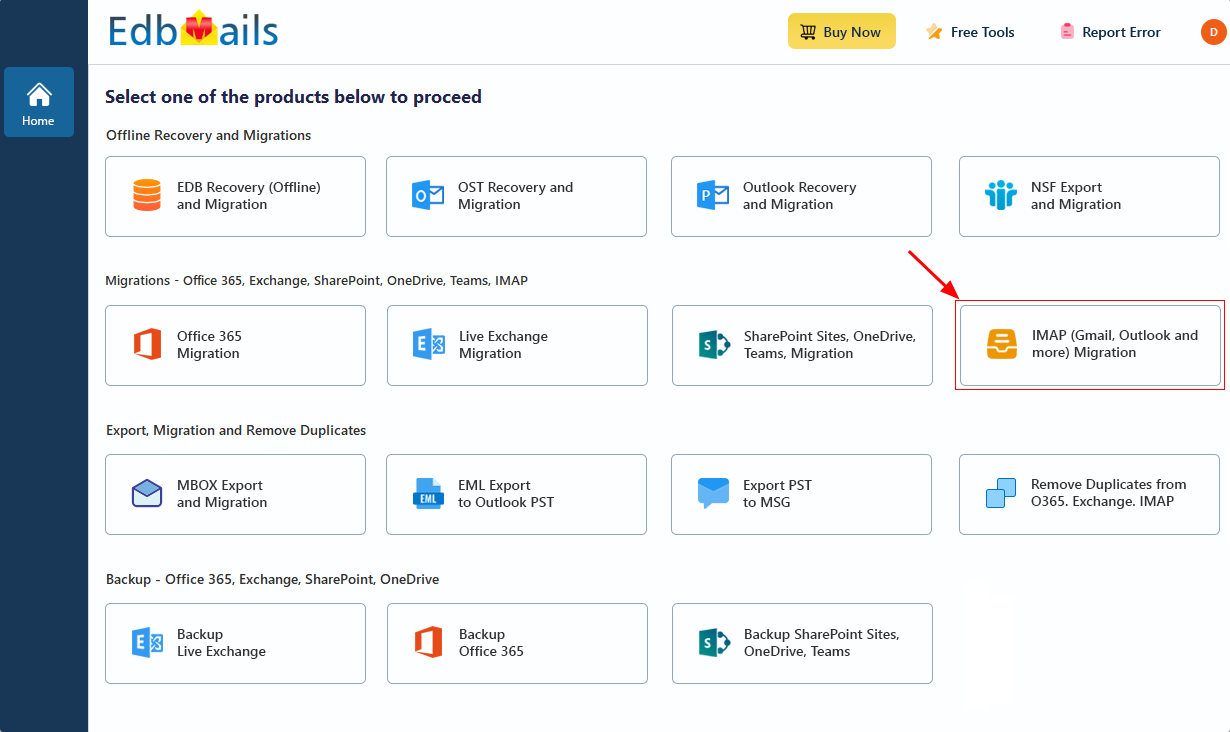
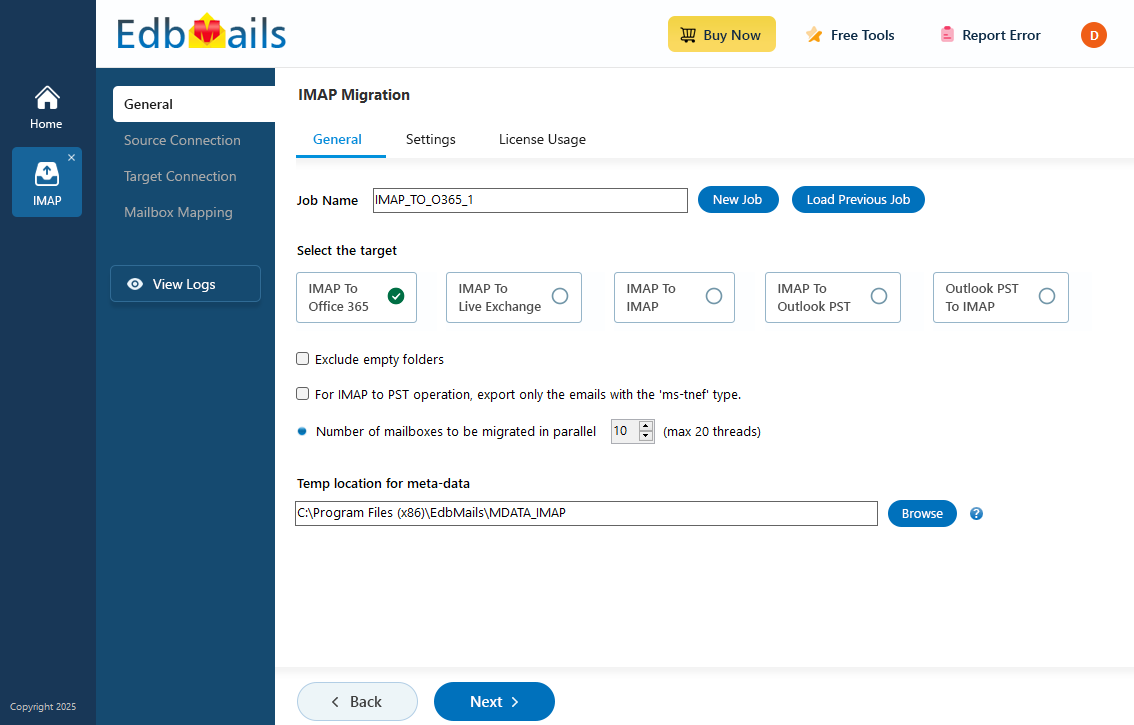
- Select the option ‘IMAP (Gmail, Outlook & more) Migration’
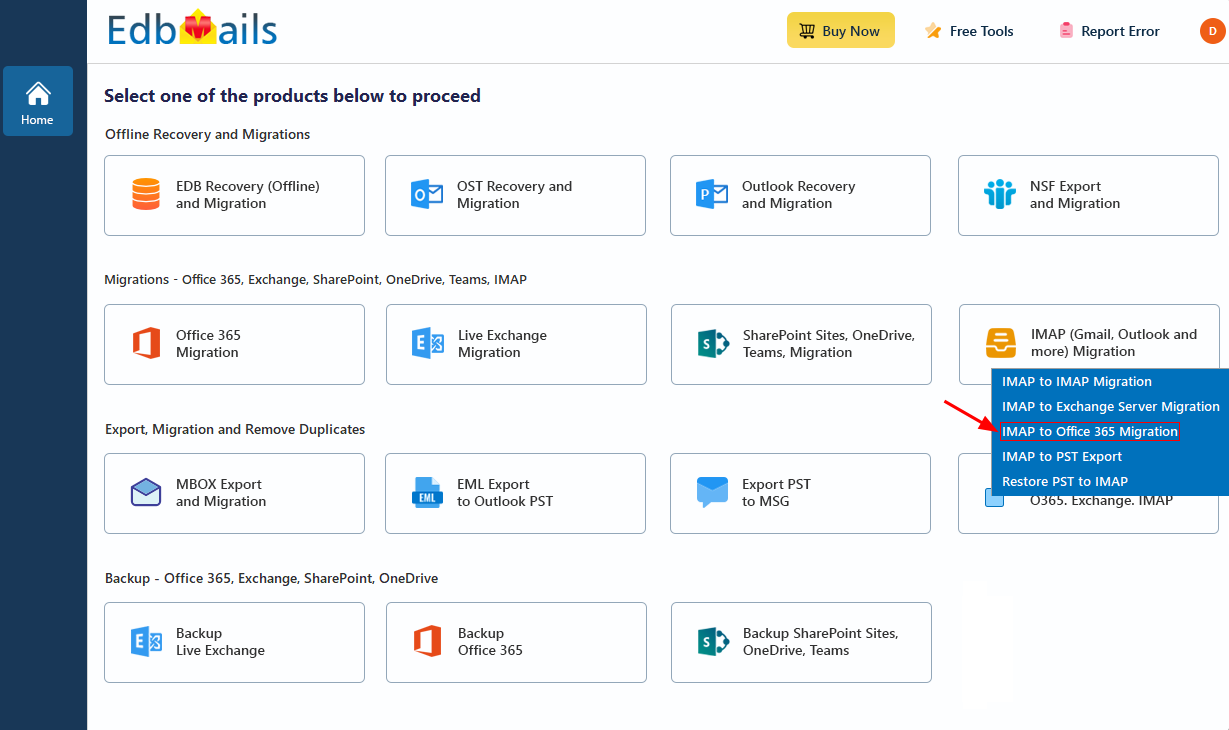
- Select ‘IMAP to Office 365 Migration’.
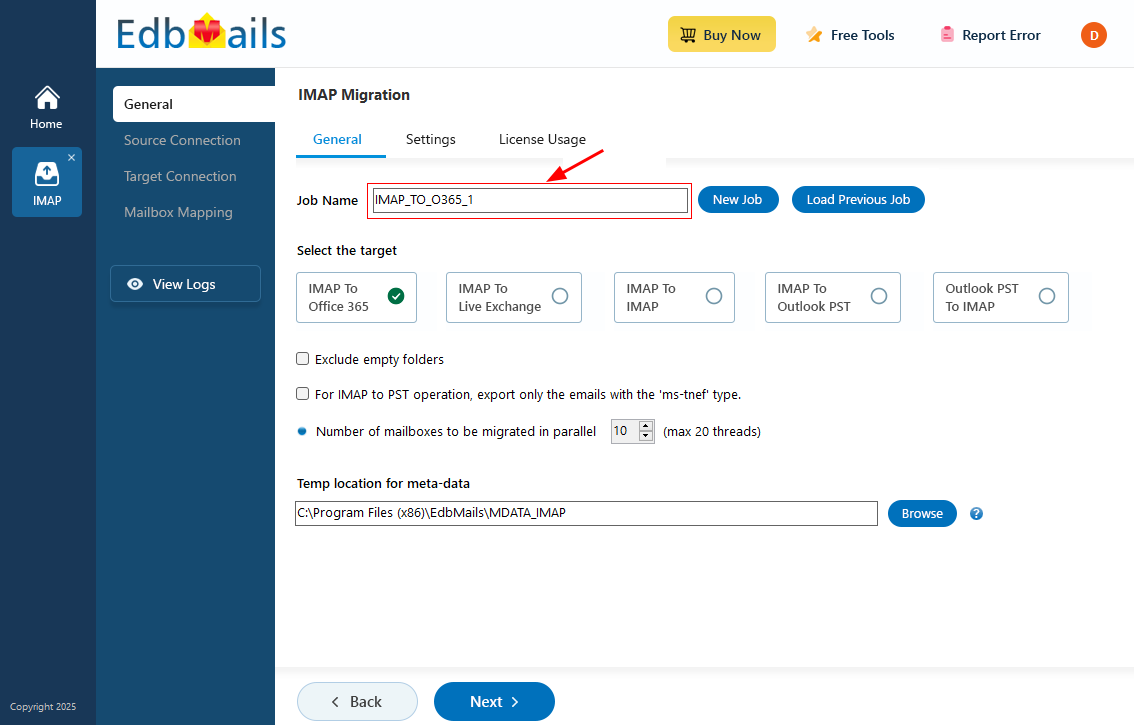
- A default job name is automatically assigned. If you want, click ‘New Job’ to give it a custom name for easier identification.
Step 2: Connect to source Zimbra Mail server
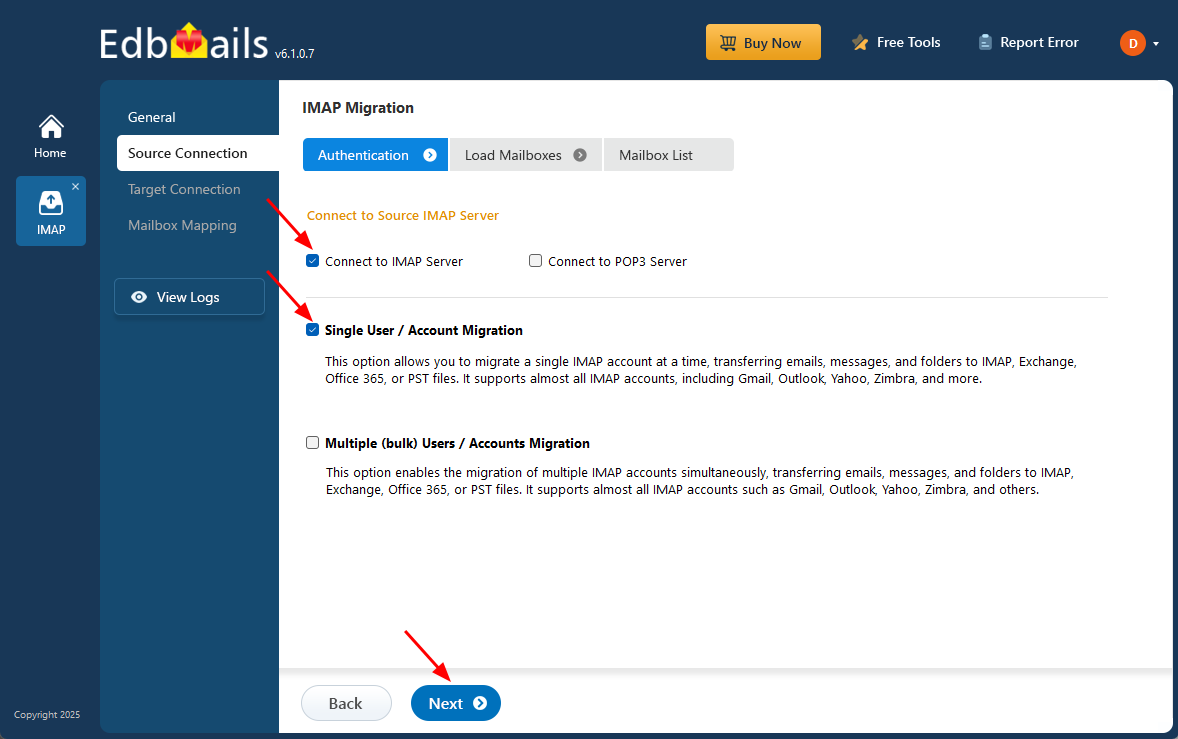
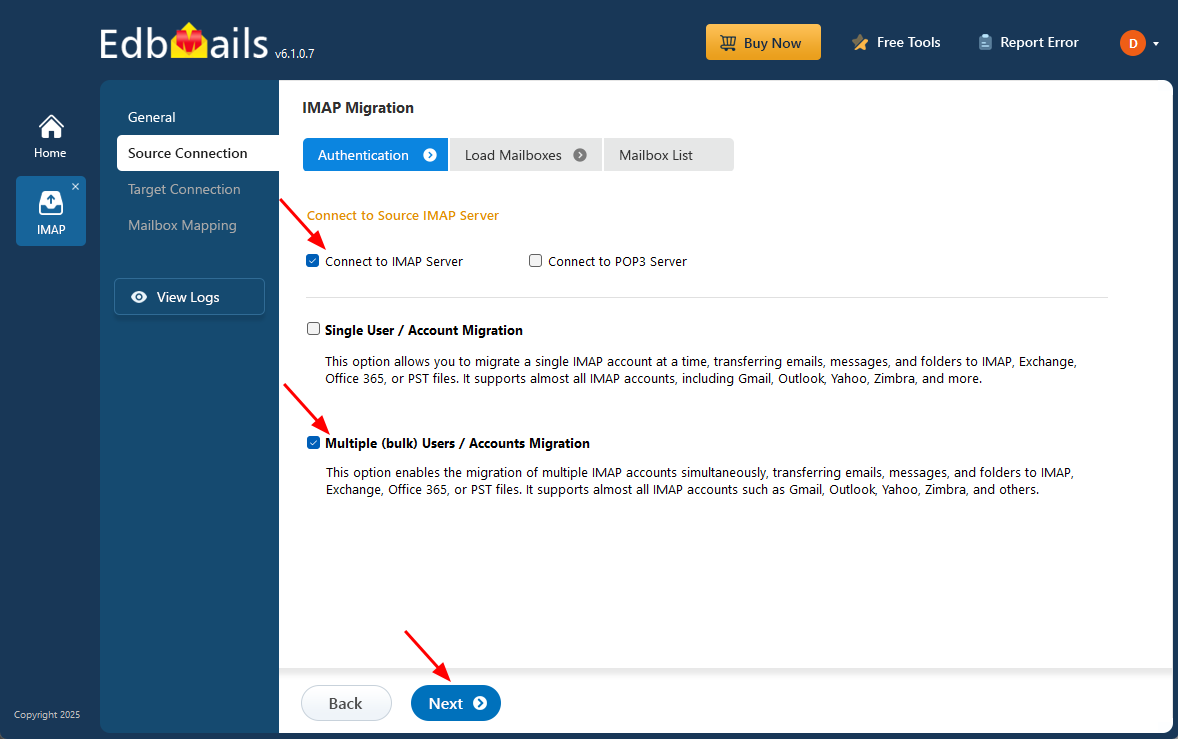
- To migrate a single Zimbra mailbox, choose the ‘Single User / Account Migration’ option and then click ‘Next’ to proceed.
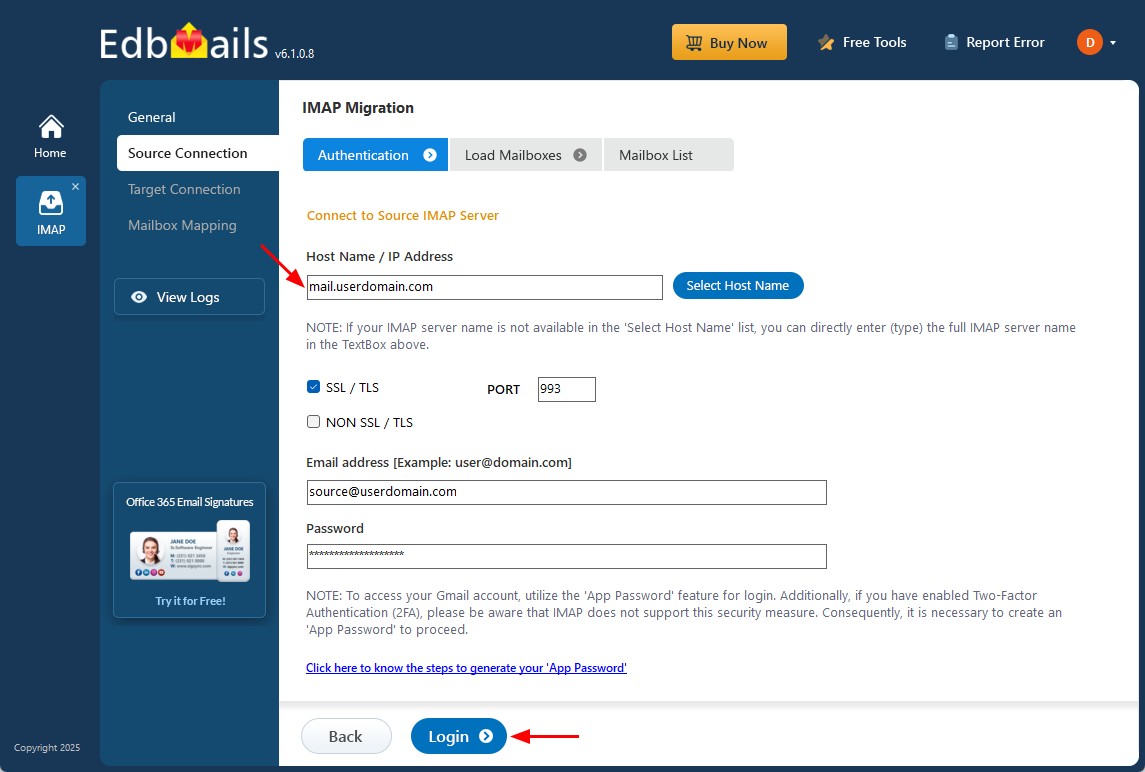
- Pick the correct IMAP host name for your Zimbra server from the list, or type it in manually if it's not listed. Then, enter the email address and password.
- Click the ‘Login’ button.
- To connect and migrate multiple Zimbra user mailboxes at once, select the ‘Multiple (Bulk) Users/Accounts Migration’ option, then click ‘Next’ to proceed
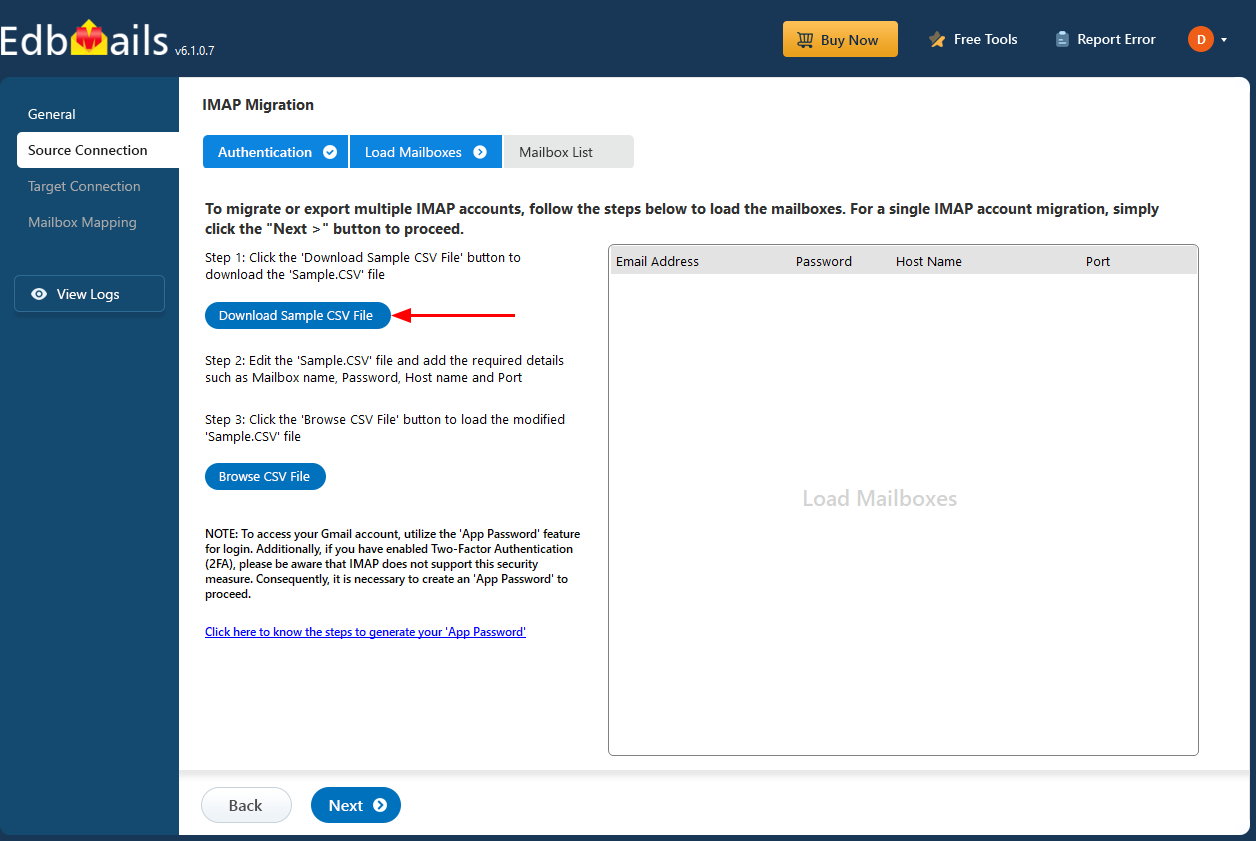
- Click ‘Download Sample CSV File’
- Open the sample CSV file and enter the required details, such as the email address, password, host name, and port number.
- After entering the required details in the CSV file, save your changes and close the file to continue with the next steps.
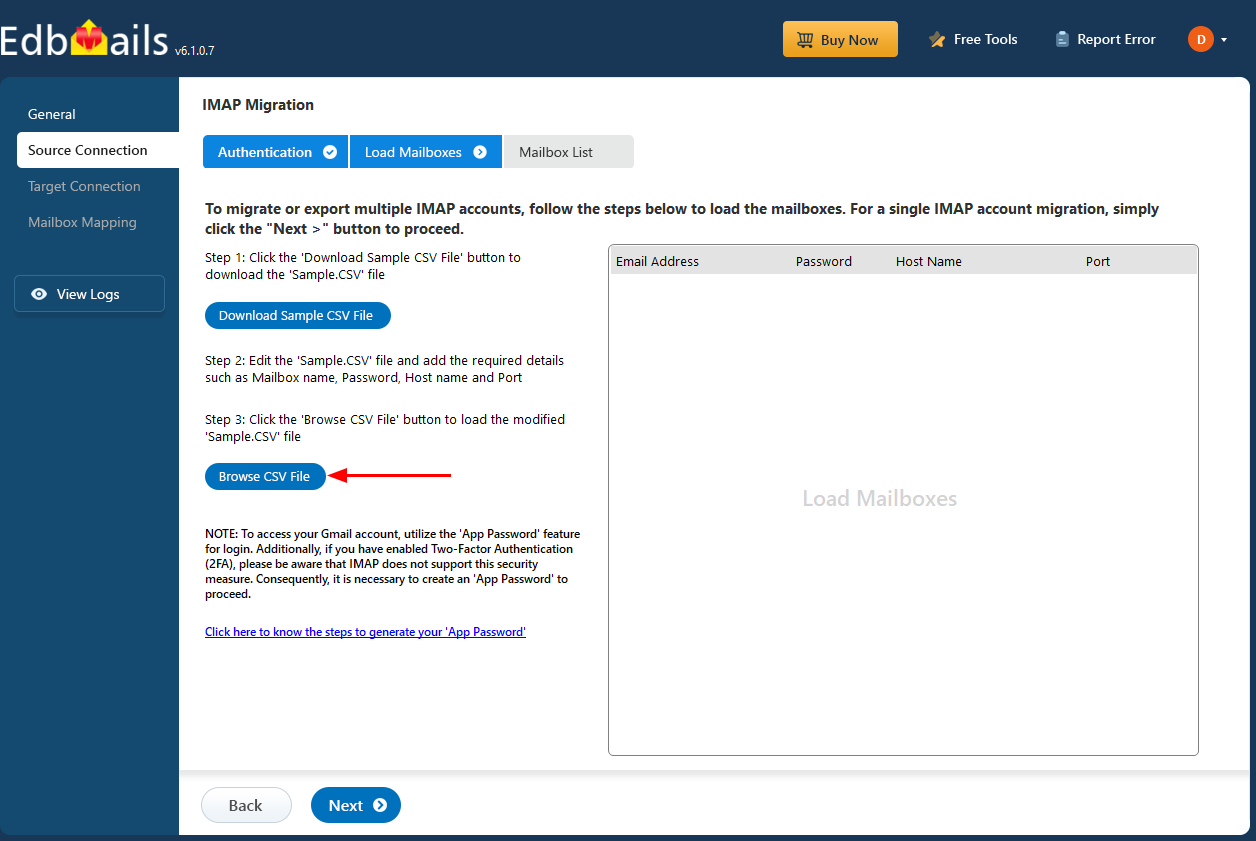
- Next, click the 'Browse CSV File' button, locate your updated CSV file, select it, and open it to proceed.
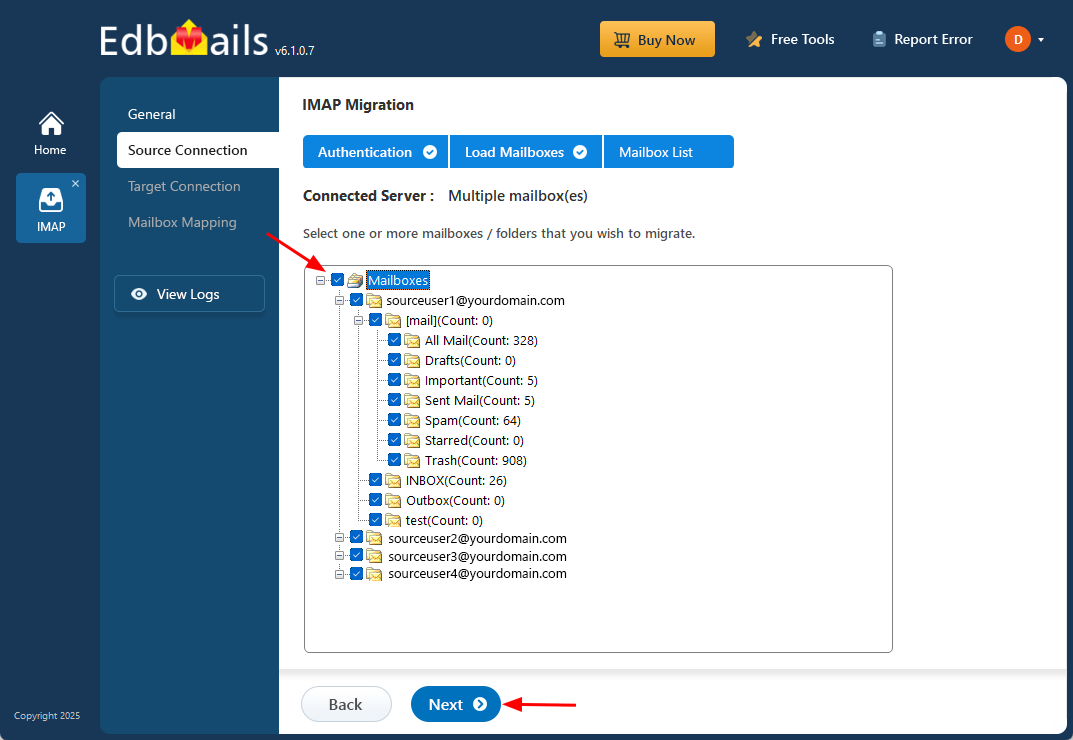
- Choose the specific mailboxes or individual folders you wish to migrate. Once your selection is complete, click ‘Next’ to continue.
Step 3: Connect to target Office 365 server
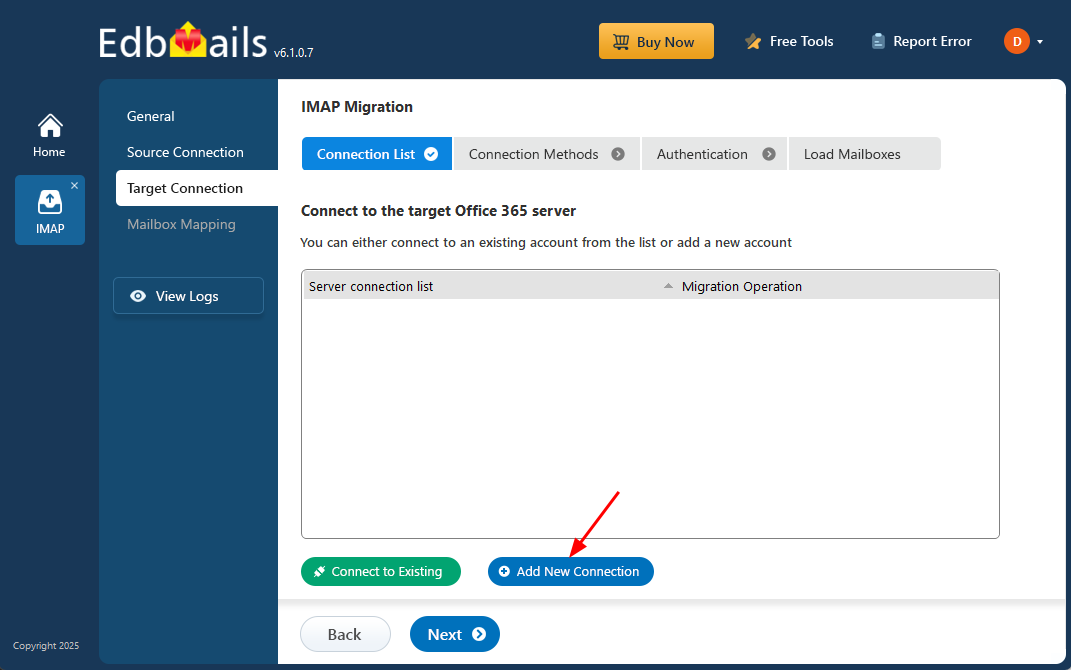
- Click the ‘Add New Connection’ button to configure a fresh connection to your target Office 365 account. If you have already set up a connection, select it from the list and click ‘Connect to Existing’.
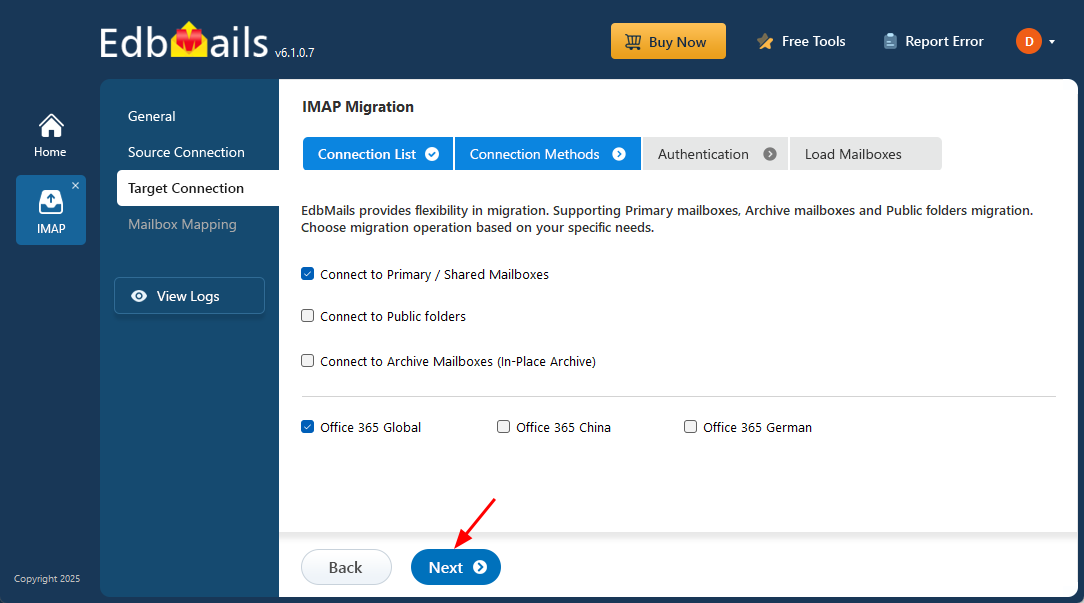
- Choose the desired connection options and click ‘Next’ to proceed.
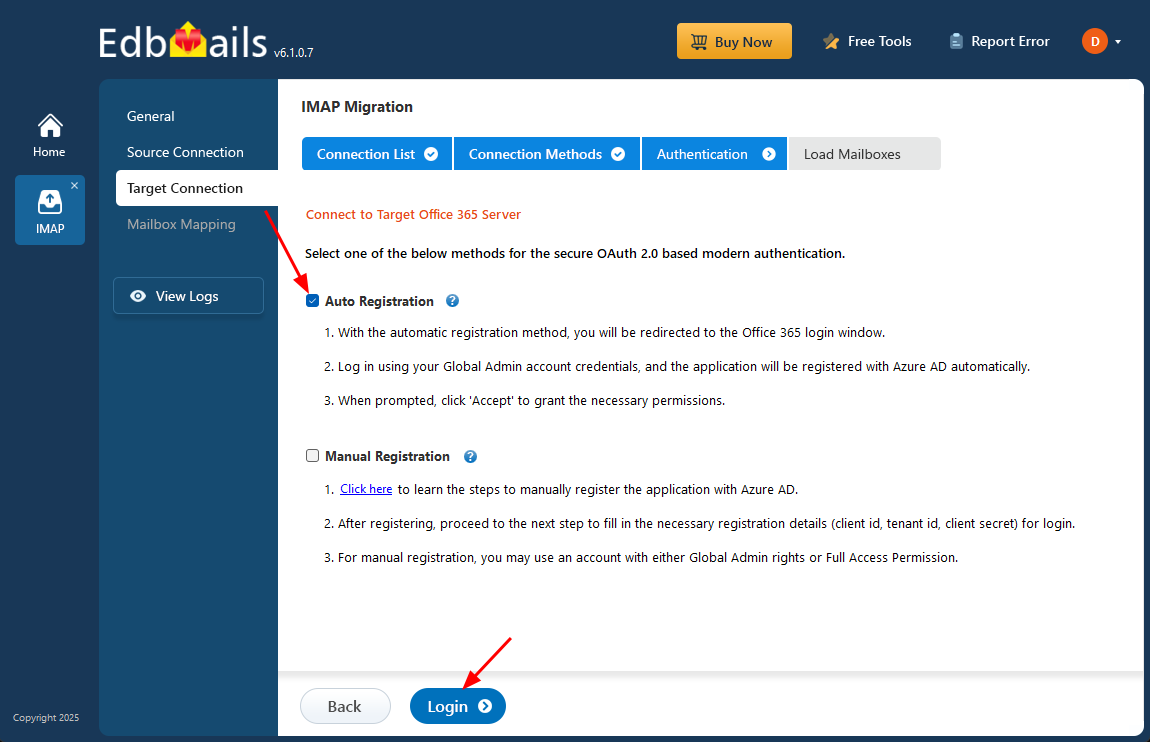
- Choose your preferred authentication method and click the ‘Login’ button to proceed.
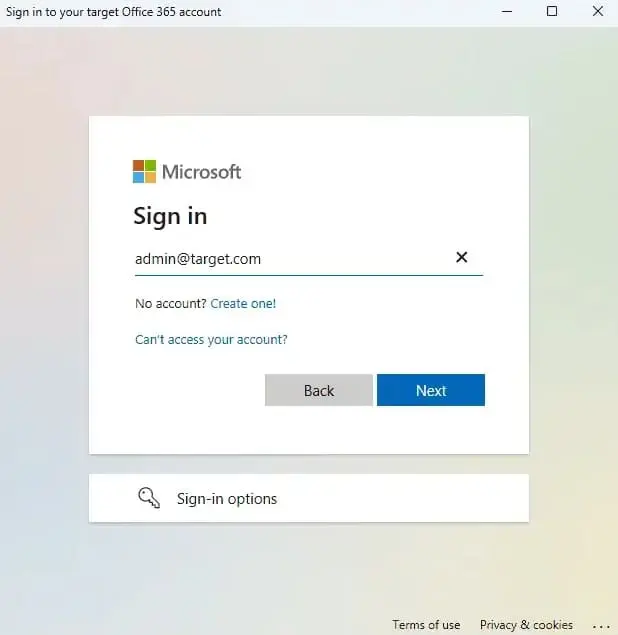
- Authenticate on Microsoft sign-in page.
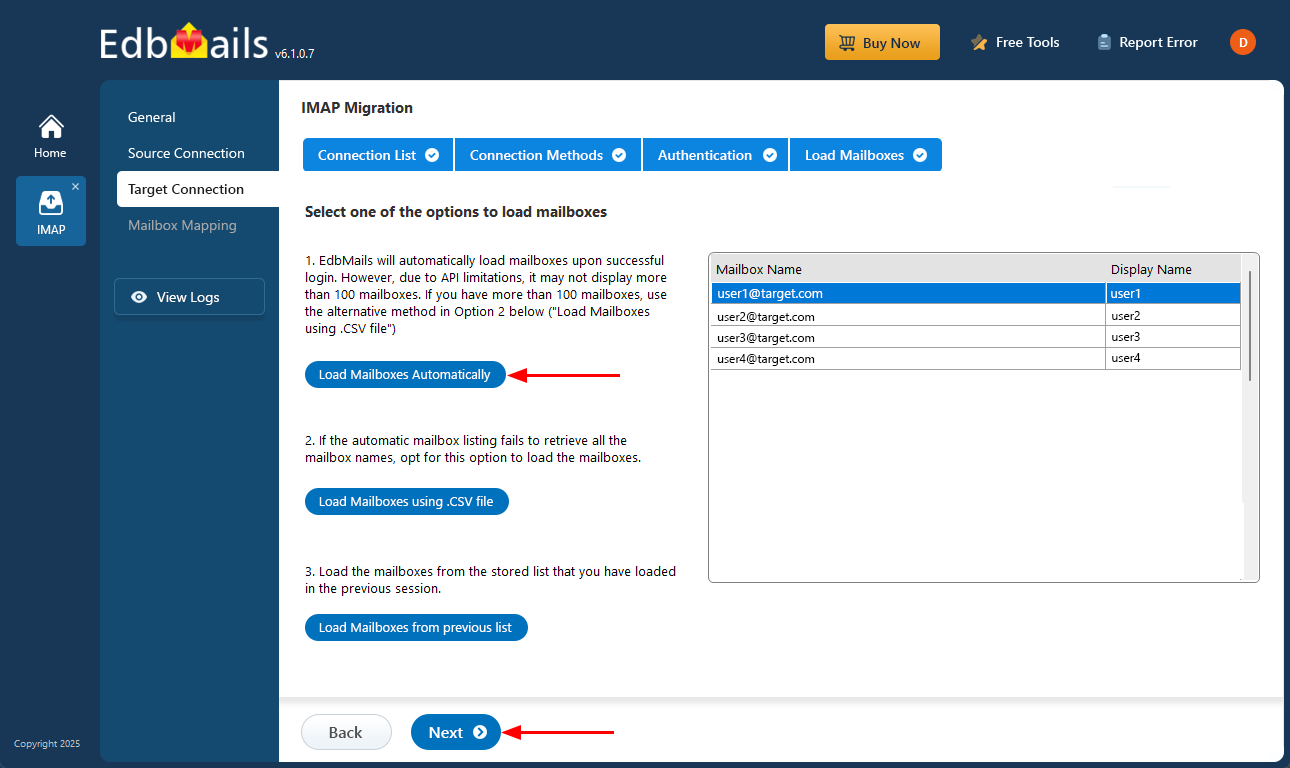
- Select one of the methods to load the mailboxes. EdbMails automatically loads Office 365 mailboxes. However, due to Microsoft API limitations, it displays only the first 100 mailboxes. For loading more than 100, use the CSV file option and proceed by clicking ‘Next’.
Step 4: Zimbra to Office 365 mailboxes mapping
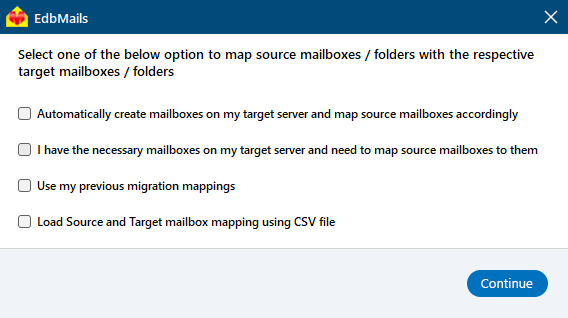
- Choose one of the available options to map the source and target mailboxes
- You can choose the option to let EdbMails automatically create mailboxes on your target Office 365 tenant if they don’t already exist, simplifying the setup process.
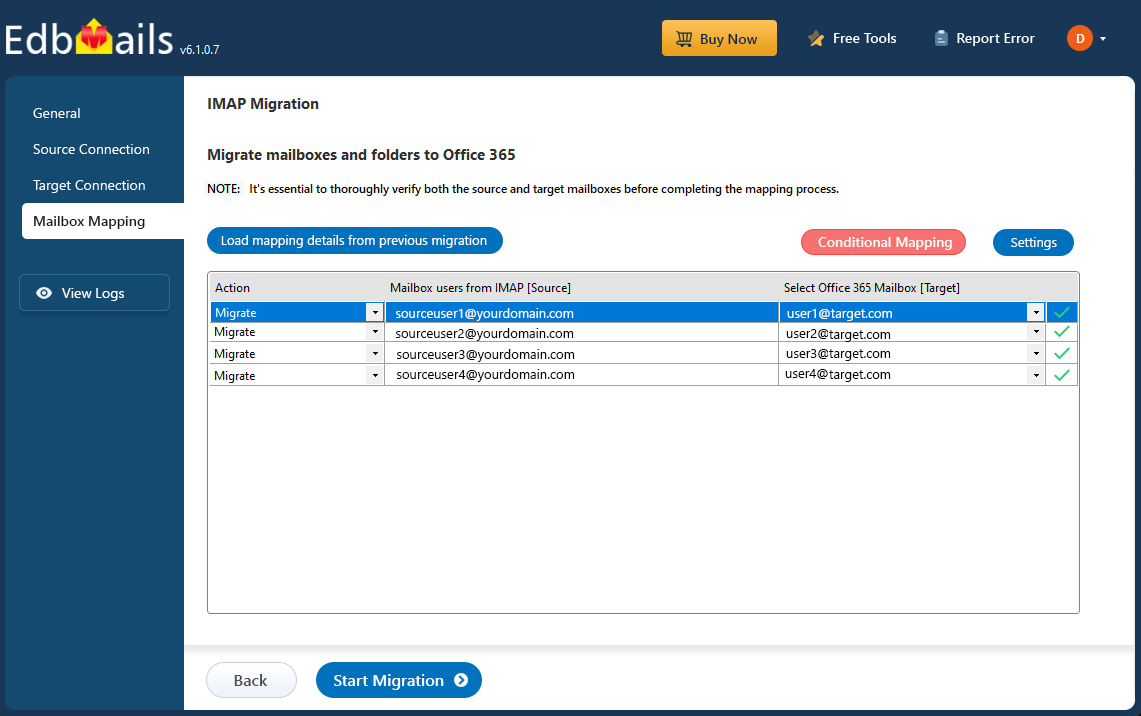
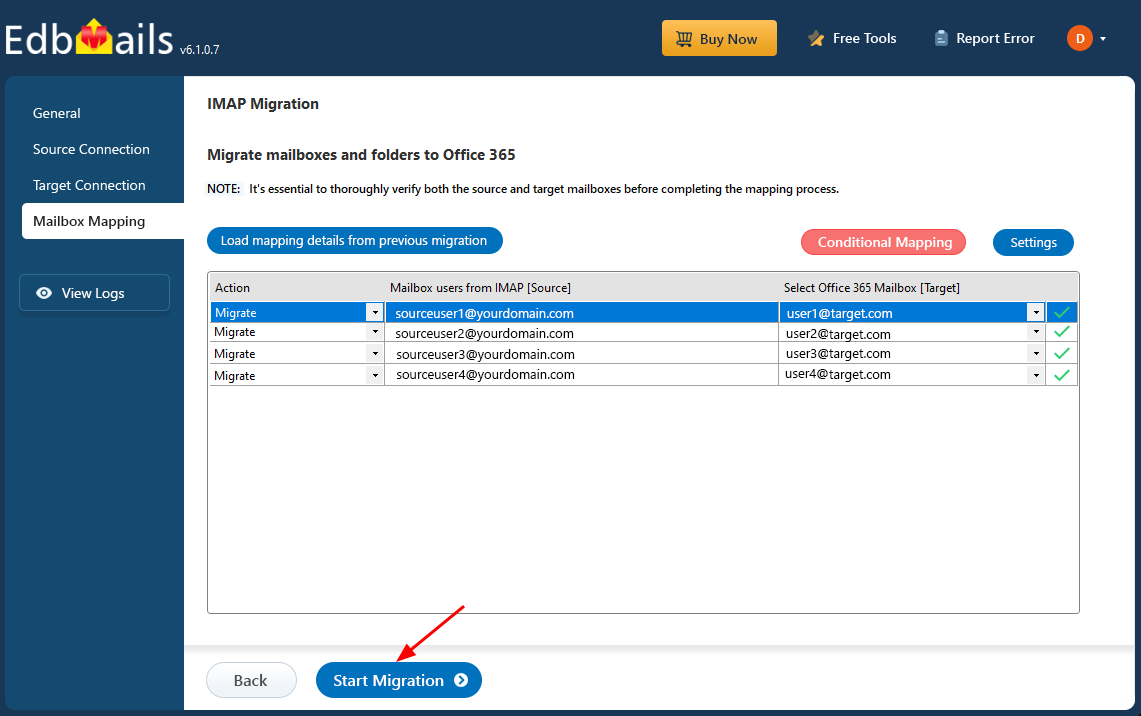
- EdbMails automatically maps the source and target mailboxes based on matching display names. You can also manually map mailboxes if needed. With manual mapping, the target mailbox folders are fetched and listed, giving you the option to match the source folders with the corresponding target folders or create custom folder mappings as required.
Step 5: Start Zimbra to Office 365 migration operation
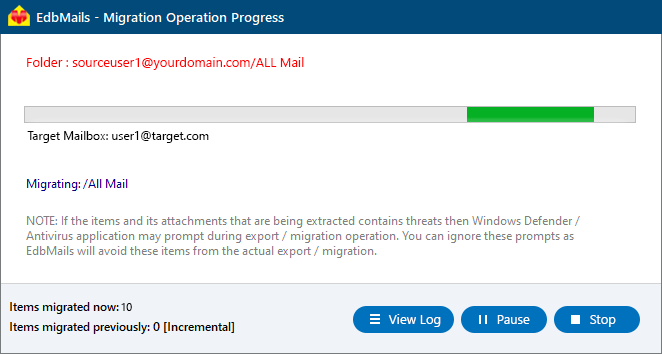
- Once the mailboxes are mapped, click the 'Start Migration' button to begin the migration process.
- Click the 'View Logs' button to access the migration report, which provides detailed information on the items migrated from each folder and mailbox. The report includes mapping details, the number of emails migrated, and any issues encountered during the migration process, helping you track and verify the migration of your data.
- Also log into your target server to verify the migrated items.
Zimbra email migration to Office 365 troubleshooting
For troubleshooting, refer to the knowledge base articles. If you have further questions or need additional assistance, check the FAQs or contact the support team for personalized help.
Why choose EdbMails for Zimbra to Office 365 migration?
- Straightforward solution for Zimbra to Office 365 migration
EdbMails delivers a professional and reliable Zimbra to Office 365 migration solution designed to simplify even the most complex transitions. Its intuitive interface ensures minimal manual effort, making it an ideal choice for businesses seeking a streamlined, secure, and efficient migration process.
- Preserve folder structure during migration
With EdbMails, you can rest assured that your folder structure will be preserved exactly as it is during Zimbra to Office 365 migration. This feature ensures that your organizational setup remains intact, maintaining consistency and easy access to your emails post-migration.
- Complete mailbox migration
EdbMails supports full mailbox migration, transferring emails, attachments, and public folders from Zimbra to Office 365 without data loss. This comprehensive migration ensures that all critical information is moved to the cloud, providing a smooth transition with no gaps in your data.
- High compatibility with Zimbra and Office 365
EdbMails is highly compatible with both Zimbra and Office 365, ensuring smooth data transfer without compatibility issues. Its ability to handle different data formats and structures means that even complex migrations are completed without any loss or corruption of data.
- Detailed migration reports for transparency
EdbMails provides detailed migration reports, giving you complete transparency into the entire migration process. With these reports, you can track the number of migrated items, view any errors or issues, and ensure the migration is completed successfully, giving you peace of mind.


