SharePoint Migration Step-by-step guide
EdbMails offers a dedicated SharePoint migration tool designed to facilitate SharePoint data migration between Microsoft 365 (Office 365) tenants. The software supports the migration of a wide range of SharePoint data, including site collections, subsites, lists, libraries, documents, site contents, files, folders, and more.
A standout feature of EdbMails is its ability to perform simultaneous migrations of multiple SharePoint sites. This significantly boosts migration performance and enables efficient handling of large volumes of data. The tool also supports installation on multiple computers, allowing users to run parallel migrations to different target sites—further enhancing speed and scalability.
EdbMails supports incremental migration, ensuring that only newly added or modified data is transferred during subsequent operations. This smart approach reduces bandwidth usage and avoids re-migrating existing content.
In the sections that follow, you'll find details on pre-migration activities, step-by-step migration instructions, best practices, and the key benefits of using EdbMails for SharePoint migration.
SharePoint Pre-Migration Activities
On Source server:
- Get the SharePoint source server URL, Admin center url, Office 365 Admin account, Password
- Grant admin access to each SharePoint site. You can choose to let EdbMails automatically grant admin access through the SharePoint login window. However, if you prefer to grant admin access manually, refer to the link below:
Steps to add Global admin as a member of each SharePoint site on the source server.
On Target server:
- Get the SharePoint target server URL, Admin center url, Office 365 Admin account, Password.
- Create the SharePoint sites on the target server. EdbMails can automatically create these sites for you, saving time and effort. If you'd rather create the sites manually, check the link below for detailed instructions.
- Make sure each SharePoint site on the target server has admin access. EdbMails can handle this automatically through the SharePoint login window. If you’d rather do it yourself, follow the manual steps in the link below.
Steps to add Global admin as a member of each SharePoint site on the target server.
Ensure to enable the option to create sites / subsites on your target SharePoint server.
SharePoint Migration Steps
EdbMails offers a user-friendly software interface that allows you to migrate SharePoint site data with minimal clicks. The software automatically maps sites between your source and target servers. Follow the steps below to successfully migrate your SharePoint site data using the EdbMails SharePoint migration tool.
Step 1: Download and Install EdbMails SharePoint Migration Software
- Download and install EdbMails software on your computer.
- Launch the EdbMails application
- Enter the email address & password and click ‘Login’ or ‘Start Your Free Trial’.
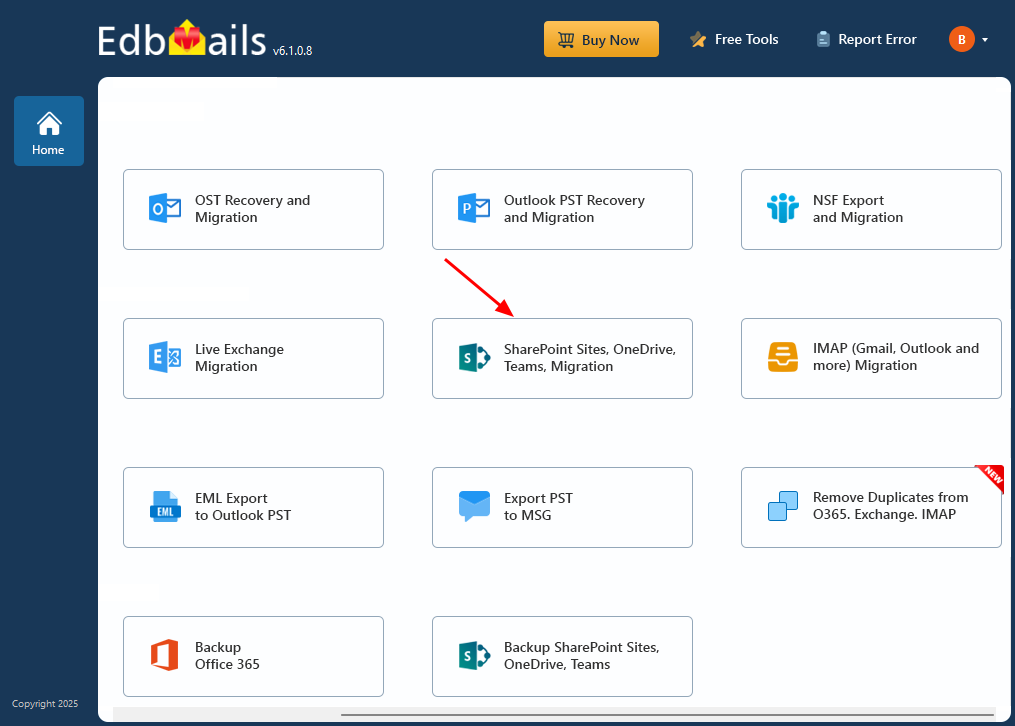
- Select ‘SharePoint Sites, OneDrive, Teams, Migration’.
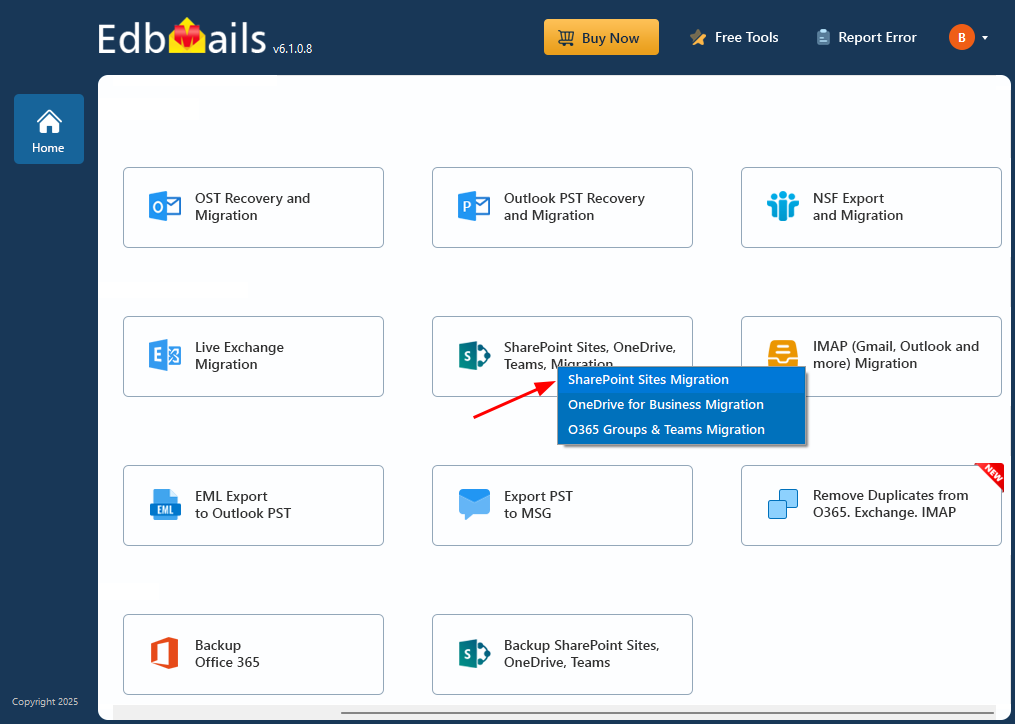
- Select ‘SharePoint Sites Migration’.
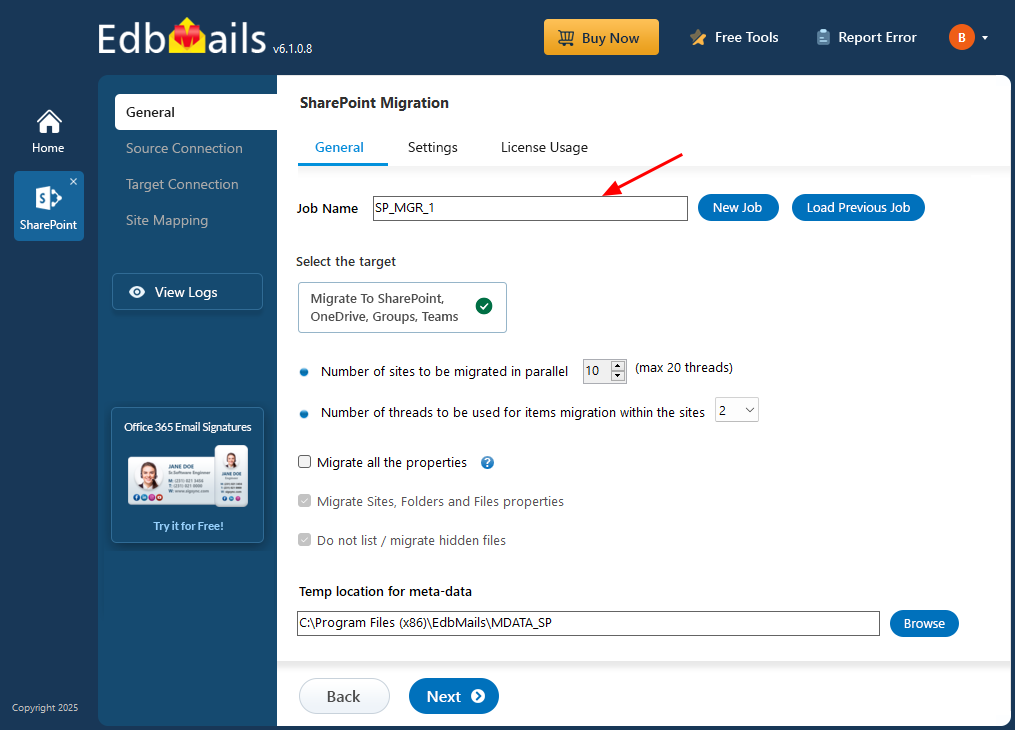
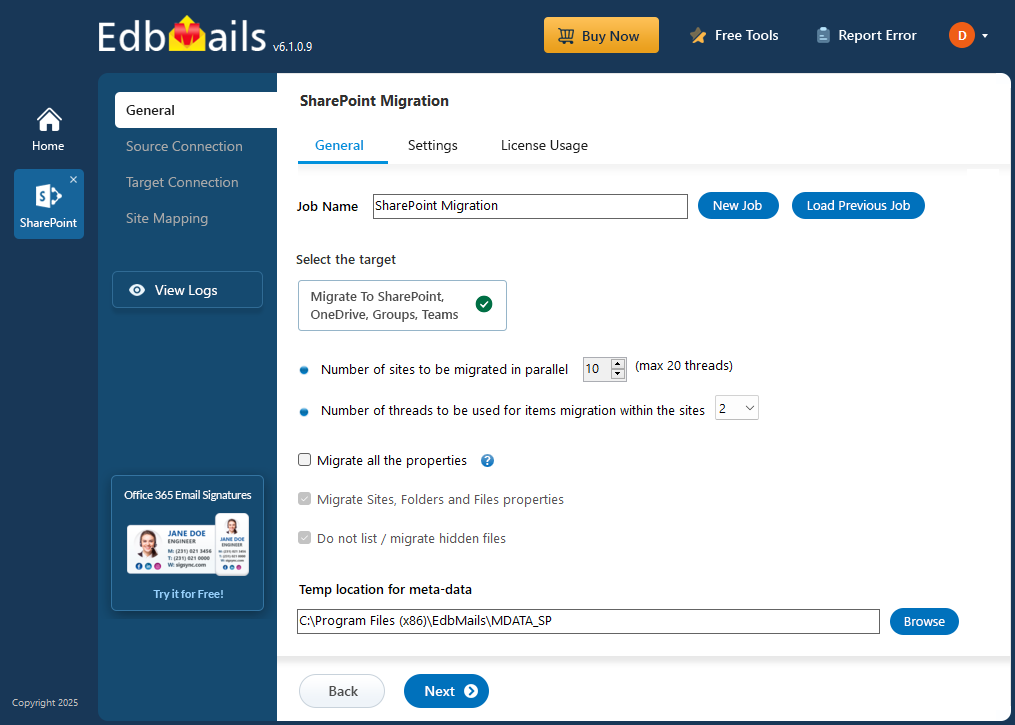
- You can either keep the default job name or click the ‘New Job’ button to change the job name.
Step 2: Connect to SharePoint Source server
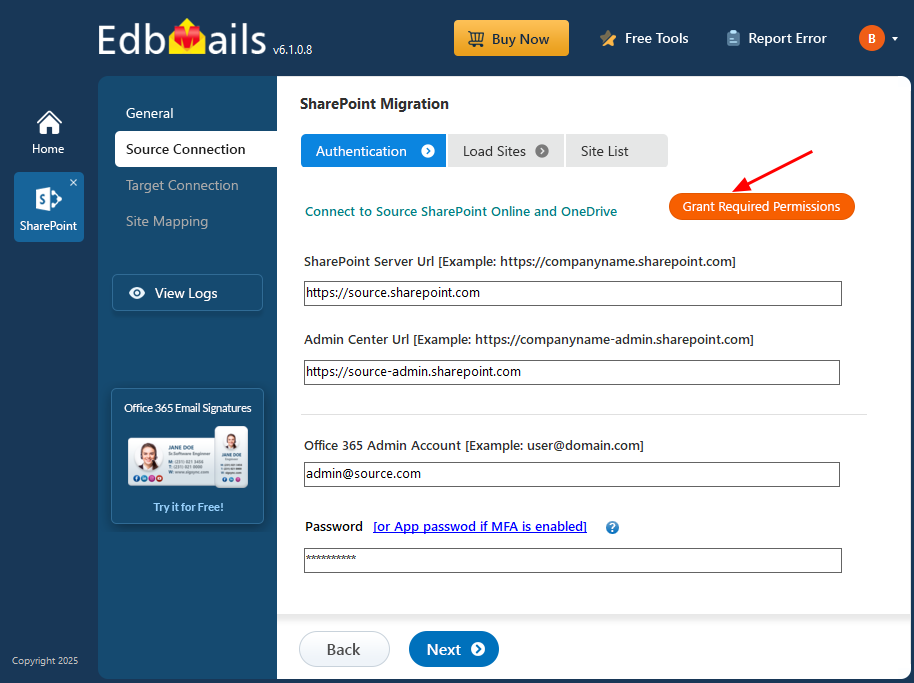
- Enter the source SharePoint server url, admin center url, Office 365 Global admin account email address and password.
- Then, click the ‘Grant Required Permissions’ button.
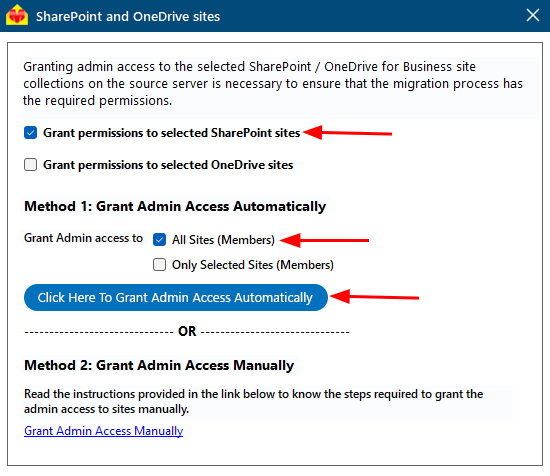
- Check the option ‘Grant permissions to selected SharePoint sites’
- Check the option ‘All Sites (Members) or ‘Only selected Sites (Members)’
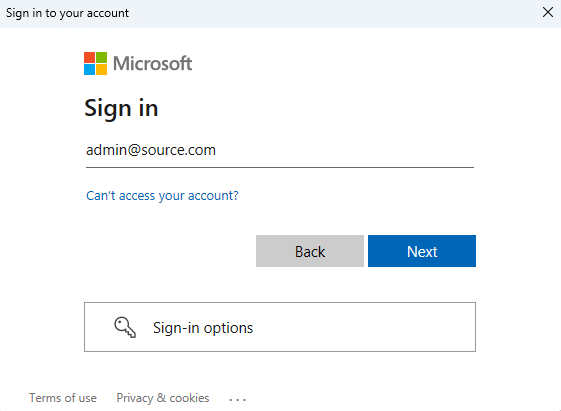
- A PowerShell window will appear in the taskbar, prompting you to authenticate on the Microsoft Sign-In page with a Global admin account.
Note: Keep checking the taskbar, as you may be prompted to authenticate multiple times.
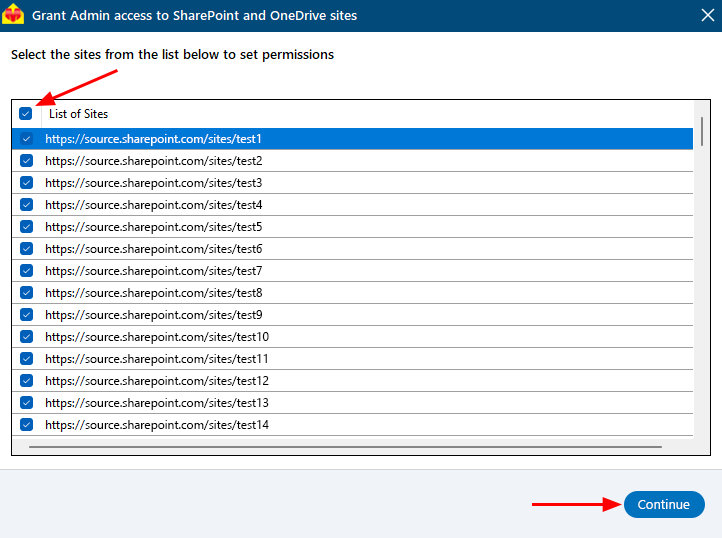
- Select the required sites to set the permissions from the list, then click ‘Continue’.
- A PowerShell window will pop up in the taskbar, asking you to sign in with a Global Admin account on the Microsoft Sign-In page.
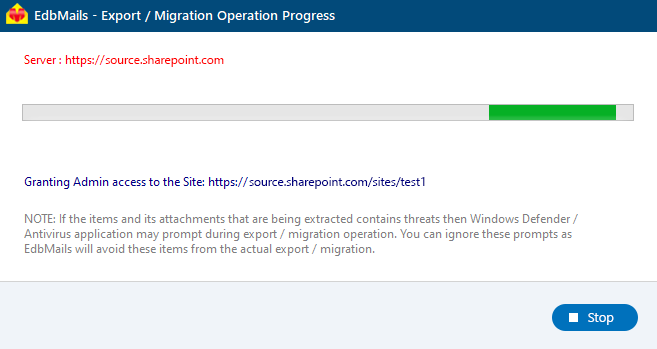
- After signing in, you’ll see the progress of admin access being granted to the selected SharePoint sites.
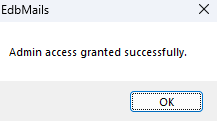
- Once permissions are granted to the selected sites, a confirmation message will appear.
- If you want to manually grant the admin access, refer to the link below:
Steps to add Global admin as a member of each SharePoint site on the source server.
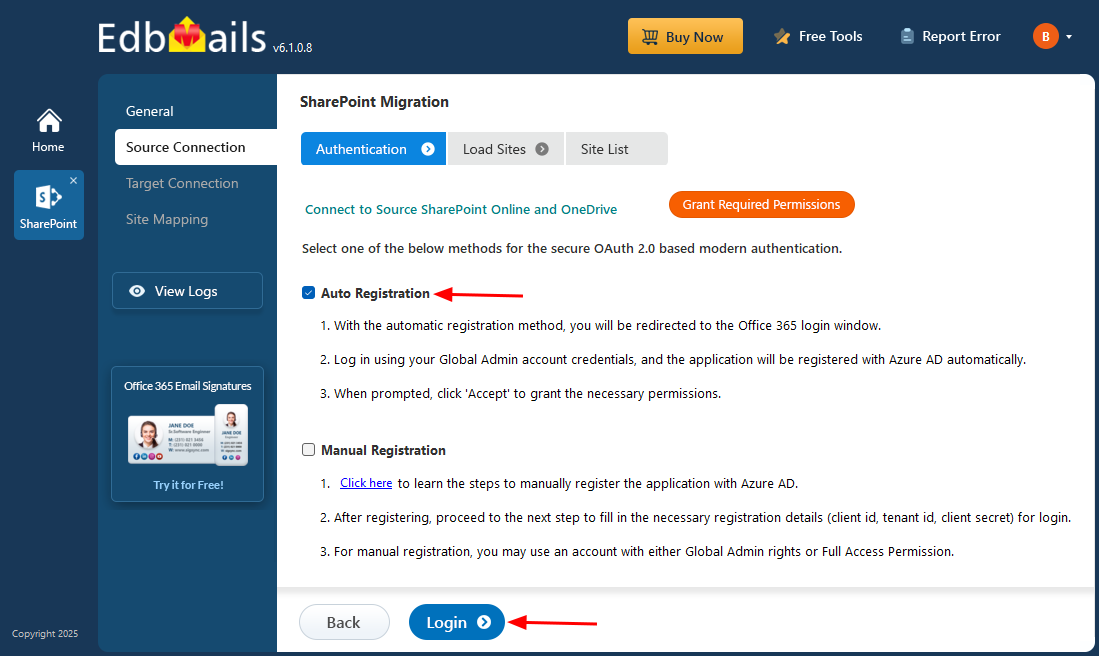
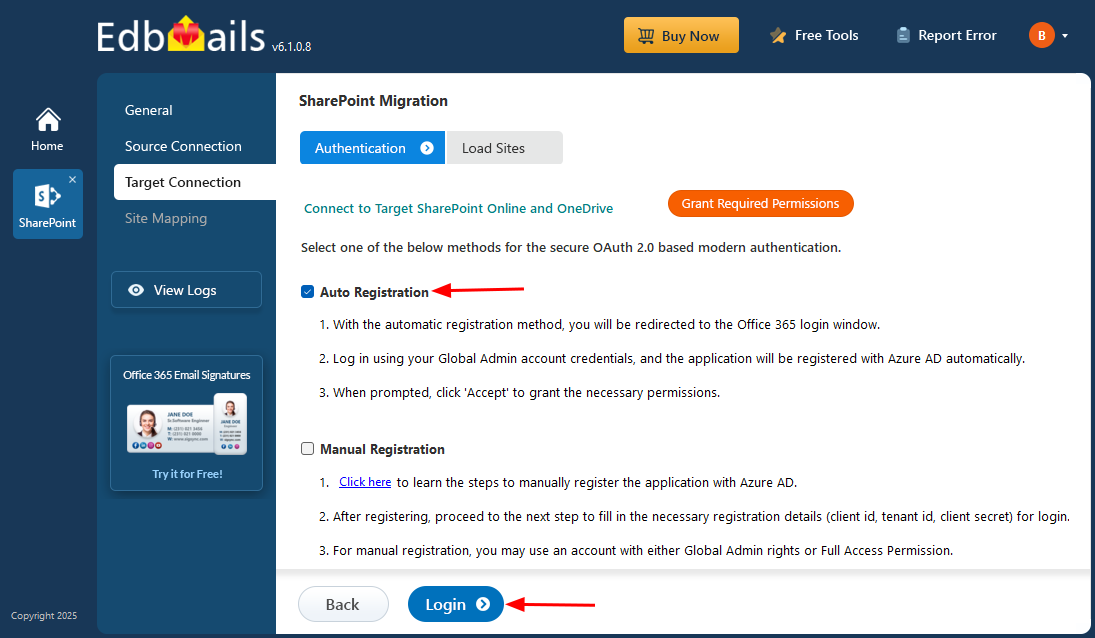
- Select one of the authentication methods and click the ‘Login’ button to continue
- If you want to manually register the EdbMails application in Azure Active Directory (AD), click here for the steps.
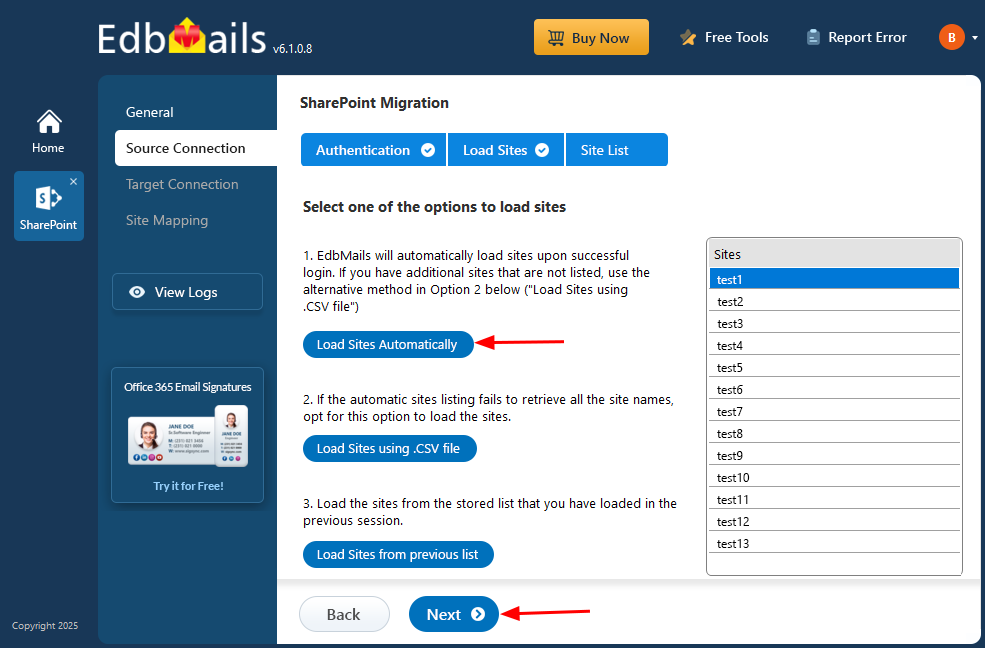
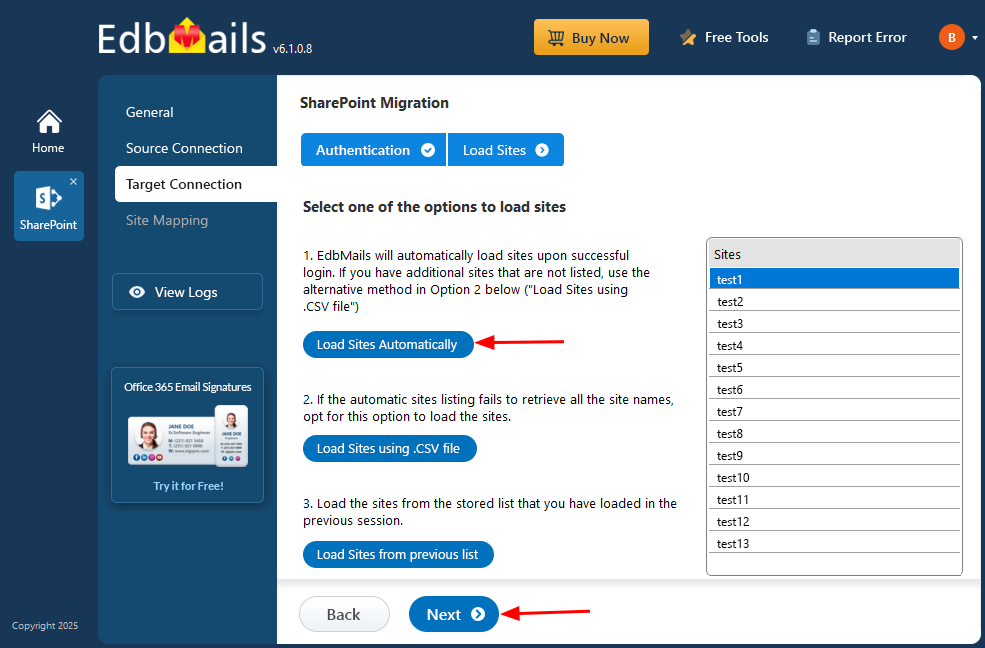
- Select one of the methods to load the SharePoint Sites. If you have additional sites that are not listed you load the sites using .CSV file.
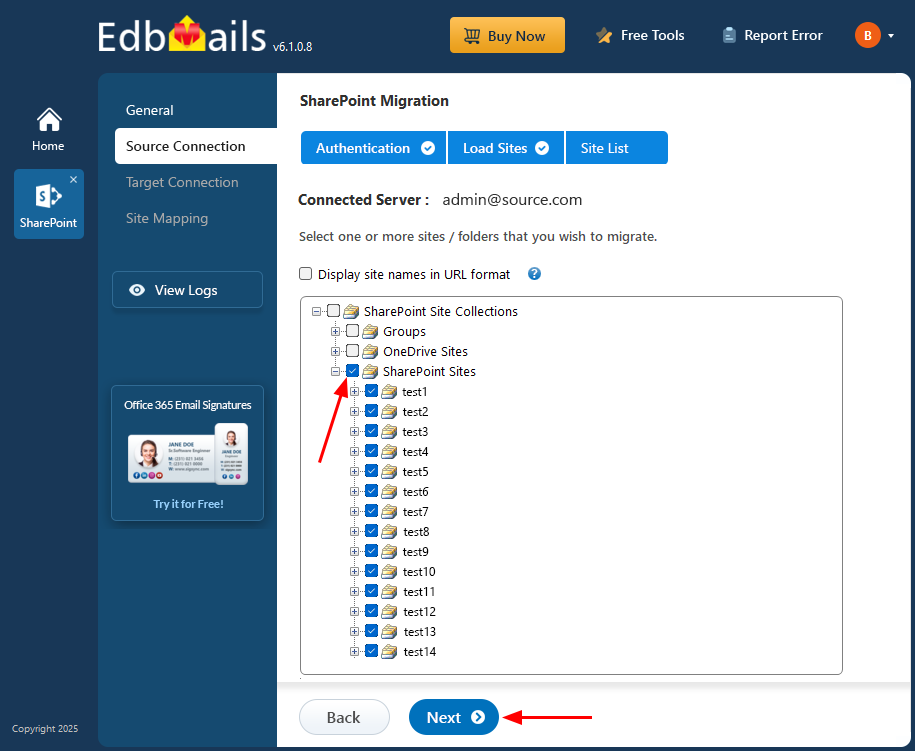
Step 3: Select the SharePoint Sites
- Select the SharePoint sites for migration and click ‘Next’ to continue
Step 4: Connect to target SharePoint server
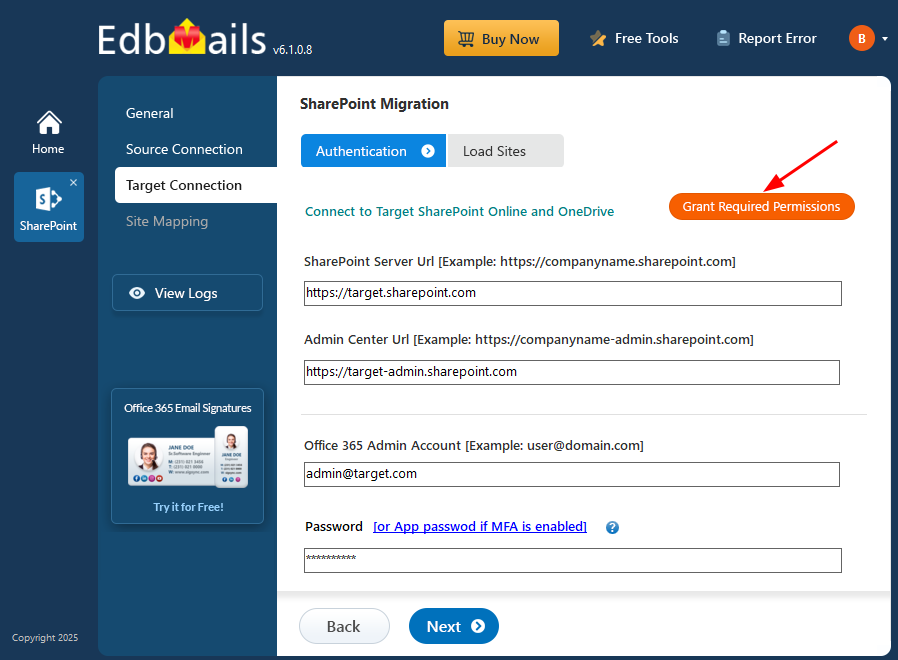
- Enter the target SharePoint server url, admin center url, Office 365 Global admin account email address and password.
- Then, click the ‘Grant Required Permissions’ button.
- Check the option ‘Grant permissions to selected OneDrive sites’.
- Check the option ‘All Sites (Members)' or ‘Only selected Sites (Members)’.
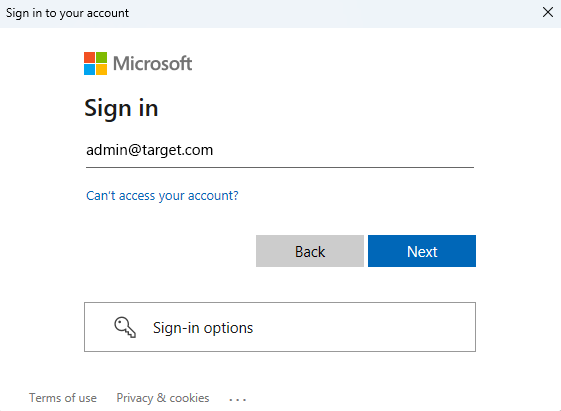
- A PowerShell window will appear in the taskbar, prompting you to authenticate on the Microsoft Sign-In page with a Global admin account.
Note: Keep checking the taskbar, as you may be prompted to authenticate multiple times.
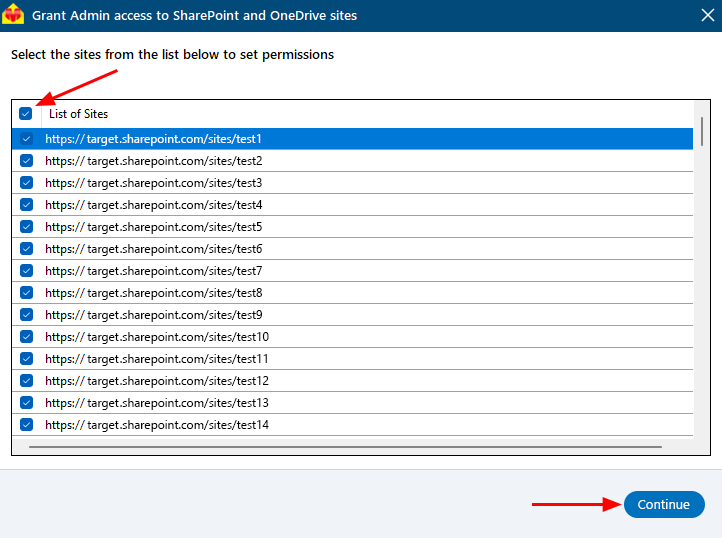
- Select the required sites to set the permissions from the list, then click ‘Continue’.
- A PowerShell window will pop up in the taskbar, asking you to sign in with a Global Admin account on the Microsoft Sign-In page.
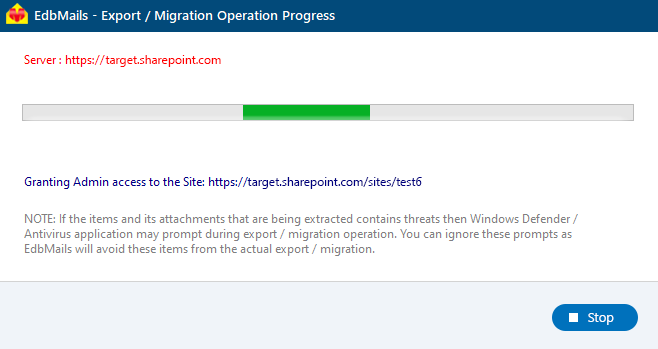
- After signing in to the target server, you’ll see the progress of admin access being granted to the selected SharePoint sites.
- Once permissions are granted to the selected sites, a confirmation message will appear.
- If you want to manually grant the admin access, refer to the link below:
Steps to add Global admin as a member of each SharePoint site on the target server.
- Select one of the authentication methods and click the ‘Login’ button to continue.
If you want to manually register the EdbMails application in Azure Active Directory (AD), click here for the steps.
- Select one of the methods to load the SharePoint Sites. If you have additional sites that are not listed you load the sites using .CSV file.
Step 5: SharePoint Source and target sites mapping
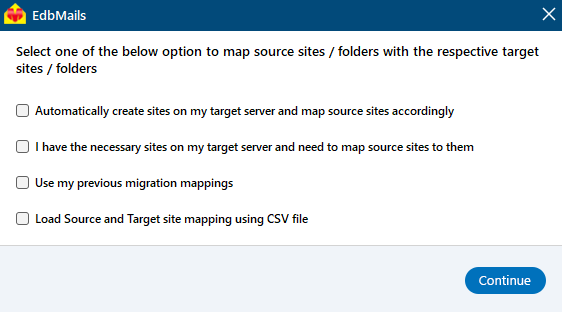
- Select an option to map the sites between the source and the target SharePoint servers.
- EdbMails Automatically maps the sites between the source and the target servers. You can also manually map the sites or select the option to map using previous migration mapping.
Step 6: Start SharePoint Migration
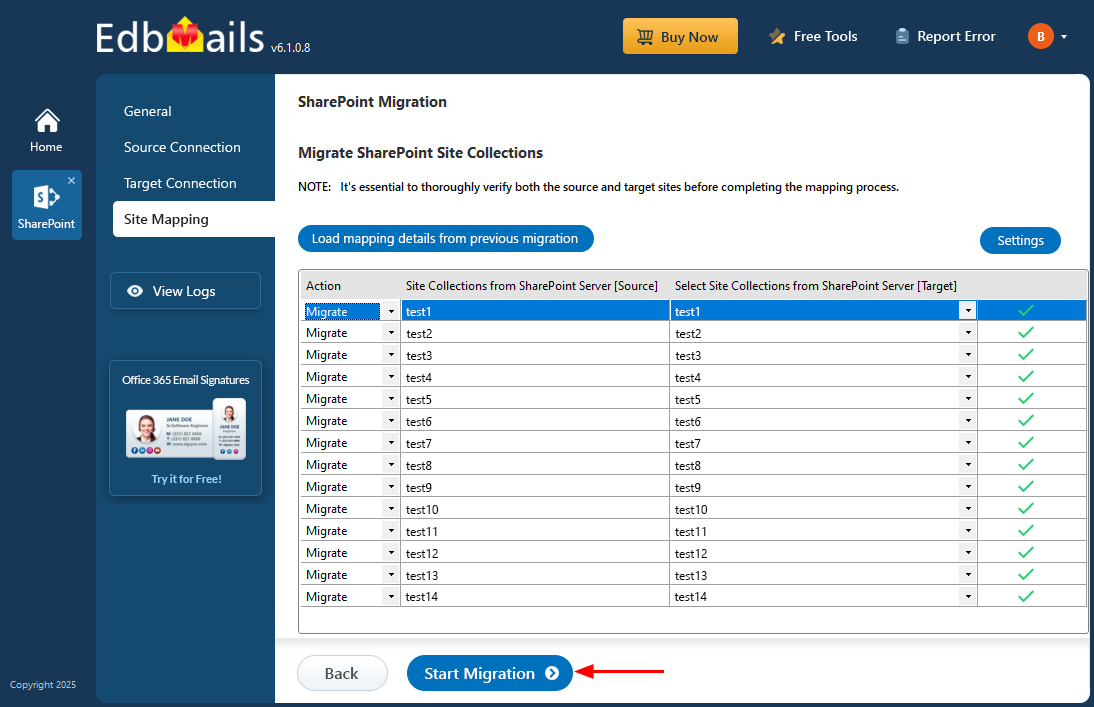
- Verify the sites mapping between the source and target SharePoint servers, then click the ‘Start Migration’ button to initiate the migration.
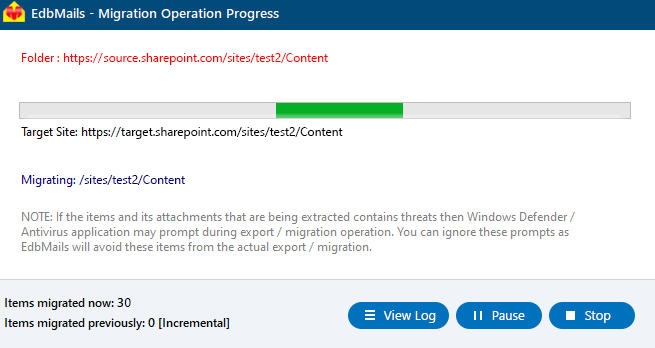
- During the migration, you can monitor the progress in real-time. Once the process is complete, a message will appear prompting you to review the migration status.
- Once the migration is complete, click the ‘View Logs’ button to view a detailed status of the migration process.
- Verify the sites mapping between the source and target SharePoint servers, then click the ‘Start Migration’ button to initiate the migration.
SharePoint Migration Best Practices
- Before initiating the migration process, carefully plan and analyze your SharePoint environment to identify critical components, dependencies, and potential risks.
- Take the opportunity to declutter and organize your SharePoint data before migration. Remove redundant, obsolete, or outdated content to streamline the migration process and improve overall performance.
- Conduct thorough testing of the migration process using a test environment to ensure compatibility, data integrity, and functionality. Address any issues or discrepancies before performing the actual migration.
- EdbMails supports incremental migration features to migrate only the changed or new data during subsequent migration cycles. This helps reduce downtime and optimize bandwidth usage.
- Continuously monitor the migration progress and verify the integrity of migrated data. Address any errors or discrepancies promptly to ensure a successful migration.
Benefits of EdbMails software for SharePoint Migration
- EdbMails provides a user-friendly software interface to successfully migrate SharePoint sites data with minimum number of clicks
- No PowerShell scripts to achieve SharePoint migration
- EdbMails offers a cost effective SharePoint migration
- Automatic mapping of SharePoint sites between the source and the target servers.
- Support for secure modern authentication to connect to source and the target SharePoint server.
- Free 24x7 tech support to address any queries related to migration.


