- Reseller
- Products Exchange EDB / Email Recovery Tools
- EDB Recovery and MigrationRecover EDB to PST, EDB to Office 365 and Exchange NO Duplicate Migration
- OST Recovery and MigrationRecover OST to PST, OST to Office 365 and Exchange Migration
- PST Recovery and MigrationRecover Outlook PST, PST to Office 365 and Exchange Migration
- MBOX Export and MigrationExport MBOX to PST, MBOX to Office 365 and Exchange Migration
- NSF Export and MigrationExport NSF to PST, NSF to Office 365 and Exchange Migration
- EML to PST ExportEML files export to Outlook PST format
- PST to MSG ExportOutlook PST files export to MSG format
Exchange and Office 365 Migration- Exchange Server MigrationMigrate Exchange 2007, 2010, 2013, 2016, 2019 to Office 365 tenants. Also, migrate between Exchange servers and PST
- Office 365 MigrationMigrate Source Office 365 tenants to Destination Office 365 tenants. Also, migrate to Exchange Server and PST
- IMAP Email Backup & MigrationMigrate all IMAP email servers (Gmail, Zimbra, Zoho, Yahoo etc.), Office 365, Exchange and Backup to Outlook PST
- SharePoint Online MigrationMigrate documents, files and folders from SharePoint sites
- OneDrive for Business MigrationMigrate documents, files and folders from OneDrive
- Microsoft Teams MigrationMigrate Teams, documents, files and folders etc.
Exchange and Office 365 Backup- Office 365 BackupIncremental, Granular, Encrypted and Compressed Office 365 Mailboxes Backup
- Exchange Server BackupIncremental, Granular, Encrypted and Compressed Exchange Mailboxes Backup
- SharePoint, OneDrive & Teams BackupBackup Online site collections, Team sites, Office 365 groups, all documents etc.
- Duplicate Remover - Office 365, Exchange & IMAP Remove duplicate emails, calendars, contacts, journal etc. from Office 365, Exchange & IMAP
- Features
- Video Tutorials
- Free Tools
- FAQ
- Knowledge Base
Knowledge Base
Get an instant help and tips on how to use and get the most out of your EdbMails tools.
How can we help you?
Search our Knowledge Base to quickly find answers to your questions.
Problem
When you reply to emails after completing migration with EdbMails Exchange / Office 365 migration, your email responses are sent with the domain name of your new server.
Resolution:
Now that the source and target domains are different, you need to change your domain from the source environment to the new one to route all mail flow to the new server. For more details on how you can add a new domain to Office 365 or Exchange on-premises, visit the Microsoft article.
If you change the domain between two Office 365 tenants, make sure to remove the domain from the source tenant before you add it to the target.
After you change the domain, create aliases for the migrated mailboxes that point to the new domain. Additionally, make this alias the primary email address if you plan to send and receive emails from this address.
You can create an alias from:
- Microsoft 365 Admin Center ( Applicable only for Office 365 Mailboxes)
- Exchange Admin Center (Applicable for both Exchange Online as well as Exchange Server 2013 and the latest versions)
Microsoft 365 Admin Center
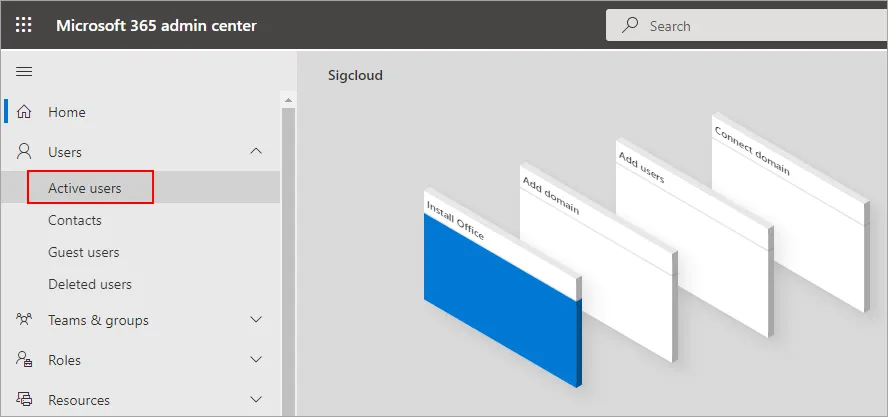
- Log in to Microsoft 365 Admin Center
- Choose'Users' < 'Active users' from the left panel
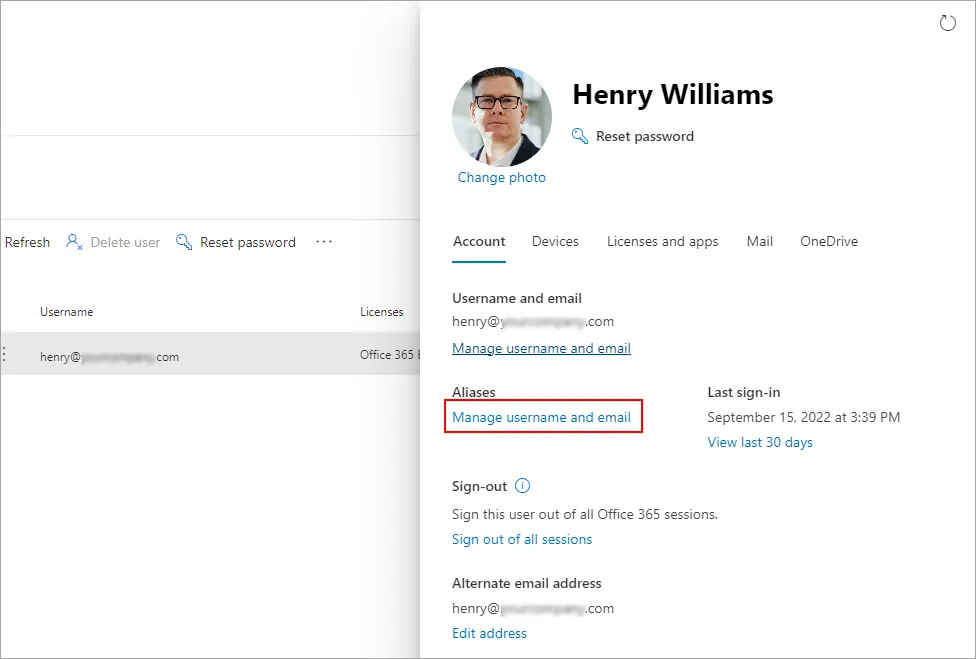
- Select the new user that you have migrated and click 'Manage username and email' under 'Aliases'
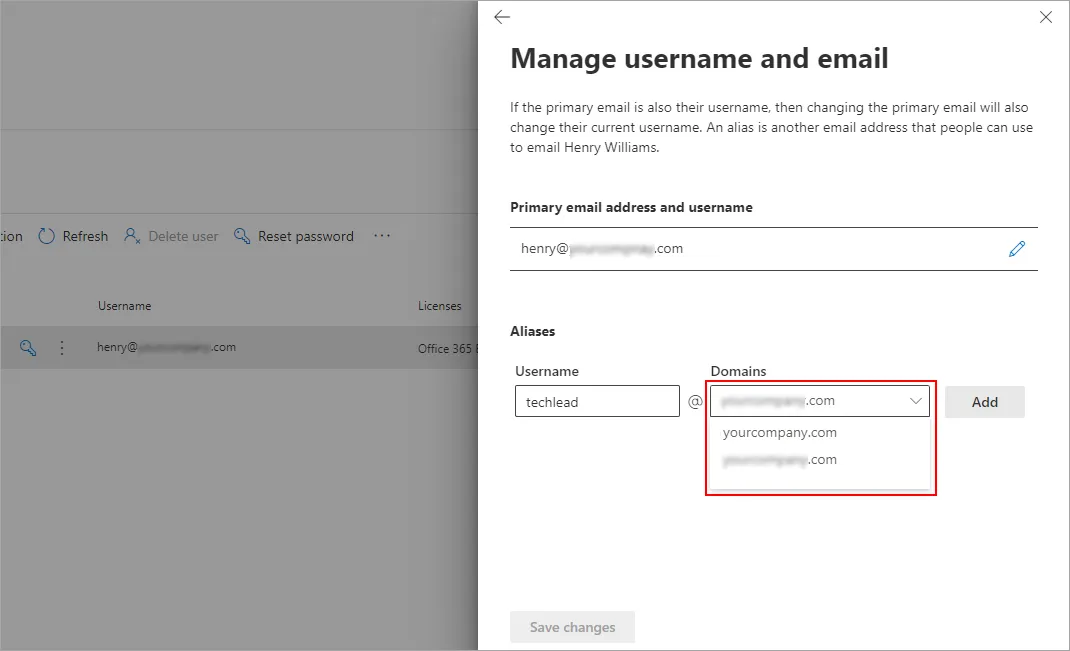
- Type the initial portion of the email address on the 'Manage username and email page', then choose your migrated domain name from the drop-down and click 'Add'
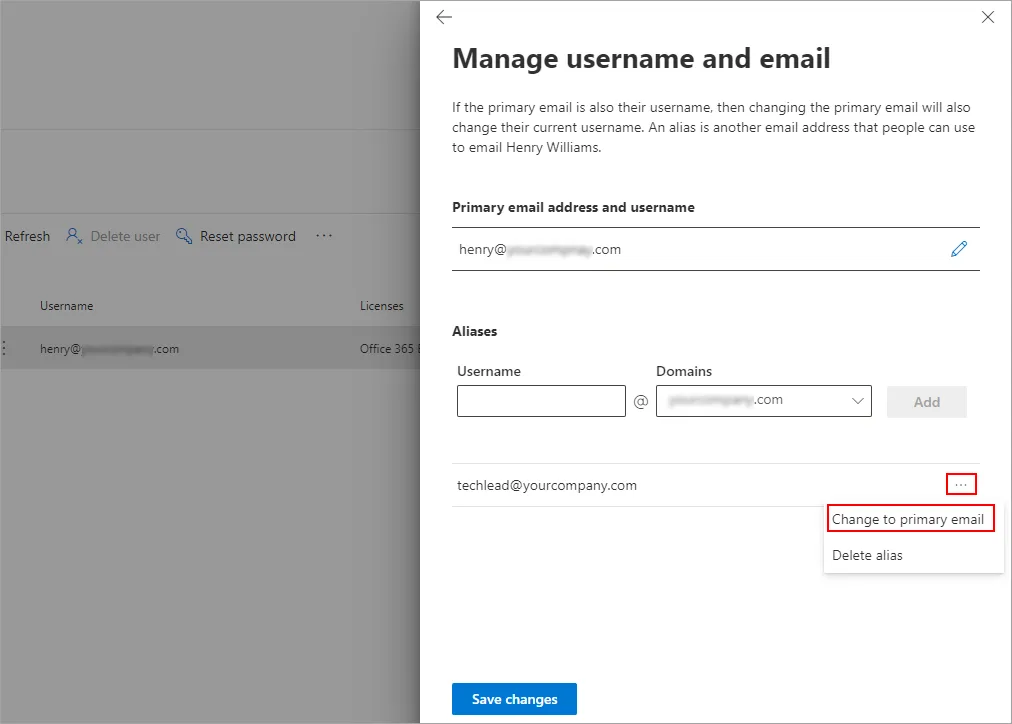
- As an optional step, click '…' and select 'Change to primary email' to make this the default email address for Office 365 login as well as to send and receive emails.
- Click 'Save Changes'
Exchange Admin Center
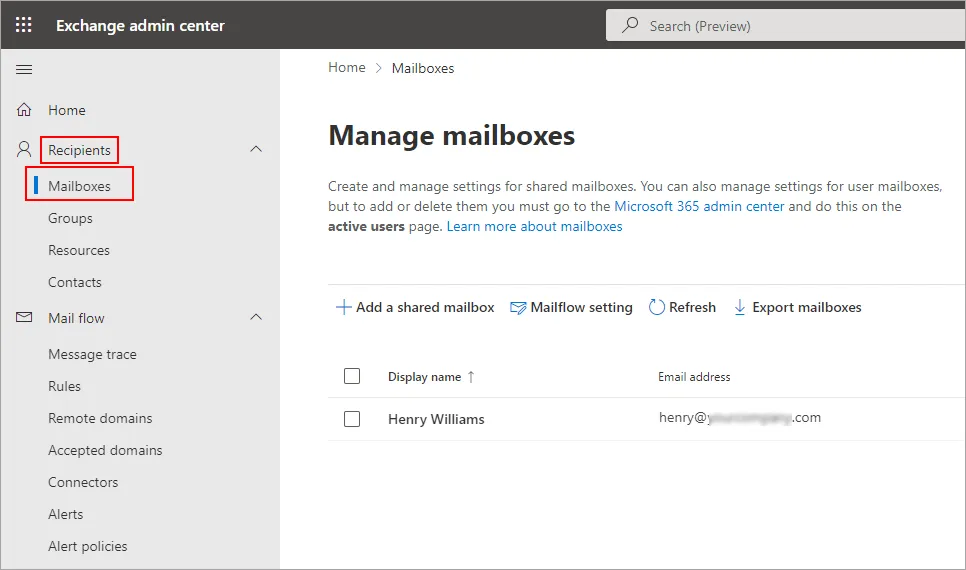
- Select 'Recipients' < 'Mailboxes' under 'Exchange admin center'
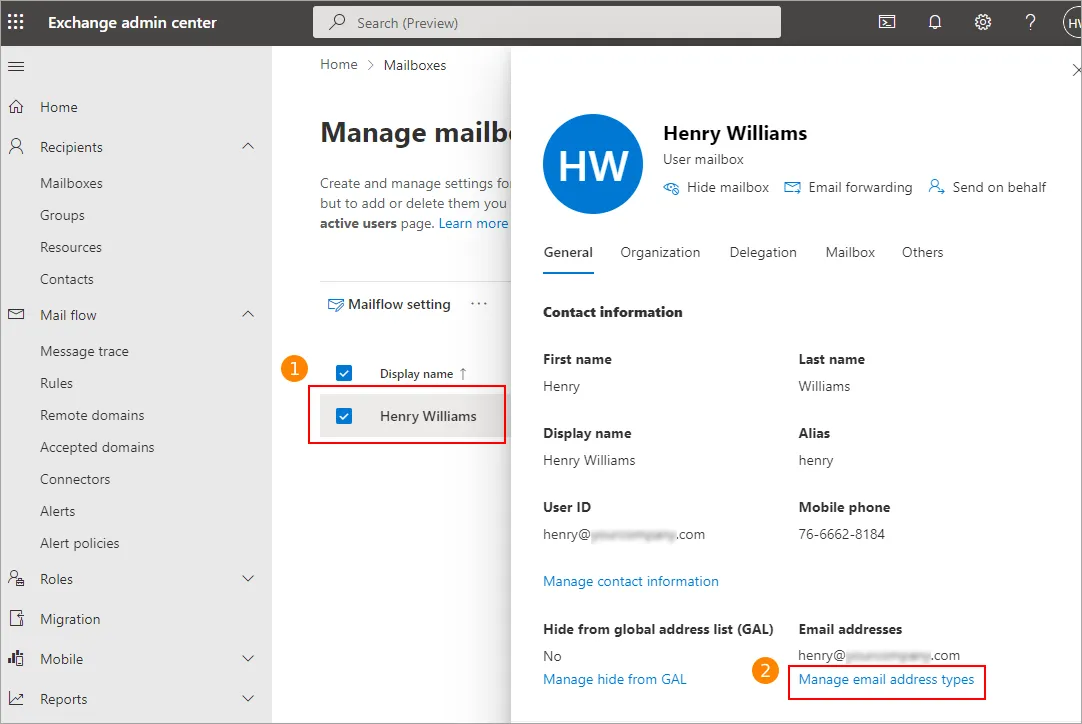
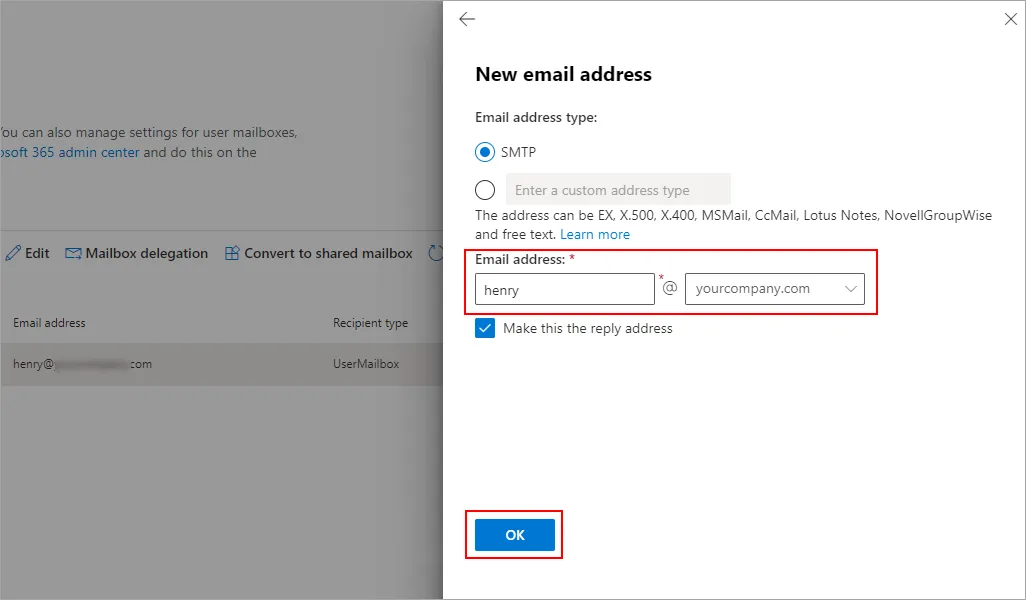
- Double click on the user mailbox and click 'Manage email address types' under 'Email addresses'
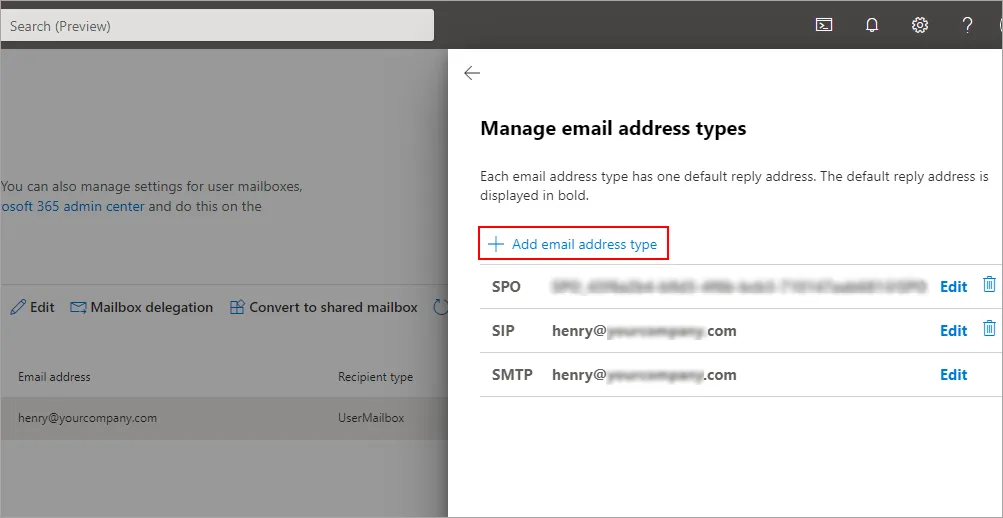
- Click '+ Add email address type'
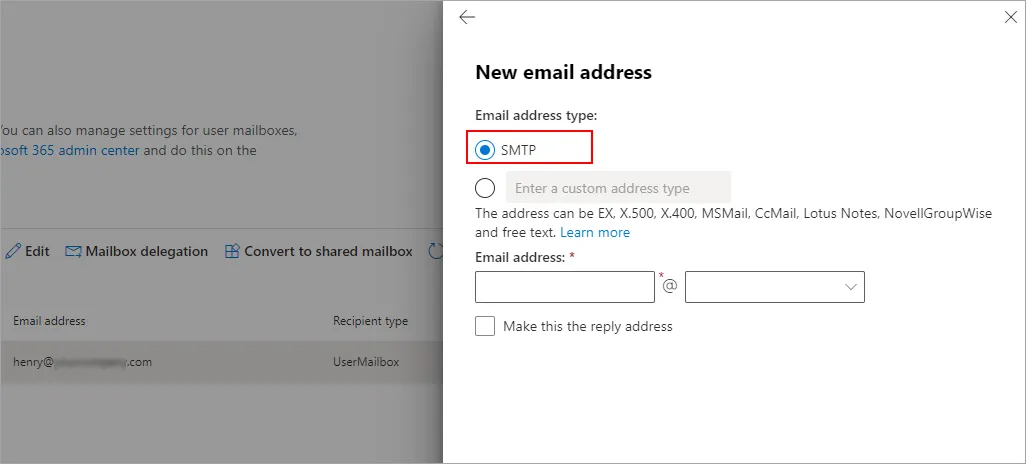
- Select the 'SMTP' under 'Email address type'
- Enter the new email address and click 'OK'
- As an optional step, back on the 'Manage email address types' window, click the 'Save' button.
Related topics:
- Mailbox size limitations in Microsoft 365
- How to switch mailboxes to Office 365 in a Hybrid environment?
- How to manage Office 365 mailboxes in a Hybrid environment?
- How to verify or edit 'User Principal Name (UPN)'?
- The mailbox database is temporarily unavailable
- Public Folder Errors
- Troubleshooting Public Folder Migration
- ErrorNoPublicFolderReplicaAvailable
- Resolve 'Access Denied' error for Public Folder migration
- How to troubleshoot the quota exceeded issue with public folder migration?
EdbMails Demo / Trial Version
Step 1. Download and install EdbMails
Step 2. Click the 'Start Your Free Trial' button


Hi, May I help you?
Hide Chat Now
