Your mailbox has been temporarily moved on Exchange server
Outlook is a widely used email client by Microsoft, but it’s not uncommon to run into errors while using it. One of the errors that users may encounter is the following one:
Your mailbox has been temporarily moved on Microsoft Exchange server. A temporary mailbox exists, but might not have all of your previous data.
You can connect to the temporary mailbox or work offline with all of your old data. If you choose to work with your old data, you cannot send or receive email messages.
It is strongly advised not to use the temporary mailbox as it can result in data loss. This error is usually related to Exchange Server and can be frustrating, especially if you rely heavily on Outlook for communication. In this article, we explain what causes this error and how you can resolve it.

The ‘Your mailbox has been temporarily moved on Exchange server’ error usually occurs when Outlook cannot connect to the Exchange Server or when the Outlook data file is corrupted. To resolve the problem, you must recreate the Outlook profile or use a data recovery tool such as EdbMails OST to PST converter tool.
This Outlook issue may arise due to various reasons, including Exchange server maintenance, server updates, or connectivity issues. When Microsoft Outlook cannot connect to the server or when the server is under maintenance, Outlook may fail to synchronize emails with the server and you won’t be able to access your mailbox through Outlook. If Outlook can automatically connect to the new server, you should be able to access your mailbox again.
How to resolve the issue ‘Mailbox temporarily moved on Exchange server’?
If you encounter the ‘Your mailbox has been temporarily moved on Exchange server’ error, here are some troubleshooting methods and steps to help you fix it.
- Method 1: Remove all Outlook profile except the default one
This method is useful when there are multiple Outlook profiles configured on your computer, and one of the profiles is causing the error. By removing all of the profiles except for the default one, you can isolate the problem and ensure that Outlook uses the correct profile.
Note that when you remove an Outlook profile, all of the data associated with that profile, such as emails, contacts, and calendar items, will be deleted. Therefore, it is important to backup your Outlook data before removing any profiles.
- Step 1: Close Outlook and open Control Panel
- Close Outlook completely to ensure that the changes made to the Outlook profiles are saved properly.
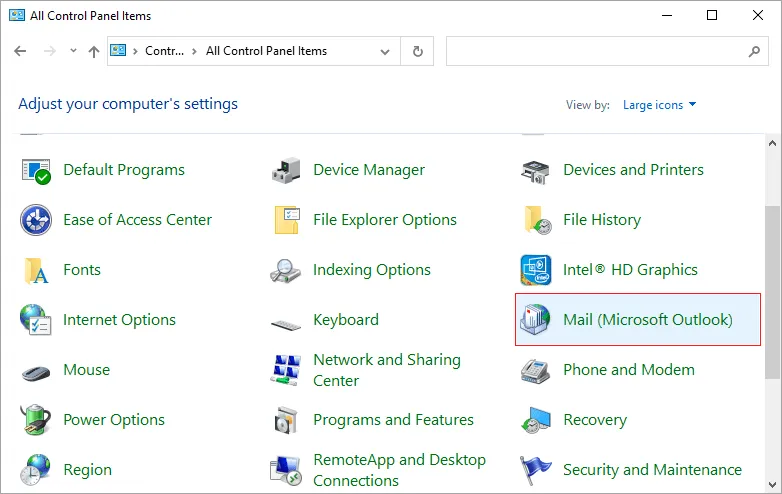
- Click on the Start menu and open the Control Panel. In the Control Panel, click on the option labeled ‘Mail’
- Step 2: Open the Mail settings
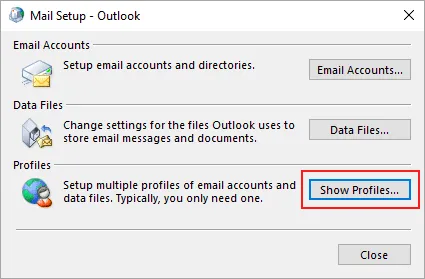
- In the Mail settings, click ‘Show Profiles’, which shows all of the Outlook profiles that are currently configured on your computer.
- Step 3: Remove all Outlook profiles except the default one
Select all of the Outlook profiles that are listed, except for the default profile, and click ‘Remove’.
This will remove all of the selected profiles from your computer.
- Step 4: Restart Outlook
- After removing the unwanted profiles, restart Outlook. The next time you start Outlook, it will automatically use the default profile, and the error should be resolved.
- Step 1: Close Outlook and open Control Panel
- Method 2: Create a new Outlook profile
If the Outlook 365 inbox is not updating, creating a new Outlook profile can resolve various issues related to Outlook and Exchange Server. The new profile will have fresh settings, and you can configure it to work with your email service. Follow these steps to create a new Outlook profile.
- Step 1: Close Outlook and open Control Panel
- Before creating a new Outlook profile, close the application to ensure that there are no conflicts with the current profile.
- Click the Windows Start menu, type ‘Control Panel’ in the search box, and then click on the Control Panel application.
- Step 2: Open the Mail applet
- In the Control Panel, locate the Mail applet (Microsoft Outlook) and click on it.
- If you're unable to find the Mail applet, change the view to large or small icons.
- Step 3: Click on the Show Profiles button
- In the Mail Setup dialog box, click ‘Show Profiles’, which displays a list of all the Outlook profiles currently configured on your computer.
- Step 4: Create and configure the new profile
- Click ‘Add’ to create a new profile. Enter a name for the new profile and click ‘OK’.
- In the Add Account dialog box, select ‘Manual setup or additional server types’ and click ‘Next’.
- Step 5: Choose email service and enter the details
- Select the email service you want to use (such as Microsoft Exchange or IMAP) and click ‘Next’.
- Enter the necessary details for the email service you selected, which may include the server name, username, password, and other settings.
- Contact your email service provider if you're unsure about any of the settings.
- Step 6: Set the new profile as the default
- After verifying that the new profile is working correctly, set it as the default profile.
- To do this, select the new profile from the list of profiles in the Mail applet, and then click ‘Set as Default’.
- Step 7: Remove all other old Outlook profiles
- Go to the Mail applet in the Control Panel and click ‘Show Profiles’
- Select the old profile and click ‘Remove’
- Under Always use this profile select the ‘New Profile’ you just configured..
- Step 1: Close Outlook and open Control Panel
- Method 3: Disable incompatible Outlook Add-ins
Another solution to resolve the ‘Your mailbox is temporarily moved on Microsoft Exchange’ error is to disable incompatible Outlook add-ins. Add-ins are third-party programs that integrate with Outlook and can cause conflicts or errors. Disabling them can resolve various performance issues related to Outlook and Exchange Server. If you're unsure which add-in is causing the error, disable them all and enable them one by one until you identify the problematic add-in. Follow the steps below to disable add-ins in Outlook:
- Step 1: Open Outlook in safe mode
To identify which add-ins are causing the error, first, open Outlook in safe mode. Safe mode disables all add-ins, so if the error does not occur in safe mode, it is likely caused by an add-in. To open Outlook in safe mode, press and hold the ‘Ctrl’ key and click on the Outlook shortcut.
- Step 2: Identify the add-in causing the error
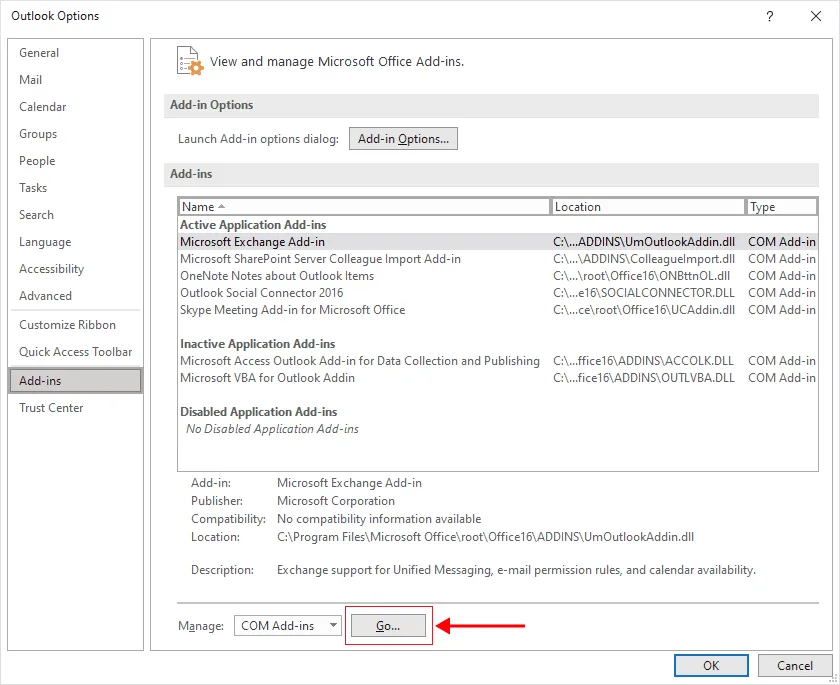
- Once you've opened Outlook in safe mode, navigate to the ‘File’ menu, click on ‘Options’, and select ‘Add-ins’.
- Under Manage select COM Add-ins and click ‘Go’. You'll see a list of all the add-ins installed in your Outlook.
- Look for the add-ins that are enabled as these add-ins may be causing the error.
- Step 3: Disable the add-ins and restart Outlook
- Select the add-in that you think is causing the error.
- Uncheck the box next to the add-in and click ‘OK’ to disable it.
- Repeat this step for all the suspected add-ins.
Once you've disabled the add-ins, close Outlook and reopen it normally. Check if the error is resolved. If the error persists, try disabling other add-ins until you find the one that is causing the issue.
- Step 4: Remove the incompatible add-in
- If you've identified the add-in that's causing the error, consider removing it.
- Go to the Add-in window in Outlook by following the preceding steps.
- Select the add-in, click ‘Remove’ and finally, restart Outlook.
- Step 1: Open Outlook in safe mode
- Method 4: Enable Cached Exchange mode
Enabling Cached Exchange mode in Outlook 365 is another solution to resolve the error ‘Mailbox moved on the Exchange server’. Cached Exchange mode enables Outlook to store a copy of your mailbox on your local computer, which can improve performance and email fetching time from the Exchange server. If Cached Exchange mode is already enabled and the error persists, try disabling it and then re-enabling it. If the error still persists, try other solutions such as resetting your Exchange Server settings.
Follow these steps to enable Cached Exchange mode in Outlook:
- Step 1: Open Outlook and go to Account Settings
- Open Outlook and navigate to the ‘File’ menu.
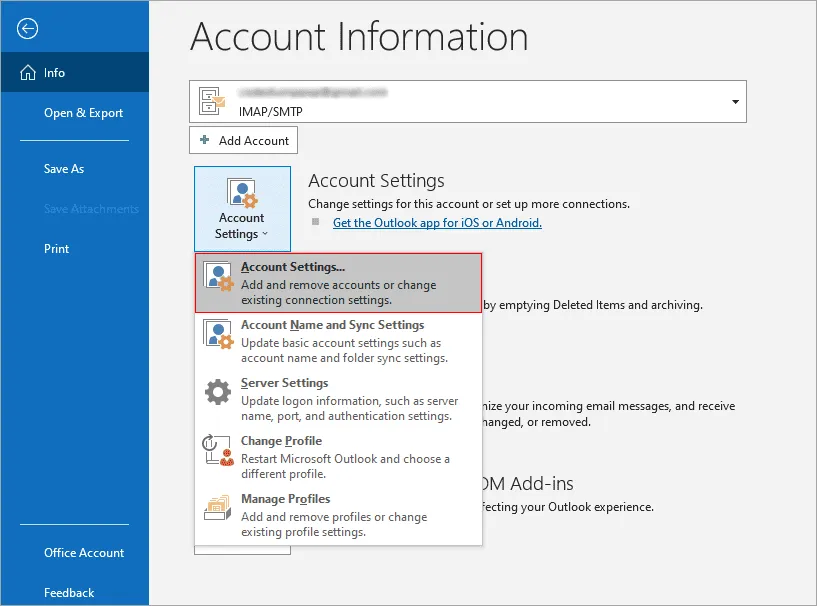
- In the Account Information section, click ‘Account Settings’ and select ‘Account Settings’ again from the drop-down menu.
- Step 2: Select the email account
- In the Account Settings dialog box, select the email account and click on ‘Change’.
- Step 3: Enable Cached Exchange Mode
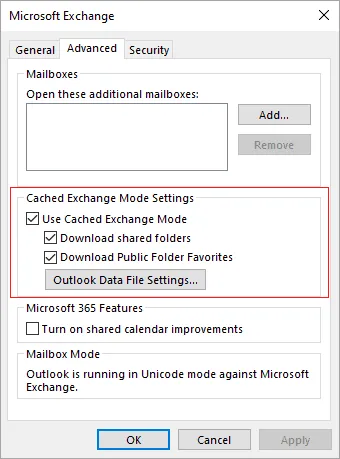
- In the Change Account dialog box, under ‘Offline Settings,’ check the box next to ‘Use Cached Exchange Mode’.
- If the option is already checked, uncheck it, click ‘OK’ to close the dialog box, and then repeat the steps to check the box again.
- Click ‘More Settings’ > ‘Advanced’ and check if the Cached Exchange mode is enabled here.
- Select ‘Download shared folders’ and ‘Download Public Folder Favorites’ and click ‘OK’
- Step 4: Adjust the mailbox size limit and restart Outlook
- If you have a large mailbox, you may need to adjust the mailbox size limit to ensure that Cached Exchange mode works correctly.
- In the Change Account dialog box, adjust the mailbox size limit as needed.
- After enabling Cached Exchange mode, close and restart Outlook.
Note that enabling Cached Exchange mode may increase the size of your mailbox file on your local computer, so make sure you have enough free disk space before enabling this option. Also, if you have a slow or unreliable internet connection, Cached Exchange mode may not work correctly, and you may experience slow performance or connection issues.
- Step 1: Open Outlook and go to Account Settings
- Method 5: Rename the Outlook data folder
Renaming the Outlook data folder is another solution to resolve the ‘Your mailbox has been temporarily moved on Exchange server’ error. If the Microsoft Outlook OST file cannot be opened, renaming the data folder essentially creates a new data file for your account, which can resolve corruption or other issues with the original file. When you create a new profile, Outlook automatically creates a new data file for your account.
The following steps describe how to rename the Outlook data folder:
- Step 1: Close Outlook and find the Outlook data folder
Close Outlook and make sure it is not running in the background. The location of the Outlook data folder depends on the version of Outlook you are using and the operating system you are running. You can use the following steps to find the location of the data folder:
- Click on the Start button and search for ‘Control Panel’
- In the Control Panel, select ‘Mail’
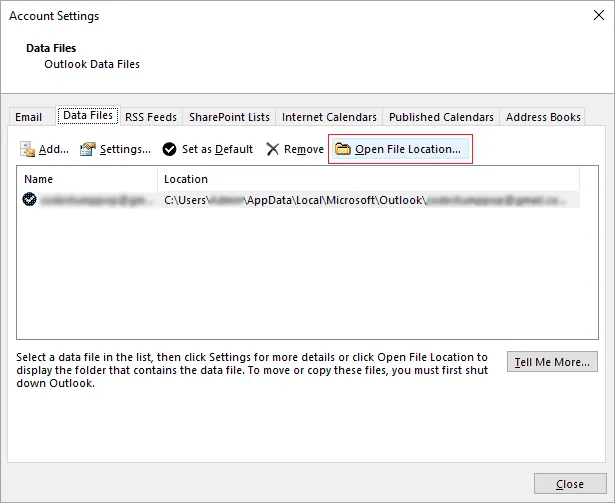
- In the Mail Setup dialog box, click on ‘Data Files’
- You will see a list of data files associated with your Outlook account.
- Select the one you want to change and click on ‘Open File Location’, which opens the folder containing your Outlook data files.
- Step 2: Rename the Outlook data file and folder
- In the folder containing your Outlook data files, right-click on the data file that's associated with the email account causing the error and click ‘Rename’.
- Add ‘.old’ to the end of the file name to rename the file.
- Step 3: Create a new Outlook profile and restart Outlook
After renaming the data folder, you will need to create a new Outlook profile.
- Open the Control Panel, select ‘Mail’, and click on ‘Add’ to create a new profile, as explained in Method 2.
- Follow the prompts to create the new profile, and make sure you set it as the default profile.
- Open Outlook and configure your email account using the new profile. Outlook will create a new data file for your account, which should resolve the error.
Note that when you rename the data folder, you may lose any customizations or settings associated with the account, such as rules or signatures. You may need to recreate these settings in the new profile.
- Step 1: Close Outlook and find the Outlook data folder
- Method 6: Repair and convert the OST to PST with EdbMails
Repairing and converting the OST file to PST format with EdbMails is the best method to restore all of your mailbox data from corrupted and orphaned OST files. After exporting mailbox items to PST format, you can import the PST file into Outlook and resynchronize your email account with the mail server. With EdbMails, you can open an OST file and can also migrate OST to Office 365.
Here’s how you can repair and convert the OST to PST file format with EdbMails:
- Step 1: Install EdbMails OST repair and converter tool
- Download and install EdbMails on your computer. It is a professional tool that can repair and convert OST files to PST format
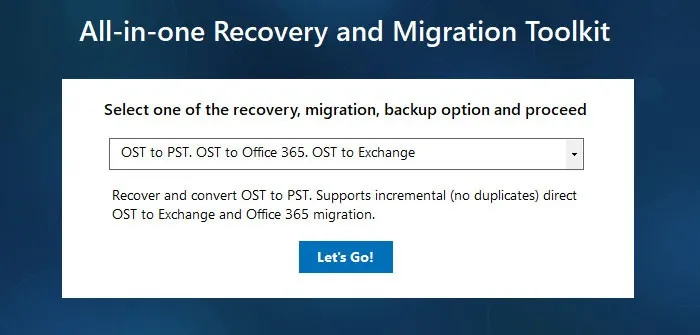
- Launch EdbMails and select the ‘OST to PST, OST to Office 365 and OST to Exchange’ option from the main screen.
- Step 2: Browse and select the OST file to repair
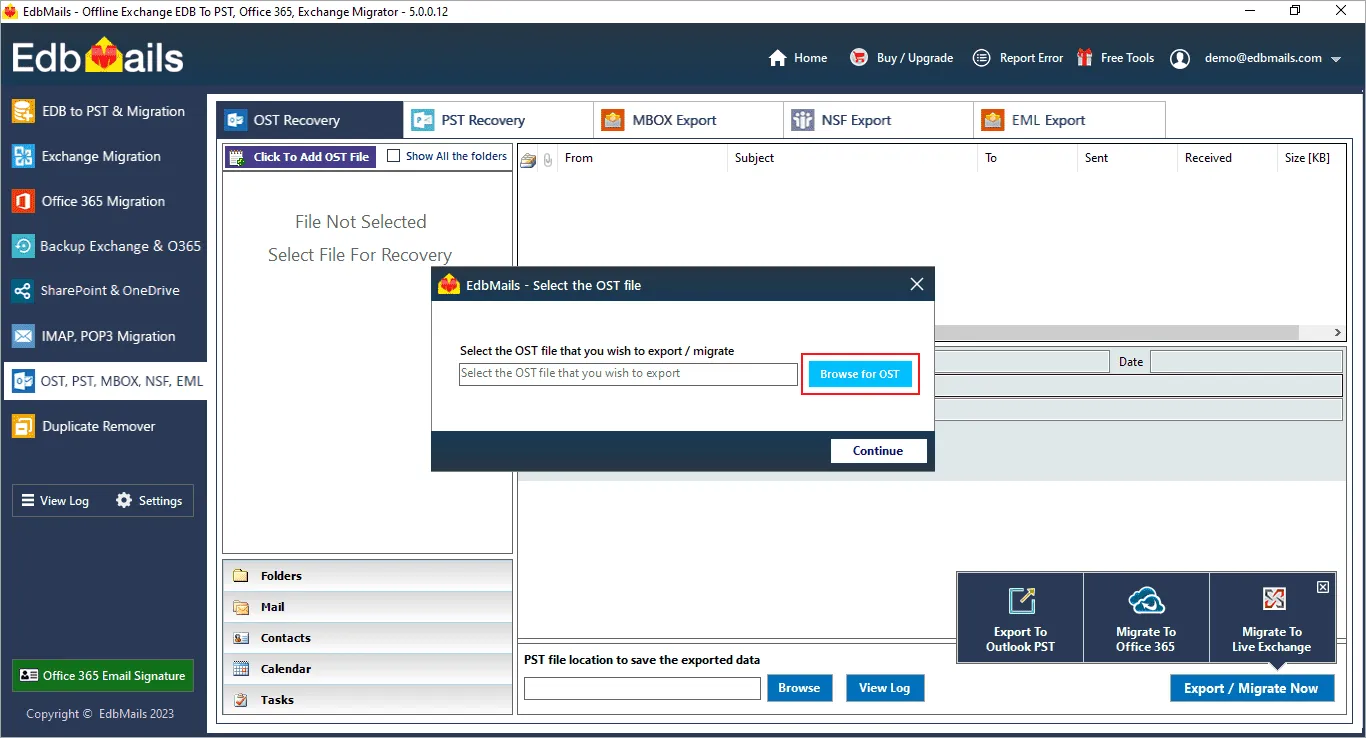
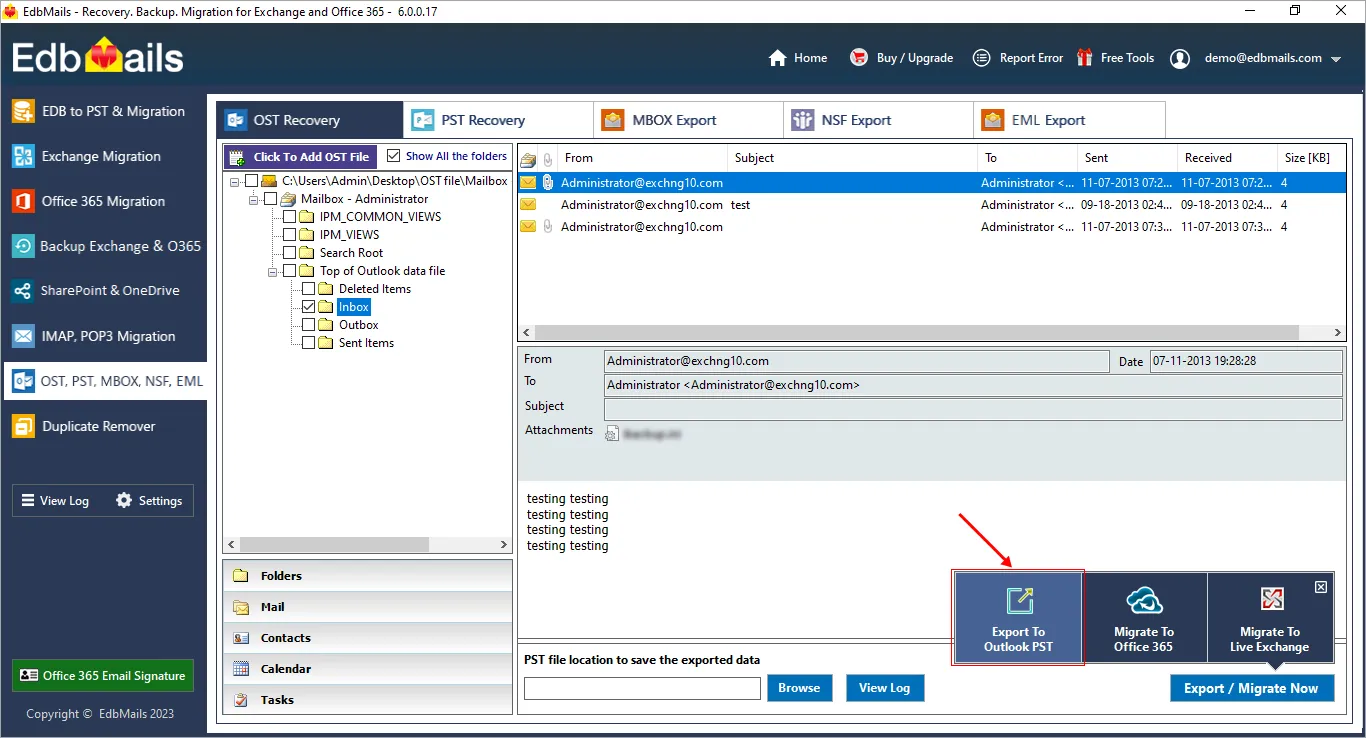
- Select the OST file associated with your email account by clicking on ‘Browse’
- After you select the OST file, click ‘Continue’ to start the repair process.
- If the Outlook OST file is corrupted, EdbMails automatically scans and repairs any errors in the OST.
- Step 3: Preview the mailbox items from the OST file
After the repair process is complete, you can preview the contents of the OST file such as emails, contacts, notes, calendars, tasks, appointments, with EdbMails OST reader.
- Step 4: Convert the OST file to PST with EdbMails
- After previewing the contents of the OST file, export the OST to PST to perform the conversion.
- EdbMails will automatically convert the file and save it to the specified location.
- Step 5: Import the PST file into Outlook
After the OST file has been converted to PST format, you can import the PST file into Outlook.
- To import the PST file, open Outlook and select the ‘Import and Export’ option from the ‘File’ menu.
- Follow the prompts to import the PST file into Outlook.
EdbMails can repair and rebuild the OST file from corrupted, damaged> and virus infected OST files> without making any changes to the original source data. The output PST file that you get after the export operation is an exact replica of the source OST file. As a result, it is the best method to recover mailbox items from Outlook errors without data loss.
- Step 1: Install EdbMails OST repair and converter tool

