Office 365 Pre-Migration Checklist
Are you planning to migrate your organization to Office 365? With the increasing number of organizations adopting Office 365, it's crucial to ensure that your migration process is well-planned and executed efficiently. The Office 365 migration checklist is a crucial document that outlines the essential tasks and steps needed to ensure a successful migration. In this article, we'll provide you with a comprehensive migration to Office 365 checklist to help you with your migration.
Before you migrate Exchange online to Office 365, there are some essential steps that you need to take to ensure a smooth transition.

- Determine your migration goals and objectives: It's crucial to identify why you are migrating to Office 365 and what benefits you hope to achieve. This task helps you to plan your migration strategy and ensure that your migration aligns with your business objectives. See tenant roadmap for Office 365
- Assess your current environment: You need to understand your current infrastructure, network, and software applications, which helps you to identify any compatibility issues that may arise during the migration process. See network and migration planning for Office 365.
- Identify the data to be migrated: It's essential to identify the data that you need to migrate to Office 365, which may include email, contacts, calendars, files, permissions and other related applications.
- Evaluate your current licenses: Check your current licensing agreements to ensure that you have the correct licenses to migrate to Office 365. You may need to purchase additional licenses to cover all your users. See Office 365 Business plans and Office 365 Enterprise plans.
- Create a comprehensive project plan: Develop a detailed project plan that outlines the migration process, timelines, and responsibilities. This task enables you to stay on track and ensure that your migration is completed on time.
From Exchange to Microsoft 365 migration checklist
If you are migrating from an on-premises Exchange Server to Exchange Online, here are some essential steps to follow with the Exchange to Office 365 migration checklist.
- Check your Exchange Server version: Ensure that your Exchange Server version is supported for migration to Exchange Online. You may need to upgrade to a supported version before starting the migration process.
- Prepare your Exchange Server: You need to prepare your Exchange Server by configuring the hybrid deployment and installing the necessary updates and service packs. See Exchange to Office 365 migration plan
- Verify the domain name: Verify the domain name that you will be using for Office 365, which ensures that your users can access their email accounts after the migration.
- Configure the mail flow: Configure the mail flow between your on-premises Exchange Server and Exchange Online. This task ensures that your email messages are routed correctly during the migration process.
- Migrate your mailbox data: Migrate your mailbox data using EdbMails Exchange migration software. You can migrate the data in batches or all at once, depending on your requirements.
Office 365 implementation checklist
If you are implementing Office 365 for the first time, here are some essential steps to follow:
- Verify your domain name: Verify your domain name with Office 365 to ensure that you can use it for your email accounts and other applications. See steps to verify and add domain.
- Create your user accounts: Create your user accounts in Office 365 and assign the appropriate licenses.
- Configure your DNS settings: Configure your DNS settings to ensure that your users can access Office 365 applications. See steps to add DNS records to connect to your domain.
- Set up your email: Configure your email settings, including the email domains, forwarding rules, and spam filters.
From IMAP to Office 365 email migration checklist
If you are migrating your email accounts to Office 365, here are some essential steps to follow:
- Determine your migration method: There are several methods for migrating email accounts to Office 365, including cutover migration, staged migration, and hybrid migration. Determine the method that is best for your organization.
- Verify your domain name: Verify your domain name with Office 365 to ensure that you can use it for your email accounts.
- Prepare your email accounts: Prepare your email accounts for migration by cleaning up your mailbox data and archiving old messages.
- Migrate your email accounts: Migrate your email accounts to Office 365 using your chosen migration method. You can migrate the data in batches or all at once, depending on your requirements.
- Verify user access: Verify that all users have access to their email accounts in Office 365 and can send and receive emails.
Recommended migration software: EdbMails for Office 365
EdbMails is a powerful and secure Office 365 migration tool that supports Exchange to Office 365, IMAP to Microsoft 365, and bulk PST imports. It enables direct mailbox migration from on-premises Exchange servers and IMAP platforms like Gmail, Zoho, and Zimbra, preserving folder hierarchy and data integrity.
To begin the mailbox migration process, download and install EdbMails on your system. After you have installed the software, you can launch it and start the migration process.
With features like automatic mailbox mapping, OAuth 2.0 authentication, and built-in throttling management, EdbMails ensures smooth and reliable transfers. Its advanced filters let users migrate specific folders, date ranges, or subject-based items, while the incremental migration avoids duplicates by syncing only new or changed data. EdbMails also provides real-time progress updates and detailed migration reports. Whether you're migrating a few users or a large organization, the software adapts to different environments, offering a streamlined and scalable solution for all Microsoft 365 migration needs.
How to perform mailbox migration to Office 365?
If you are planning to migrate your mailbox to Office 365, EdbMails is a powerful tool that can help you perform the Office 365 migration efficiently. Here are the steps to follow:
Steps to migrate your mailboxes to Office 365
Step 1: Download and install EdbMails migration tool
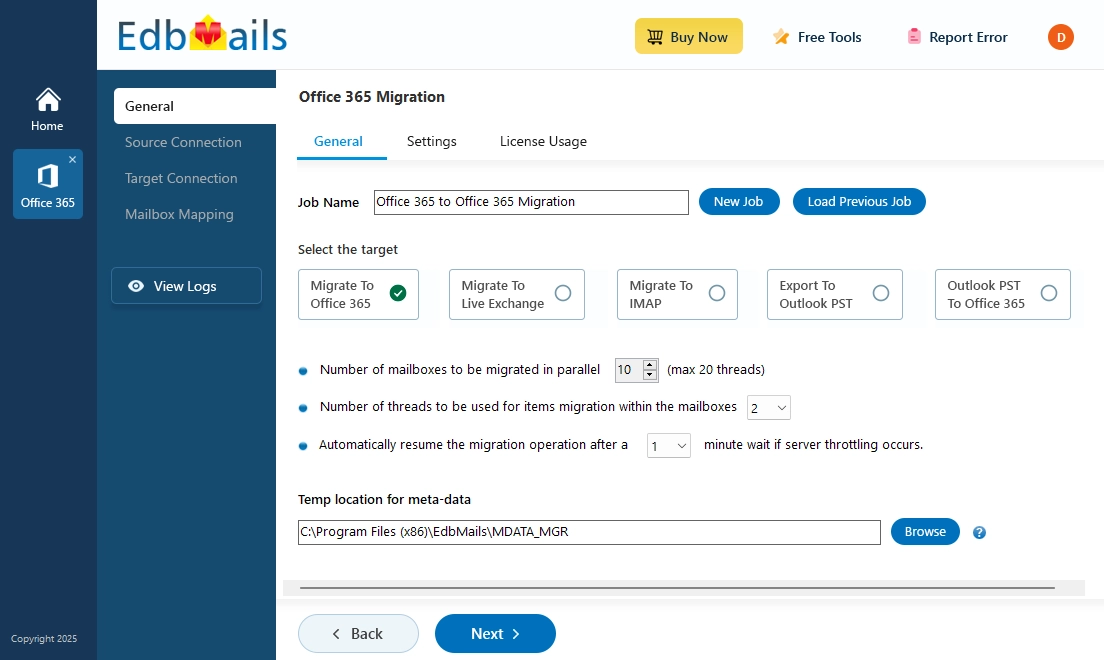
Step 2: Select the Office 365 migration option
Step 3: Connect to your Exchange or Office 365 source server
Step 4: Select the mailboxes to migrate to the target server
Step 5: Connect to target Microsoft 365 server
Step 6: Mapping source and target servers
Step 7: Start the mailbox migration to Office 365
Step 8: Verify the migrated folders and mail items
Click here for a comprehensive guide for Microsoft 365 migration
Office 365 post-migration checklist
After the migration is complete, you need to perform some essential tasks to ensure that your users can access their data and applications.
- Verify user access: Verify that all users have access to their email accounts, files, and applications in Office 365. This task includes testing login credentials and verifying that users can access their data and applications.
- Configure user settings: Configure the user settings, including Office 365 email signatures, distribution lists, and other settings.
- Test your applications: Test your applications to ensure that they are working correctly in Office 365. This includes testing third-party applications and custom applications.
- Set up your security settings: Set up your security settings in Office 365, including password policies, multi-factor authentication, and other security settings.
- Train your users: Provide training to your users on how to use Office 365 applications and features. This will help them to be more productive and efficient.
Migrating to Office 365 can be a complex process, but with the right planning and execution, it can be a seamless transition. The Microsoft 365 migration checklist that we outlined in this article can help you plan and execute the Office 365 migration efficiently. Remember to test your migration process thoroughly and provide training to your users to ensure a smooth transition.
Quick Links
Export Office 365 mailbox to PST
Office 365 migration with the same domain


